
Water Spinach No Watering Trick: Imagine harvesting vibrant, crisp water spinach from your very own garden, without the constant worry of watering! Sounds like a dream, right? Well, it doesn’t have to be. For generations, resourceful gardeners, particularly in water-rich regions of Asia, have understood the secrets to cultivating this delicious and nutritious leafy green with minimal effort. They’ve tapped into the plant’s natural affinity for moisture, creating clever systems that practically eliminate the need for daily watering.
I know what you’re thinking: “That’s impossible! All plants need water!” And you’re right, they do. But what if I told you there’s a simple, DIY trick that mimics the water spinach’s natural environment, allowing it to thrive with significantly less intervention from you? This isn’t just about saving water; it’s about saving time, reducing stress, and enjoying a bountiful harvest of fresh, homegrown goodness.
In today’s busy world, who has time to constantly monitor their garden’s moisture levels? This water spinach no watering trick is perfect for busy individuals, beginner gardeners, or anyone looking to simplify their gardening routine. Plus, with growing concerns about water conservation, this method is an eco-friendly way to enjoy fresh produce. Let’s dive in and discover how you can unlock the secrets to effortless water spinach cultivation!
DIY: Grow Water Spinach (Kangkong) with Minimal Watering!
Hey there, fellow gardening enthusiasts! Are you craving fresh, delicious water spinach (also known as Kangkong or Ong Choy) but dread the thought of constant watering? Well, I’ve got a fantastic DIY hack for you that will let you enjoy this leafy green with significantly less effort. This method focuses on creating a self-watering environment, mimicking the natural conditions where water spinach thrives. Let’s dive in!
What You’ll Need:
Before we get started, gather these supplies. Don’t worry, most of them are easily accessible and budget-friendly!
* A large container (a plastic storage bin, a repurposed bathtub, or even a kiddie pool will work – aim for at least 12 inches deep).
* Water spinach seeds or cuttings (cuttings are faster!).
* Potting soil (a mix of garden soil, compost, and coco coir is ideal).
* Perlite or vermiculite (for drainage and aeration).
* A large plastic bag or pond liner (to waterproof the container if needed).
* Gravel or pebbles (for drainage).
* Water (obviously!).
* Optional: Slow-release fertilizer.
Understanding the Method: The Self-Watering Magic
The key to this low-watering method is creating a reservoir of water at the bottom of the container. The soil above will draw moisture from this reservoir through capillary action, keeping the water spinach roots consistently moist without you having to water every day. This mimics the natural environment of water spinach, which loves consistently damp conditions.
Step-by-Step Instructions: From Prep to Harvest
Alright, let’s get our hands dirty! Follow these steps carefully, and you’ll be enjoying fresh water spinach in no time.
1. Prepare the Container:
* First, choose your container. If you’re using a container that isn’t waterproof (like a wooden box), line it with a large plastic bag or pond liner. Make sure the liner is securely in place and extends over the edges of the container. This will prevent water from leaking out and damaging your patio or garden.
* Next, add a layer of gravel or pebbles to the bottom of the container. This layer is crucial for drainage and prevents the soil from becoming waterlogged. Aim for a layer that’s about 2-3 inches thick.
* If you are using a container with drainage holes, you can skip the liner, but make sure the drainage is adequate. You might want to cover the holes with landscape fabric to prevent soil from washing out.
2. Prepare the Soil Mix:
* Water spinach thrives in rich, well-draining soil. I like to use a mix of equal parts garden soil, compost, and coco coir. The compost provides nutrients, the coco coir helps retain moisture, and the garden soil provides structure.
* Add a generous amount of perlite or vermiculite to the mix. This will improve drainage and aeration, preventing the soil from becoming compacted. Aim for about 1 part perlite/vermiculite to 3 parts soil mix.
* If you want to give your water spinach an extra boost, you can mix in some slow-release fertilizer according to the package instructions. This will provide a steady supply of nutrients over time.
3. Fill the Container:
* Now, carefully fill the container with your prepared soil mix, leaving about 2-3 inches of space at the top.
* Gently pat down the soil to remove any air pockets.
* Water the soil thoroughly until it’s evenly moist but not soggy.
4. Planting the Seeds or Cuttings:
* From Seeds: If you’re starting from seeds, sow them directly into the soil, spacing them about 2-3 inches apart. Cover the seeds with a thin layer of soil (about ¼ inch). Gently water the area after sowing.
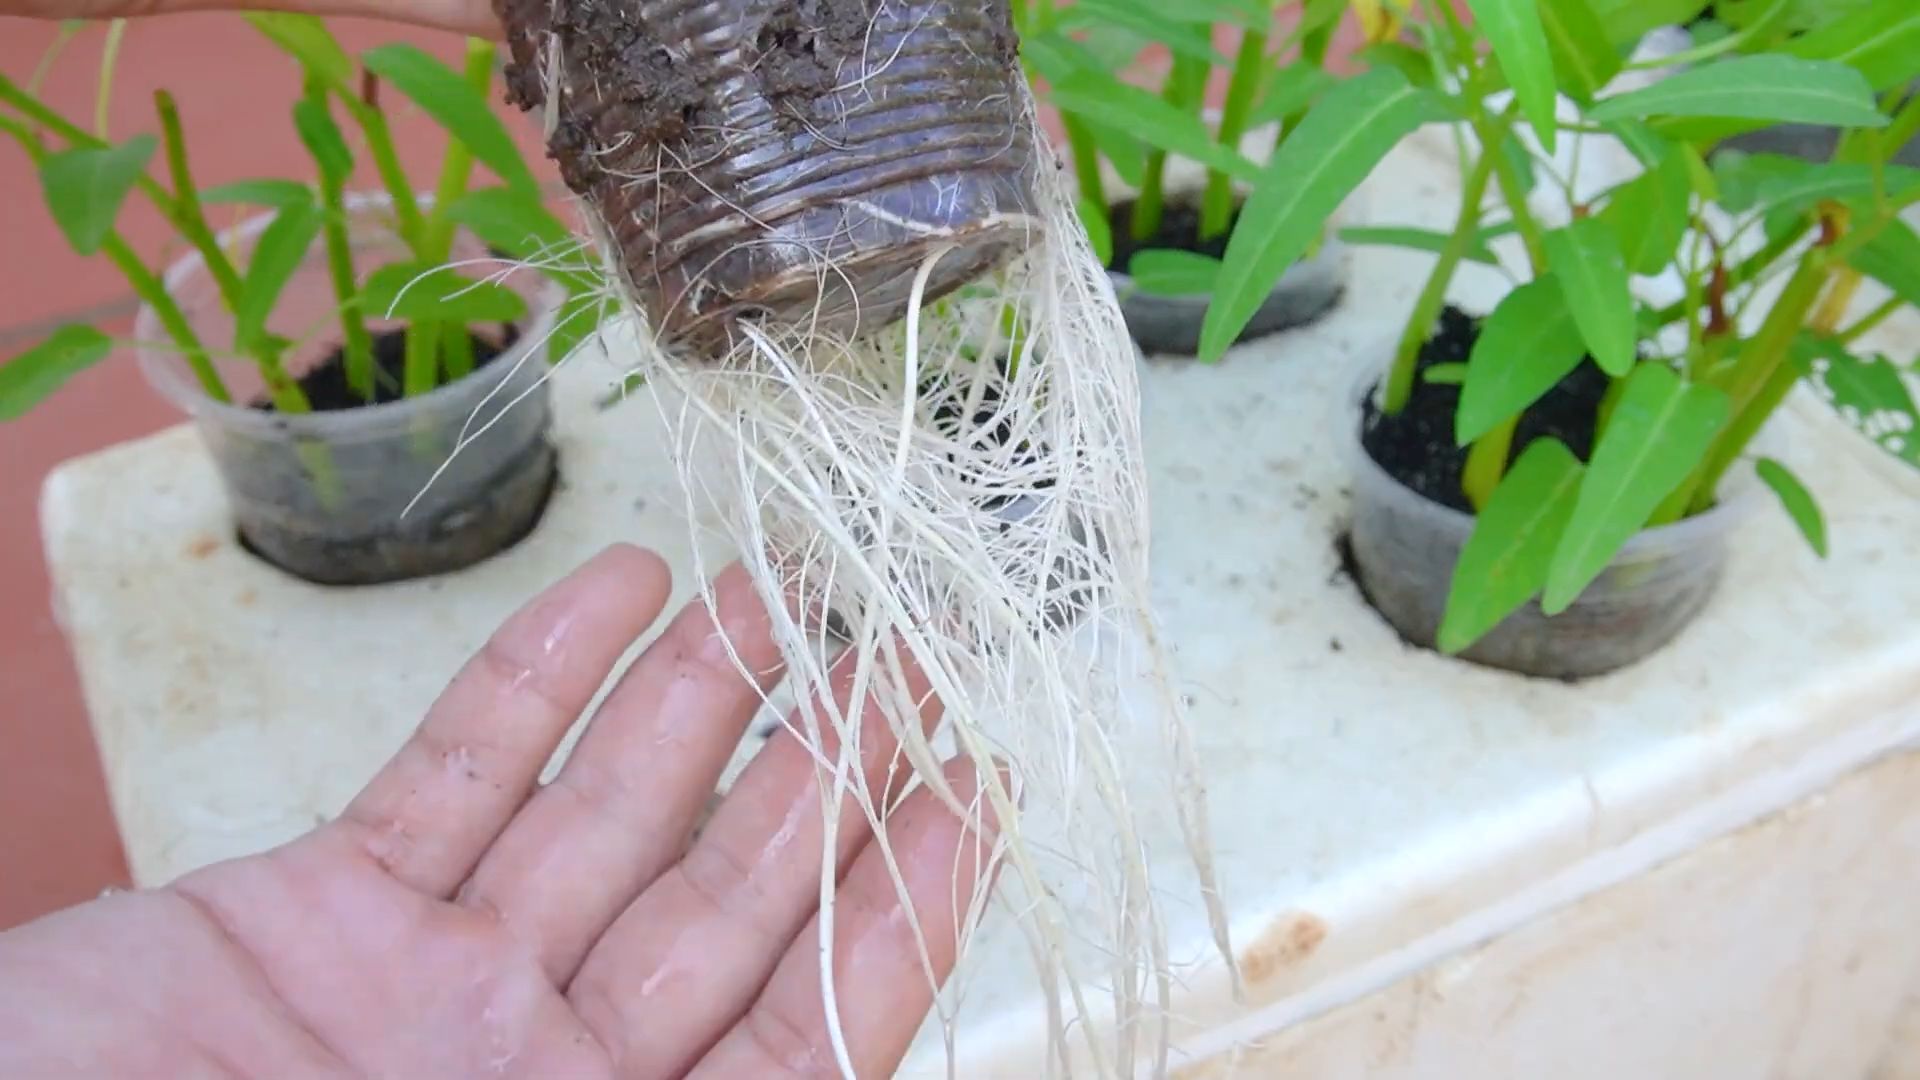
* From Cuttings: Using cuttings is a faster way to get your water spinach growing. Take cuttings that are about 6-8 inches long from healthy water spinach plants. Remove the leaves from the bottom 2 inches of the cutting. Plant the cuttings directly into the soil, burying the bottom 2 inches. Space the cuttings about 4-6 inches apart. Water the cuttings thoroughly after planting.
* Whether you’re using seeds or cuttings, make sure to label the area so you know what you’ve planted!
5. Creating the Water Reservoir:
* This is the heart of the self-watering system! After planting, slowly add water to the bottom of the container, allowing the gravel layer to fill up. You should be able to see the water level rising through the soil.
* Continue adding water until the water level is just below the surface of the soil. Be careful not to overwater and saturate the soil completely.
* Once the water reservoir is established, you won’t need to water the plants from the top unless the soil surface feels dry. The soil will draw moisture from the reservoir as needed.
6. Location, Location, Location:
* Water spinach loves sunlight! Choose a location that receives at least 6 hours of direct sunlight per day.
* If you live in a particularly hot climate, you might want to provide some afternoon shade to prevent the plants from scorching.
* Protect your water spinach from strong winds, which can damage the delicate leaves.
7. Ongoing Care and Maintenance:
* Monitoring the Water Level: Regularly check the water level in the reservoir. You can do this by gently digging a small hole in the soil near the edge of the container. If the soil feels dry a few inches down, it’s time to add more water to the reservoir.
* Fertilizing: If you didn’t add slow-release fertilizer initially, you can fertilize your water spinach every 2-3 weeks with a liquid fertilizer diluted to half strength.
* Weeding: Keep the container free of weeds, which can compete with your water spinach for nutrients and water.
* Pest Control: Water spinach is generally pest-resistant, but keep an eye out for aphids or other common garden pests. If you spot any pests, treat them with an organic insecticide or insecticidal soap.
* Pruning: Pruning encourages bushier growth. Pinch off the tips of the stems regularly to promote branching.
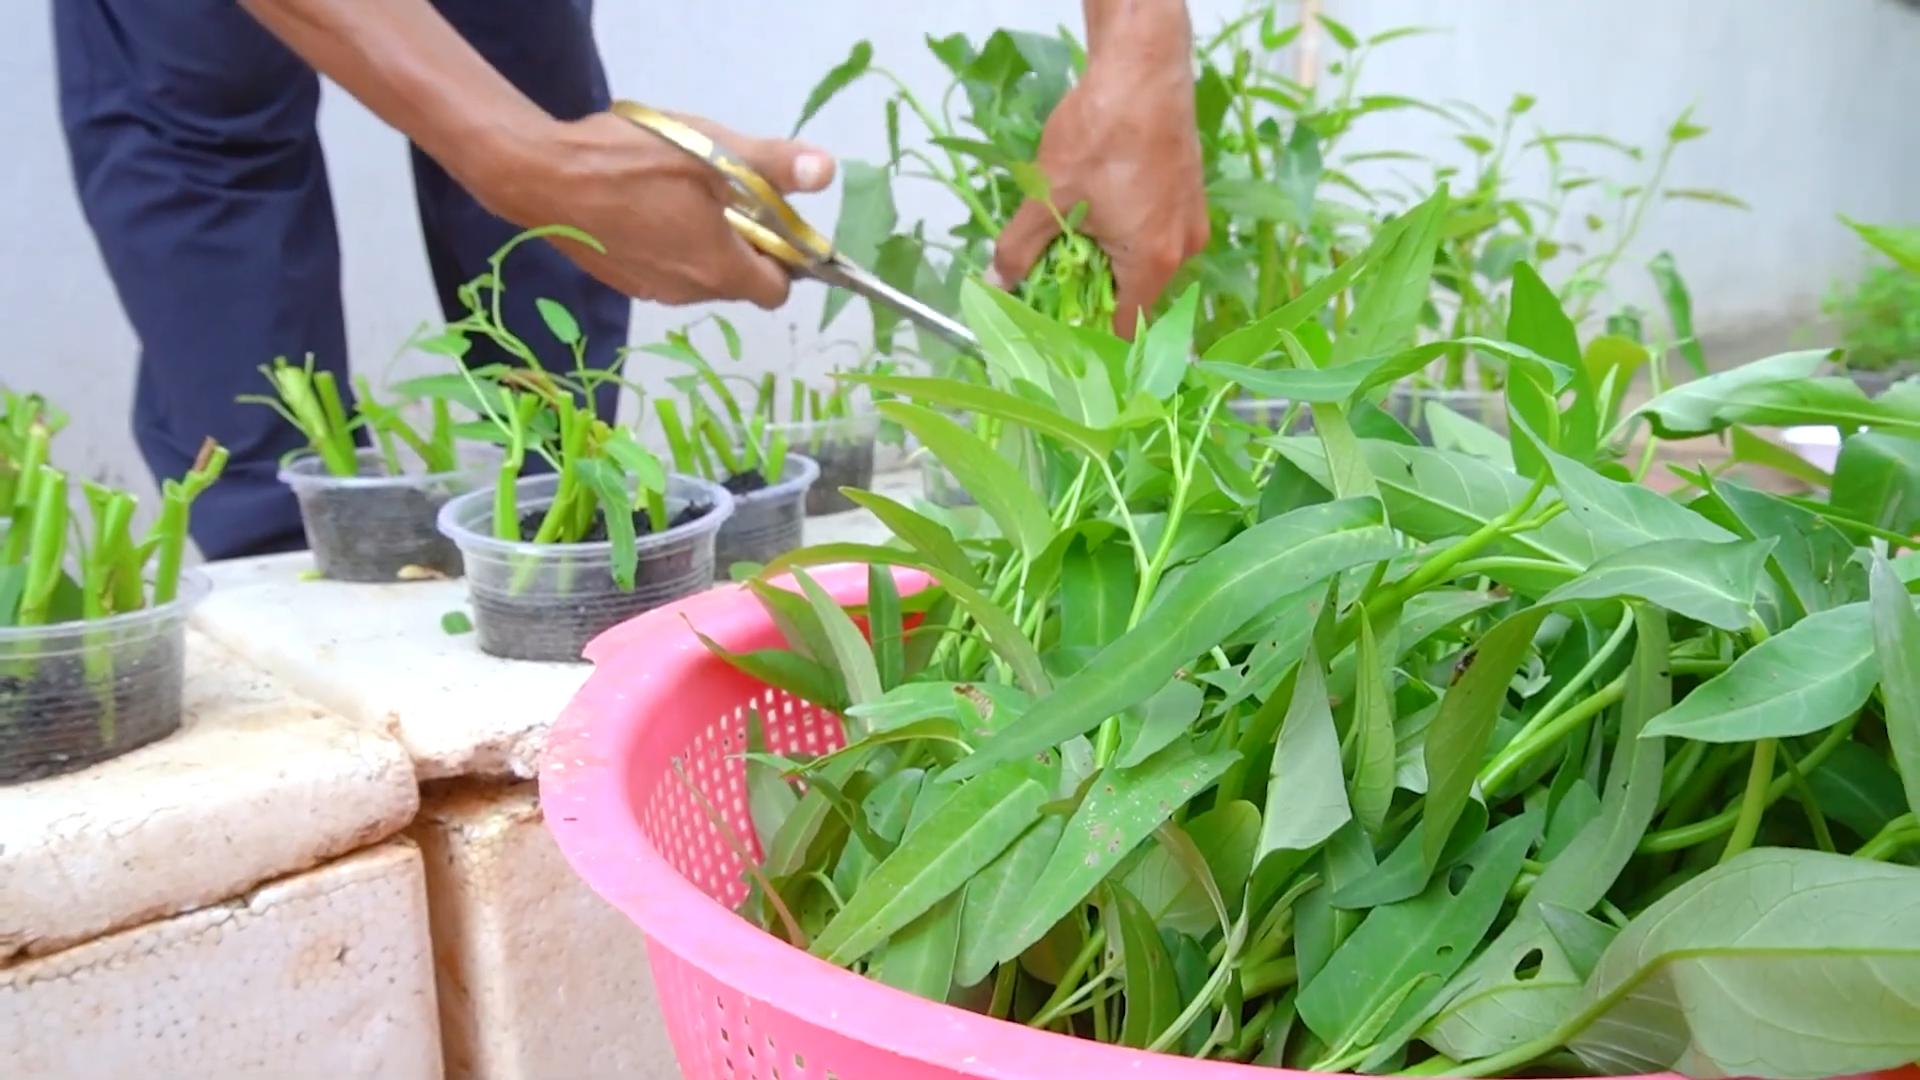
8. Harvesting Your Bounty:
* You can start harvesting your water spinach about 4-6 weeks after planting.
* To harvest, simply cut the stems about 6 inches from the base of the plant.
* The plants will continue to grow and produce new shoots, so you can harvest them repeatedly throughout the growing season.
* Harvest in the morning for the best flavor.
Troubleshooting Tips:
* Yellowing Leaves: This could be a sign of overwatering or nutrient deficiency. Check the water level in the reservoir and make sure the soil is well-draining. If the soil is too wet, allow it to dry out slightly before adding more water. If the plants are nutrient deficient, fertilize them with a balanced fertilizer.
* Slow Growth: This could be due to insufficient sunlight or poor soil quality. Make sure the plants are getting at least 6 hours of direct sunlight per day. If the soil is poor, amend it with compost or other organic matter.
* Pests: Regularly inspect your plants for pests. If you find any, treat them promptly with an appropriate insecticide.
Bonus Tip: Propagating from Cuttings
Once your water spinach is thriving, you can easily propagate new plants from cuttings. Simply take cuttings from healthy stems and root them in water or directly in the soil. This is a great way to expand your water spinach garden or share plants with friends and family.
Enjoy Your Homegrown Water Spinach!
And there you have it! With this simple DIY hack, you can enjoy fresh, delicious water spinach with minimal watering. This method is not only convenient but also environmentally friendly, as it conserves water and reduces the need for frequent watering. Happy gardening!
Conclusion
So, there you have it! This simple, yet incredibly effective, no-watering trick for growing water spinach is a game-changer for any gardener, regardless of experience level. We’ve walked you through the process, highlighting how easy it is to create a self-watering system that will keep your water spinach thriving, even when you’re short on time or live in a drier climate.
Why is this a must-try? Because it drastically reduces the amount of time and effort required to cultivate this delicious and nutritious vegetable. No more daily watering, no more worrying about your plants drying out in the scorching sun. This method provides a consistently moist environment, which is exactly what water spinach needs to flourish. You’ll be amazed at the rapid growth and the abundance of leafy greens you’ll harvest.
Beyond the basic setup, there’s plenty of room for experimentation. Consider using different types of containers. While we’ve suggested plastic bins, you could also repurpose old bathtubs, large ceramic pots, or even construct a raised bed with a waterproof liner. The key is to ensure the container is watertight and large enough to accommodate the water reservoir and the growing water spinach.
For variations, you can also explore different growing mediums. While soil works perfectly well, you might want to try a soilless mix like coco coir or perlite for even better drainage and aeration. This can be particularly beneficial if you’re prone to overwatering (even with the reservoir system!). You can also amend the soil with compost or other organic matter to provide additional nutrients.
Another exciting variation is to experiment with different varieties of water spinach. There are several cultivars available, each with slightly different leaf shapes, sizes, and flavors. Try growing a few different varieties side-by-side to see which one you prefer.
Don’t be afraid to get creative with your setup. You can add a small fountain or bubbler to the water reservoir to oxygenate the water and prevent stagnation. You can also add a layer of mulch on top of the soil to help retain moisture and suppress weeds.
This water spinach no watering trick isn’t just about convenience; it’s about creating a sustainable and efficient gardening system that allows you to enjoy fresh, homegrown vegetables with minimal effort. It’s about connecting with nature and experiencing the satisfaction of growing your own food.
We wholeheartedly encourage you to give this DIY trick a try. It’s a simple, affordable, and rewarding project that will transform your gardening experience. And most importantly, we want to hear about your results! Share your photos, tips, and experiences in the comments section below. Let’s build a community of water spinach enthusiasts and learn from each other. What worked for you? What challenges did you face? What creative adaptations did you make? Your feedback will help others succeed and inspire even more people to embrace this amazing gardening technique. So, get your hands dirty, and let’s grow some delicious water spinach together!
Frequently Asked Questions (FAQ)
What exactly is water spinach, and why should I grow it?
Water spinach (Ipomoea aquatica), also known as ong choy or kangkong, is a semi-aquatic leafy green vegetable popular in Asian cuisine. It’s incredibly nutritious, packed with vitamins A and C, iron, and fiber. It has a mild, slightly sweet flavor and a crisp texture, making it a versatile ingredient in stir-fries, soups, salads, and more. Growing your own water spinach ensures you have a fresh, readily available supply of this delicious and healthy vegetable, and this no-watering trick makes it incredibly easy.
How much sunlight does water spinach need?
Water spinach thrives in full sun, requiring at least 6-8 hours of direct sunlight per day. However, it can tolerate partial shade, especially in hotter climates. If you’re growing your water spinach indoors, make sure to provide it with adequate artificial light using grow lights. Insufficient sunlight can lead to leggy growth and reduced yields.
What kind of soil is best for water spinach?
Water spinach prefers a rich, well-draining soil with a slightly acidic to neutral pH (6.0-7.0). A good mix would be equal parts garden soil, compost, and perlite or vermiculite. The compost provides nutrients, while the perlite or vermiculite improves drainage and aeration. Avoid heavy clay soils, as they can become waterlogged and inhibit root growth.
How often do I need to refill the water reservoir?
The frequency of refilling the water reservoir depends on several factors, including the size of the reservoir, the weather conditions, and the size of your water spinach plants. In general, you’ll need to check the water level every few days and refill it when it gets low. A good rule of thumb is to refill the reservoir when it’s about halfway empty. During hot, dry weather, you may need to refill it more frequently.
Can I use tap water to fill the reservoir?
Yes, you can use tap water to fill the reservoir, but it’s best to let it sit out for 24 hours before using it to allow chlorine and other chemicals to dissipate. Alternatively, you can use filtered water or rainwater. Avoid using softened water, as it contains high levels of sodium, which can be harmful to plants.
How do I harvest water spinach?
You can start harvesting water spinach about 4-6 weeks after planting. Simply cut the stems about 6 inches from the base of the plant. The plant will continue to produce new shoots, allowing you to harvest multiple times. Harvest regularly to encourage bushier growth and prevent the plants from becoming too leggy.
What are some common pests and diseases that affect water spinach?
Water spinach is generally resistant to pests and diseases, but it can be susceptible to aphids, spider mites, and fungal diseases like powdery mildew. To prevent pest and disease problems, keep your plants healthy and well-ventilated. Inspect your plants regularly for signs of infestation or disease, and take action promptly if you notice any problems. You can use insecticidal soap or neem oil to control aphids and spider mites, and a fungicide to treat fungal diseases.
Can I grow water spinach indoors using this no-watering trick?
Yes, you can absolutely grow water spinach indoors using this no-watering trick. Just make sure to provide your plants with adequate light, either natural or artificial. A sunny windowsill or a grow light setup will work well. You may also need to provide additional humidity, especially in dry climates. You can do this by misting your plants regularly or using a humidifier.
How do I know if my water spinach is getting enough nutrients?
If your water spinach leaves are turning yellow or pale green, it may be a sign that they’re not getting enough nutrients. You can amend the soil with compost or other organic matter to provide additional nutrients. You can also use a liquid fertilizer specifically formulated for leafy greens. Follow the instructions on the fertilizer label carefully to avoid over-fertilizing.
Is this no-watering trick suitable for other vegetables?
While this no-watering trick is particularly well-suited for water spinach, it can also be adapted for other moisture-loving vegetables like lettuce, spinach, and kale. The key is to choose vegetables that thrive in consistently moist conditions. You may need to adjust the size of the reservoir and the type of growing medium depending on the specific needs of the vegetable you’re growing.


Leave a Comment