
Soilless Potato Growing: Imagine harvesting a bounty of fresh, homegrown potatoes without ever getting your hands dirty in traditional soil! Sounds like a dream, right? Well, it’s not! This DIY guide unlocks the secrets to cultivating delicious potatoes using innovative soilless techniques. For centuries, potatoes have been a staple food source, deeply intertwined with cultures worldwide, from the Andes Mountains where they originated to the Irish countryside where they became a cornerstone of their diet.
But what if you lack a sprawling garden or struggle with poor soil quality? That’s where the magic of soilless potato growing comes in. I’m going to show you how to bypass these limitations and enjoy the satisfaction of growing your own spuds, even in a small apartment or balcony.
This DIY trick is a game-changer because it offers a cleaner, more controlled environment for potato cultivation. You’ll minimize pests, diseases, and the back-breaking labor of traditional gardening. Plus, it’s incredibly rewarding to witness the entire growth process, from tiny seed potatoes to a harvest of plump, flavorful tubers. So, let’s dive in and discover the simple steps to successful soilless potato growing!
Growing Potatoes Without Soil: A Fun and Easy DIY Project!
Hey there, fellow gardening enthusiasts! Ever thought about growing potatoes without any soil? Sounds crazy, right? Well, it’s totally doable, and I’m here to walk you through the whole process. This method, often called “container gardening” or “potato towers,” is perfect if you’re short on space, have poor soil quality, or just want to try something new and exciting. Get ready to harvest a mountain of potatoes from a single container!
What You’ll Need
Before we dive in, let’s gather our supplies. Don’t worry, most of these are easy to find and relatively inexpensive.
* **A Large Container:** This is crucial. Think big! A plastic bin, a large bucket (at least 20 gallons), a trash can, or even a repurposed tire stack will work. The bigger, the better, as it gives the potatoes plenty of room to grow. I personally prefer using a large, sturdy plastic bin because it’s easy to drill drainage holes in.
* **Seed Potatoes:** These aren’t your regular grocery store potatoes. Seed potatoes are specifically grown for planting and are certified disease-free. You can find them at your local garden center or online. Choose a variety you love to eat! I’m partial to Yukon Gold for their creamy texture.
* **Growing Medium:** We’re not using soil, remember? Instead, we’ll use a mix of soilless materials. A good combination is:
* Peat moss or coco coir (for moisture retention)
* Perlite or vermiculite (for drainage and aeration)
* Compost (for nutrients)
I usually go for a 1:1:1 ratio of these ingredients. You can buy pre-mixed soilless potting mix, but making your own is usually cheaper.
* **Fertilizer:** Potatoes are heavy feeders, so you’ll need a good fertilizer. A slow-release fertilizer specifically formulated for vegetables is ideal. Alternatively, you can use a balanced liquid fertilizer diluted according to the package instructions.
* **Watering Can or Hose:** Essential for keeping your potatoes hydrated.
* **Knife (for cutting seed potatoes):** Make sure it’s clean to prevent disease.
* **Gloves (optional):** To keep your hands clean.
Preparing Your Seed Potatoes
This step is important for maximizing your potato yield.
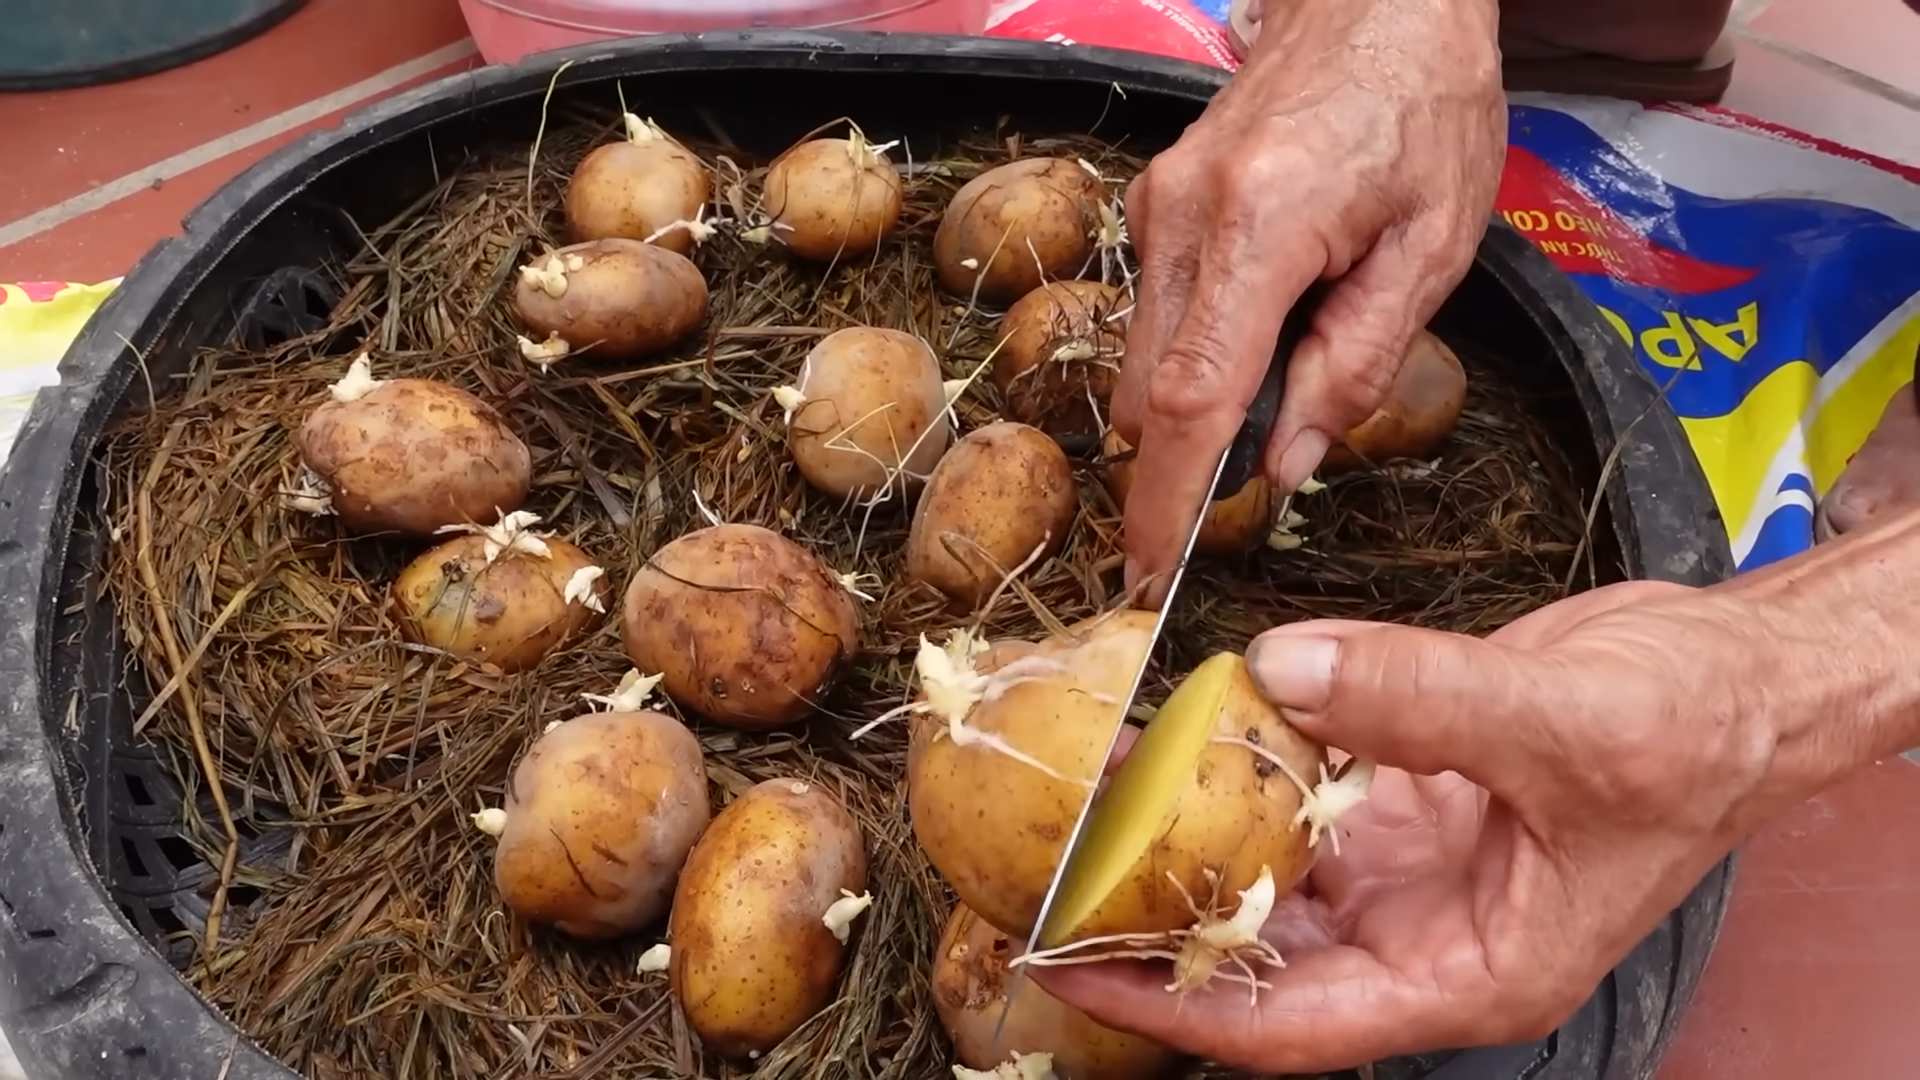
1. **Chitting (Sprouting):** This involves encouraging your seed potatoes to sprout before planting. Place them in a cool, bright location (but not direct sunlight) for a week or two. You’ll notice small “eyes” or sprouts starting to form. This gives them a head start.
2. **Cutting (if necessary):** If your seed potatoes are large (bigger than an egg), you can cut them into smaller pieces. Each piece should have at least 2-3 “eyes.” Let the cut pieces air dry for a day or two to allow the cut surfaces to callous over. This helps prevent rotting. I usually cut mine into pieces about the size of a golf ball.
Planting Your Potatoes
Now for the fun part!
1. **Drill Drainage Holes:** If your container doesn’t already have them, drill plenty of drainage holes in the bottom. Potatoes don’t like sitting in soggy soil (or soilless mix!).
2. **First Layer of Growing Medium:** Add a layer of your soilless mix to the bottom of the container, about 4-6 inches deep.
3. **Planting the Seed Potatoes:** Place your seed potato pieces (sprouts facing up) on top of the growing medium, spacing them about 8-12 inches apart. If you’re using a very large container, you can plant more.
4. **Cover with More Growing Medium:** Cover the seed potatoes with another 4-6 inches of growing medium.
5. **Water Thoroughly:** Water the container well until the water drains out of the bottom.
The “Hilling” Process
This is the key to getting a large harvest. As the potato plants grow, you’ll need to add more growing medium to encourage more potatoes to form along the stems.
1. **Wait for Growth:** Once the potato plants emerge from the growing medium and reach about 6-8 inches tall, it’s time to “hill.”
2. **Add More Growing Medium:** Add another 4-6 inches of growing medium to the container, burying the lower part of the stems. Leave the top few leaves exposed.
3. **Repeat:** Continue this process every few weeks as the plants grow taller. Each time, add more growing medium, burying the stems. The goal is to fill the container almost to the top. This encourages the plants to produce more potatoes along the buried stems. I usually hill about 3-4 times during the growing season.
4. **Watering:** Keep the growing medium consistently moist, but not waterlogged. Check the moisture level regularly by sticking your finger into the mix. If it feels dry an inch or two down, it’s time to water.
5. **Fertilizing:** Fertilize your potato plants every 2-3 weeks with a balanced liquid fertilizer or according to the instructions on your slow-release fertilizer.
Caring for Your Potato Plants
A little TLC goes a long way.
* **Sunlight:** Potatoes need at least 6-8 hours of sunlight per day. Place your container in a sunny location.
* **Watering:** As mentioned earlier, keep the growing medium consistently moist.
* **Fertilizing:** Don’t forget to fertilize regularly!
* **Pest Control:** Keep an eye out for pests like aphids, potato beetles, and flea beetles. If you spot any, you can use insecticidal soap or other organic pest control methods. I’ve found that a strong blast of water from the hose can often dislodge aphids.
* **Disease Prevention:** Ensure good air circulation around your plants to prevent fungal diseases. Avoid overwatering.
Harvesting Your Potatoes
The moment we’ve all been waiting for!
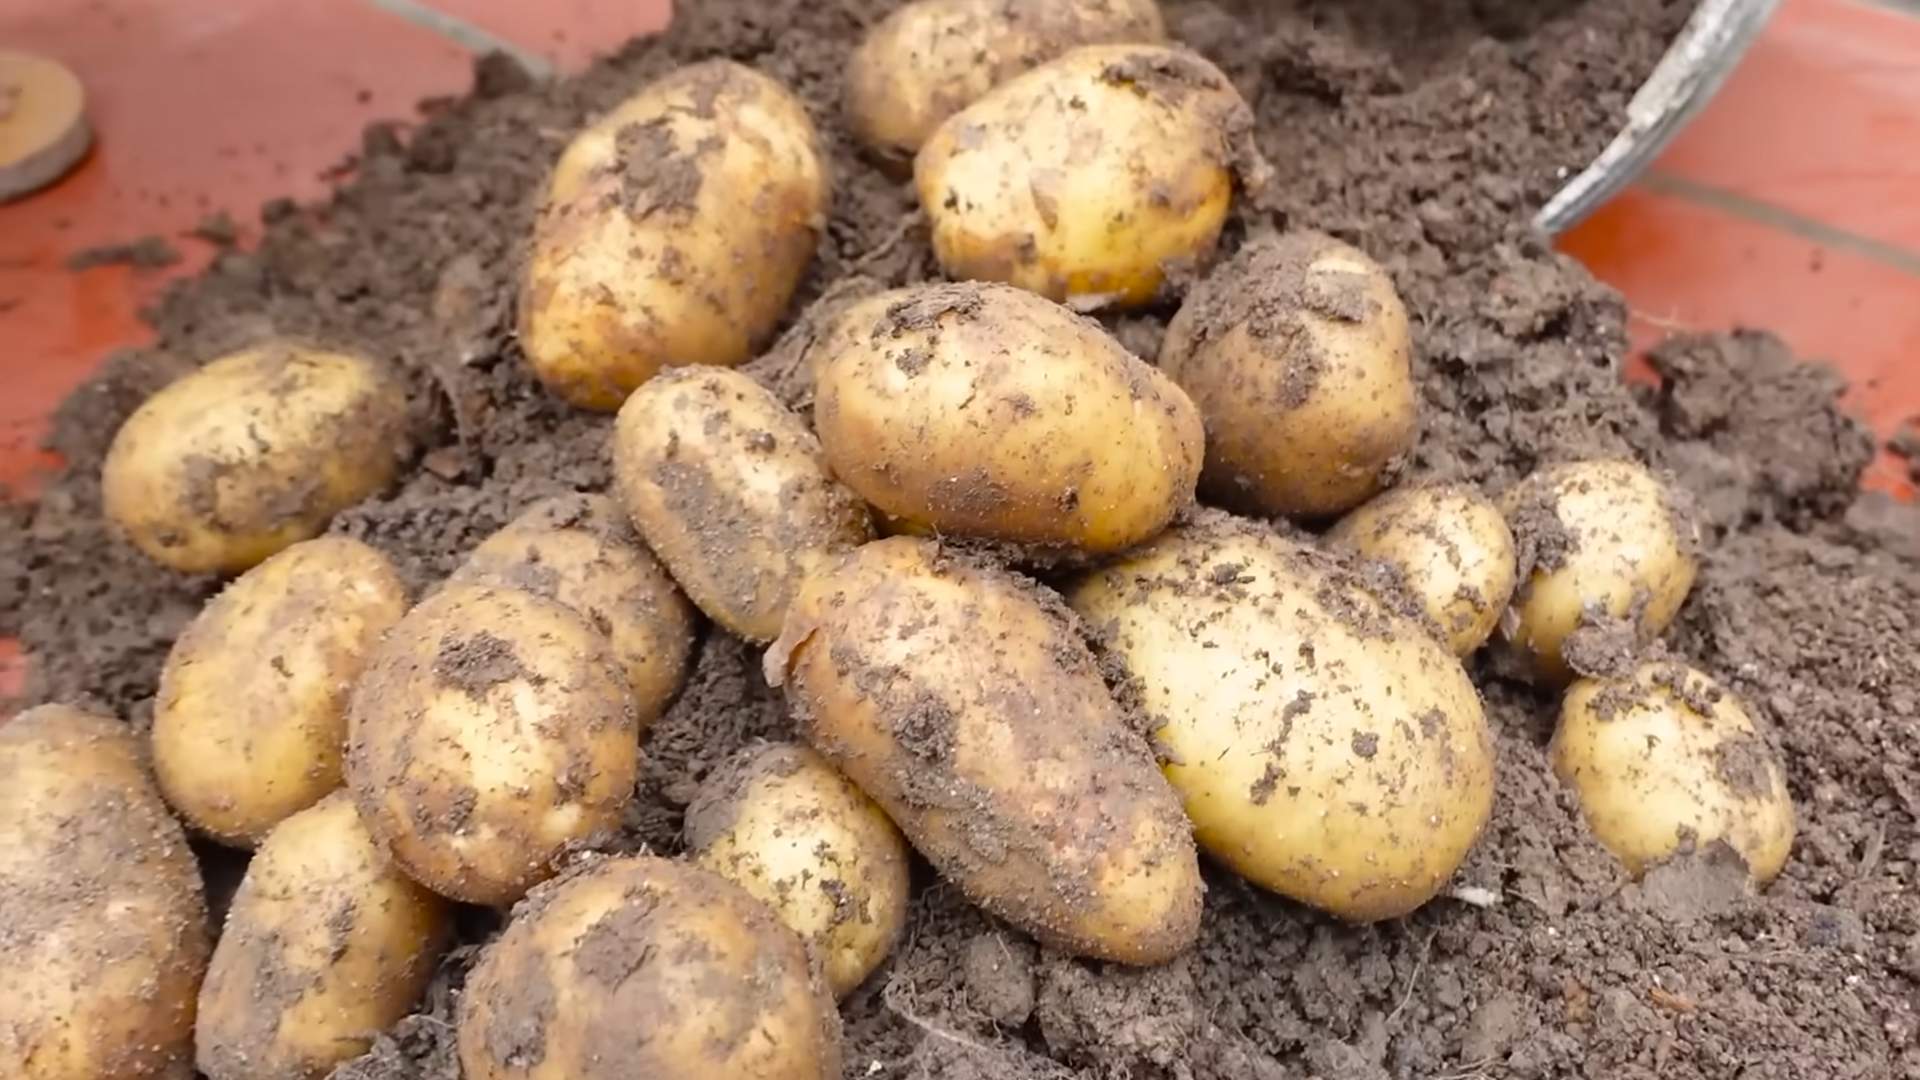
1. **When to Harvest:** Potatoes are usually ready to harvest about 70-90 days after planting, depending on the variety. You’ll know they’re ready when the plants start to flower and the foliage begins to turn yellow and die back.
2. **Harvesting:** The easiest way to harvest is to simply tip the container over and sift through the growing medium. You’ll find a treasure trove of potatoes! Be gentle when digging them out to avoid bruising them.
3. **Curing (Optional):** If you plan to store your potatoes for a longer period, you can cure them first. Spread them out in a cool, dark, and well-ventilated place for about a week. This allows the skins to harden, which helps prevent spoilage.
Troubleshooting
Even with the best planning, things can sometimes go wrong. Here are a few common issues and how to address them:
* **Yellowing Leaves:** This could be a sign of overwatering, underwatering, nutrient deficiency, or disease. Check the moisture level of the growing medium and adjust your watering accordingly. Fertilize if necessary. If you suspect disease, remove any affected leaves.
* **Small Potatoes:** This could be due to insufficient sunlight, lack of fertilizer, or overcrowding. Make sure your plants are getting enough sunlight and fertilize regularly. If you planted too many seed potatoes in one container, you might need to thin them out.
* **Rotting Potatoes:** This is usually caused by overwatering or poor drainage. Make sure your container has plenty of drainage holes and avoid overwatering.
Tips and Tricks for a Bumper Crop
Here are a few extra tips to help you maximize your potato harvest:
* **Choose the Right Variety:** Some potato varieties are better suited for container gardening than others. Look for varieties that are compact and early-maturing.
* **Use a Dark-Colored Container:** Dark-colored containers absorb more heat, which can help warm the growing medium and promote faster growth.
Hey there, fellow gardening enthusiasts! Ever thought about growing potatoes without any soil? Sounds crazy, right? Well, it’s totally doable, and I’m here to walk you through the whole process. This method, often called “container gardening” or “potato towers,” is perfect if you’re short on space, have poor soil quality, or just want to try something new and exciting. Get ready to harvest a mountain of potatoes from a single container!
What You’ll Need
Before we dive in, let’s gather our supplies. Don’t worry, most of these are easy to find and relatively inexpensive.
* **A Large Container:** This is crucial. Think big! A plastic bin, a large bucket (at least 20 gallons), a trash can, or even a repurposed tire stack will work. The bigger, the better, as it gives the potatoes plenty of room to grow. I personally prefer using a large, sturdy plastic bin because it’s easy to drill drainage holes in.
* **Seed Potatoes:** These aren’t your regular grocery store potatoes. Seed potatoes are specifically grown for planting and are certified disease-free. You can find them at your local garden center or online. Choose a variety you love to eat! I’m partial to Yukon Gold for their creamy texture.
* **Growing Medium:** We’re not using soil, remember? Instead, we’ll use a mix of soilless materials. A good combination is:
* Peat moss or coco coir (for moisture retention)
* Perlite or vermiculite (for drainage and aeration)
* Compost (for nutrients)
I usually go for a 1:1:1 ratio of these ingredients. You can buy pre-mixed soilless potting mix, but making your own is usually cheaper.
* **Fertilizer:** Potatoes are heavy feeders, so you’ll need a good fertilizer. A slow-release fertilizer specifically formulated for vegetables is ideal. Alternatively, you can use a balanced liquid fertilizer diluted according to the package instructions.
* **Watering Can or Hose:** Essential for keeping your potatoes hydrated.
* **Knife (for cutting seed potatoes):** Make sure it’s clean to prevent disease.
* **Gloves (optional):** To keep your hands clean.
Preparing Your Seed Potatoes
This step is important for maximizing your potato yield.
1. **Chitting (Sprouting):** This involves encouraging your seed potatoes to sprout before planting. Place them in a cool, bright location (but not direct sunlight) for a week or two. You’ll notice small “eyes” or sprouts starting to form. This gives them a head start.
2. **Cutting (if necessary):** If your seed potatoes are large (bigger than an egg), you can cut them into smaller pieces. Each piece should have at least 2-3 “eyes.” Let the cut pieces air dry for a day or two to allow the cut surfaces to callous over. This helps prevent rotting. I usually cut mine into pieces about the size of a golf ball.
Planting Your Potatoes
Now for the fun part!
1. **Drill Drainage Holes:** If your container doesn’t already have them, drill plenty of drainage holes in the bottom. Potatoes don’t like sitting in soggy soil (or soilless mix!).
2. **First Layer of Growing Medium:** Add a layer of your soilless mix to the bottom of the container, about 4-6 inches deep.
3. **Planting the Seed Potatoes:** Place your seed potato pieces (sprouts facing up) on top of the growing medium, spacing them about 8-12 inches apart. If you’re using a very large container, you can plant more.
4. **Cover with More Growing Medium:** Cover the seed potatoes with another 4-6 inches of growing medium.
5. **Water Thoroughly:** Water the container well until the water drains out of the bottom.
The “Hilling” Process
This is the key to getting a large harvest. As the potato plants grow, you’ll need to add more growing medium to encourage more potatoes to form along the stems.
1. **Wait for Growth:** Once the potato plants emerge from the growing medium and reach about 6-8 inches tall, it’s time to “hill.”
2. **Add More Growing Medium:** Add another 4-6 inches of growing medium to the container, burying the lower part of the stems. Leave the top few leaves exposed.
3. **Repeat:** Continue this process every few weeks as the plants grow taller. Each time, add more growing medium, burying the stems. The goal is to fill the container almost to the top. This encourages the plants to produce more potatoes along the buried stems. I usually hill about 3-4 times during the growing season.
4. **Watering:** Keep the growing medium consistently moist, but not waterlogged. Check the moisture level regularly by sticking your finger into the mix. If it feels dry an inch or two down, it’s time to water.
5. **Fertilizing:** Fertilize your potato plants every 2-3 weeks with a balanced liquid fertilizer or according to the instructions on your slow-release fertilizer.
Caring for Your Potato Plants
A little TLC goes a long way.
* **Sunlight:** Potatoes need at least 6-8 hours of sunlight per day. Place your container in a sunny location.
* **Watering:** As mentioned earlier, keep the growing medium consistently moist.
* **Fertilizing:** Don’t forget to fertilize regularly!
* **Pest Control:** Keep an eye out for pests like aphids, potato beetles, and flea beetles. If you spot any, you can use insecticidal soap or other organic pest control methods. I’ve found that a strong blast of water from the hose can often dislodge aphids.
* **Disease Prevention:** Ensure good air circulation around your plants to prevent fungal diseases. Avoid overwatering.
Harvesting Your Potatoes
The moment we’ve all been waiting for!
1. **When to Harvest:** Potatoes are usually ready to harvest about 70-90 days after planting, depending on the variety. You’ll know they’re ready when the plants start to flower and the foliage begins to turn yellow and die back.
2. **Harvesting:** The easiest way to harvest is to simply tip the container over and sift through the growing medium. You’ll find a treasure trove of potatoes! Be gentle when digging them out to avoid bruising them.
3. **Curing (Optional):** If you plan to store your potatoes for a longer period, you can cure them first. Spread them out in a cool, dark, and well-ventilated place for about a week. This allows the skins to harden, which helps prevent spoilage.
Troubleshooting
Even with the best planning, things can sometimes go wrong. Here are a few common issues and how to address them:
* **Yellowing Leaves:** This could be a sign of overwatering, underwatering, nutrient deficiency, or disease. Check the moisture level of the growing medium and adjust your watering accordingly. Fertilize if necessary. If you suspect disease, remove any affected leaves.
* **Small Potatoes:** This could be due to insufficient sunlight, lack of fertilizer, or overcrowding. Make sure your plants are getting enough sunlight and fertilize regularly. If you planted too many seed potatoes in one container, you might need to thin them out.
* **Rotting Potatoes:** This is usually caused by overwatering or poor drainage. Make sure your container has plenty of drainage holes and avoid overwatering.
Tips and Tricks for a Bumper Crop
Here are a few extra tips to help you maximize your potato harvest:
* **Choose the Right Variety:** Some potato varieties are better suited for container gardening than others. Look for varieties that are compact and early-maturing.
* **Use a Dark-Colored Container:** Dark-colored containers absorb more heat, which can help warm the growing medium and promote faster growth.
* **Rotate Your Crops:** If you’re growing potatoes in the same container year after year, rotate your crops to prevent soilborne diseases.
* **Add Worm Castings:** Worm castings are a great source of nutrients and can help improve the drainage and aeration of your growing medium.
* **Don’t Be Afraid to Experiment:** Gardening is all about learning and experimenting. Try different varieties, growing mediums, and fertilizers to see what works best for you.
Growing potatoes without soil is a rewarding and fun project that anyone can do. With a little bit of planning and effort, you can enjoy a delicious harvest of homegrown potatoes right from your own backyard (or balcony!). Happy gardening!
Conclusion
So, there you have it! Growing potatoes without soil might seem like a futuristic farming technique reserved for NASA, but it’s surprisingly accessible and rewarding for the home gardener. This method, often referred to as hydroponic potato growing or container potato growing, offers a multitude of benefits over traditional in-ground planting. You sidestep common soilborne diseases and pests, gain complete control over the growing environment, and often achieve a significantly higher yield in a smaller space. Plus, the sheer novelty of watching potato roots develop in water is a fascinating educational experience for both kids and adults.
But the real magic lies in the ease and efficiency of this method. Forget back-breaking digging and endless weeding. With soilless potato growing, harvesting is as simple as reaching into your container and plucking out the perfectly formed potatoes. It’s a game-changer for urban gardeners, those with limited mobility, or anyone simply looking for a cleaner, more efficient way to grow their own food.
Don’t be afraid to experiment! While the basic method outlined is a great starting point, there’s plenty of room for customization. Try different nutrient solutions to see which yields the best results for your specific potato variety. Consider adding air stones to your water reservoir to boost oxygen levels and promote even faster growth. You can also explore different container sizes and materials to find what works best for your space and budget.
Variations to Consider:
* Vertical Potato Towers: For those with limited horizontal space, consider building a vertical potato tower using stacked containers or repurposed materials. This maximizes your growing area and creates a visually stunning display.
* Deep Water Culture (DWC): This method involves suspending the potato roots directly in a nutrient-rich solution with constant aeration. It’s a more advanced technique but can lead to even faster growth and larger yields.
* Kratky Method: A passive hydroponic system where the roots are partially submerged in the nutrient solution, and the air gap provides oxygen. This is a low-maintenance option perfect for beginners.
* Different Potato Varieties: Experiment with different potato varieties to see which ones thrive in your soilless setup. Smaller, early-maturing varieties like Yukon Gold or fingerling potatoes are often a good choice for beginners.
The key to success with soilless potato growing is observation and adaptation. Pay close attention to your plants, monitor the nutrient levels in your solution, and adjust your approach as needed. Don’t be discouraged if you encounter challenges along the way – every growing season is a learning experience.
We wholeheartedly encourage you to give this DIY trick a try. It’s a fun, rewarding, and surprisingly easy way to grow your own delicious potatoes, regardless of your gardening experience. Once you’ve harvested your first crop of homegrown, soilless potatoes, we’re confident you’ll be hooked!
And most importantly, we want to hear about your experiences! Share your photos, tips, and challenges in the comments below. Let’s build a community of soilless potato growers and learn from each other’s successes and failures. Together, we can unlock the full potential of this innovative growing method and enjoy a bountiful harvest of homegrown goodness. Happy growing!
Frequently Asked Questions (FAQ)
What exactly is soilless potato growing, and why should I try it?
Soilless potato growing, also known as hydroponic potato growing or container potato growing, is a method of cultivating potatoes without using traditional soil. Instead, the potatoes are grown in a nutrient-rich water solution, providing them with all the essential elements they need to thrive. You should try it because it offers several advantages: it eliminates soilborne diseases and pests, allows for better control over the growing environment, often results in higher yields in smaller spaces, and simplifies the harvesting process. It’s also a great option for urban gardeners or those with limited mobility.
What kind of container should I use for soilless potato growing?
The ideal container should be opaque (to prevent algae growth), food-grade, and large enough to accommodate the potato plants and their developing tubers. A 5-gallon bucket is a good starting point, but larger containers (10-20 gallons) will allow for more potato production. You can also use plastic storage bins, repurposed barrels, or even build your own custom containers. Make sure the container has drainage holes if you’re not using a completely closed system like deep water culture.
What kind of nutrient solution do I need for soilless potato growing?
You’ll need a balanced hydroponic nutrient solution specifically formulated for vegetables or potatoes. These solutions typically contain essential macronutrients (nitrogen, phosphorus, potassium) and micronutrients (iron, manganese, zinc, etc.). Follow the manufacturer’s instructions for dilution and application. You can find these solutions at most garden centers or online retailers. It’s crucial to monitor the pH of the nutrient solution regularly and adjust it as needed to maintain a slightly acidic range (around 5.5-6.5) for optimal nutrient absorption.
How often should I change the nutrient solution?
The frequency of nutrient solution changes depends on several factors, including the size of your container, the growth rate of your plants, and the concentration of the nutrient solution. As a general rule, you should change the nutrient solution every 1-2 weeks. However, it’s essential to monitor the solution’s clarity and nutrient levels. If the solution becomes cloudy or the nutrient levels drop significantly, it’s time for a change.
How much light do soilless potatoes need?
Potatoes need plenty of sunlight to thrive, ideally 6-8 hours of direct sunlight per day. If you’re growing your potatoes indoors, you’ll need to supplement with artificial grow lights. LED grow lights are a good option because they are energy-efficient and provide the full spectrum of light that plants need. Position the grow lights close enough to the plants to provide adequate illumination but not so close that they burn the leaves.
How do I know when my potatoes are ready to harvest?
The time it takes for potatoes to mature depends on the variety and growing conditions. Generally, potatoes are ready to harvest when the foliage starts to yellow and die back. You can also gently reach into the container and feel for the size of the potatoes. If they are the size you desire, you can harvest them. Unlike soil-grown potatoes, you don’t have to wait for the entire plant to die back before harvesting. You can harvest potatoes as needed, leaving the remaining tubers to continue growing.
Can I reuse the nutrient solution?
While it’s technically possible to reuse the nutrient solution, it’s generally not recommended. Over time, the solution can accumulate salts, pathogens, and other contaminants that can harm your plants. It’s best to discard the old solution and start with a fresh batch for each nutrient change.
What are some common problems I might encounter with soilless potato growing?
Some common problems include nutrient deficiencies, algae growth, root rot, and pest infestations. Nutrient deficiencies can be identified by yellowing leaves or stunted growth. Algae growth can be prevented by using opaque containers and keeping the nutrient solution clean. Root rot can be caused by poor aeration or overwatering. Pest infestations can be controlled with organic pesticides or by introducing beneficial insects. Regularly inspect your plants for any signs of problems and take corrective action promptly.
Is soilless potato growing more expensive than traditional soil growing?
The initial setup cost for soilless potato growing may be slightly higher than traditional soil growing, as you’ll need to purchase a container, nutrient solution, and possibly grow lights. However, in the long run, soilless potato growing can be more cost-effective because it eliminates the need for soil amendments, pesticides, and herbicides. It can also result in higher yields, which can offset the initial investment.
Can I grow other vegetables using the same soilless method?
Yes, many other vegetables can be grown using soilless methods, including tomatoes, peppers, cucumbers, lettuce, and herbs. The specific nutrient requirements and growing conditions may vary depending on the vegetable, so it’s essential to research the specific needs of each plant.

Leave a Comment