
Rooting bay leaves might sound like a culinary challenge best left to professional chefs, but trust me, it’s a rewarding and surprisingly simple DIY project you can tackle right in your own backyard! For centuries, bay leaves have been prized not just for their aromatic contribution to stews and sauces, but also for their potential medicinal properties. From ancient Greece, where bay leaves were woven into wreaths for victors and scholars, to modern kitchens worldwide, this herb holds a special place.
But why bother rooting bay leaves yourself? Well, for starters, imagine having a constant supply of fresh, fragrant bay leaves right outside your door, ready to elevate your culinary creations. No more trips to the grocery store or settling for dried leaves that lack that vibrant flavor! Plus, propagating your own bay laurel tree is a fantastic way to connect with nature, learn about plant life cycles, and even create unique gifts for friends and family. In this article, I’ll guide you through easy-to-follow steps and share some insider tips to ensure your bay leaf rooting adventure is a success. Get ready to unleash your inner gardener and enjoy the satisfaction of growing your own flavorful bay leaves!
Rooting Bay Leaves: A Gardener’s Guide to Propagating Your Own Flavor
Okay, so you’re thinking about rooting bay leaves? Awesome! It’s a bit of a patience game, but totally rewarding when you can harvest your own fresh bay leaves straight from your garden. Forget buying them dried at the store – let’s get you growing! This guide will walk you through the process, step-by-step, to give you the best chance of success.
Understanding Bay Leaf Propagation
Before we dive in, let’s talk a little about bay leaf propagation. Bay laurel ( *Laurus nobilis* ) can be propagated from seeds, but that’s a slow process and the seeds can be tricky to germinate. A much more reliable method is to take cuttings. This involves snipping off a piece of an existing bay laurel plant and encouraging it to grow its own roots.
Here’s what you need to know about successful bay leaf rooting:
* Timing is Key: The best time to take cuttings is in late spring or early summer, when the plant is actively growing.
* Healthy Mother Plant: Choose a healthy, vigorous bay laurel plant to take your cuttings from. Avoid plants that show signs of disease or stress.
* Semi-Hardwood Cuttings: We’re looking for semi-hardwood cuttings. This means the new growth from the current year that has started to mature and harden off a bit. It shouldn’t be too soft and flexible, nor too woody and old.
* Patience is a Virtue: Rooting bay leaves can take several weeks, even months. Don’t get discouraged if you don’t see results immediately.
* Proper Environment: Bay leaf cuttings need a humid environment to prevent them from drying out before they can root.
Materials You’ll Need
Gathering your supplies beforehand will make the whole process smoother. Here’s what you’ll need:
* Sharp, Clean Pruning Shears or Knife: Sterilize them with rubbing alcohol to prevent the spread of disease.
* Rooting Hormone: This isn’t strictly necessary, but it significantly increases your chances of success. I recommend a powdered rooting hormone.
* Small Pots or Containers: 2-3 inch pots are ideal. Make sure they have drainage holes.
* Well-Draining Potting Mix: A mix of perlite, vermiculite, and peat moss works well. You can also use a seed starting mix.
* Clear Plastic Bags or a Humidity Dome: To create a humid environment for your cuttings.
* Spray Bottle with Water: For misting the cuttings.
* Labels: To keep track of your cuttings.
* Water: For soaking the cuttings and watering the potting mix.
Taking the Cuttings
This is where the magic begins! Follow these steps carefully to take healthy cuttings from your bay laurel plant.
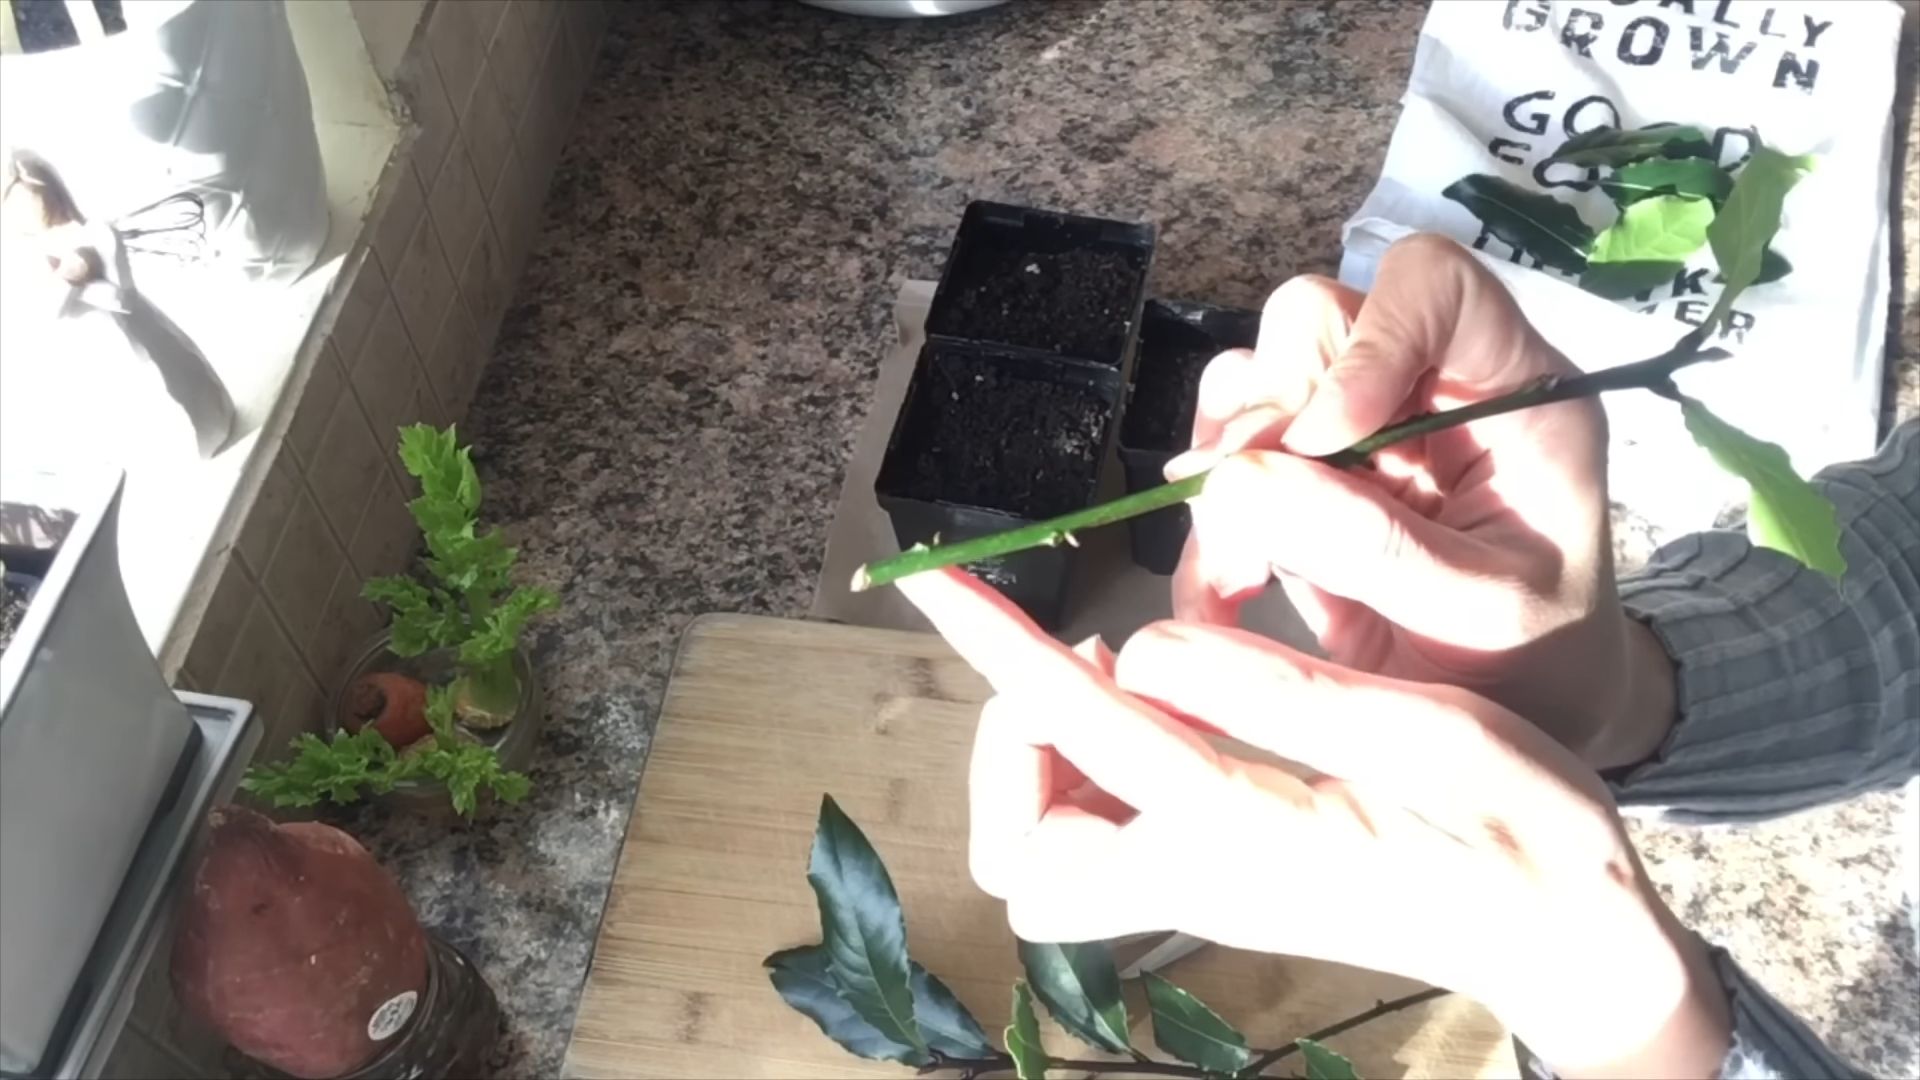
1. Choose Your Cuttings: Look for healthy, semi-hardwood stems that are about 4-6 inches long. Avoid stems with flowers or buds.
2. Make the Cut: Using your sterilized pruning shears or knife, make a clean cut just below a leaf node (the point where a leaf grows from the stem).
3. Remove Lower Leaves: Remove the leaves from the bottom 1-2 inches of the cutting. This will prevent them from rotting when they’re buried in the potting mix.
4. Prepare the Cutting: Gently scrape the bottom inch of the stem with your knife. This will encourage root formation.
5. Apply Rooting Hormone: Moisten the bottom of the cutting and dip it into the rooting hormone powder. Tap off any excess powder.
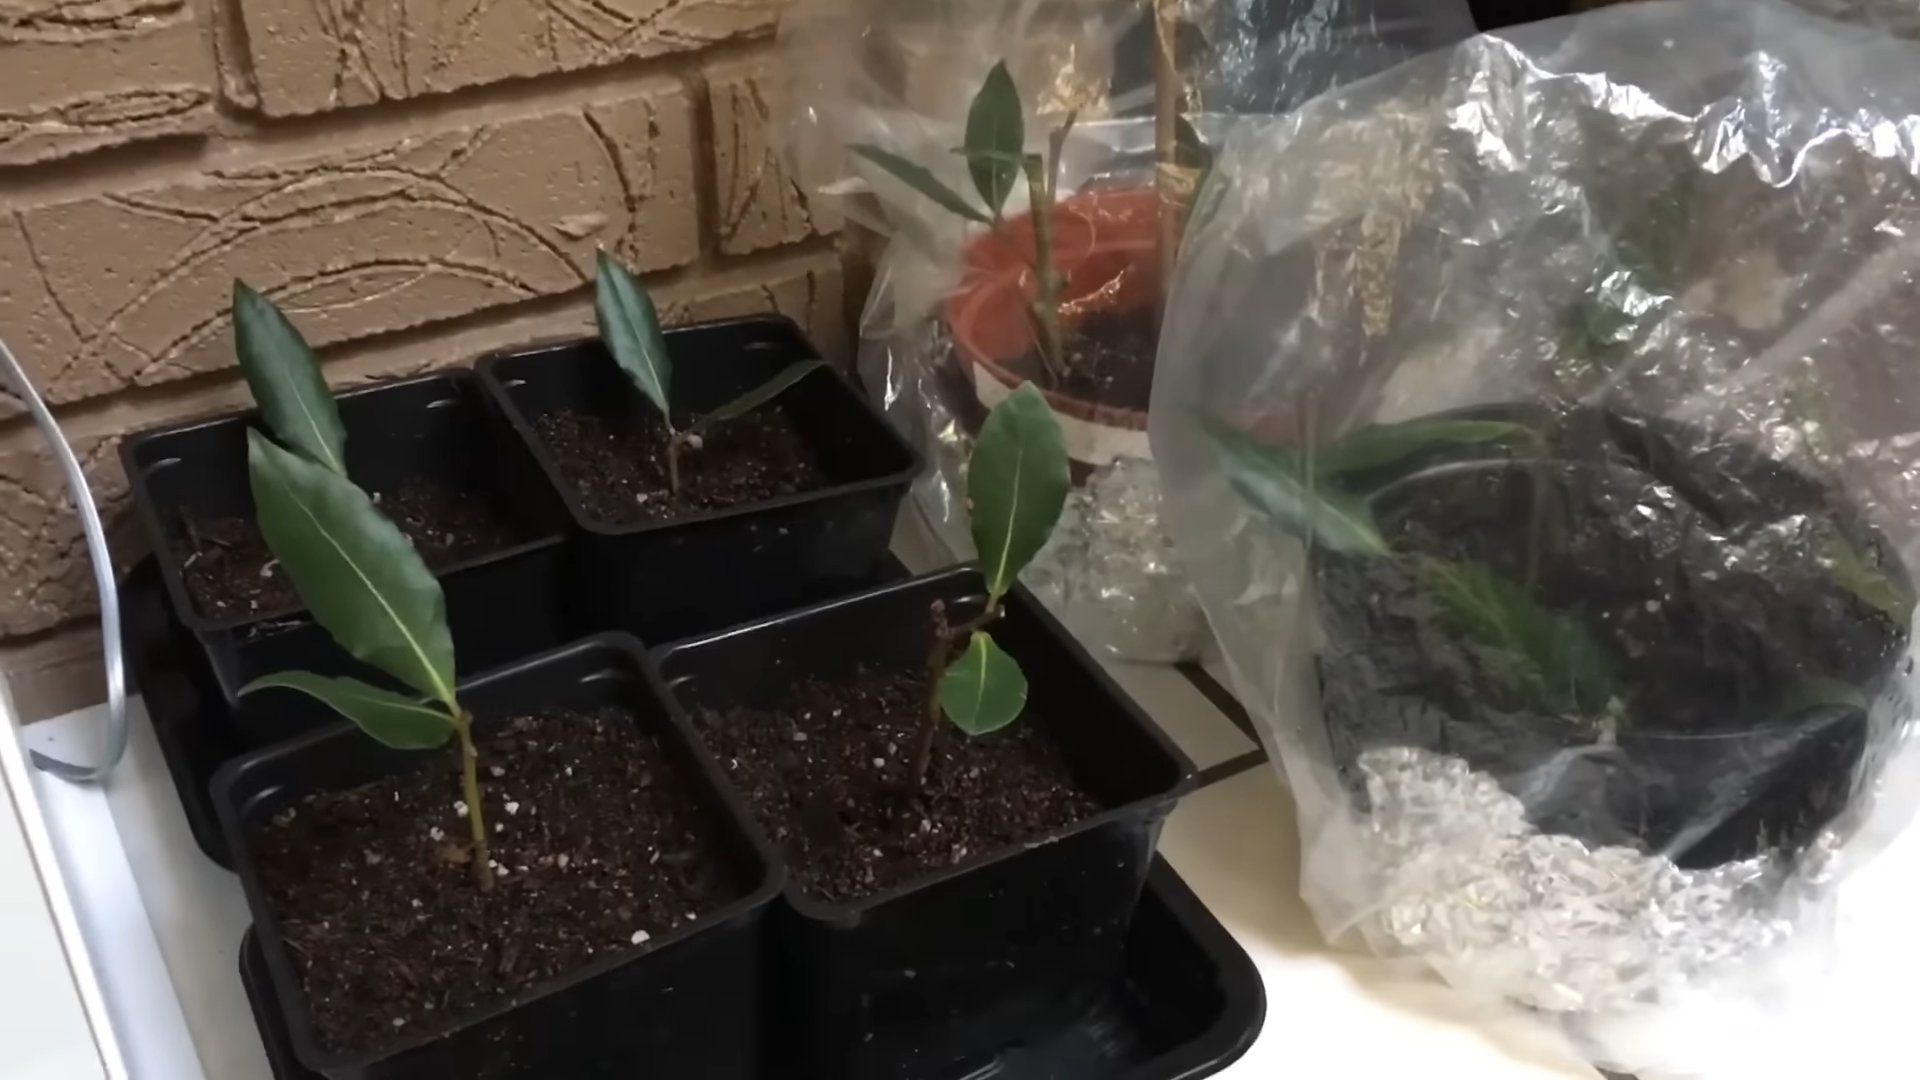
Planting the Cuttings
Now that you have your cuttings, it’s time to plant them in their new homes.
1. Prepare the Pots: Fill your small pots with the well-draining potting mix. Moisten the mix thoroughly, but don’t let it become waterlogged.
2. Make a Hole: Use a pencil or your finger to create a hole in the center of the potting mix, deep enough to accommodate the bottom inch of the cutting.
3. Plant the Cutting: Gently insert the cutting into the hole and firm the potting mix around it.
4. Water Gently: Water the cutting gently to settle the potting mix.
5. Label the Pot: Label the pot with the date and the type of cutting (bay laurel).
Creating a Humid Environment
Bay leaf cuttings need a humid environment to prevent them from drying out before they can root. Here’s how to create one:
1. Mist the Cuttings: Mist the cuttings thoroughly with water.
2. Cover the Pots: Place the pots inside clear plastic bags or under a humidity dome. Make sure the plastic bag doesn’t touch the leaves of the cuttings. You can use skewers or sticks to prop up the bag.
3. Seal the Bag (Mostly): If using plastic bags, seal the bag loosely to trap humidity, but leave a small opening for air circulation. If using a humidity dome, make sure the vents are slightly open.
Caring for Your Cuttings
Now comes the waiting game! Here’s how to care for your bay leaf cuttings while they’re rooting:
1. Location: Place the pots in a warm, bright location, but out of direct sunlight. Direct sunlight can scorch the cuttings. An east-facing window is ideal.
2. Humidity: Check the humidity level inside the plastic bag or humidity dome regularly. If the air seems dry, mist the cuttings with water.
3. Watering: Keep the potting mix consistently moist, but not waterlogged. Water when the top inch of the potting mix feels dry to the touch.
4. Ventilation: Open the plastic bag or humidity dome for a few minutes every day to allow for air circulation. This will help prevent fungal diseases.
5. Patience: Rooting can take anywhere from 4 to 12 weeks, or even longer. Be patient and don’t disturb the cuttings too much.
Checking for Roots
After a few weeks, you can gently check for roots. Here’s how:
1. Gently Tug: Gently tug on the cutting. If you feel resistance, it means roots have started to form.
2. Look for New Growth: New growth on the cutting is another sign that it has rooted.
3. Transplant (Optional): Once the cutting has developed a good root system, you can transplant it into a larger pot. Use a well-draining potting mix and water thoroughly.
Troubleshooting
Sometimes, things don’t go as planned. Here are some common problems you might encounter when rooting bay leaves, and how to fix them:
* Cuttings Rotting: This is usually caused by overwatering or poor air circulation. Make sure the potting mix is well-draining and that you’re not overwatering. Increase ventilation by opening the plastic bag or humidity dome more frequently.
* Cuttings Drying Out: This is usually caused by low humidity. Make sure the plastic bag or humidity dome is sealed properly and that you’re misting the cuttings regularly.
* No Rooting After Several Weeks: This could be due to a number of factors, including poor cutting quality, improper rooting environment, or lack of rooting hormone. Try taking new cuttings from a different part of the plant, using rooting hormone, and ensuring a warm, humid environment.
Moving to a Larger Pot and Beyond
Once your bay leaf cutting has established a good root system in its small pot, it’s time to move it to a larger container. This will give the roots more room to grow and allow the plant to develop into a healthy, thriving bay laurel.
1. Choosing the Right Pot: Select a pot that is a few inches larger in diameter than the current pot. Make sure the pot has drainage holes to prevent waterlogging. Terracotta pots are a good choice because they allow the soil to breathe.
2. Preparing the Potting Mix: Use a well-draining potting mix that is specifically formulated for container gardening. You can also amend a general-purpose potting mix with perlite or vermiculite to improve drainage.
3. Removing the Cutting from the Old Pot: Gently loosen the soil around the edges of the old pot. Turn the pot upside down and tap the bottom to release the cutting. Be careful not to damage the roots.
4. Planting in the New Pot: Place a layer of potting mix in the bottom of the new pot. Position the cutting in the center of the pot and fill in around the roots with more potting mix. Gently firm the soil around the base of the plant.
5. Watering: Water the newly transplanted cutting thoroughly to settle the soil and help the roots establish.
6. Location: Place the pot in a location that receives at least six hours of sunlight per day. Bay laurel
Conclusion
So, there you have it! Rooting bay leaves might seem like a botanical challenge reserved for seasoned gardeners, but with a little patience and this straightforward method, you can cultivate your own thriving bay laurel plant right at home. Forget constantly buying dried bay leaves from the store; imagine the satisfaction of snipping fresh, fragrant leaves directly from your own plant whenever a recipe calls for that distinctive, aromatic touch.
This DIY trick isn’t just about saving money; it’s about connecting with nature, understanding the life cycle of plants, and adding a unique, personal touch to your culinary creations. The process itself is incredibly rewarding, offering a glimpse into the magic of propagation. Watching those tiny roots emerge is a truly exciting experience.
Why is this a must-try? Because it empowers you to grow your own essential culinary herb, ensuring a constant supply of fresh, flavorful bay leaves. It’s also a sustainable and eco-friendly alternative to purchasing dried leaves, reducing your carbon footprint and supporting a more self-sufficient lifestyle. Plus, a bay laurel plant makes a beautiful and fragrant addition to any garden or indoor space.
Ready to take it a step further? Consider experimenting with different rooting mediums. While we’ve recommended a well-draining potting mix, you could also try perlite or vermiculite. Some gardeners have even had success rooting bay leaves in water, although this method may require more frequent water changes to prevent algae growth. Another variation is to use a rooting hormone powder or liquid to further encourage root development, especially if you’re working with more mature or less vigorous cuttings. You can also try different types of bay laurel. While the standard *Laurus nobilis* is the most common for culinary use, there are other varieties with slightly different leaf shapes and aromas.
Don’t be discouraged if your first attempt isn’t a resounding success. Rooting bay leaves can be a bit tricky, and success rates can vary depending on factors like the health of the parent plant, the time of year, and environmental conditions. The key is to be patient, persistent, and observant. Pay close attention to your cuttings, monitor their progress, and adjust your approach as needed.
We are confident that with a little care and attention, you’ll be well on your way to enjoying a bountiful harvest of fresh, homegrown bay leaves. So, grab your pruning shears, gather your supplies, and embark on this exciting botanical adventure.
We’d love to hear about your experiences rooting bay leaves! Share your tips, tricks, and success stories in the comments below. Let’s build a community of bay laurel enthusiasts and learn from each other’s successes and challenges. Happy growing!
Frequently Asked Questions (FAQ)
What is the best time of year to root bay leaves?
The ideal time to root bay leaves is typically in the spring or early summer. During these months, the bay laurel plant is actively growing, and the cuttings are more likely to root successfully. The warmer temperatures and longer daylight hours provide optimal conditions for root development. However, with proper care and attention, you can attempt to root bay leaves at other times of the year, although the success rate may be lower. If you live in a region with mild winters, you may even be able to root bay leaves year-round.
How long does it take for bay leaves to root?
Rooting bay leaves can be a slow process, so patience is key. It typically takes anywhere from 6 to 12 weeks for roots to develop. The exact timeframe can vary depending on factors such as the health of the cutting, the rooting medium, and the environmental conditions. Be sure to check the cuttings regularly for signs of root growth, such as the appearance of small white roots emerging from the cut end. Avoid disturbing the cuttings too much during this time, as this can hinder root development.
What kind of soil is best for rooting bay leaves?
A well-draining potting mix is essential for rooting bay leaves. The soil should be light and airy to allow for proper aeration and drainage. A mix of peat moss, perlite, and vermiculite is a good option. Avoid using heavy or compacted soil, as this can lead to root rot. You can also add a small amount of compost to the potting mix to provide nutrients to the developing roots. Ensure that the pot you are using has drainage holes to prevent water from accumulating at the bottom.
How often should I water the bay leaf cuttings?
Keep the rooting medium consistently moist, but not waterlogged. Water the cuttings whenever the top inch of soil feels dry to the touch. Avoid overwatering, as this can lead to root rot. Use a spray bottle to mist the cuttings regularly to maintain humidity. If you are using a humidity dome or plastic bag, be sure to vent it regularly to prevent condensation from building up.
What kind of light do bay leaf cuttings need?
Bay leaf cuttings need bright, indirect light to root successfully. Avoid placing them in direct sunlight, as this can scorch the leaves. A north- or east-facing window is a good option. If you don’t have access to natural light, you can use a grow light to provide supplemental lighting.
How do I know if my bay leaf cuttings have rooted?
The most obvious sign that your bay leaf cuttings have rooted is the appearance of small white roots emerging from the cut end. You can gently tug on the cuttings to see if they are firmly anchored in the soil. If they resist being pulled out, it’s a good indication that they have rooted. You may also notice new growth on the cuttings, such as the emergence of new leaves.
What do I do after the bay leaf cuttings have rooted?
Once the bay leaf cuttings have rooted, you can transplant them into individual pots. Use a well-draining potting mix and choose pots that are slightly larger than the root ball. Water the newly transplanted seedlings thoroughly and place them in a location with bright, indirect light. Gradually acclimate the seedlings to outdoor conditions before planting them in the garden.
Can I root bay leaves in water?
Yes, it is possible to root bay leaves in water, although this method may be less reliable than rooting them in soil. To root bay leaves in water, place the cuttings in a glass or jar filled with water, ensuring that the leaves are above the waterline. Change the water every few days to prevent algae growth. Once roots have developed, you can transplant the cuttings into pots filled with potting mix.
What are some common problems when rooting bay leaves?
Some common problems when rooting bay leaves include root rot, leaf drop, and failure to root. Root rot is caused by overwatering and can be prevented by using a well-draining potting mix and avoiding overwatering. Leaf drop can be caused by dry air or insufficient light. Failure to root can be caused by a variety of factors, including poor quality cuttings, improper rooting medium, or unfavorable environmental conditions.
Can I use rooting hormone to help bay leaves root?
Yes, using rooting hormone can increase the chances of success when rooting bay leaves. Rooting hormone contains auxins, which are plant hormones that promote root development. To use rooting hormone, dip the cut end of the bay leaf cutting into the hormone powder or liquid before planting it in the rooting medium. Follow the instructions on the rooting hormone package for best results.
Leave a Comment