
Onion Growing Plastic Bottles: Who knew your recycling bin could be the secret to a bountiful harvest? I’m so excited to share a game-changing DIY trick that will revolutionize your home garden and have you enjoying fresh, homegrown onions like never before! Forget struggling with limited garden space or battling pesky weeds – we’re taking onion cultivation to a whole new level with a simple, sustainable, and surprisingly effective method.
For centuries, onions have been a staple in cuisines around the world, revered not only for their flavor but also for their medicinal properties. From ancient Egypt, where they were symbols of eternity, to medieval Europe, where they were believed to ward off disease, onions have a rich and fascinating history. Now, you can easily cultivate your own piece of that history, right in your backyard (or even on your balcony!).
Are you tired of buying onions from the grocery store, unsure of their origin or freshness? Do you dream of having a constant supply of these flavorful bulbs at your fingertips? This DIY guide is your answer! I’ll show you how to transform ordinary plastic bottles into mini onion-growing powerhouses. This method is perfect for small spaces, reduces water waste, and provides excellent drainage for healthy onion development. Plus, it’s a fantastic way to repurpose those plastic bottles and contribute to a more sustainable lifestyle. So, let’s dive in and discover the magic of onion growing plastic bottles – your garden (and your taste buds) will thank you!
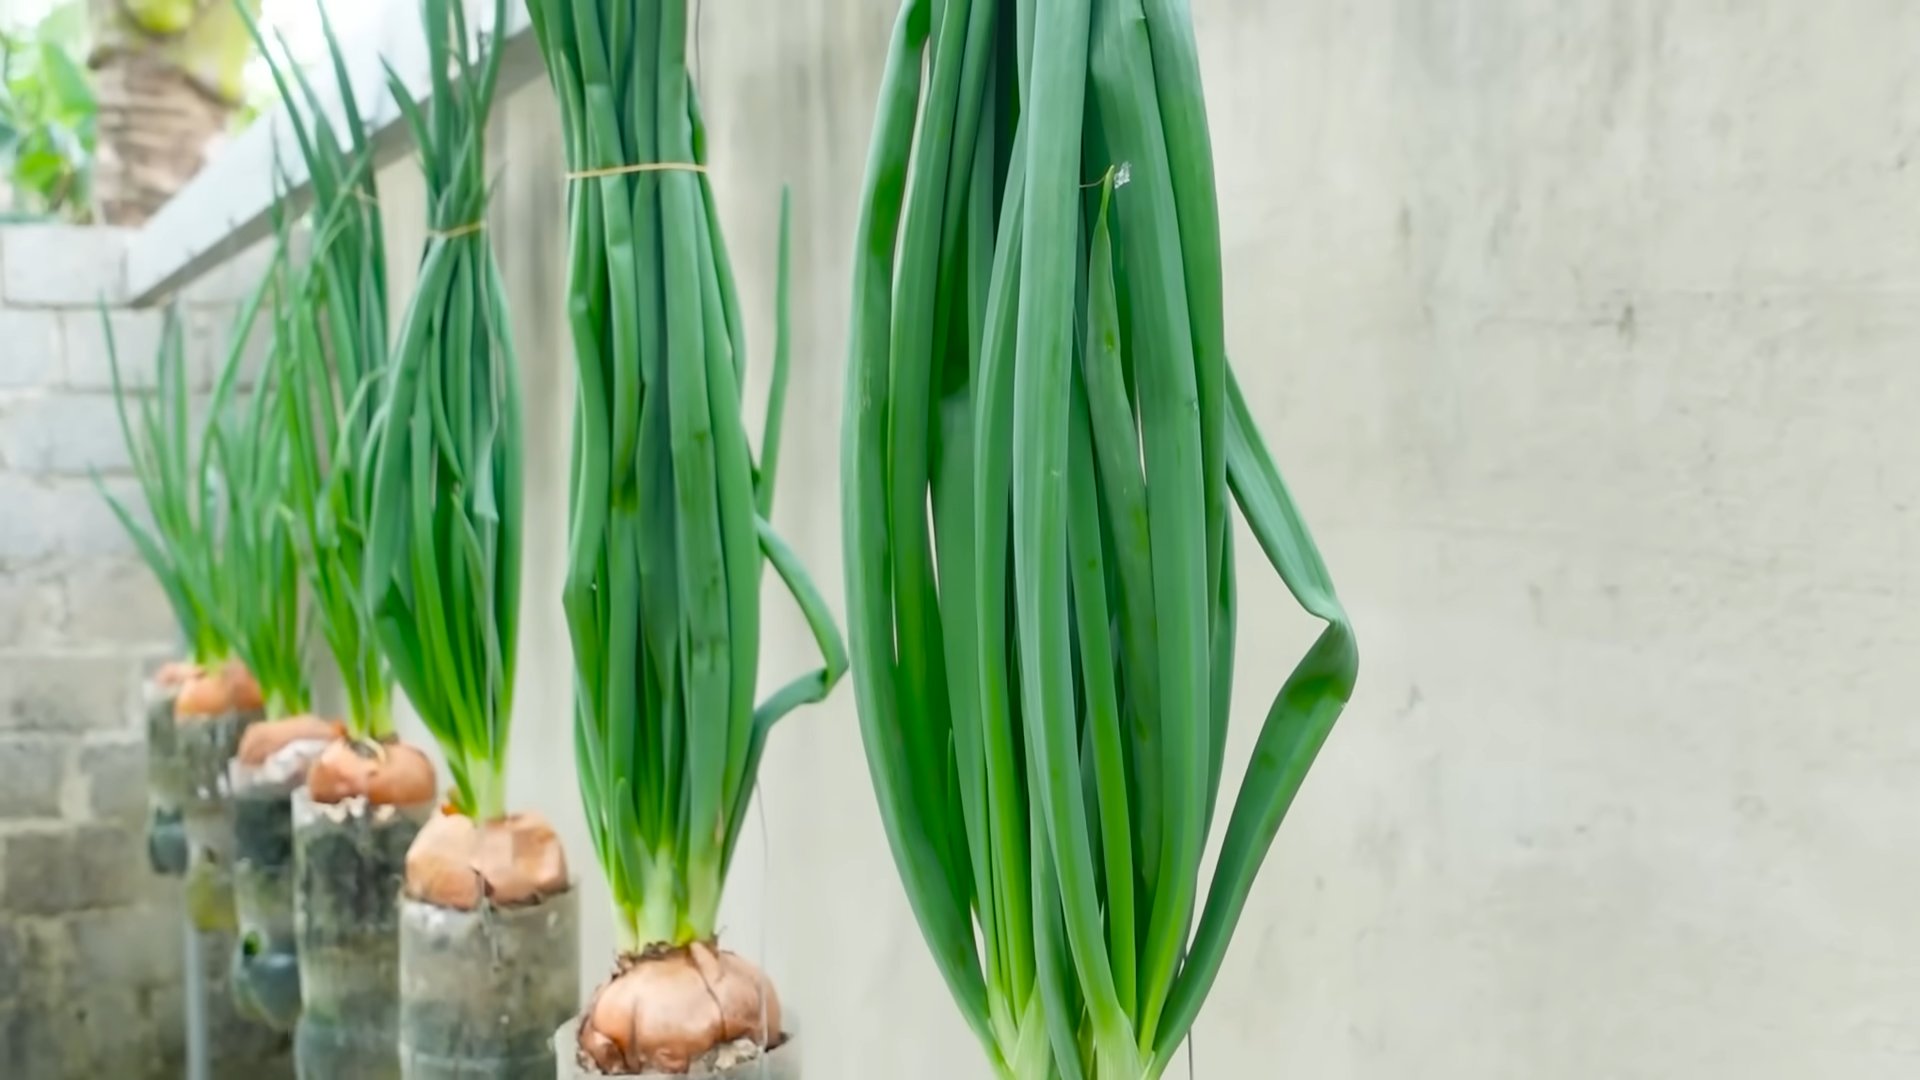
Growing Onions in Plastic Bottles: A DIY Vertical Garden
Hey there, fellow gardening enthusiasts! Are you short on space but dreaming of a bountiful onion harvest? Well, I’ve got just the project for you: growing onions in plastic bottles! It’s a fantastic way to recycle, save space, and enjoy fresh, homegrown onions. This method is surprisingly effective and super satisfying. Let’s dive in!
What You’ll Need
Before we get started, let’s gather our supplies. This is a pretty low-cost project, which is always a win in my book!
* Plastic Bottles: You’ll need several plastic bottles, preferably the 2-liter kind. The more bottles you have, the more onions you can grow! Make sure they’re clean and dry.
* Onion Sets or Seedlings: You can use onion sets (small, immature onions) or onion seedlings. Sets are easier to work with, especially for beginners. I usually go with yellow or red onion sets.
* Potting Soil: A good quality potting mix is essential for healthy onion growth. Avoid using garden soil, as it can be too heavy and compact.
* Scissors or Utility Knife: For cutting the plastic bottles. Be careful!
* Drill or Nail: To create drainage holes.
* String or Wire: For hanging the bottles.
* Watering Can: For, well, watering!
* Gloves (Optional): To keep your hands clean.
* Measuring tape or ruler: To ensure consistent spacing.
Preparing the Plastic Bottles
This is where the magic begins! We’re going to transform those humble plastic bottles into mini onion paradises.
1. Clean the Bottles: First things first, give those bottles a good rinse with soap and water. Make sure to remove any labels or sticky residue. Let them dry completely.
2. Cut the Bottles: Now, grab your scissors or utility knife. We’re going to cut each bottle horizontally, creating two separate sections.
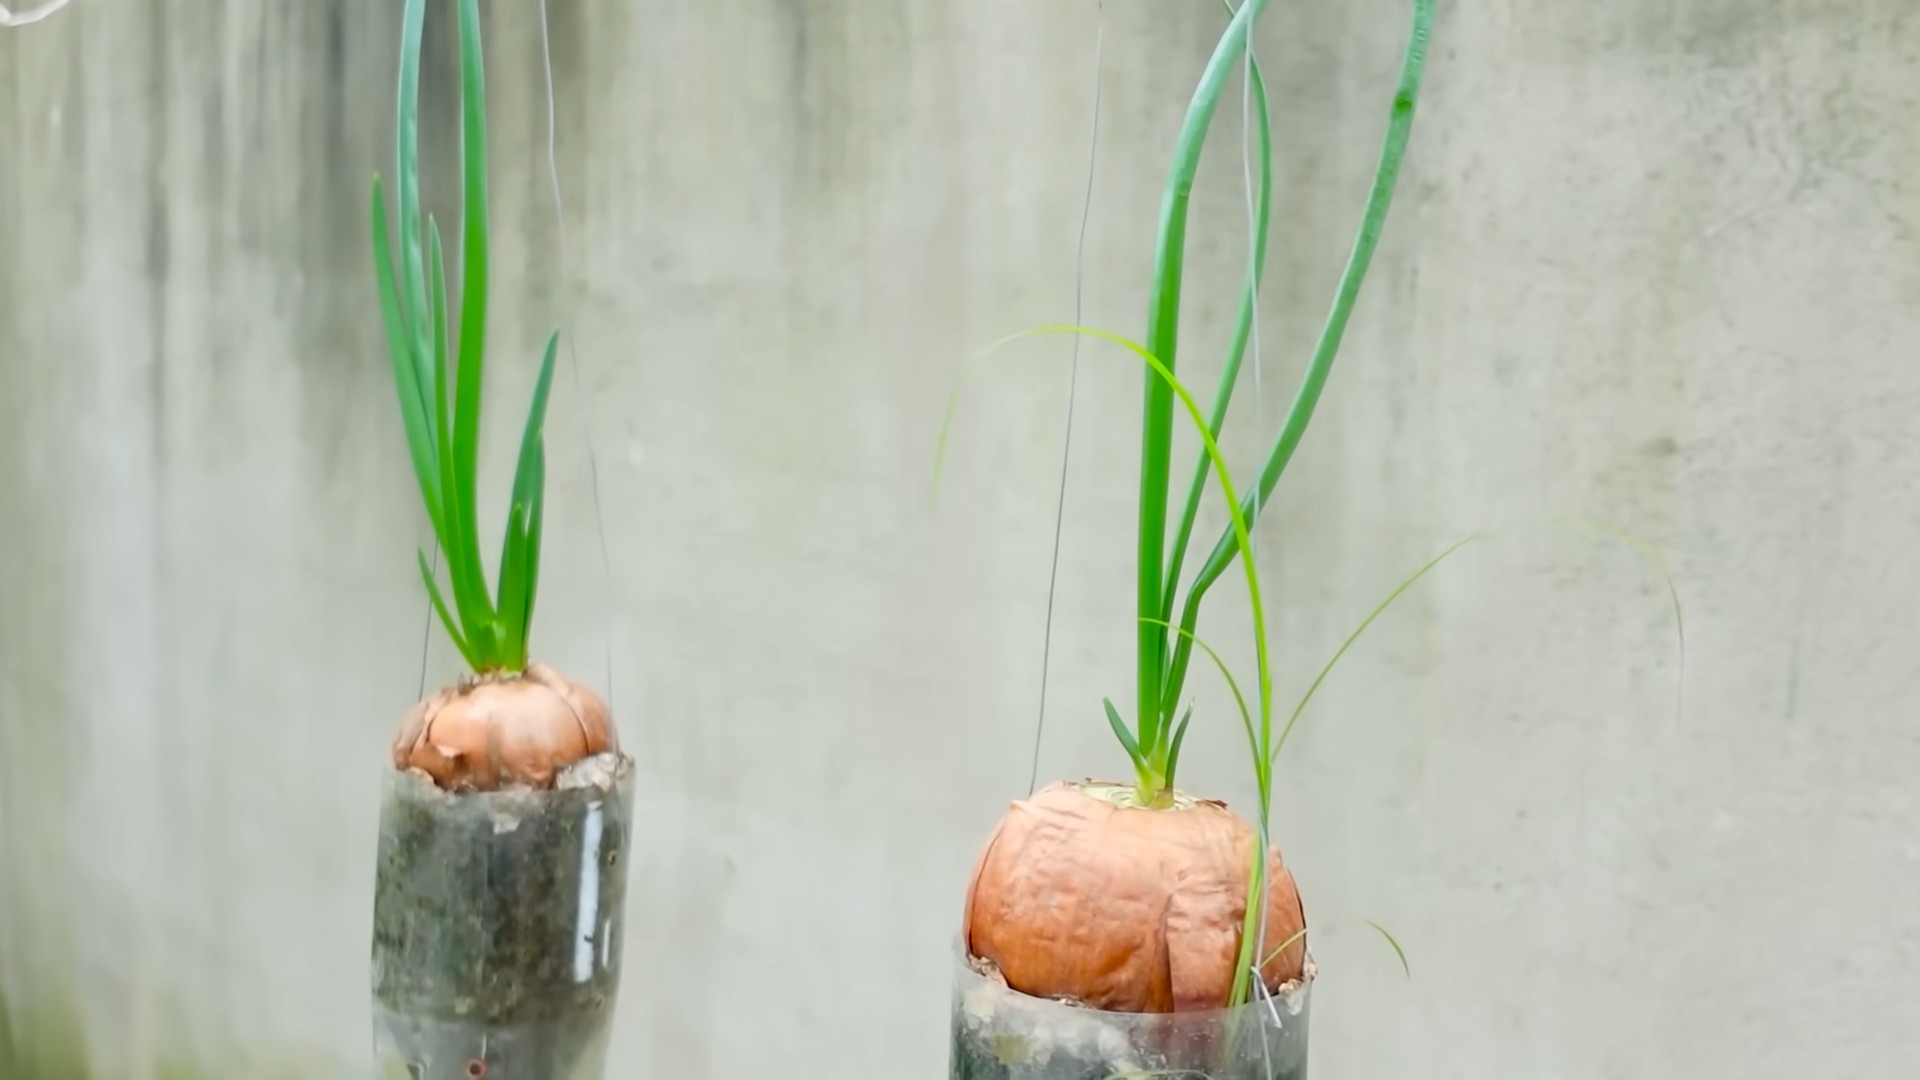
* Bottle Top: Cut off the top portion of the bottle, about 4-5 inches from the neck. You’ll be inverting this part later, so keep it!
* Bottle Bottom: Cut off the bottom of the bottle, leaving a container that’s about 6-8 inches tall. This will be the main growing container.
3. Create Drainage Holes: Drainage is crucial for healthy onion growth. Use a drill or nail to create several small holes in the bottom of each bottle bottom. I usually make about 5-6 holes.
4. Prepare Hanging Holes: If you want to hang your vertical garden, you’ll need to create holes for the string or wire.
* On the Bottle Bottoms: Drill two holes on opposite sides of the bottle bottom, near the top edge.
* On the Bottle Tops: Drill two holes on opposite sides of the bottle top, near the cut edge. These holes should align with the holes on the bottle bottoms when the top is inverted.
Planting the Onions
Alright, we’ve got our bottles prepped and ready to go. Now comes the fun part: planting the onions!
1. Fill the Bottle Bottoms with Soil: Fill each bottle bottom with potting soil, leaving about an inch of space at the top. Gently pat down the soil to remove any air pockets.
2. Plant the Onion Sets or Seedlings:
* Onion Sets: Make a small hole in the soil, about an inch deep. Place the onion set in the hole, with the root end facing down. Cover the set with soil, leaving the tip exposed.
* Onion Seedlings: Gently separate the seedlings and plant them in the soil, spacing them about 2-3 inches apart. Make sure the roots are covered with soil.
3. Water Thoroughly: After planting, water the onions thoroughly until the water drains out of the drainage holes. This will help settle the soil and encourage root growth.
4. Invert the Bottle Top: Take the top portion of the bottle that you cut off earlier and invert it. Place it inside the bottle bottom, so the neck of the bottle is pointing downwards. This creates a self-watering system.
5. Add Water to the Inverted Top: Pour water into the inverted bottle top. The water will slowly seep into the soil, keeping it moist.
Creating a Vertical Garden
Now that we’ve planted our onions, let’s assemble our vertical garden! There are a couple of ways to do this, depending on your preference and available space.
Hanging Method
This method is great if you have a balcony, patio, or fence where you can hang the bottles.
1. Cut the String or Wire: Cut several lengths of string or wire, long enough to hang the bottles from your desired location.
2. Thread the String or Wire: Thread the string or wire through the holes you created on the bottle bottoms and tops.
3. Hang the Bottles: Hang the bottles from a sturdy support, such as a railing, fence, or hook. Make sure the bottles are securely attached and won’t fall.
4. Space the Bottles: Space the bottles evenly apart, allowing enough room for the onions to grow. I usually leave about 6-8 inches between each bottle.
Stacking Method
If you don’t want to hang the bottles, you can stack them on a shelf or table.
1. Prepare a Shelf or Table: Choose a sturdy shelf or table that can support the weight of the bottles.
2. Arrange the Bottles: Arrange the bottles on the shelf or table, spacing them evenly apart.
3. Secure the Bottles (Optional): If you’re concerned about the bottles tipping over, you can secure them to the shelf or table with adhesive putty or double-sided tape.
Caring for Your Onion Plants
Congratulations! You’ve successfully created your own onion vertical garden. Now, let’s talk about how to keep those onions happy and healthy.
* Watering: Onions need consistent moisture, but they don’t like to be waterlogged. Check the soil moisture regularly and water when the top inch of soil feels dry. Remember to refill the inverted bottle top with water as needed.
* Sunlight: Onions need at least 6 hours of sunlight per day. Place your vertical garden in a sunny location. If you don’t have enough sunlight, you can supplement with grow lights.
* Fertilizing: Feed your onions with a balanced liquid fertilizer every 2-3 weeks. Follow the instructions on the fertilizer label.
* Weeding: Keep the soil free of weeds, as they can compete with the onions for nutrients and water.
* Pest Control: Keep an eye out for pests, such as aphids or onion maggots. If you spot any pests, treat them with an appropriate insecticide or organic pest control method. I prefer using neem oil.
* Rotation: Rotate the bottles regularly to ensure that all sides of the plants receive equal sunlight.
Harvesting Your Onions
The moment we’ve all been waiting for! Harvesting your homegrown onions is incredibly rewarding.
1. When to Harvest: Onions are typically ready to harvest when the tops start to turn yellow and fall over. This usually takes about 3-4 months, depending on the variety and growing conditions.
2. How to Harvest: Gently pull the onions from the soil. If the soil is dry, you may need to loosen it with a trowel first.
3. Curing the Onions: After harvesting, cure the onions by laying them out in a dry, well-ventilated place for about 1-2 weeks. This will help them develop a papery skin and prevent them from rotting.
4. Storing the Onions: Store the cured onions in a cool, dry place, such as a pantry or basement. They should last for several months.
Troubleshooting
Even with the best intentions, things can sometimes go wrong. Here are a few common problems you might encounter and how to fix them.
* Yellowing Leaves: This could be a sign of overwatering, underwatering, or nutrient deficiency. Check the soil moisture and adjust your watering schedule accordingly. Fertilize the plants with a balanced fertilizer.
* Slow Growth: This could be due to lack of sunlight, poor soil, or pests. Make sure the plants are getting enough sunlight and use a good quality potting mix. Check for pests and treat them if necessary.
* Rotting Onions: This is usually caused by overwatering or poor drainage. Make sure the drainage holes are clear and avoid overwatering.
Tips and Tricks
Here are a few extra tips to help you succeed with your onion vertical garden.
* Choose the Right Onion Variety: Some onion varieties are better suited for container gardening than others. Look for varieties that are compact
Conclusion
So, there you have it! Transforming discarded plastic bottles into miniature onion-growing powerhouses is more than just a quirky gardening hack; it’s a sustainable, space-saving, and surprisingly effective way to cultivate fresh onions right at your fingertips. We’ve walked you through the simple steps, highlighting the benefits and addressing potential challenges. But why is this DIY trick a must-try?
Firstly, it’s incredibly eco-friendly. By repurposing plastic bottles, you’re actively reducing plastic waste and giving these materials a new lease on life. In a world grappling with environmental concerns, every little bit helps, and this project allows you to contribute in a tangible and rewarding way.
Secondly, it’s perfect for small spaces. Whether you have a sprawling garden or a tiny balcony, these bottle planters can be easily accommodated. They’re ideal for apartment dwellers, urban gardeners, or anyone looking to maximize their growing potential in limited areas. Imagine the satisfaction of harvesting fresh onions from your own vertical garden!
Thirdly, it’s cost-effective. Onions are a staple ingredient in countless dishes, and growing your own can significantly reduce your grocery bills. Plus, the initial investment is minimal – just some plastic bottles, soil, and onion sets or seeds.
But the real magic lies in the versatility of this method. Feel free to experiment with different types of onions. Shallots, scallions, or even garlic cloves can thrive in these bottle planters. You can also explore different soil mixes to optimize growth. Consider adding compost or other organic matter to enrich the soil and provide your onions with the nutrients they need.
Furthermore, don’t be afraid to get creative with the design. Paint the bottles, decorate them with colorful tape, or arrange them in unique patterns to add a touch of personality to your garden. This project is not only about growing onions; it’s about expressing your creativity and connecting with nature.
And speaking of creativity, consider using different sizes of plastic bottles. Larger bottles can accommodate more soil and support larger onion varieties, while smaller bottles are perfect for starting seeds or growing smaller onions like chives. You can even create a tiered system by stacking the bottles on top of each other, maximizing vertical space and creating a visually appealing display.
The key to success with this DIY onion growing method is consistent care. Ensure your onions receive adequate sunlight, water them regularly, and monitor them for any signs of pests or diseases. With a little attention and effort, you’ll be rewarded with a bountiful harvest of fresh, flavorful onions.
We wholeheartedly encourage you to try this DIY trick and experience the joy of growing your own onions. It’s a simple, sustainable, and incredibly rewarding project that will transform your relationship with food and gardening.
Once you’ve given it a try, we’d love to hear about your experience! Share your photos, tips, and challenges in the comments section below. Let’s create a community of DIY onion growers and inspire others to embrace sustainable gardening practices. Your insights and experiences can help others succeed and further refine this innovative method. Let’s all become masters of **onion growing**!
Frequently Asked Questions (FAQ)
What type of plastic bottles are best for growing onions?
Ideally, you should use food-grade plastic bottles, such as those that previously contained water, juice, or soda. These bottles are generally safe for growing edible plants. Avoid using bottles that contained harsh chemicals or cleaning products, as these could contaminate the soil and affect the onions. PET (Polyethylene Terephthalate) bottles, commonly used for water and soda, are a good choice. Make sure to thoroughly clean the bottles before using them to remove any residue.
How often should I water my onions grown in plastic bottles?
The frequency of watering depends on several factors, including the weather, the type of soil you’re using, and the size of the bottle. As a general rule, water your onions when the top inch of soil feels dry to the touch. During hot and dry weather, you may need to water them daily or even twice a day. In cooler weather, you can water them less frequently. Be careful not to overwater, as this can lead to root rot. Ensure the bottles have adequate drainage holes to prevent water from accumulating at the bottom.
What type of soil is best for growing onions in plastic bottles?
A well-draining potting mix is ideal for growing onions in plastic bottles. You can purchase a pre-made potting mix or create your own by combining equal parts of garden soil, compost, and perlite or vermiculite. The compost will provide essential nutrients, while the perlite or vermiculite will improve drainage and aeration. Avoid using heavy clay soil, as it can become waterlogged and suffocate the roots.
How much sunlight do onions need when grown in plastic bottles?
Onions need at least 6-8 hours of direct sunlight per day to thrive. Place your bottle planters in a sunny location, such as a south-facing balcony or windowsill. If you don’t have enough natural sunlight, you can supplement with grow lights. Rotate the bottles regularly to ensure that all sides of the plants receive adequate light.
Can I grow onions from seed in plastic bottles?
Yes, you can grow onions from seed in plastic bottles. Start by sowing the seeds in a seed-starting mix and keeping them moist until they germinate. Once the seedlings have developed a few true leaves, you can transplant them into the bottle planters. Alternatively, you can start with onion sets, which are small, immature onions that are easier to grow. Plant the sets about an inch deep in the soil, spacing them a few inches apart.
How do I prevent pests and diseases from affecting my onions in plastic bottles?
To prevent pests and diseases, start with healthy onion sets or seeds and use a well-draining potting mix. Monitor your plants regularly for any signs of infestation or disease. Common onion pests include onion maggots, thrips, and aphids. You can control these pests with insecticidal soap or neem oil. Common onion diseases include downy mildew and white rot. To prevent these diseases, ensure good air circulation and avoid overwatering.
How long does it take to grow onions in plastic bottles?
The time it takes to grow onions depends on the variety and the growing conditions. Generally, it takes about 90-120 days to grow onions from sets and 120-150 days to grow onions from seed. You can harvest the onions when the tops start to fall over and turn yellow.
Can I grow other vegetables in plastic bottles using the same method?
Yes, you can grow a variety of other vegetables in plastic bottles using the same method. Some popular choices include herbs, lettuce, spinach, and strawberries. The key is to choose vegetables that are well-suited to container gardening and provide them with the appropriate growing conditions.
What are some creative ways to decorate my plastic bottle onion planters?
There are many creative ways to decorate your plastic bottle onion planters. You can paint them with colorful designs, wrap them with twine or burlap, or decorate them with mosaic tiles. You can also add labels to identify the different onion varieties. Get creative and have fun with it!
How do I harvest my onions grown in plastic bottles?
Harvest your onions when the tops start to fall over and turn yellow or brown. Gently pull the onions from the soil, being careful not to damage the roots. Brush off any excess soil and allow the onions to cure in a dry, well-ventilated place for a week or two before storing them. Curing helps to extend the shelf life of the onions.

Leave a Comment