
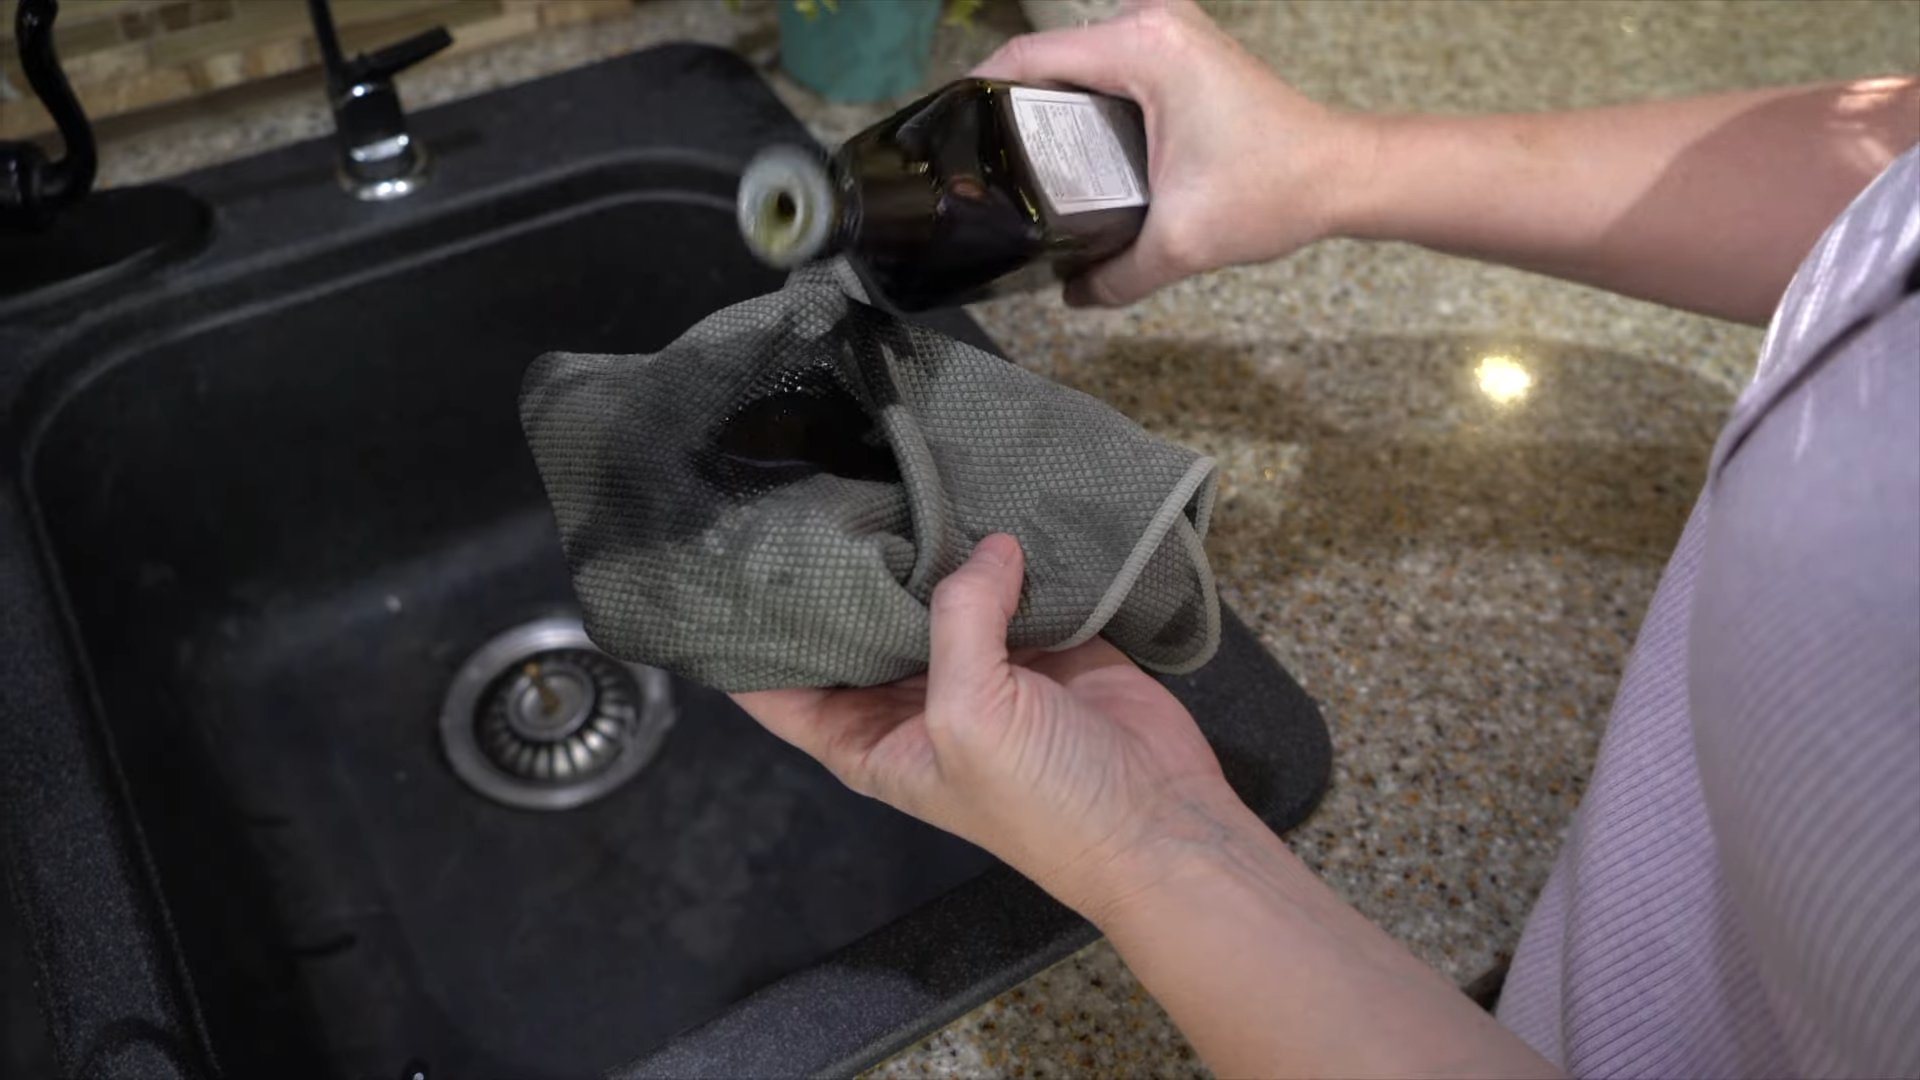
Olive oil granite cleaner: sounds too good to be true, right? I thought so too, until I stumbled upon this surprisingly effective DIY solution! For generations, folks have been searching for the perfect way to keep their granite countertops gleaming, and while commercial cleaners abound, many are harsh, expensive, and frankly, unnecessary. Think about it – granite, a stone often associated with ancient civilizations and used in everything from Egyptian pyramids to Roman temples, deserves a cleaning method that’s both gentle and effective.
That’s where this simple, yet powerful, olive oil granite cleaner comes in. We all want sparkling clean countertops without the worry of damaging them with harsh chemicals. This DIY trick not only saves you money, but it also utilizes ingredients you likely already have in your pantry. I’m going to show you how to create a natural, streak-free shine that will have your granite looking its absolute best. Get ready to ditch those expensive cleaners and embrace a greener, more effective way to care for your beautiful granite surfaces!
Growing Watermelons in Your Backyard: A Comprehensive DIY Guide
Hey there, fellow gardening enthusiasts! Ever dreamed of biting into a juicy, homegrown watermelon on a hot summer day? Well, you’ve come to the right place! I’m going to walk you through everything you need to know to successfully grow watermelons right in your own backyard. It might seem daunting, but trust me, with a little planning and effort, you’ll be harvesting your own sweet treats in no time.
Choosing the Right Watermelon Variety
Before we even think about planting, let’s talk about watermelon varieties. Not all watermelons are created equal, and some are better suited for backyard gardens than others. Consider your climate, space, and personal preferences when making your choice.
* Sugar Baby: This is a popular choice for smaller gardens because it produces relatively small, round watermelons (about 8-10 pounds). They mature quickly, usually in about 75-80 days.
* Crimson Sweet: A classic watermelon with a bright red flesh and a sweet flavor. They’re larger than Sugar Baby, typically weighing around 20-25 pounds, and take about 85 days to mature.
* Jubilee: These are large, oblong watermelons with a distinctive striped rind. They can weigh up to 30 pounds and take about 90-100 days to mature.
* Bush Sugar Baby: If space is a major constraint, this bush variety is perfect! It produces smaller watermelons on compact vines, making it ideal for container gardening or small gardens.
* Yellow Watermelon Varieties: For a fun twist, consider growing a yellow-fleshed watermelon like ‘Yellow Crimson’ or ‘Buttercup Yellow’. They offer a unique flavor and visual appeal.
Preparing Your Garden for Watermelons
Watermelons are heavy feeders, meaning they need a lot of nutrients to thrive. They also need plenty of sunshine and well-drained soil. Here’s how to get your garden ready:
* Sunlight: Watermelons need at least 6-8 hours of direct sunlight per day. Choose a location in your yard that gets plenty of sun.
* Soil: Watermelons prefer well-drained, sandy loam soil with a pH between 6.0 and 6.8. If your soil is heavy clay, amend it with compost, aged manure, or other organic matter to improve drainage.
* Nutrients: Watermelons need a lot of nutrients, especially nitrogen, phosphorus, and potassium. Before planting, amend your soil with compost and a balanced fertilizer (e.g., 10-10-10).
* Space: Watermelon vines can spread quite a bit, so give them plenty of room. Allow at least 3-4 feet between plants and 6-8 feet between rows. For bush varieties, you can reduce the spacing slightly.
Step-by-Step Planting Guide
Now for the fun part – planting! You can either start your watermelon seeds indoors or direct sow them in your garden. I personally prefer starting them indoors to get a head start, especially in cooler climates.
Starting Seeds Indoors (Optional)
1. Timing: Start your seeds indoors about 4-6 weeks before the last expected frost.
2. Containers: Use peat pots or biodegradable containers to avoid disturbing the roots when transplanting.
3. Soil: Fill the containers with a seed-starting mix.
4. Sowing: Plant 2-3 seeds per container, about 1 inch deep.
5. Watering: Water gently to moisten the soil.
6. Warmth: Keep the containers in a warm place (70-80°F) until the seeds germinate. You can use a heat mat to speed up germination.
7. Light: Once the seedlings emerge, move them to a sunny window or under grow lights.
8. Thinning: Once the seedlings have a few true leaves, thin them to one plant per container.
Direct Sowing Seeds
1. Timing: Direct sow your seeds after the last expected frost, when the soil temperature is at least 70°F.
2. Soil Preparation: Prepare the soil as described above, amending it with compost and fertilizer.
3. Planting: Sow the seeds about 1 inch deep, spacing them according to the variety you’ve chosen.
4. Watering: Water gently to moisten the soil.
5. Marking: Mark the planting location so you know where you planted the seeds.
Transplanting Seedlings (If Started Indoors)
1. Hardening Off: Before transplanting, harden off your seedlings by gradually exposing them to outdoor conditions for a week or two. Start by placing them in a sheltered location for a few hours each day, gradually increasing the amount of time they spend outdoors.
2. Timing: Transplant your seedlings after the last expected frost, when the soil temperature is at least 70°F.
3. Planting: Dig a hole slightly larger than the root ball of the seedling. Gently remove the seedling from the container and place it in the hole. Backfill with soil and water thoroughly.
4. Spacing: Space the seedlings according to the variety you’ve chosen.
Caring for Your Watermelon Plants
Once your watermelon plants are in the ground, it’s important to provide them with the care they need to thrive.
* Watering: Watermelons need consistent moisture, especially during fruit development. Water deeply and regularly, aiming for about 1-2 inches of water per week. Avoid overhead watering, as this can promote fungal diseases. Drip irrigation is a great option.
* Fertilizing: Side-dress your watermelon plants with a balanced fertilizer every 2-3 weeks. You can also use a liquid fertilizer, such as fish emulsion or seaweed extract.
* Weeding: Keep the area around your watermelon plants free of weeds. Weeds compete with watermelons for nutrients and water.
* Mulching: Apply a layer of mulch around your watermelon plants to help retain moisture, suppress weeds, and regulate soil temperature. Straw, hay, or wood chips are good options.
* Pollination: Watermelons need to be pollinated in order to produce fruit. Bees are the primary pollinators, so encourage them to visit your garden by planting flowers that attract bees. If you’re not seeing many bees, you can hand-pollinate your watermelons by transferring pollen from the male flowers to the female flowers. You can identify female flowers by the small, immature watermelon at the base of the flower.
* Vine Training: As your watermelon vines grow, you may need to train them to keep them from spreading too far. You can use stakes or trellises to support the vines.
* Pest Control: Watermelons can be susceptible to pests such as aphids, squash bugs, and cucumber beetles. Monitor your plants regularly and take action if you see any signs of infestation. Insecticidal soap, neem oil, and hand-picking are effective methods of pest control.
* Disease Control: Watermelons can also be susceptible to diseases such as powdery mildew, anthracnose, and fusarium wilt. To prevent diseases, choose disease-resistant varieties, provide good air circulation, and avoid overhead watering. If you see any signs of disease, treat your plants with a fungicide.
Protecting Your Watermelons
As your watermelons grow, you may need to protect them from pests and diseases.
* Pest Protection: Use row covers to protect young plants from pests. You can also use netting to protect ripening watermelons from birds and other animals.
* Disease Prevention: Choose disease-resistant varieties and provide good air circulation. Avoid overhead watering and treat your plants with a fungicide if you see any signs of disease.
* Sun Protection: In very hot climates, you may need to protect your watermelons from sunburn. You can use shade cloth or straw to provide shade.
Harvesting Your Watermelons
The moment we’ve all been waiting for! Knowing when to harvest your watermelons is crucial for getting that perfect, sweet flavor. Here are a few indicators:
* Days to Maturity: Check the seed packet or plant tag for the days to maturity. This is a good starting point, but it’s not always accurate.
* Tendril: The tendril closest to the watermelon should be brown and dry.
* Ground Spot: The spot where the watermelon rests on the ground (the ground spot) should be yellow or cream-colored.
* Thumping: Thump the watermelon. A ripe watermelon will sound hollow.
* Rind: The rind should be dull and hard.
Once you’ve determined that your watermelon is ripe, carefully cut it from the vine with a sharp knife. Leave a few inches of stem attached.
Enjoying Your
Conclusion
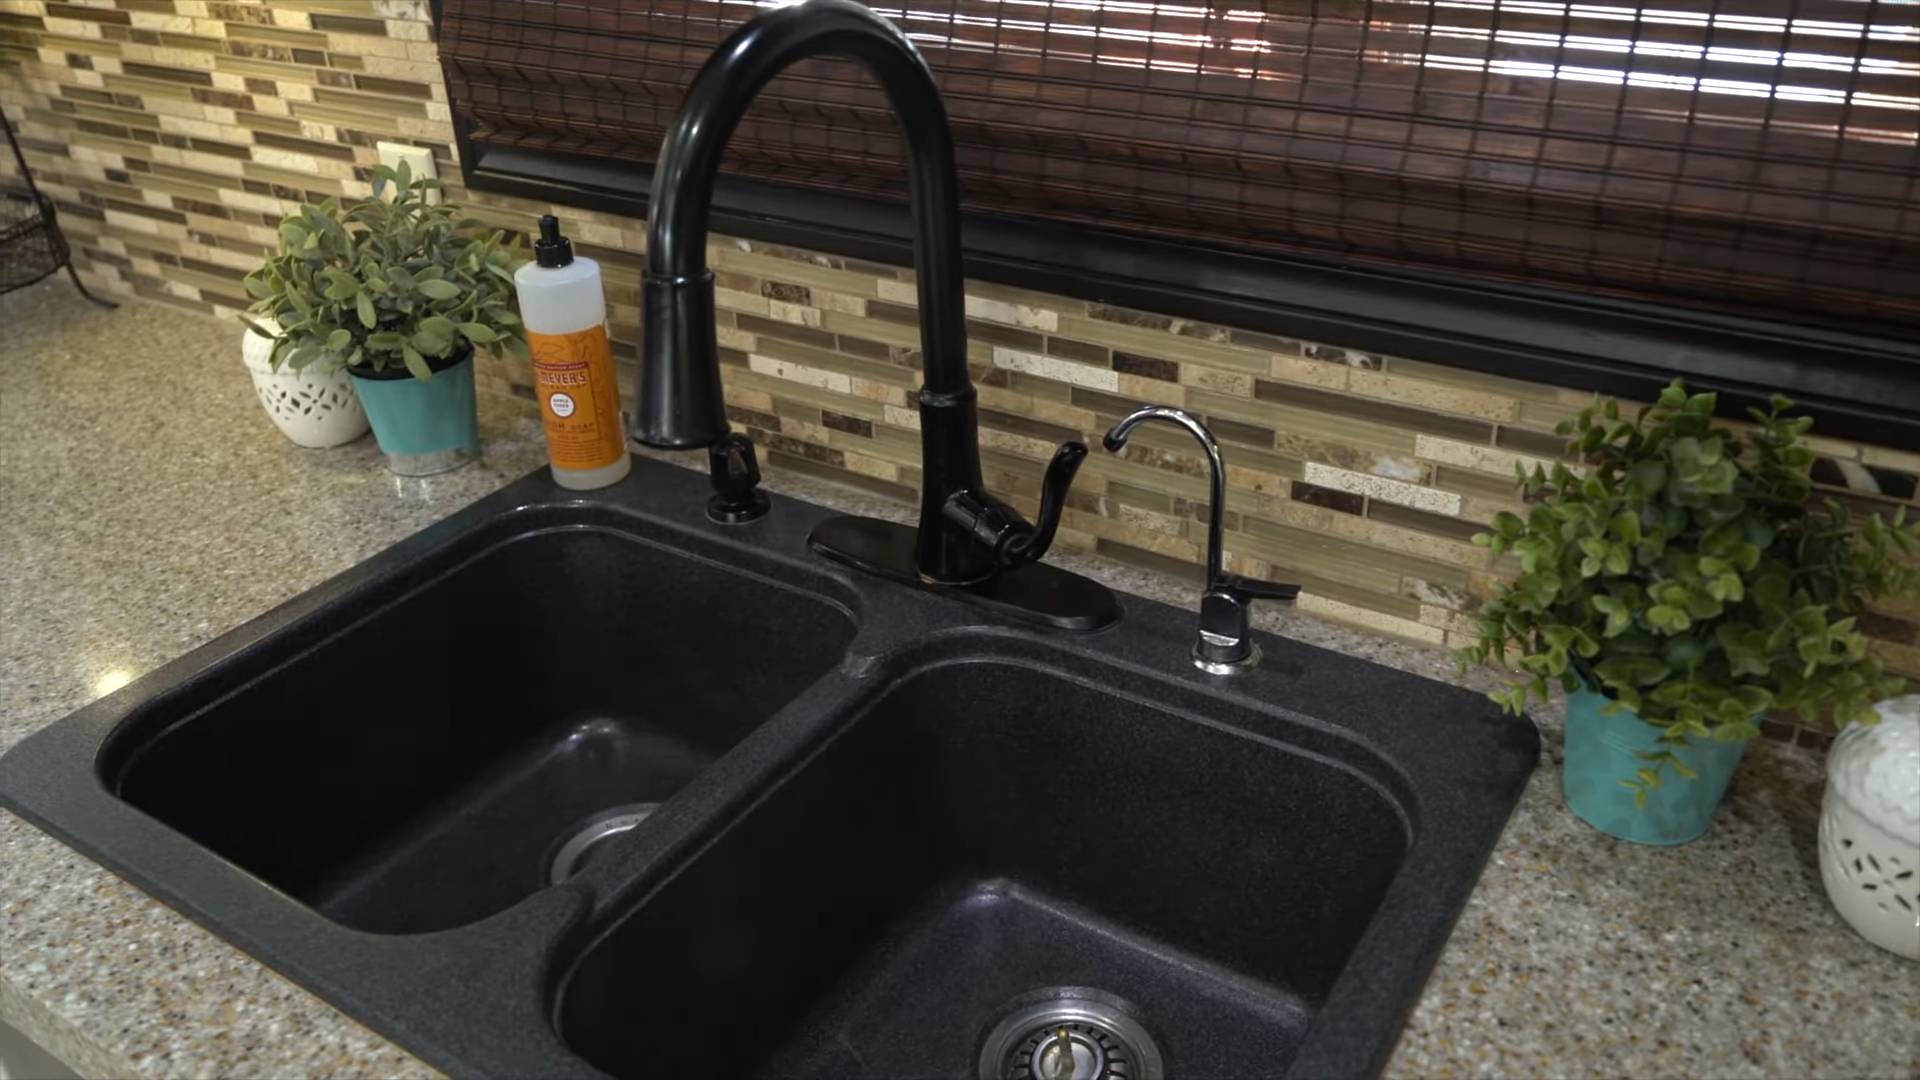
So, there you have it! This simple, yet incredibly effective, DIY olive oil granite cleaner is a game-changer for anyone looking to maintain the beauty and luster of their granite countertops without resorting to harsh chemicals or expensive commercial products. We’ve shown you how easy it is to create a solution that not only cleans but also polishes and protects your granite surfaces, leaving them sparkling and revitalized.
Why is this a must-try? Because it’s cost-effective, environmentally friendly, and, most importantly, it works! You’re likely already have the ingredients in your pantry, eliminating the need for a special trip to the store. Plus, you’re avoiding the potentially harmful chemicals found in many commercial cleaners, creating a healthier home environment for you and your family. The gentle nature of olive oil ensures that your granite’s natural beauty is enhanced, not damaged, over time.
But the benefits don’t stop there. This DIY cleaner is incredibly versatile. Feel free to experiment with different essential oils to customize the scent to your liking. A few drops of lemon essential oil can add an extra boost of cleaning power and a refreshing citrus aroma. Lavender essential oil can create a calming and relaxing atmosphere in your kitchen. Peppermint essential oil can provide a stimulating and invigorating scent. The possibilities are endless!
For a deeper clean, especially on heavily soiled areas, consider adding a small amount of baking soda to the mixture. Baking soda acts as a gentle abrasive, helping to lift stubborn stains and grime without scratching the granite surface. However, always test this variation on an inconspicuous area first to ensure compatibility.
Another variation involves using a different type of oil. While olive oil is our preferred choice due to its readily availability and excellent polishing properties, you can also experiment with other natural oils like coconut oil or almond oil. Keep in mind that these oils may have different consistencies and scents, so adjust the recipe accordingly.
We are confident that once you try this DIY olive oil granite cleaner, you’ll never go back to store-bought alternatives. It’s a simple, effective, and sustainable way to keep your granite countertops looking their best.
Don’t just take our word for it – give it a try! We encourage you to experiment with the recipe, find the variations that work best for you, and share your experiences with us. Let us know what essential oil combinations you love, what challenges you encountered, and what tips you discovered along the way. Your feedback will help us refine the recipe and provide even better guidance to other readers.
We believe in the power of DIY solutions and the importance of sharing knowledge. By working together, we can create a community of informed and empowered homeowners who are committed to maintaining their homes in a healthy and sustainable way. So, grab your olive oil, gather your essential oils, and get ready to transform your granite countertops with this amazing DIY trick! Your granite will thank you for it.
Frequently Asked Questions (FAQs)
1. Why use olive oil for cleaning granite? Isn’t it oily?
Olive oil might seem like an odd choice for cleaning, but it’s actually a fantastic option for granite. While it is an oil, when used in the correct proportion with other ingredients like water and dish soap, it doesn’t leave a greasy residue. Instead, it acts as a natural polisher, bringing out the shine and luster of the granite. The oil helps to fill in microscopic imperfections on the surface, creating a smoother and more reflective finish. It also provides a protective layer that helps to repel water and prevent stains. The key is to use a small amount and buff the surface thoroughly after cleaning.
2. What kind of dish soap should I use?
A mild, pH-neutral dish soap is best for cleaning granite. Avoid using dish soaps that contain harsh chemicals, abrasives, or citrus extracts, as these can damage the granite’s surface. Look for dish soaps that are specifically labeled as safe for natural stone or delicate surfaces. Unscented dish soap is also a good option if you’re sensitive to fragrances or want the essential oils to be the primary scent.
3. Can I use this cleaner on other types of stone countertops?
While this cleaner is specifically formulated for granite, it may also be suitable for other types of natural stone countertops, such as marble or quartz. However, it’s always best to test the cleaner on an inconspicuous area first to ensure compatibility. Marble, in particular, is more porous and susceptible to etching than granite, so it’s important to use a very mild cleaner and avoid using acidic ingredients like lemon juice or vinegar. Quartz countertops are generally more durable and resistant to staining than granite or marble, but it’s still a good idea to use a gentle cleaner to avoid damaging the surface.
4. How often should I clean my granite countertops with this DIY cleaner?
The frequency of cleaning depends on how often you use your countertops and how much they’re exposed to spills and messes. For general cleaning, once or twice a week is usually sufficient. For heavily used areas, you may need to clean more frequently. Always wipe up spills immediately to prevent staining.
5. What if I don’t have essential oils? Can I still make the cleaner?
Yes, you can definitely make the cleaner without essential oils. The essential oils are primarily added for their scent and potential antibacterial properties, but they’re not essential for the cleaning power of the solution. If you don’t have essential oils, simply omit them from the recipe. The olive oil, water, and dish soap will still effectively clean and polish your granite countertops.
6. My granite countertops are sealed. Will this cleaner damage the sealant?
This DIY cleaner is gentle enough to use on sealed granite countertops. However, it’s important to avoid using harsh chemicals or abrasive cleaners that can strip away the sealant. The olive oil in the cleaner can actually help to maintain the sealant by providing a protective layer. If you’re concerned about damaging the sealant, you can always test the cleaner on an inconspicuous area first.
7. How do I know if my granite countertops are sealed?
You can test if your granite countertops are sealed by placing a few drops of water on the surface. If the water beads up, the granite is likely sealed. If the water soaks into the granite, it’s likely not sealed and may need to be resealed.
8. Can I use this cleaner on my granite floors or other granite surfaces?
Yes, this cleaner can be used on granite floors and other granite surfaces, but you may need to adjust the proportions of the ingredients. For floors, you can use a larger amount of water to create a more diluted solution. Always test the cleaner on an inconspicuous area first to ensure compatibility.
9. How should I store the DIY olive oil granite cleaner?
Store the DIY olive oil granite cleaner in a clean, airtight spray bottle. Keep it in a cool, dark place away from direct sunlight. The cleaner should last for several weeks, but it’s best to use it within a month for optimal effectiveness.
10. What if I accidentally get the cleaner in my eyes?
If you accidentally get the cleaner in your eyes, rinse them immediately with plenty of water for at least 15 minutes. If irritation persists, seek medical attention.
Leave a Comment