
Mushroom Growing Indoors Beginner? Intrigued? You should be! For centuries, mushrooms have been prized for their unique flavors and nutritional benefits. From ancient civilizations who revered them as delicacies to modern chefs who incorporate them into gourmet dishes, mushrooms hold a special place in culinary history. But did you know that you don’t need a sprawling farm or specialized equipment to cultivate these fascinating fungi?
I’m here to tell you that bringing the magic of mushroom cultivation into your own home is easier than you might think! Imagine harvesting fresh, delicious mushrooms right from your kitchen counter. No more trips to the grocery store or wondering about the freshness of your produce. This DIY guide is designed specifically for the mushroom growing indoors beginner, providing you with simple, step-by-step instructions to get started.
In today’s world, where we’re increasingly conscious of where our food comes from and eager to embrace sustainable practices, growing your own mushrooms is a fantastic way to connect with nature and enjoy fresh, healthy food. Plus, it’s a rewarding and fascinating hobby! So, let’s embark on this exciting journey together and unlock the secrets to successful indoor mushroom cultivation. Get ready to transform your home into a miniature mushroom farm!
Growing Mushrooms Indoors: A Beginner’s Guide to a Bountiful Harvest
Okay, so you’re thinking about growing mushrooms indoors? Awesome! It’s a surprisingly rewarding hobby, and trust me, nothing beats the taste of freshly grown, homegrown fungi. Don’t be intimidated; it’s easier than you might think. This guide will walk you through the process, step-by-step, to get you started on your mushroom-growing journey.
Choosing Your Mushroom Variety
First things first, let’s talk about what kind of mushrooms you want to grow. Some varieties are easier for beginners than others. Here are a few good options:
* Oyster Mushrooms (Pleurotus spp.): These are super forgiving and fast-growing. They come in a variety of colors, too!
* Shiitake Mushrooms (Lentinula edodes): A bit more patience is required, but they’re incredibly flavorful and worth the wait.
* Wine Cap Mushrooms (Stropharia rugosoannulata): These are typically grown outdoors, but can be adapted for indoor setups with the right conditions.
For this guide, we’ll focus on growing oyster mushrooms, as they’re the most beginner-friendly.
Gathering Your Supplies
Before we dive in, let’s make sure you have everything you need. Here’s a checklist:
* Oyster Mushroom Spawn: This is essentially the “seed” of the mushroom. You can buy it online or from a local mushroom supplier. Look for grain spawn or sawdust spawn.
* Substrate: This is what the mushrooms will grow on. Straw is a great option for oyster mushrooms. You can also use coffee grounds, cardboard, or wood chips.
* Large Container: A bucket, tub, or even a large plastic bag will work. Make sure it’s clean!
* Spray Bottle: For misting the mushrooms.
* Bleach: For sterilizing your equipment.
* Gloves: To keep things sanitary.
* Optional: Micropore tape (for covering holes in your container)
Preparing the Substrate
This is a crucial step, as it helps prevent contamination. We need to pasteurize the straw to kill off any competing organisms.
1. Chop the Straw: Cut the straw into smaller pieces, about 2-3 inches long. This will make it easier to pack into the container.
2. Pasteurize the Straw: There are a few ways to do this. The easiest method for beginners is hot water pasteurization.
* Fill a large pot or tub with water and heat it to around 160-180°F (71-82°C). You’ll need a thermometer to monitor the temperature.
* Submerge the chopped straw in the hot water and let it soak for about an hour. This will kill off most of the unwanted bacteria and fungi.
* Drain the straw thoroughly. You want it to be moist but not soaking wet. Squeeze out any excess water. It should feel like a wrung-out sponge.
Inoculating the Substrate
Now comes the fun part – introducing the mushroom spawn to the substrate!
1. Clean Your Container: Wash your container thoroughly with soap and water, then sanitize it with a bleach solution (1 part bleach to 9 parts water). Rinse well and let it dry completely.
2. Layer the Substrate and Spawn: This is called “layering.” Start with a layer of pasteurized straw at the bottom of the container.
3. Sprinkle a Layer of Spawn: Spread a layer of oyster mushroom spawn over the straw. You want to use about 10-20% spawn by weight of the substrate. So, if you have 10 pounds of straw, use 1-2 pounds of spawn.
4. Repeat the Layers: Continue layering straw and spawn until you reach the top of the container. Leave a few inches of space at the top.
5. Final Layer: Finish with a layer of straw on top.
6. Cover the Container: Cover the container with a lid or plastic wrap. You can poke a few small holes for air exchange, or cover the holes with micropore tape.
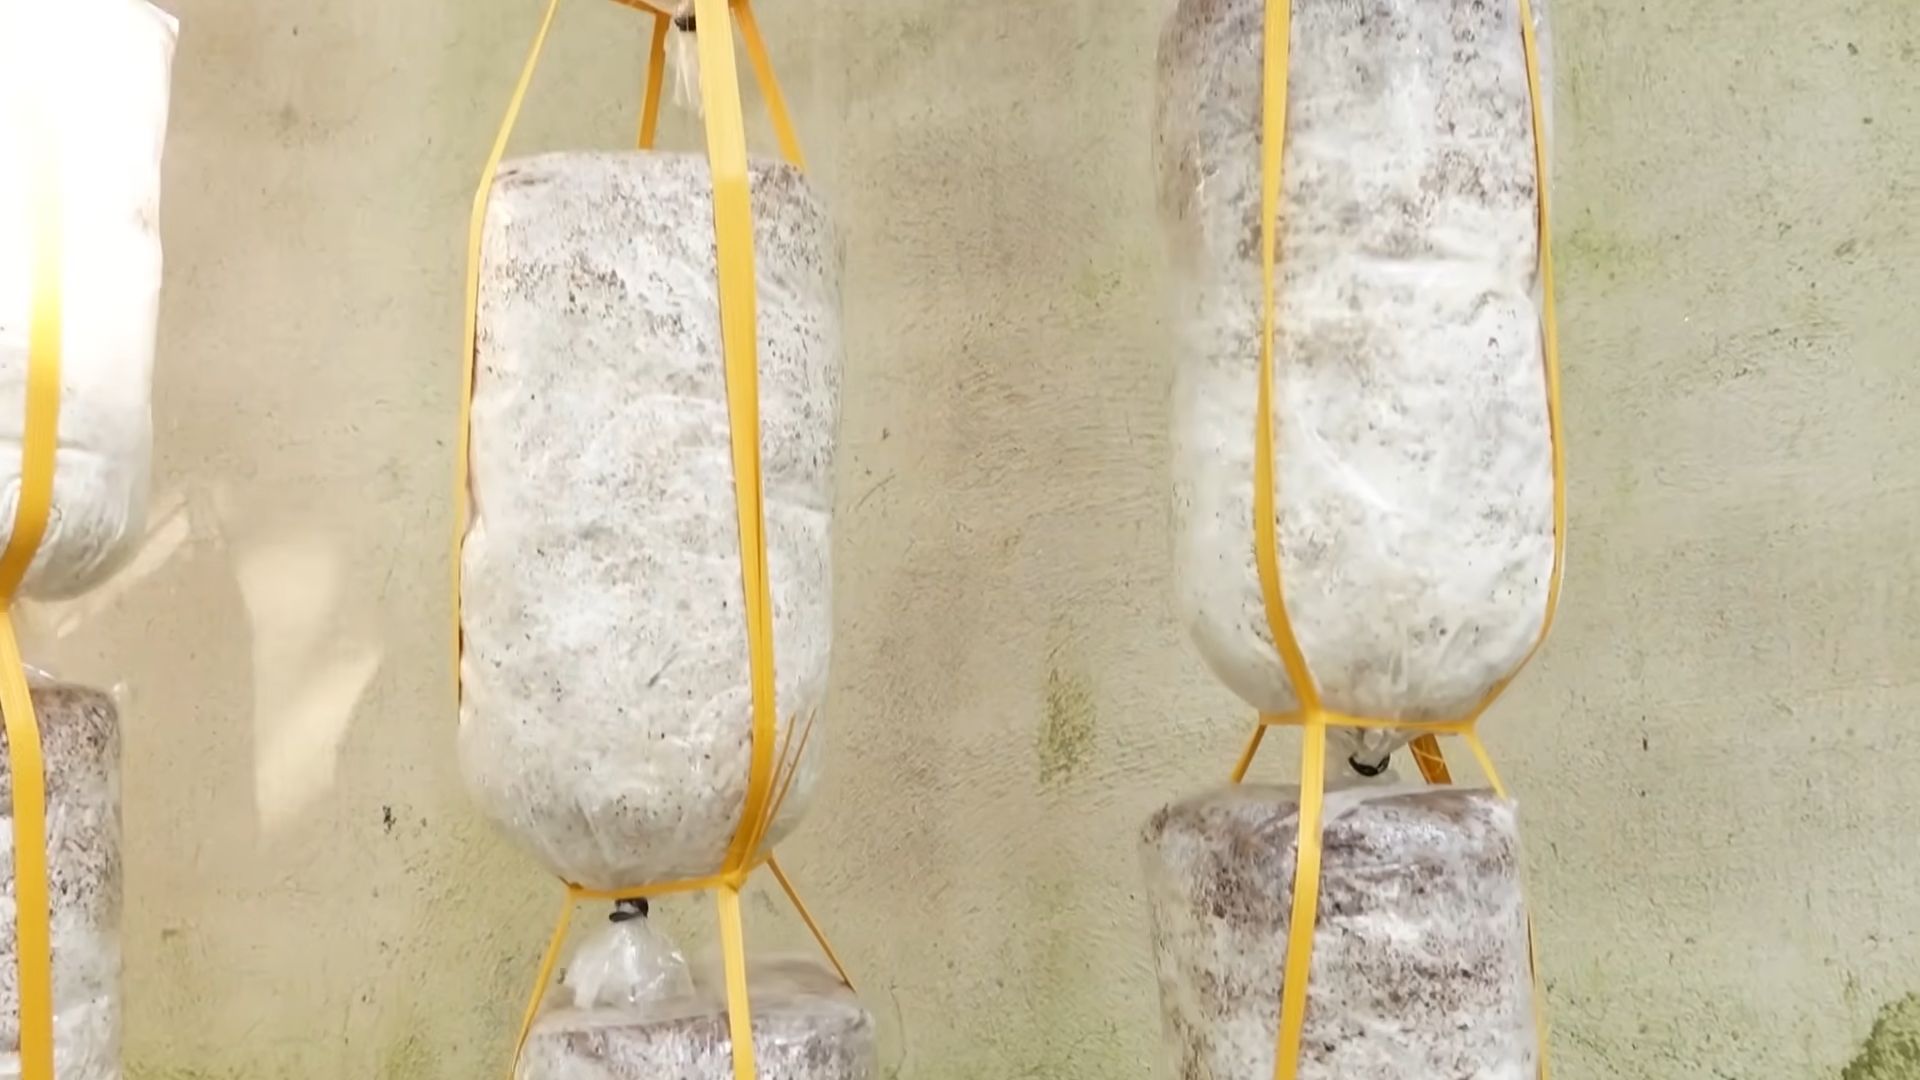
Incubation Phase
This is where the magic happens! The mushroom mycelium (the vegetative part of the fungus) will colonize the substrate.
1. Find a Warm, Dark Place: Place the container in a warm, dark place with a temperature of around 65-75°F (18-24°C). A closet, basement, or spare room works well.
2. Monitor the Colonization: Check the container every few days. You should start to see white, fuzzy growth (the mycelium) spreading throughout the straw.
3. Be Patient: This process can take anywhere from 2-4 weeks, depending on the temperature and the amount of spawn you used.
4. Avoid Disturbing the Container: Try not to move the container around too much during this phase.
Fruiting Phase
Once the substrate is fully colonized (it will be almost entirely white), it’s time to trigger fruiting. This means creating the right conditions for the mushrooms to start growing.
1. Increase Humidity: Oyster mushrooms need high humidity to fruit. Mist the inside of the container with water several times a day to keep the humidity up. You can also place a humidity dome over the container.
2. Increase Airflow: Oyster mushrooms also need fresh air to fruit properly. Remove the lid or plastic wrap and fan the container a few times a day to provide fresh air.
3. Introduce Light: While mushrooms don’t need a lot of light, they do need some light to fruit properly. Place the container in a location that receives indirect sunlight or use a grow light.
4. Maintain Temperature: Keep the temperature in the same range as during the incubation phase (65-75°F or 18-24°C).
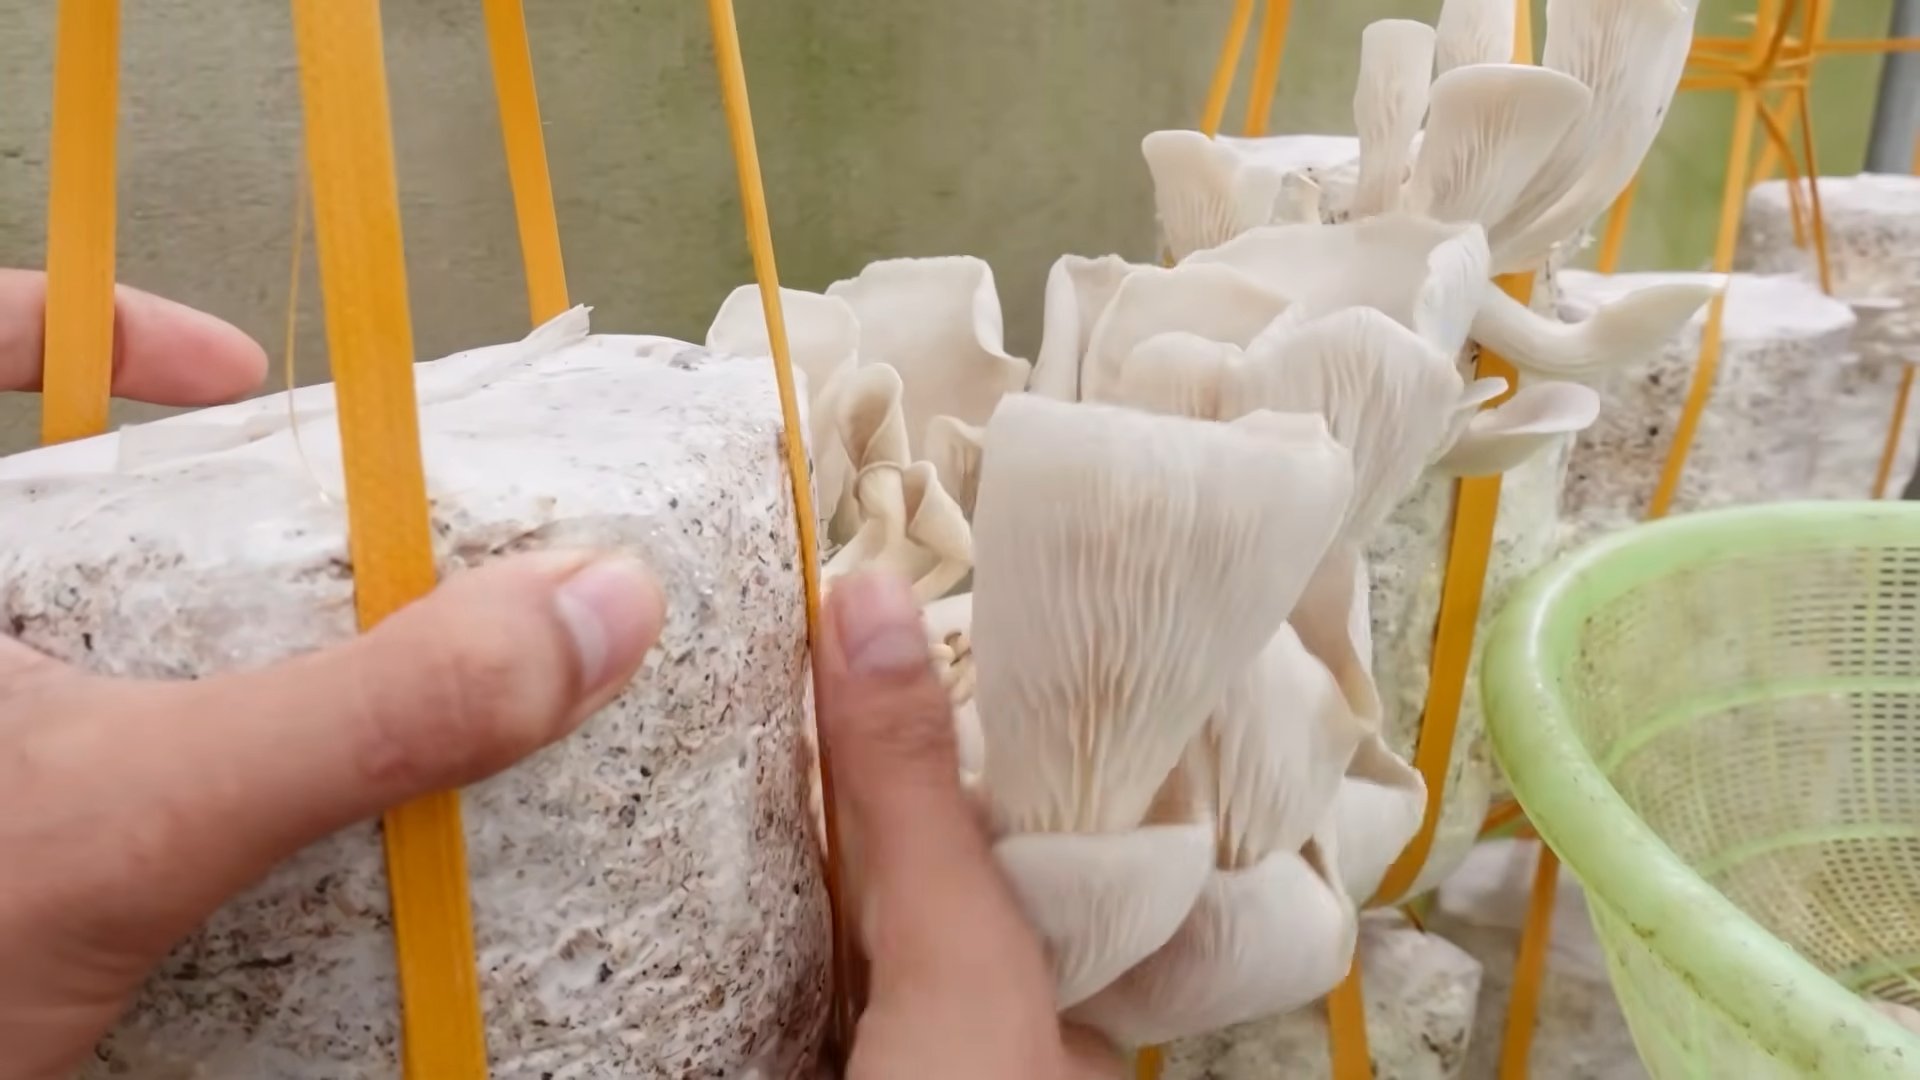
Harvesting Your Mushrooms
You’ll know your mushrooms are ready to harvest when the caps are fully formed and the edges start to curl upwards.
1. Harvest the Entire Cluster: Gently twist and pull the entire cluster of mushrooms from the substrate.
2. Clean the Base: Trim any excess substrate from the base of the mushrooms.
3. Enjoy Your Harvest! Oyster mushrooms are best eaten fresh. Store them in the refrigerator in a paper bag for up to a week.
Second Flush and Beyond
After you harvest your first flush of mushrooms, you can often get a second (and sometimes even a third) flush.
1. Soak the Substrate: After harvesting, soak the substrate in water for 12-24 hours. This will rehydrate the substrate and encourage another flush of mushrooms.
2. Drain the Substrate: Drain the substrate thoroughly after soaking.
3. Repeat the Fruiting Phase: Return the container to the fruiting conditions (high humidity, fresh air, and light).
4. Be Patient: It may take a few weeks for the second flush to appear.
Troubleshooting
Sometimes things don’t go exactly as planned. Here are a few common problems and how to fix them:
* First things first, let’s talk about what kind of mushrooms you want to grow. Some varieties are easier for beginners than others. Here are a few good options: * Oyster Mushrooms (Pleurotus spp.): These are super forgiving and fast-growing. They come in a variety of colors, too! For this guide, we’ll focus on growing oyster mushrooms, as they’re the most beginner-friendly. Before we dive in, let’s make sure you have everything you need. Here’s a checklist: * Oyster Mushroom Spawn: This is essentially the “seed” of the mushroom. You can buy it online or from a local mushroom supplier. Look for grain spawn or sawdust spawn. This is a crucial step, as it helps prevent contamination. We need to pasteurize the straw to kill off any competing organisms. 1. Chop the Straw: Cut the straw into smaller pieces, about 2-3 inches long. This will make it easier to pack into the container. Now comes the fun part – introducing the mushroom spawn to the substrate! 1. Clean Your Container: Wash your container thoroughly with soap and water, then sanitize it with a bleach solution (1 part bleach to 9 parts water). Rinse well and let it dry completely. This is where the magic happens! The mushroom mycelium (the vegetative part of the fungus) will colonize the substrate. 1. Find a Warm, Dark Place: Place the container in a warm, dark place with a temperature of around 65-75°F (18-24°C). A closet, basement, or spare room works well. Once the substrate is fully colonized (it will be almost entirely white), it’s time to trigger fruiting. This means creating the right conditions for the mushrooms to start growing. 1. Increase Humidity: Oyster mushrooms need high humidity to fruit. Mist the inside of the container with water several times a day to keep the humidity up. You can also place a humidity dome over the container. You’ll know your mushrooms are ready to harvest when the caps are fully formed and the edges start to curl upwards. 1. Harvest the Entire Cluster: Gently twist and pull the entire cluster of mushrooms from the substrate. After you harvest your first flush of mushrooms, you can often get a second (and sometimes even a third) flush. 1. Soak the Substrate: After harvesting, soak the substrate in water for 12-24 hours. This will rehydrate the substrate and encourage another flush of mushrooms. Sometimes things don’t go exactly as planned. Here are a few common problems and how to fix them: * Contamination: If you see green, black, or other colored mold growing in your container, it’s likely contaminated. Unfortunately, there’s not much you can do at this point except discard the substrate. To prevent contamination, make sure to pasteurize your substrate thoroughly and work in a clean environment. While I mentioned straw as a great beginner option, let’s explore other substrates and their pros and cons: * Coffee Grounds: Free and readily available! Coffee grounds are rich in nitrogen, which mushrooms love. However, they can be prone to contamination, so extra care is needed during pasteurization. I recommend mixing coffee grounds with another substrate like straw or cardboard. I can’t stress this enough: cleanliness is paramount! Here are some tips to So, there you have it! Cultivating your own mushrooms indoors is not only achievable for beginners, but it’s also a deeply rewarding experience. Forget those expensive grocery store prices and the uncertainty of where your food comes from. With a little patience and the right setup, you can enjoy a continuous supply of fresh, flavorful mushrooms right from the comfort of your home. This DIY approach to mushroom growing indoors for beginners is a game-changer, offering a sustainable and cost-effective way to add a gourmet touch to your meals. Think about the possibilities! Imagine adding freshly harvested oyster mushrooms to your stir-fries, shiitakes to your ramen, or lion’s mane to your morning smoothie. The flavor and texture of homegrown mushrooms are simply unmatched. Plus, you’ll have the satisfaction of knowing exactly what went into growing them – no pesticides, no hidden ingredients, just pure, natural goodness. But the benefits extend beyond just delicious food. Mushroom cultivation is a fantastic way to reduce food waste. You can use spent coffee grounds, cardboard, and other organic materials as substrate, turning waste into a valuable resource. It’s a small step towards a more sustainable lifestyle that can make a big difference. Don’t be afraid to experiment! Once you’ve mastered the basics, you can explore different mushroom varieties and growing techniques. Try growing your mushrooms in a repurposed container, or create a more elaborate fruiting chamber for optimal yields. You can even experiment with different substrates to see which ones work best for your chosen mushroom species. Consider these variations to elevate your indoor mushroom growing: * **Vertical Gardening:** If space is limited, explore vertical mushroom growing systems. Stackable containers or hanging bags can maximize your growing area. We understand that the idea of growing mushrooms indoors might seem daunting at first, but we assure you it’s easier than you think. With the right information and a little bit of effort, you can become a successful home mushroom grower. So, what are you waiting for? Take the plunge and embark on your mushroom growing adventure today! We’re confident that you’ll be amazed by the results. And most importantly, we want to hear about your experience! Share your successes, your challenges, and your tips with us in the comments below. Let’s build a community of passionate home mushroom growers and learn from each other. Happy growing! Oyster mushrooms are generally considered the easiest to grow for beginners due to their fast growth rate, tolerance of a wide range of conditions, and ability to thrive on various substrates like straw, coffee grounds, and cardboard. Shiitake mushrooms are another good option, although they require a bit more patience as they have a longer incubation period. Lion’s mane is also becoming increasingly popular and relatively easy to cultivate indoors with the right substrate and humidity levels. Avoid more complex varieties like morels or truffles, which require very specific and challenging conditions. The basic setup for mushroom growing indoors for beginners includes a growing container (bucket, tub, or bag), a suitable substrate (pasteurized straw, coffee grounds, cardboard, etc.), mushroom spawn (the “seeds” of the mushroom), a spray bottle for misting, and a location with adequate humidity and indirect light. A humidity tent or fruiting chamber can be created using a plastic bag or container to maintain optimal humidity levels. You’ll also need a way to pasteurize your substrate to kill off competing organisms. A large pot for boiling water or a pressure cooker can be used for this purpose. The time it takes to grow mushrooms indoors varies depending on the species and growing conditions. Oyster mushrooms can typically be harvested within 2-3 weeks after the substrate is fully colonized by the mycelium. Shiitake mushrooms take longer, usually 2-3 months for the first flush. Lion’s mane mushrooms typically fruit within 1-2 weeks after pinning (the formation of small mushroom buds). Factors like temperature, humidity, and substrate quality can also affect the growth rate. Maintaining adequate humidity is crucial for successful mushroom growing. You can increase humidity by misting the mushrooms and the surrounding area with water several times a day. Enclosing the growing container in a humidity tent or fruiting chamber can also help retain moisture. A humidifier can be used in larger growing spaces. Aim for a humidity level of 80-90% for most mushroom species. You can monitor humidity levels using a hygrometer. If your mushrooms aren’t growing, several factors could be at play. First, ensure that the substrate is fully colonized by the mycelium. If not, be patient and allow more time for colonization. Check the humidity levels and make sure they are within the optimal range for your chosen mushroom species. Temperature is also important; most mushrooms prefer temperatures between 60-75°F (15-24°C). Ensure that the growing area is well-ventilated to prevent the buildup of carbon dioxide. Finally, make sure the substrate is not too dry or too wet. Yes, spent coffee grounds are an excellent substrate for growing mushrooms, particularly oyster mushrooms. Coffee grounds are rich in nutrients and have already been pasteurized during the brewing process, making them less susceptible to contamination. However, it’s important to use fresh coffee grounds (within a day or two) and mix them with other substrates like straw or wood chips to provide a more balanced nutrient profile. Preventing contamination is essential for successful mushroom growing. Start by pasteurizing your substrate thoroughly to kill off competing organisms. Work in a clean environment and sanitize your hands and tools before handling the spawn or substrate. Use sterile techniques when inoculating the substrate with spawn. Ensure adequate ventilation to prevent the buildup of mold. If you notice any signs of contamination (e.g., green, black, or orange mold), remove the affected area immediately to prevent it from spreading. You can typically harvest multiple flushes (crops) of mushrooms from the same substrate. After the first harvest, rehydrate the substrate by soaking it in water for several hours. Then, return it to the growing environment and wait for the next flush to develop. The number of flushes you can get depends on the mushroom species, the substrate, and the growing conditions. Oyster mushrooms typically produce 2-3 flushes, while shiitake mushrooms can produce up to 4-5 flushes. While there are many poisonous mushrooms in the wild, the mushroom spawn sold for indoor cultivation is generally safe and edible. However, it’s crucial to purchase your spawn from a reputable source to ensure that you are growing the correct species. Never consume any mushroom that you are not 100% certain is edible. If you are unsure, consult with a mycologist or experienced mushroom grower.
* Shiitake Mushrooms (Lentinula edodes): A bit more patience is required, but they’re incredibly flavorful and worth the wait.
* Wine Cap Mushrooms (Stropharia rugosoannulata): These are typically grown outdoors, but can be adapted for indoor setups with the right conditions.Gathering Your Supplies
* Substrate: This is what the mushrooms will grow on. Straw is a great option for oyster mushrooms. You can also use coffee grounds, cardboard, or wood chips.
* Large Container: A bucket, tub, or even a large plastic bag will work. Make sure it’s clean!
* Spray Bottle: For misting the mushrooms.
* Bleach: For sterilizing your equipment.
* Gloves: To keep things sanitary.
* Optional: Micropore tape (for covering holes in your container)Preparing the Substrate
2. Pasteurize the Straw: There are a few ways to do this. The easiest method for beginners is hot water pasteurization.
* Fill a large pot or tub with water and heat it to around 160-180°F (71-82°C). You’ll need a thermometer to monitor the temperature.
* Submerge the chopped straw in the hot water and let it soak for about an hour. This will kill off most of the unwanted bacteria and fungi.
* Drain the straw thoroughly. You want it to be moist but not soaking wet. Squeeze out any excess water. It should feel like a wrung-out sponge.Inoculating the Substrate
2. Layer the Substrate and Spawn: This is called “layering.” Start with a layer of pasteurized straw at the bottom of the container.
3. Sprinkle a Layer of Spawn: Spread a layer of oyster mushroom spawn over the straw. You want to use about 10-20% spawn by weight of the substrate. So, if you have 10 pounds of straw, use 1-2 pounds of spawn.
4. Repeat the Layers: Continue layering straw and spawn until you reach the top of the container. Leave a few inches of space at the top.
5. Final Layer: Finish with a layer of straw on top.
6. Cover the Container: Cover the container with a lid or plastic wrap. You can poke a few small holes for air exchange, or cover the holes with micropore tape.Incubation Phase
2. Monitor the Colonization: Check the container every few days. You should start to see white, fuzzy growth (the mycelium) spreading throughout the straw.
3. Be Patient: This process can take anywhere from 2-4 weeks, depending on the temperature and the amount of spawn you used.
4. Avoid Disturbing the Container: Try not to move the container around too much during this phase.Fruiting Phase
2. Increase Airflow: Oyster mushrooms also need fresh air to fruit properly. Remove the lid or plastic wrap and fan the container a few times a day to provide fresh air.
3. Introduce Light: While mushrooms don’t need a lot of light, they do need some light to fruit properly. Place the container in a location that receives indirect sunlight or use a grow light.
4. Maintain Temperature: Keep the temperature in the same range as during the incubation phase (65-75°F or 18-24°C).Harvesting Your Mushrooms
2. Clean the Base: Trim any excess substrate from the base of the mushrooms.
3. Enjoy Your Harvest! Oyster mushrooms are best eaten fresh. Store them in the refrigerator in a paper bag for up to a week.Second Flush and Beyond
2. Drain the Substrate: Drain the substrate thoroughly after soaking.
3. Repeat the Fruiting Phase: Return the container to the fruiting conditions (high humidity, fresh air, and light).
4. Be Patient: It may take a few weeks for the second flush to appear.Troubleshooting
* Pinning but No Growth: If you see small mushroom “pins” forming but they don’t grow any larger, it could be due to low humidity or lack of fresh air. Increase the humidity and airflow to encourage growth.
* Leggy Mushrooms: If your mushrooms are long and thin, it’s usually a sign of insufficient light. Move the container to a location with more light.Choosing the Right Substrate: A Deeper Dive
* Cardboard: Another readily available and inexpensive option. Cardboard needs to be shredded and soaked before pasteurization. It’s a good choice for oyster mushrooms.
* Wood Chips/Sawdust: These are better suited for wood-loving mushrooms like shiitake. They require a longer pasteurization process.
* Soy Hulls: A commercially available substrate that’s often used by professional mushroom growers. It’s a good source of nutrients for mushrooms.Maintaining a Clean Environment: Key to Success
Conclusion
* **Automated Systems:** For the tech-savvy, consider automating aspects of your mushroom farm, such as humidity control and ventilation, using timers and sensors.
* **Mushroom Compost Tea:** After harvesting, use the spent substrate to create a nutrient-rich compost tea for your garden plants. It’s a fantastic way to recycle and nourish your other plants.
* Different Substrates: While coffee grounds and cardboard are great starting points, explore other options like straw, wood chips, or even cotton waste, depending on the mushroom species you’re growing.Frequently Asked Questions (FAQ)
What are the easiest types of mushrooms to grow indoors for beginners?
What kind of setup do I need to start growing mushrooms indoors?
How long does it take to grow mushrooms indoors?
How do I maintain the right humidity levels for my mushrooms?
What do I do if my mushrooms aren’t growing?
Can I use spent coffee grounds to grow mushrooms?
How do I prevent contamination in my mushroom grow?
How many times can I harvest mushrooms from the same substrate?
Are there any mushrooms that are poisonous to grow indoors?
Leave a Comment