
Mung Bean Sprouts DIY: Ever dreamt of having fresh, crunchy sprouts at your fingertips, ready to add a burst of flavor and nutrition to your salads, sandwiches, and stir-fries? Forget those pricey, often wilted sprouts from the grocery store! I’m going to show you how incredibly easy and rewarding it is to grow your own mung bean sprouts right in your kitchen.
Sprouting beans, including mung beans, has a rich history, dating back thousands of years in Asian cultures. They were, and still are, a vital source of nutrients, especially during times of scarcity. Think of it as a miniature, edible garden you can cultivate indoors, regardless of the season! This isn’t just a fun project; it’s a sustainable way to access fresh, healthy food.
Why should you learn this Mung Bean Sprouts DIY trick? Well, for starters, it’s incredibly cost-effective. A small bag of mung beans can yield a surprisingly large quantity of sprouts. Plus, you control the entire process, ensuring they’re free from harmful chemicals and grown to your preferred level of crunchiness. In today’s world, where we’re all looking for ways to eat healthier and save money, mastering this simple technique is a total game-changer. So, let’s dive in and unlock the secrets to growing perfect mung bean sprouts at home!
DIY Mung Bean Sprouts: A Beginner’s Guide to Growing Your Own Crunchy Goodness
Hey there, fellow food enthusiasts! Ever wondered how to get those fresh, crunchy mung bean sprouts you see in stir-fries and salads without hitting the grocery store? Well, you’re in luck! I’m going to walk you through a super easy, step-by-step guide on how to grow your own mung bean sprouts at home. It’s surprisingly simple, requires minimal equipment, and is incredibly rewarding. Plus, you’ll have a constant supply of fresh sprouts whenever you crave them. Let’s get sprouting!
What You’ll Need: The Essentials
Before we dive in, let’s gather our supplies. The beauty of this project is that you probably already have most of these items lying around your kitchen.
* Mung Beans: Obviously! Choose organic mung beans if possible, as they tend to sprout better. You can find them at most health food stores or online. Start with about 1/2 cup of dried mung beans – they expand significantly!
* A Wide-Mouth Jar: A quart-sized mason jar works perfectly. The wide mouth makes rinsing and draining much easier.
* Sprouting Lid or Cheesecloth: You’ll need something to cover the jar and allow for drainage. A sprouting lid is ideal, but a piece of cheesecloth secured with a rubber band works just as well.
* A Bowl or Tray: This will hold the jar at an angle, allowing excess water to drain.
* Water: Clean, filtered water is best.
* A Dark Place: A cupboard, pantry, or even a covered box will do the trick. Darkness is crucial for preventing the sprouts from turning bitter.
Step-by-Step Sprouting Guide
Okay, now for the fun part! Follow these steps carefully, and you’ll be munching on your own homegrown sprouts in no time.
1. Rinse the Mung Beans: Place the mung beans in a colander and rinse them thoroughly under cold water. This removes any dirt or debris.
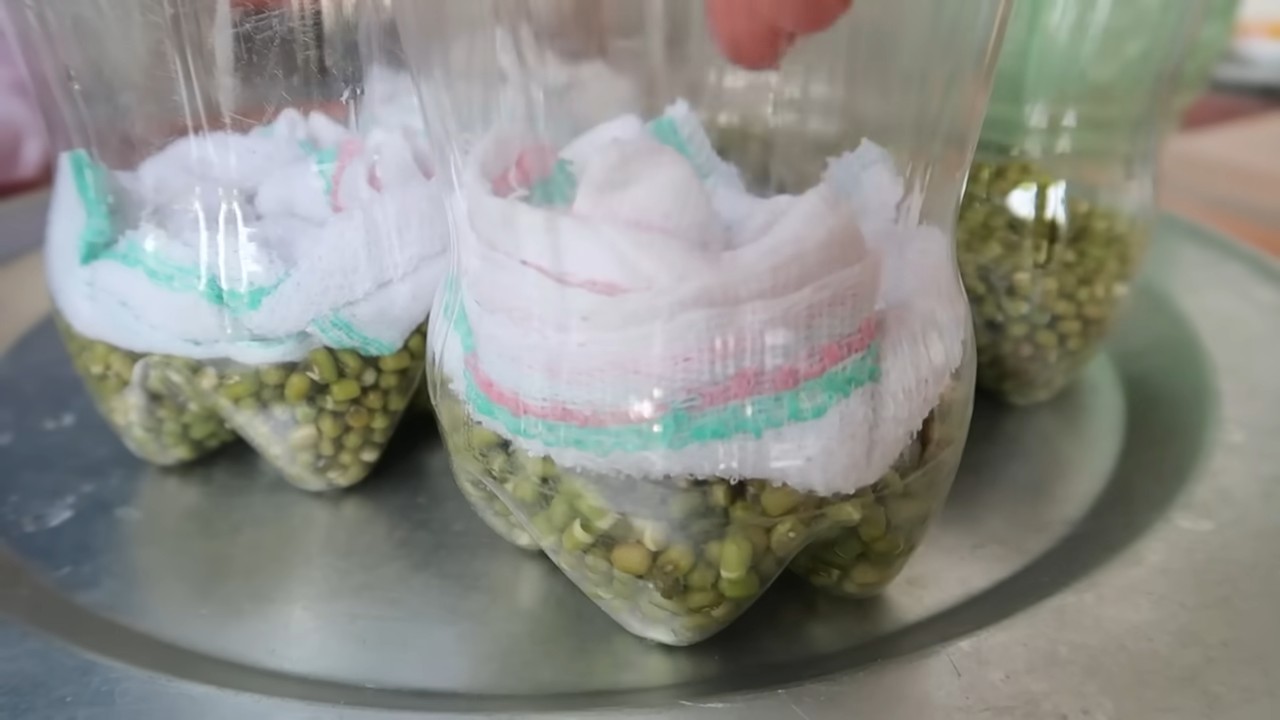
2. Soak the Mung Beans: Transfer the rinsed beans to your wide-mouth jar. Add about 2-3 times the volume of water to the jar. The beans will absorb a lot of water, so make sure they’re fully submerged.
3. Soaking Time: Let the beans soak for 8-12 hours, or even overnight. This rehydrates them and kickstarts the germination process. I usually soak mine overnight so I can start the next steps in the morning.
4. Drain and Rinse Again: After soaking, drain the water completely using your sprouting lid or cheesecloth. Rinse the beans thoroughly with fresh, cold water. This is important to prevent mold growth.
5. Position the Jar: Place the jar upside down in your bowl or tray at an angle. This allows any excess water to drain out. The beans should be moist but not sitting in water.
6. Find a Dark Home: Place the jar in your dark cupboard, pantry, or covered box. Remember, darkness is key!
7. Rinse and Drain Regularly: This is the most crucial step! Rinse and drain the sprouts 2-3 times a day. This keeps them hydrated and prevents mold. I usually do it in the morning, afternoon, and before bed.
8. Repeat the Process: Continue rinsing and draining 2-3 times a day for the next 3-5 days. You’ll start to see tiny sprouts emerging from the beans.
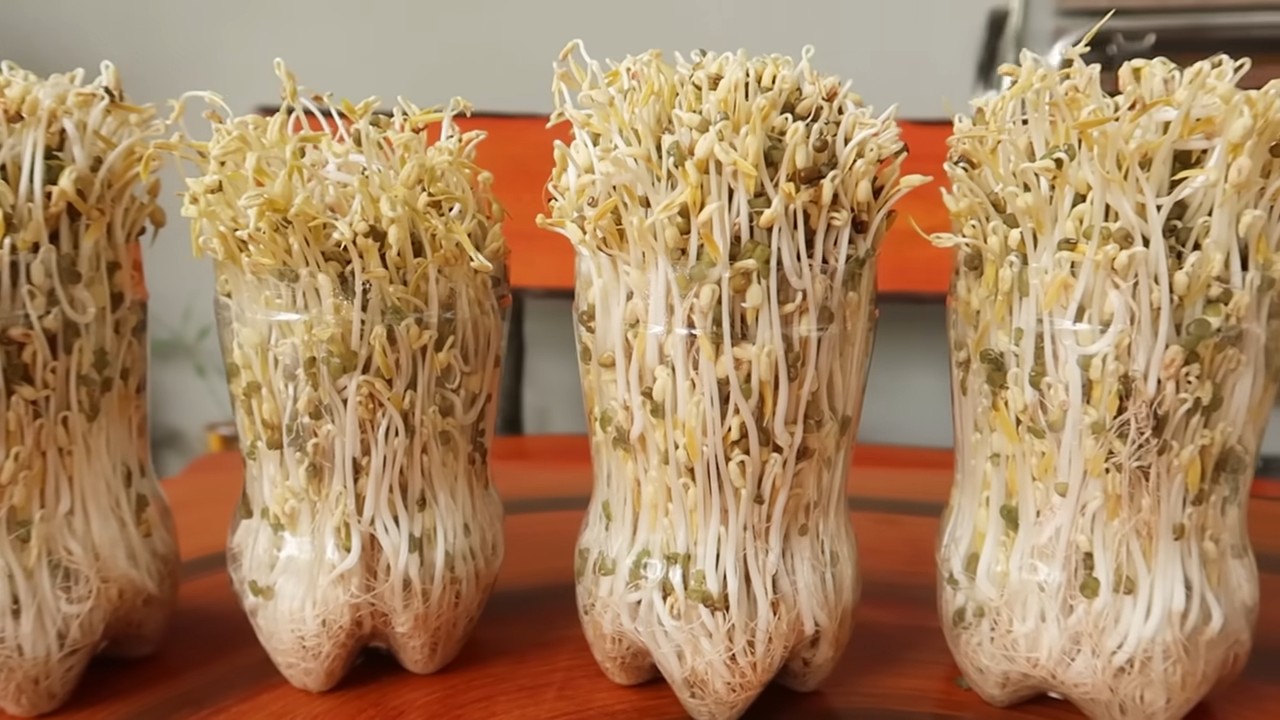
9. Observe the Growth: Watch your sprouts grow! They’ll get longer and thicker each day. The ideal length is usually around 1-2 inches, but you can harvest them whenever they reach your desired size.
10. Harvest Time: Once your sprouts are ready, give them one final rinse.
11. Sunlight Exposure (Optional): If you want greener sprouts, you can expose them to indirect sunlight for a few hours on the last day. This will encourage chlorophyll production. However, be careful not to expose them to direct sunlight, as this can dry them out.
12. Storage: Store your freshly harvested sprouts in an airtight container in the refrigerator. They should last for about a week.
Troubleshooting: Common Issues and Solutions
Even with the best intentions, sometimes things don’t go exactly as planned. Here are a few common issues you might encounter and how to fix them:
* Mold Growth: If you see any fuzzy, white, or colored mold, discard the entire batch. Mold is a sign of contamination and can be harmful. To prevent mold, make sure you’re rinsing and draining the sprouts thoroughly and frequently. Good ventilation is also important.
* Unpleasant Smell: A foul odor is another sign of bacterial growth. Discard the batch and start over. Again, proper rinsing and drainage are crucial.
* Slow Growth: If your sprouts aren’t growing as quickly as you’d like, make sure they’re getting enough moisture and are kept in a warm enough environment (around 70-75°F is ideal).
* Bitter Taste: This is usually caused by exposing the sprouts to too much light. Make sure they’re kept in a dark place throughout the sprouting process.
Tips and Tricks for Sprouting Success
Here are a few extra tips to help you become a sprouting pro:
* Use Filtered Water: Tap water can sometimes contain chlorine or other chemicals that can inhibit sprouting. Filtered water is always a safer bet.
* Maintain Hygiene: Wash your hands thoroughly before handling the sprouts to prevent contamination.
* Don’t Overcrowd the Jar: Using too many beans can lead to overcrowding and poor ventilation, increasing the risk of mold growth.
* Experiment with Different Beans: Once you’ve mastered mung bean sprouts, try sprouting other types of beans and seeds, such as lentils, alfalfa, or radish seeds.
* Enjoy Your Sprouts: Add your homegrown sprouts to salads, sandwiches, stir-fries, soups, or even just eat them as a healthy snack!
Cleaning and Sanitizing Your Sprouting Equipment
Keeping your sprouting equipment clean is essential for preventing bacterial growth and ensuring healthy sprouts. Here’s how I keep my jar and lid sparkling:
1. After Each Batch: After harvesting your sprouts, thoroughly rinse the jar and sprouting lid with hot, soapy water. Use a bottle brush to scrub the inside of the jar to remove any residue.
2. Sanitize Regularly: At least once a month, or more frequently if you notice any signs of mold or discoloration, sanitize your sprouting equipment. You can do this in a few ways:
* Boiling: Submerge the jar and lid in boiling water for 10 minutes. This is a very effective way to kill bacteria.
* Bleach Solution: Mix 1 tablespoon of unscented bleach with 1 gallon of water. Soak the jar and lid in the solution for 30 minutes, then rinse thoroughly with clean water. Be sure to rinse very well to remove all traces of bleach.
* Vinegar Solution: Mix equal parts white vinegar and water. Soak the jar and lid in the solution for 1 hour, then rinse thoroughly with clean water. Vinegar is a natural disinfectant and is a good option if you prefer to avoid bleach.
3. Air Dry: After cleaning and sanitizing, allow the jar and lid to air dry completely before storing them. This helps prevent mold growth.
Understanding the Science Behind Sprouting
Sprouting is more than just a fun DIY project; it’s a fascinating biological process. Here’s a little bit about what’s happening inside those beans:
1. Germination: When you soak the mung beans, you’re essentially waking them up from their dormant state. They absorb water, which activates enzymes that break down complex carbohydrates and proteins into simpler, more digestible forms.
2. Nutrient Enhancement: Sprouting actually increases the nutritional value of the beans. The process boosts the levels of vitamins, minerals, and antioxidants. For example, sprouted mung beans have higher levels of vitamin C and B vitamins than unsprouted beans.
3. Improved Digestibility: The enzymes produced during sprouting also help to break down phytic acid, a compound that can inhibit the absorption of certain nutrients. This makes sprouted beans easier to digest and allows your body to absorb more of their beneficial nutrients.
4. Enzyme Activity: Sprouts are packed with enzymes, which are essential for digestion and overall health. Enzymes help to break down food into smaller particles that your body can easily absorb.
Incorporating Mung Bean Sprouts into Your Diet
Now that you’re a sprouting expert, let’s talk about how to enjoy your delicious, homegrown sprouts! Mung bean sprouts are incredibly versatile and can be added to a wide variety of dishes.
1. Salads: Add a handful of sprouts to your favorite salad for a crunchy and nutritious boost. They pair well with
Conclusion
So, there you have it! Cultivating your own mung bean sprouts at home is not only incredibly simple and cost-effective, but it also guarantees you the freshest, most nutritious sprouts imaginable. Forget those limp, often questionable sprouts from the grocery store. With this easy DIY method, you’re in complete control of the process, ensuring a crisp, clean, and flavorful addition to your meals.
Why is this DIY trick a must-try? Because it empowers you to take charge of your food source, even in a small way. You’ll be amazed at how quickly these little powerhouses grow, transforming from tiny beans into crunchy, vibrant sprouts in just a few days. Plus, the satisfaction of nurturing something from seed (or bean, in this case!) to table is truly rewarding.
Beyond the basic method, there’s plenty of room for experimentation. Try varying the sprouting container – a mason jar works wonderfully, but you could also use a plastic container with drainage holes. Adjust the sprouting time based on your preference for sprout length. Some people prefer shorter, stubbier sprouts, while others like them long and trailing.
Consider adding a touch of flavor during the rinsing process. A splash of lemon juice or a pinch of sea salt can subtly enhance the taste of your mung bean sprouts. You can also experiment with different types of beans, although mung beans are particularly well-suited for sprouting due to their high germination rate and mild flavor.
Don’t be intimidated! This is a forgiving process. Even if your first batch isn’t perfect, you’ll learn something valuable and be well on your way to becoming a sprouting pro. The key is consistent rinsing and proper drainage to prevent mold growth.
We wholeheartedly encourage you to give this DIY mung bean sprouts method a try. It’s a fun, educational, and delicious way to add a healthy boost to your diet. And once you’ve mastered the art of sprouting, the possibilities are endless! Think fresh spring rolls, vibrant salads, flavorful stir-fries, and nutritious additions to your sandwiches.
Most importantly, we want to hear about your experience! Share your photos, tips, and variations in the comments below. Let us know what worked for you, what challenges you faced, and what delicious dishes you created with your homegrown mung bean sprouts. Your feedback will not only inspire others but also help us refine this guide for future sprouting enthusiasts. So, grab a bag of mung beans, get your sprouting container ready, and embark on this exciting culinary adventure. Happy sprouting!
Frequently Asked Questions (FAQ)
What are the nutritional benefits of mung bean sprouts?
Mung bean sprouts are nutritional powerhouses, packed with vitamins, minerals, and antioxidants. They are an excellent source of Vitamin C, Vitamin K, folate, and several B vitamins. They also contain essential minerals like iron, potassium, and magnesium. Furthermore, mung bean sprouts are a good source of protein and fiber, making them a filling and healthy addition to any diet. The sprouting process itself increases the bioavailability of nutrients, meaning your body can absorb them more easily. They are also low in calories and fat, making them a guilt-free way to add bulk and texture to your meals.
How long do homemade mung bean sprouts last?
Freshly sprouted mung bean sprouts are best consumed within 3-5 days. To maximize their shelf life, store them in an airtight container in the refrigerator. Before storing, ensure the sprouts are thoroughly dry to prevent them from becoming slimy. You can gently pat them dry with a clean paper towel. Avoid storing them in a humid environment, as this can promote mold growth. If you notice any signs of spoilage, such as a foul odor or slimy texture, discard them immediately.
What if my mung bean sprouts start to smell bad?
A bad smell is a sign that your mung bean sprouts have likely gone bad and should be discarded. This is usually caused by bacterial growth due to insufficient rinsing or poor drainage. Ensure you are rinsing your sprouts thoroughly at least twice a day with fresh, cool water. Make sure your sprouting container has adequate drainage to prevent water from pooling at the bottom. If you live in a particularly warm or humid climate, you may need to rinse them more frequently. Using clean water and a clean sprouting container is also crucial to prevent contamination.
Can I eat the mung bean sprouts raw?
Yes, you can eat mung bean sprouts raw. However, it’s important to note that raw sprouts can sometimes carry bacteria, such as Salmonella or E. coli. To minimize the risk of foodborne illness, purchase your mung beans from a reputable source and thoroughly rinse the sprouts before consumption. If you are pregnant, elderly, or have a compromised immune system, it’s generally recommended to cook the sprouts before eating them to eliminate any potential bacteria. Lightly steaming or stir-frying them for a few minutes is sufficient.
What if my mung beans don’t sprout?
There are several reasons why your mung beans might not be sprouting. First, ensure that your beans are fresh and viable. Old beans may have a lower germination rate. Second, check the temperature. Mung beans sprout best in a warm environment, ideally between 70-80°F (21-27°C). If your kitchen is too cold, try placing the sprouting container in a warmer location. Third, make sure the beans are getting enough moisture. They should be kept consistently moist but not waterlogged. Finally, ensure the beans are not exposed to direct sunlight, as this can inhibit sprouting.
Can I use any type of bean for sprouting?
While mung beans are a popular choice for sprouting, you can also sprout other types of beans, such as lentils, adzuki beans, and chickpeas. However, some beans, like kidney beans, contain toxins that are only destroyed by thorough cooking and should not be eaten raw or sprouted. Always research the specific type of bean before attempting to sprout it to ensure it is safe to consume. Sprouting times and methods may also vary depending on the type of bean.
How do I prevent mold growth on my mung bean sprouts?
Preventing mold growth is crucial for successful sprouting. The key is to maintain a clean environment and ensure proper drainage and ventilation. Rinse your sprouts thoroughly at least twice a day with fresh, cool water. Make sure your sprouting container has adequate drainage holes to prevent water from pooling at the bottom. Avoid overcrowding the container, as this can restrict airflow. If you live in a humid climate, consider using a fan to improve ventilation. If you notice any signs of mold, such as fuzzy white or black spots, discard the entire batch immediately.
What are some creative ways to use mung bean sprouts in my cooking?
Mung bean sprouts are incredibly versatile and can be used in a wide variety of dishes. They are a classic addition to stir-fries, spring rolls, and salads. You can also add them to soups, sandwiches, and wraps for a crunchy and nutritious boost. Try using them as a topping for tacos or nachos, or blend them into smoothies for added nutrients. For a simple and healthy snack, toss them with a little olive oil, salt, and pepper. The possibilities are endless!
Is it possible to sprout mung beans without a special sprouting container?
Yes, absolutely! While specialized sprouting containers can be convenient, you can easily sprout mung beans using items you likely already have in your kitchen. A mason jar with a cheesecloth or mesh lid secured with a rubber band works perfectly. You can also use a plastic container with drainage holes drilled into the bottom. The key is to ensure that the container allows for adequate drainage and ventilation.
How do I know when my mung bean sprouts are ready to eat?
Your mung bean sprouts are ready to eat when they have reached your desired length and have a crisp, fresh appearance. Generally, this takes about 3-5 days. The sprouts should be white or pale yellow in color, with small green leaves emerging from the top. Taste a few sprouts to ensure they have a pleasant, slightly sweet flavor. If they taste bitter or have an off-putting odor, discard them.

Leave a Comment