
Natural oven cleaning – sounds like a dream, right? I know, I used to dread oven cleaning day. The harsh chemicals, the lingering fumes, the sheer elbow grease required… it was a nightmare! But what if I told you there’s a way to banish those toxic cleaners and achieve a sparkling clean oven using ingredients you probably already have in your pantry?
For generations, resourceful homemakers have relied on simple, natural solutions for cleaning. Before the advent of commercial cleaners, baking soda and vinegar were the go-to powerhouses for tackling grime and grease. This tradition isn’t just about saving money; it’s about creating a healthier home environment for ourselves and our families. And honestly, who doesn’t love a good DIY project that’s both effective and eco-friendly?
Let’s face it, a dirty oven isn’t just unsightly; it can also affect the taste of your food and even pose a fire hazard. Burnt food particles and grease buildup can smoke and release unpleasant odors, impacting the flavor of your culinary creations. Plus, all that gunk can ignite at high temperatures, creating a potentially dangerous situation. That’s why regular oven cleaning is so important. But with this natural oven cleaning trick, you can say goodbye to harsh chemicals and hello to a sparkling clean oven – the easy, safe, and natural way! I’m excited to share this simple yet effective method with you, so let’s get started!
DIY Natural Oven Cleaning: Say Goodbye to Harsh Chemicals!
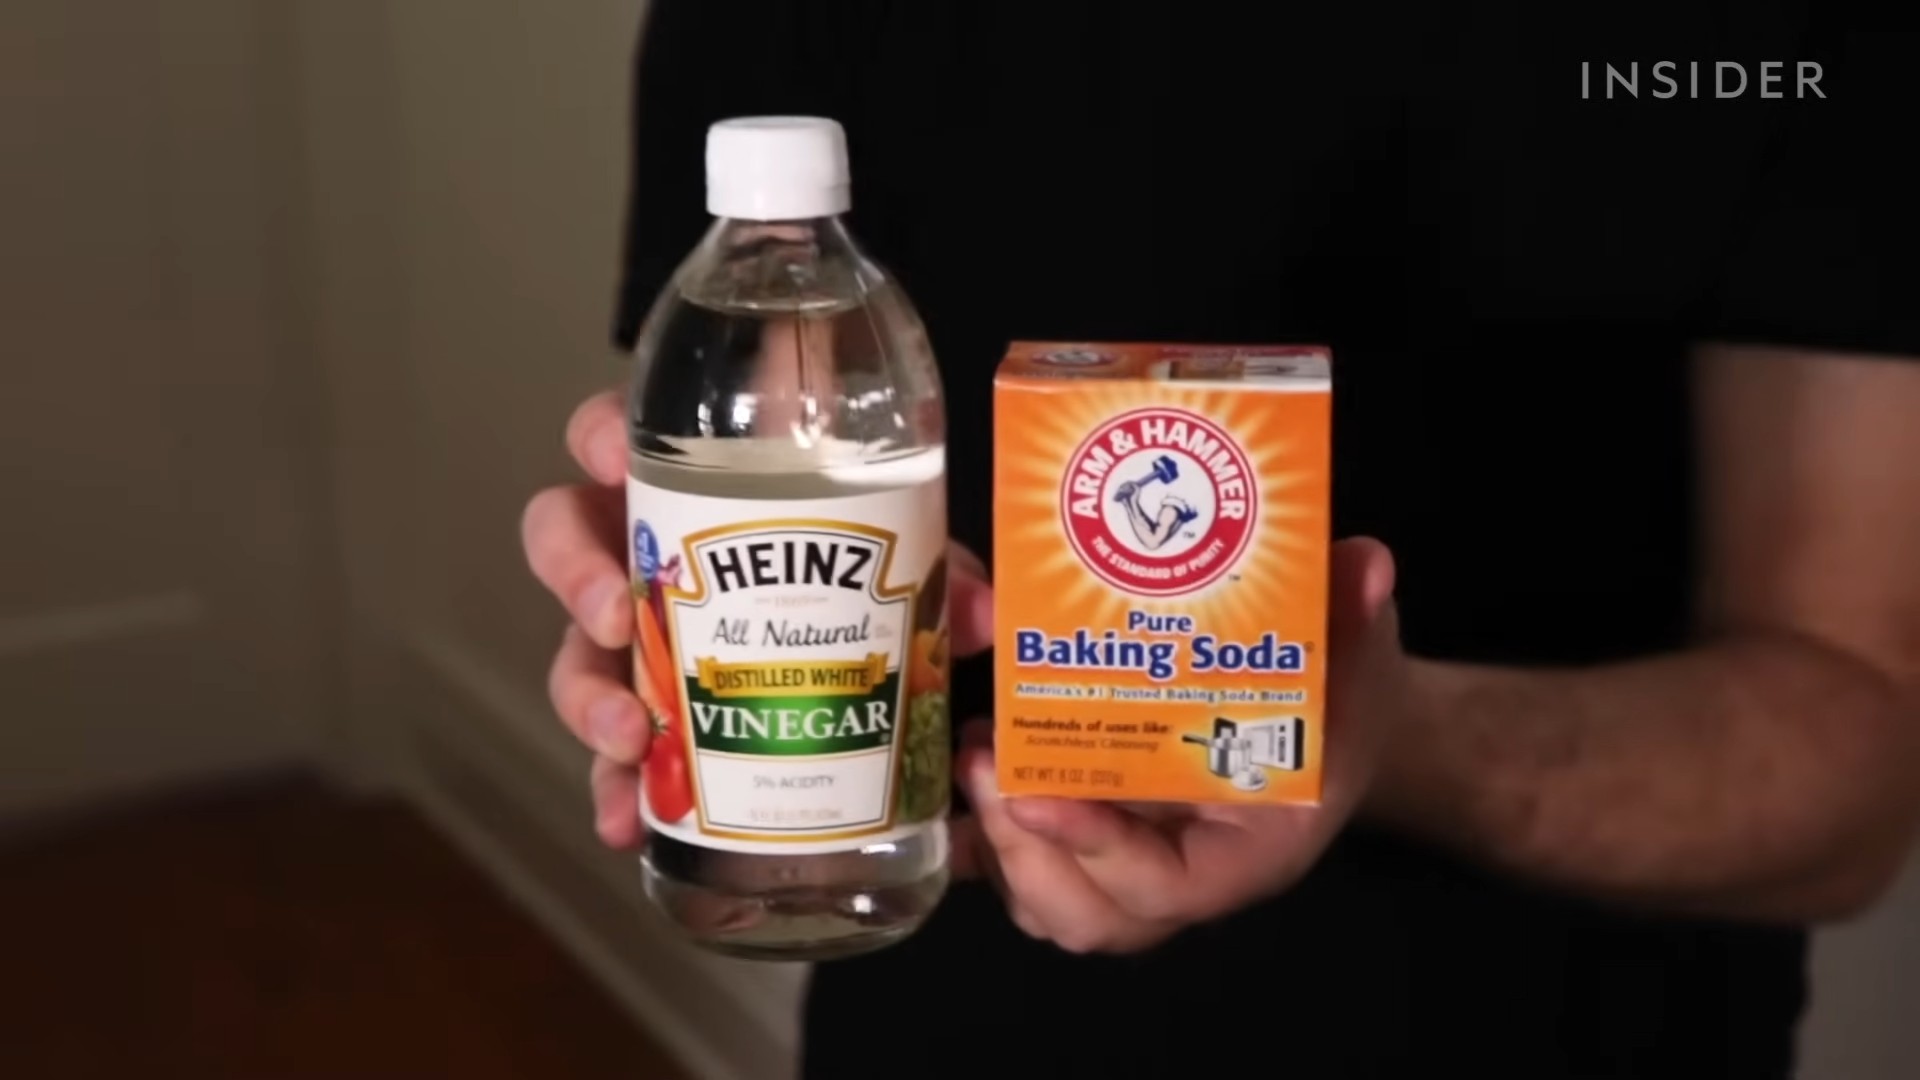
Okay, let’s be honest, cleaning the oven is probably on everyone’s list of least favorite chores. The baked-on grime, the lingering smells, and the harsh chemicals in most oven cleaners? No thanks! But fear not, my friends, because I’m going to show you how to clean your oven naturally, effectively, and without all the nasty stuff. This method uses simple ingredients you probably already have in your pantry: baking soda, vinegar, and water. Trust me, it works wonders!
What You’ll Need
Before we dive in, let’s gather our supplies. This is a pretty straightforward process, so the list is short and sweet:
* Baking soda
* White vinegar
* Water
* Spray bottle
* Spatula or scraper (plastic is best to avoid scratching)
* Sponge or scrub brush
* Rubber gloves (optional, but recommended)
* Old towels or rags
* Small bowl
The Baking Soda Paste: Our Grime-Fighting Hero
This is the foundation of our natural oven cleaning process. The baking soda acts as a mild abrasive, helping to loosen the baked-on food and grease.
1. Empty the Oven: First things first, remove everything from your oven. That includes racks, baking stones, pizza pans – everything! We want a clean slate to work with.
2. Mix the Paste: In your small bowl, combine about ½ cup of baking soda with enough water to form a spreadable paste. You’re aiming for a consistency similar to frosting. Add the water gradually, mixing as you go, until you get the right texture. Don’t make it too runny!
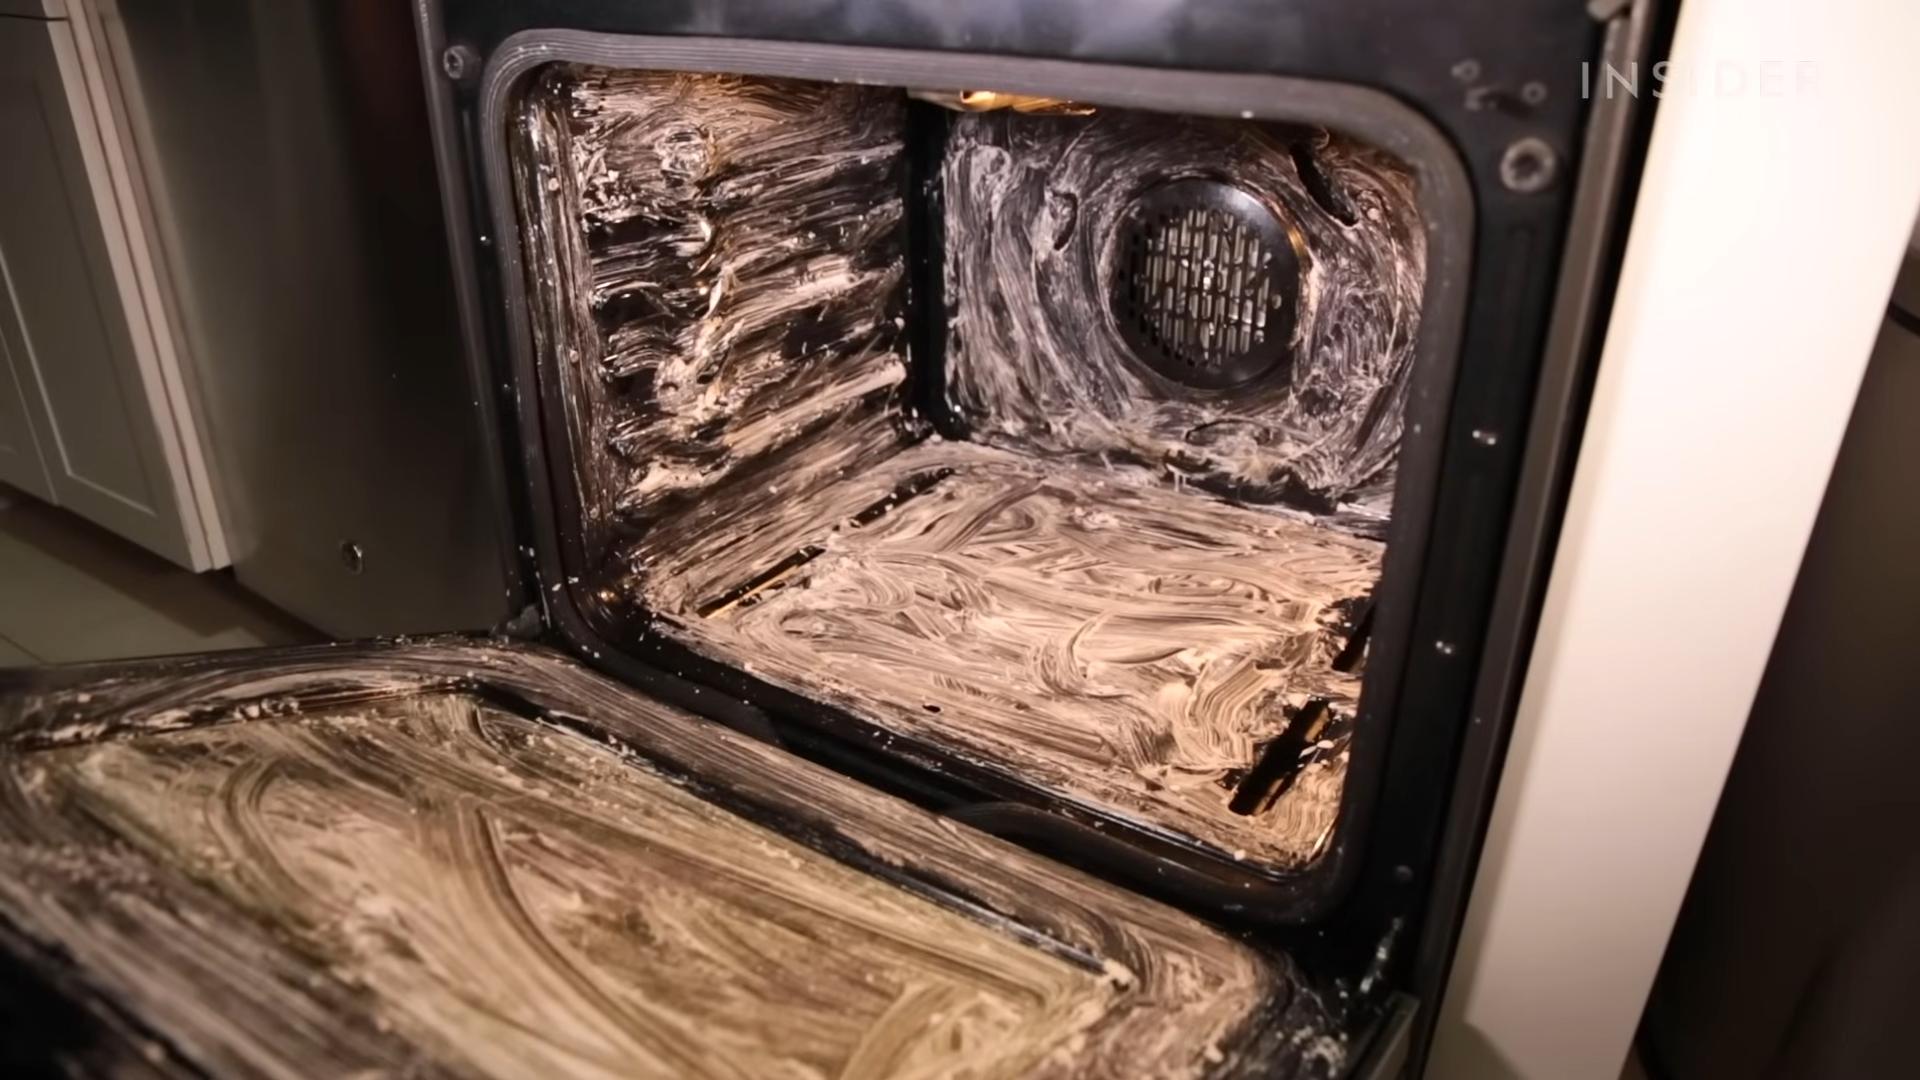
3. Coat the Oven: Now, put on your rubber gloves (if you’re using them) and get ready to get your hands dirty! Using your fingers or a spatula, spread the baking soda paste all over the interior surfaces of your oven. This includes the walls, floor, door (inside), and even the heating elements (if you can reach them safely). Avoid the heating elements if you are not comfortable.
4. Be Thorough: Make sure you cover every inch of the oven, paying special attention to areas with heavy buildup. Really work the paste into those stubborn spots.
5. Let it Sit: This is the most important part! Let the baking soda paste sit in your oven for at least 12 hours, or even better, overnight. The longer it sits, the more time it has to work its magic and loosen the grime. I usually do this before I go to bed so it has all night to work.
Cleaning the Oven Racks
While the baking soda paste is doing its thing inside the oven, let’s tackle those greasy racks.
1. Soak the Racks: Find a large tub, sink, or even your bathtub (make sure it’s clean!). Fill it with hot water and add about ½ cup of dish soap and ½ cup of baking soda.
2. Submerge the Racks: Place the oven racks in the water, making sure they are completely submerged. If they don’t fit, you can clean them one at a time or use a smaller container and rotate them.
3. Let Them Soak: Let the racks soak for at least 2-3 hours, or even overnight. The longer they soak, the easier it will be to scrub off the grime.
4. Scrub and Rinse: After soaking, use a scrub brush or sponge to scrub the racks clean. The grime should come off much easier now. Rinse them thoroughly with clean water.
5. Dry the Racks: Dry the racks with a clean towel before putting them back in the oven.
The Vinegar Power Wash: Dissolving the Residue
After the baking soda has had its time to work, we’re going to use vinegar to dissolve the remaining residue and leave your oven sparkling clean.
1. Prepare the Vinegar: Pour some white vinegar into your spray bottle. You don’t need to dilute it; we’re using it full strength.
2. Spray the Vinegar: Spray the vinegar all over the baking soda paste inside your oven. You’ll notice it will start to fizz and bubble – that’s the vinegar reacting with the baking soda, which is exactly what we want!
3. Wipe it Down: Using a damp sponge or scrub brush, start wiping down the interior of the oven. The baking soda paste and loosened grime should come off easily. You may need to rinse your sponge frequently as it gets dirty.
4. Stubborn Spots: For any stubborn spots that are still clinging on, use your spatula or scraper to gently scrape them away. Be careful not to scratch the oven surface. You can also try making a fresh batch of baking soda paste and applying it directly to those areas for a little extra cleaning power.
5. Rinse Thoroughly: Once you’ve removed all the baking soda paste and grime, rinse the oven thoroughly with clean water. Use a clean, damp sponge to wipe down all the surfaces, making sure to remove any remaining vinegar residue.
6. Dry the Oven: Finally, dry the interior of the oven with clean towels or rags. You want to make sure it’s completely dry before you start using it again.
Final Touches and Tips
Okay, we’re almost there! Here are a few final touches and tips to make sure your oven is sparkling clean and ready to go:
* Clean the Oven Door: Don’t forget to clean the outside of the oven door! Use a glass cleaner or a mixture of vinegar and water to clean the glass.
* Clean the Control Panel: Wipe down the control panel with a damp cloth to remove any grease or fingerprints.
* Run the Oven: After cleaning, run the oven at a low temperature (around 200°F) for about 15-20 minutes to help dry out any remaining moisture and eliminate any lingering odors.
* Preventative Measures: To keep your oven clean in the future, try to wipe up spills as soon as they happen. You can also place a baking sheet on the bottom rack to catch any drips.
* Regular Cleaning: Aim to clean your oven every few months, or more often if you use it frequently. The more often you clean it, the easier it will be to maintain.
* Lemon Power: For a fresh, citrusy scent, you can place a bowl of water with lemon slices in the oven and bake it at 350°F for about 30 minutes after cleaning. This will help to neutralize any lingering odors and leave your oven smelling amazing.
Dealing with Extra Stubborn Grime
Sometimes, you might encounter some really stubborn grime that just doesn’t want to budge. Don’t worry, I’ve got a few tricks up my sleeve for those situations:
* Boiling Water: Before applying the baking soda paste, try placing a pot of boiling water in the oven and letting it steam for about 30 minutes. The steam can help to loosen the grime and make it easier to remove.
* Salt Scrub: For really tough spots, you can try making a scrub with salt and water. The salt acts as a more abrasive cleaner than baking soda. Just be careful not to scratch the oven surface.
* Commercial Natural Cleaners: If you’re still struggling, you can try using a commercial natural oven cleaner. Look for products that are made with plant-based ingredients and are free of harsh chemicals. Always follow the manufacturer’s instructions carefully.
Why Choose Natural Oven Cleaning?
You might be wondering why you should bother with natural oven cleaning when there are so many commercial oven cleaners available. Here are a few reasons why I prefer the natural approach:
* No Harsh Chemicals: Commercial oven cleaners often contain harsh chemicals that can be harmful to your health and the environment. Natural oven cleaning is a safer and more eco-friendly option.
* Cost-Effective: Baking soda and vinegar are inexpensive and readily available, making natural oven cleaning a very cost-effective option.
* Effective Cleaning: As you’ve seen, natural oven cleaning can be just as effective as commercial cleaners, especially when you use the right techniques and give the baking soda paste enough time to work.
* No Lingering Odors: Commercial oven cleaners often leave behind strong, unpleasant odors that can linger for days. Natural oven cleaning leaves your oven smelling fresh and clean.
So there you have it! A complete guide to cleaning your oven naturally and effectively. It might take a little more time and elbow grease than using commercial cleaners, but the results are worth it. You’ll have a sparkling clean oven without exposing yourself to harsh chemicals. Happy cleaning!
Conclusion
So, there you have it! Ditching those harsh chemicals and embracing this natural oven cleaning method is more than just a trend; it’s a game-changer for your kitchen, your health, and the environment. We’ve walked you through a simple, effective process that utilizes ingredients you likely already have in your pantry: baking soda, vinegar, and a little bit of elbow grease.
But why is this DIY trick a must-try? Beyond the obvious benefits of avoiding toxic fumes and expensive cleaning products, this method is incredibly effective at tackling baked-on grease and grime. It’s gentle on your oven’s surfaces, preventing damage that can occur with abrasive chemical cleaners. Plus, the satisfaction of knowing you’ve achieved a sparkling clean oven using only natural ingredients is truly rewarding.
Think of it this way: you’re not just cleaning your oven; you’re creating a healthier cooking environment for yourself and your family. You’re reducing your exposure to harmful chemicals that can linger in the air and potentially contaminate your food. And you’re contributing to a more sustainable lifestyle by minimizing your reliance on commercially produced cleaning products.
Now, let’s talk about variations. While the baking soda paste and vinegar spray method is our go-to, you can certainly adapt it to suit your specific needs and preferences. For instance, if you have particularly stubborn stains, you can add a few drops of lemon essential oil to your baking soda paste for extra degreasing power and a fresh, citrusy scent. Alternatively, you can preheat your oven to a low temperature (around 200°F or 93°C) for about 15 minutes after applying the baking soda paste. This will help to loosen the grime and make it easier to wipe away.
Another variation involves using a pumice stone (specifically designed for oven cleaning) to gently scrub away tough, baked-on residue. Be sure to wet the pumice stone thoroughly before using it to avoid scratching the oven surface. Always test in an inconspicuous area first.
For those with self-cleaning ovens, you might be wondering if this method is still relevant. While self-cleaning cycles can be convenient, they often produce intense heat and unpleasant odors. Using our natural oven cleaning method as a regular maintenance routine can help prevent the buildup of grime, reducing the need for frequent self-cleaning cycles and prolonging the life of your oven.
We truly believe that this natural oven cleaning method is a win-win for everyone. It’s effective, affordable, eco-friendly, and safe. So, what are you waiting for? Give it a try! We’re confident that you’ll be amazed by the results.
But don’t just take our word for it. We encourage you to try this DIY trick and share your experience with us. Let us know how it worked for you, what variations you tried, and any tips or tricks you discovered along the way. Share your before-and-after photos on social media and tag us! We can’t wait to see your sparkling clean ovens and hear about your success stories. Together, we can create a community of eco-conscious cooks who are committed to using natural and sustainable methods in the kitchen. Let’s ditch the chemicals and embrace the power of nature!
Frequently Asked Questions (FAQ)
1. How often should I clean my oven using this natural method?
The frequency of cleaning depends on how often you use your oven and how messy it gets. As a general guideline, we recommend cleaning your oven every 1-3 months. If you cook frequently or tend to have spills and splatters, you might want to clean it more often. Regular maintenance with this natural method will prevent the buildup of stubborn grime and make future cleanings easier. A quick wipe-down after each use can also help to keep your oven clean.
2. Can I use this method on a self-cleaning oven?
Yes, you can absolutely use this method on a self-cleaning oven. In fact, it’s a great way to reduce the frequency of using the self-cleaning cycle, which can produce high heat and unpleasant odors. Using this natural method regularly will help prevent the buildup of grime, making the self-cleaning cycle less necessary. However, always consult your oven’s manual for specific cleaning recommendations.
3. What if I have a particularly stubborn stain that won’t come off?
For particularly stubborn stains, you can try a few different approaches. First, make sure you’ve allowed the baking soda paste to sit for a sufficient amount of time (at least 12 hours, or even overnight). You can also try adding a few drops of lemon essential oil to the baking soda paste for extra degreasing power. Another option is to gently scrub the stain with a pumice stone specifically designed for oven cleaning. Be sure to wet the pumice stone thoroughly before using it to avoid scratching the oven surface, and always test in an inconspicuous area first. You can also try making a thicker paste of baking soda and water and applying it directly to the stain. Let it sit for several hours before scrubbing.
4. Is it safe to use vinegar on my oven’s heating element?
While vinegar is generally safe to use on most oven surfaces, it’s best to avoid spraying it directly onto the heating element. The heating element is delicate and can be damaged by excessive moisture. Instead, focus on cleaning the interior walls, racks, and door of the oven. If you accidentally get vinegar on the heating element, simply wipe it off with a dry cloth.
5. Can I use this method on my oven door glass?
Yes, this method is very effective for cleaning oven door glass. The baking soda paste will help to loosen baked-on grease and grime, making it easier to wipe away. You can also use a glass cleaner after wiping away the baking soda paste to achieve a streak-free shine. For particularly stubborn stains on the oven door glass, you can try using a razor blade scraper (carefully!) to gently remove the residue. Be sure to hold the scraper at a shallow angle to avoid scratching the glass.
6. What if I don’t have baking soda or vinegar? Are there any alternatives?
While baking soda and vinegar are the most common and effective ingredients for this natural oven cleaning method, there are a few alternatives you can try. For example, you can use cream of tartar mixed with water to create a paste similar to baking soda. Lemon juice can also be used as a natural degreaser. However, baking soda and vinegar are generally the most readily available and effective options.
7. Will this method remove burnt smells from my oven?
While this method will help to remove baked-on food particles that can contribute to burnt smells, it may not completely eliminate strong odors. To further deodorize your oven, you can try placing a bowl of vinegar or baking soda inside the oven overnight. You can also simmer a pot of water with lemon slices or orange peels on the stovetop to help freshen the air in your kitchen.
8. How do I clean my oven racks using this method?
You can clean your oven racks using the same baking soda and vinegar method. Simply soak the racks in a solution of hot water and baking soda for several hours, or even overnight. Then, scrub them with a sponge or brush to remove any remaining grime. For particularly stubborn stains, you can try using a steel wool pad. Rinse the racks thoroughly with water and dry them before placing them back in the oven. Alternatively, you can place the racks in a large trash bag with a cup of ammonia overnight. The fumes from the ammonia will help to loosen the grime, making it easier to wipe away. Be sure to do this in a well-ventilated area and wear gloves.
9. Is this method safe for all types of ovens?
This method is generally safe for most types of ovens, including gas and electric ovens. However, it’s always a good idea to consult your oven’s manual for specific cleaning recommendations. If you have a convection oven, be sure to remove the convection fan before cleaning the oven. Also, avoid spraying vinegar directly onto the heating element or any electrical components.
10. What if I have allergies to baking soda or vinegar?
If you have allergies to baking soda or vinegar, it’s best to avoid using this method. You can try alternative natural cleaning methods, such as using lemon juice or cream of tartar. Always test any new cleaning product in an inconspicuous area first to ensure that it doesn’t cause any adverse reactions. You can also consult with a doctor or allergist for recommendations on safe and effective cleaning products for your specific allergies.


Leave a Comment