
Indoor Spinach Growing Hack: Imagine plucking fresh, vibrant spinach leaves right from your kitchen, even in the dead of winter! Sounds like a dream, right? Well, it doesn’t have to be. For centuries, humans have cultivated gardens, finding solace and sustenance in nurturing plants. From the hanging gardens of Babylon to the meticulously planned kitchen gardens of medieval Europe, the desire to grow our own food is deeply ingrained in our history.
But let’s face it, not everyone has acres of land or the perfect outdoor climate. That’s where this game-changing indoor spinach growing hack comes in. I’m going to show you how to bypass the limitations of space and weather, bringing the joy of fresh, homegrown spinach directly into your home. No more sad, wilted spinach from the grocery store! This DIY trick is perfect for apartment dwellers, busy professionals, or anyone who simply wants a constant supply of this nutritious leafy green. Get ready to unlock the secrets to a thriving indoor spinach garden – it’s easier than you think!
Grow Spinach Indoors Like a Pro: My Foolproof DIY Guide
Hey there, fellow plant enthusiasts! Are you craving fresh, vibrant spinach but don’t have the outdoor space or the right climate? Don’t worry, because I’m about to share my super-easy, super-effective DIY hack for growing spinach indoors. Trust me, even if you think you have a “brown thumb,” you can totally nail this!
What You’ll Need: The Essential Supplies
Before we dive in, let’s gather our supplies. This is a pretty low-cost project, which is always a win in my book!
* Spinach Seeds: Choose a variety that’s known to do well indoors. I personally love ‘Bloomsdale Long Standing’ or ‘Baby’s Leaf Hybrid.’ You can find these at most garden centers or online.
* Containers: You’ll need containers with drainage holes. I recommend using pots that are at least 6 inches deep and wide. You can use plastic pots, terracotta pots, or even repurposed containers like yogurt tubs (just make sure to clean them thoroughly and drill drainage holes).
* Potting Mix: Don’t use garden soil! It’s too heavy and doesn’t drain well. Opt for a high-quality potting mix specifically designed for containers. I like to use a mix that contains peat moss, perlite, and vermiculite.
* Grow Lights (Optional, but Highly Recommended): Spinach needs a good amount of light, especially indoors. If you don’t have a super sunny window, grow lights are your best friend. LED grow lights are energy-efficient and work wonders.
* Spray Bottle: For misting the seedlings.
* Watering Can or Pitcher: For watering the mature plants.
* Seed Starting Tray (Optional): If you want to start your seeds indoors before transplanting.
* Small Shovel or Trowel: For planting and transplanting.
* Fertilizer (Optional): A balanced liquid fertilizer can help boost growth.
Phase 1: Getting Started – Sowing the Seeds
Okay, let’s get our hands dirty! This is the most exciting part – planting the seeds and watching them sprout.
1. Prepare Your Containers: Fill your containers with the potting mix, leaving about an inch of space at the top. Gently pat down the soil to remove any air pockets.
2. Sow the Seeds: Sprinkle the spinach seeds evenly over the surface of the soil. Aim for about 2-3 seeds per inch.
3. Cover the Seeds: Lightly cover the seeds with about ¼ inch of potting mix.
4. Water Gently: Use your spray bottle to gently mist the soil. You want to moisten the soil without disturbing the seeds.
5. Create a Humid Environment (Optional): If you’re using a seed starting tray, cover it with a clear plastic lid or plastic wrap to create a humid environment. This will help the seeds germinate. If you’re not using a tray, you can simply mist the soil more frequently.
6. Find a Warm Spot: Place your containers in a warm location (around 60-70°F or 15-21°C). A sunny windowsill or under grow lights is ideal.
7. Be Patient: Spinach seeds typically germinate in about 5-10 days. Keep the soil consistently moist, but not soggy, during this time.
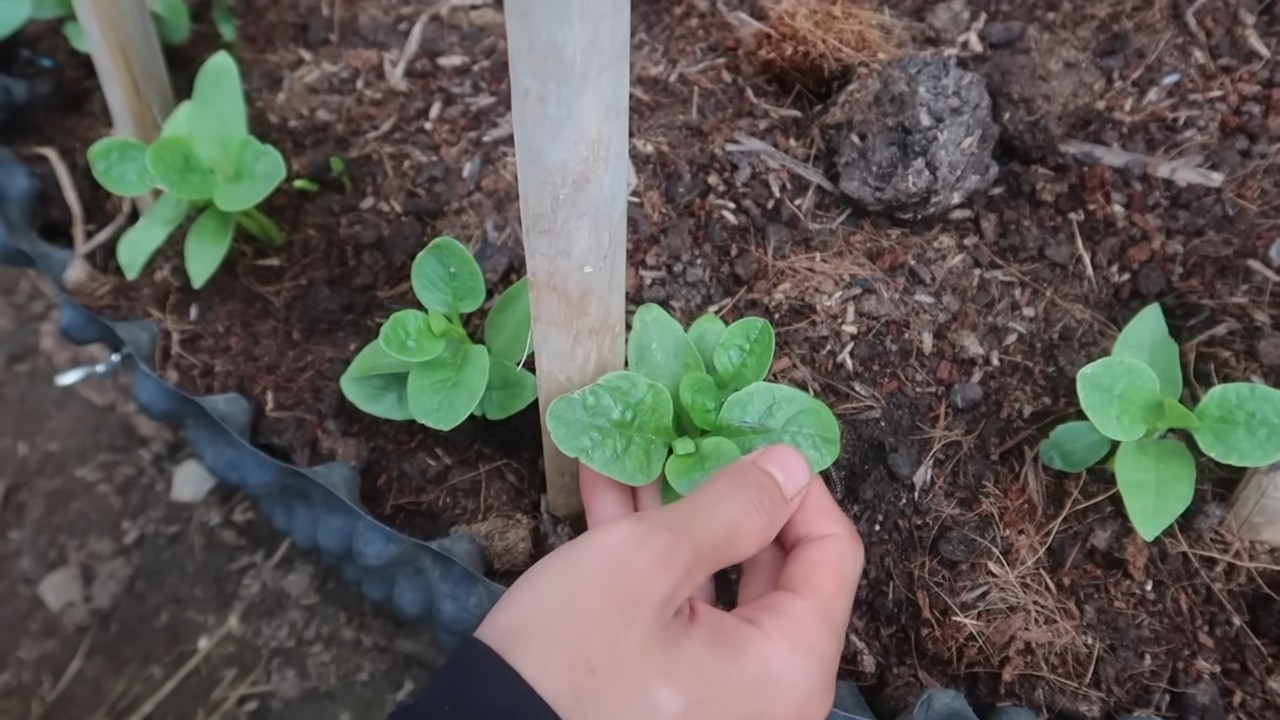
Phase 2: Nurturing Your Seedlings – Light, Water, and Air
Once your seedlings emerge, it’s time to provide them with the care they need to thrive.
1. Provide Adequate Light: This is crucial! If you’re using a sunny windowsill, rotate the containers regularly to ensure that all the seedlings receive even light. If you’re using grow lights, position them about 6-12 inches above the seedlings and keep them on for about 12-14 hours per day.
2. Water Regularly: Water your seedlings when the top inch of soil feels dry to the touch. Avoid overwatering, as this can lead to root rot. Water deeply, allowing the excess water to drain out of the drainage holes.
3. Thin the Seedlings (If Necessary): If you have too many seedlings growing in one spot, thin them out by snipping off the weaker ones at the soil line. This will give the remaining seedlings more room to grow. Aim for about 2-3 inches between plants.
4. Provide Good Air Circulation: Spinach likes good air circulation. Make sure your plants are not crowded together and that there is adequate airflow around them. You can use a small fan to improve air circulation if needed.
5. Fertilize (Optional): If you want to give your spinach a boost, you can fertilize it with a balanced liquid fertilizer every 2-3 weeks. Follow the instructions on the fertilizer label. I usually dilute the fertilizer to half strength to avoid burning the seedlings.
Phase 3: Growing to Maturity – Maintaining Your Spinach Patch
As your spinach plants grow, you’ll need to continue providing them with the right conditions to ensure a bountiful harvest.
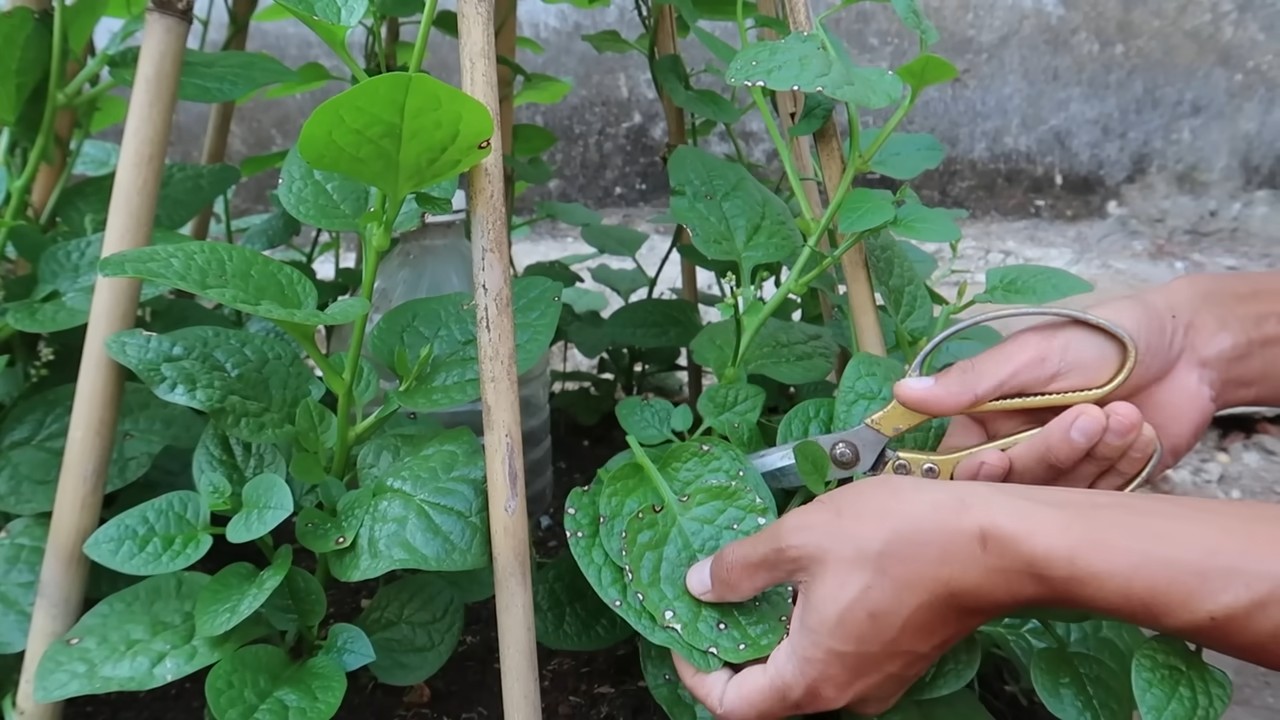
1. Monitor for Pests and Diseases: Keep an eye out for any signs of pests or diseases. Aphids and spider mites are common pests that can affect spinach. If you spot any pests, you can try spraying them with insecticidal soap or neem oil.
2. Maintain Consistent Moisture: Continue to water your spinach regularly, keeping the soil consistently moist but not soggy.
3. Provide Support (If Necessary): As your spinach plants grow taller, they may need some support. You can use small stakes or trellises to help keep them upright. This is especially important for larger varieties.
4. Keep the Area Clean: Remove any dead or yellowing leaves to prevent the spread of disease.
5. Temperature Control: Spinach prefers cooler temperatures (60-70°F or 15-21°C). If your indoor environment is too warm, your spinach may bolt (go to seed), which will make the leaves bitter. Try to keep the temperature as cool as possible.
Phase 4: Harvesting Your Bounty – Enjoying Your Fresh Spinach
The moment you’ve been waiting for! Harvesting your own homegrown spinach is incredibly rewarding.
1. Harvest When Ready: You can start harvesting your spinach when the leaves are about 4-6 inches long.
2. Harvest Outer Leaves First: Use scissors or a knife to cut off the outer leaves, leaving the inner leaves to continue growing. This is known as “cut and come again” harvesting.
3. Harvest Regularly: Harvest your spinach regularly to encourage continued growth.
4. Wash and Enjoy: Wash your harvested spinach thoroughly before eating. You can use it in salads, smoothies, soups, or any other dish that calls for spinach.
5. Store Properly: Store your harvested spinach in the refrigerator in a plastic bag or container. It will typically last for about a week.
Troubleshooting Tips: Common Issues and Solutions
Even with the best care, you might encounter a few challenges along the way. Here are some common issues and how to address them:
* Yellowing Leaves: This could be a sign of overwatering, underwatering, nutrient deficiency, or lack of light. Adjust your watering schedule, fertilize your plants, and ensure they are receiving adequate light.
* Leggy Seedlings: This is usually caused by insufficient light. Move your seedlings to a sunnier location or provide them with grow lights.
* Slow Growth: This could be due to a variety of factors, including poor soil, lack of nutrients, or inadequate light. Amend your soil with compost, fertilize your plants, and ensure they are receiving enough light.
* Pests: As mentioned earlier, aphids and spider mites are common pests that can affect spinach. Treat them with insecticidal soap or neem oil.
* Bolting: This is when your spinach plants start to produce flowers and seeds, which makes the leaves bitter. Bolting is usually caused by high temperatures or stress. Try to keep the temperature as cool as possible and provide your plants with consistent care.
Extra Tips for Success
* Choose the Right Variety: Some spinach varieties are better suited for indoor growing than others. ‘Bloomsdale Long Standing’ and ‘Baby’s Leaf Hybrid’ are good choices.
* Use High-Quality Potting Mix: Don’t skimp on the potting mix! A good quality potting mix will provide your spinach with the nutrients and drainage it needs to thrive.
* Provide Adequate Light: Light is essential for spinach growth. If you don’t have a sunny window, invest in grow lights.
* Water Regularly: Keep the soil consistently moist, but not soggy.
* Fertilize Regularly: Fertilize your spinach every 2-3 weeks with a balanced liquid fertilizer.
* Harvest Regularly: Harvest your spinach regularly to encourage continued growth.
* Be
Conclusion
So, there you have it! This simple, yet incredibly effective, indoor spinach growing hack is more than just a gardening tip; it’s a gateway to fresh, nutritious greens right at your fingertips. Forget those wilted, overpriced bags of spinach from the grocery store. Imagine stepping into your kitchen and harvesting vibrant, crisp spinach leaves whenever you need them. This isn’t just about convenience; it’s about control – control over the quality, freshness, and even the environmental impact of your food.
Why is this DIY trick a must-try? Because it democratizes access to fresh produce. Whether you live in an apartment with limited outdoor space, experience harsh weather conditions that make outdoor gardening challenging, or simply want a reliable source of organic spinach year-round, this method empowers you to grow your own. It’s a sustainable solution that reduces your carbon footprint by eliminating transportation and packaging waste associated with store-bought spinach. Plus, there’s an undeniable satisfaction in nurturing a plant from seed to harvest, knowing you’ve created something delicious and healthy with your own hands.
But the beauty of this indoor spinach growing hack lies in its adaptability. Feel free to experiment with different varieties of spinach. Try baby spinach for tender, delicate leaves perfect for salads, or explore more robust varieties like Bloomsdale for cooking. Consider adding companion plants like chamomile or basil to your indoor garden to deter pests and enhance the flavor of your spinach. You can also adjust the lighting and watering schedule based on your specific environment and the needs of your plants. For example, if you live in a particularly sunny area, you might need to provide some shade to prevent the spinach leaves from scorching. Conversely, if your indoor space is naturally dark, you might need to supplement with grow lights to ensure optimal growth.
Don’t be afraid to get creative with your container choices, too. While the instructions outline a basic setup, you can use recycled containers, repurposed planters, or even vertical gardening systems to maximize space and add a touch of personality to your indoor garden. The key is to ensure proper drainage and adequate space for the spinach roots to develop.
We wholeheartedly encourage you to try this indoor spinach growing hack. It’s a rewarding experience that will not only provide you with fresh, healthy spinach but also connect you to the natural world in a meaningful way. Once you’ve given it a try, we’d love to hear about your experience! Share your photos, tips, and any variations you’ve discovered in the comments below. Let’s build a community of indoor spinach growers and inspire others to embrace the joy of homegrown goodness. Your insights could help someone else overcome a challenge or discover a new technique that enhances their own indoor gardening journey. So, grab your seeds, prepare your soil, and get ready to enjoy the taste of homegrown spinach! This simple hack can truly transform the way you think about fresh produce and empower you to take control of your food supply.
Frequently Asked Questions (FAQ)
What kind of spinach seeds should I use for indoor growing?
The best spinach varieties for indoor growing are those that are compact and quick to mature. Baby spinach varieties like ‘Baby’s Leaf Hybrid’ or ‘Space’ are excellent choices because they produce tender leaves and don’t require a lot of space. Other good options include ‘Tyee’ and ‘Winter Bloomsdale’. Look for seeds that are specifically labeled for container gardening or indoor growing, as these are often bred to thrive in controlled environments. Ultimately, the best choice depends on your personal preference for taste and texture, so feel free to experiment with different varieties to find your favorite.
How much light does indoor spinach need?
Spinach needs at least 6 hours of direct sunlight per day to thrive. If you don’t have a sunny window, you’ll need to supplement with grow lights. Fluorescent or LED grow lights are both good options. Place the lights about 6-12 inches above the spinach plants and keep them on for 12-14 hours per day. Monitor your plants closely and adjust the lighting as needed. If the leaves are pale or leggy, they’re not getting enough light. If the leaves are scorched or yellowing, they’re getting too much light.
How often should I water my indoor spinach?
Spinach needs consistent moisture, but it doesn’t like to be waterlogged. Water your spinach when the top inch of soil feels dry to the touch. Water deeply, until water drains out of the bottom of the container. Avoid getting water on the leaves, as this can promote fungal diseases. During hot weather, you may need to water more frequently. Check the soil moisture daily and adjust your watering schedule accordingly.
What kind of soil should I use for indoor spinach?
Use a well-draining potting mix that is rich in organic matter. A mix of peat moss, perlite, and vermiculite is a good option. You can also add compost or other organic amendments to improve the soil’s fertility and drainage. Avoid using garden soil, as it can be too heavy and may contain pests or diseases. The ideal soil pH for spinach is between 6.0 and 7.0.
How do I fertilize my indoor spinach?
Spinach is a heavy feeder, so it needs regular fertilization. Use a balanced liquid fertilizer, such as 10-10-10, diluted to half strength. Fertilize every 2-3 weeks, or as needed. You can also use organic fertilizers, such as compost tea or fish emulsion. Avoid over-fertilizing, as this can burn the roots and damage the plants.
How long does it take for indoor spinach to grow?
Spinach typically takes 4-6 weeks to mature, depending on the variety and growing conditions. You can start harvesting the outer leaves when they are about 4-6 inches long. Cut the leaves at the base of the plant, leaving the inner leaves to continue growing. This cut-and-come-again method allows you to harvest spinach continuously for several weeks.
What are some common pests and diseases that affect indoor spinach?
Common pests that can affect indoor spinach include aphids, spider mites, and whiteflies. These pests can be controlled with insecticidal soap or neem oil. Common diseases that can affect indoor spinach include downy mildew and powdery mildew. These diseases can be prevented by providing good air circulation and avoiding overwatering. If you notice any signs of pests or diseases, treat them promptly to prevent them from spreading.
Can I grow spinach indoors year-round?
Yes, you can grow spinach indoors year-round, as long as you provide the right growing conditions. This includes adequate light, water, and nutrients. You may need to adjust your growing practices depending on the season. For example, during the winter, you may need to supplement with grow lights to provide enough light. During the summer, you may need to water more frequently to prevent the soil from drying out.
How do I harvest my indoor spinach?
Harvest your spinach using the cut-and-come-again method. This means harvesting the outer leaves as they mature, leaving the inner leaves to continue growing. This allows you to harvest spinach continuously for several weeks. To harvest, simply cut the leaves at the base of the plant with a sharp knife or scissors. Wash the leaves thoroughly before eating.
What can I do with my homegrown spinach?
The possibilities are endless! You can use your homegrown spinach in salads, smoothies, soups, stews, and stir-fries. You can also sauté it with garlic and olive oil, or add it to omelets and quiches. Spinach is a versatile and nutritious vegetable that can be enjoyed in many different ways. Experiment with different recipes and find your favorite ways to use your homegrown spinach.

Leave a Comment