
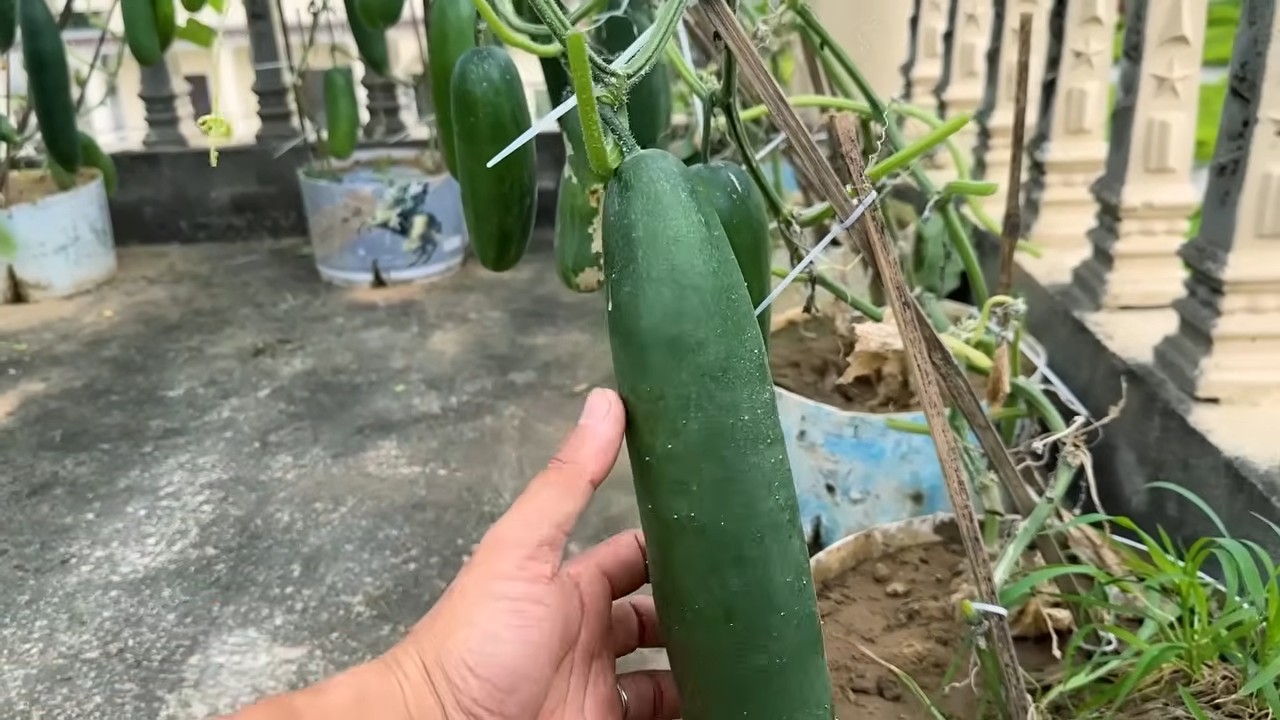
Improve Cucumber Harvest? Absolutely! Imagine biting into a crisp, juicy cucumber you grew yourself, knowing you had a hand in its deliciousness. There’s nothing quite like the satisfaction of harvesting your own vegetables, and cucumbers are a fantastic choice for any home garden. But let’s be honest, sometimes those cucumber vines can be a little… temperamental. You might end up with a few sad, stunted cucumbers instead of the bountiful harvest you dreamed of.
Cucumbers have been cultivated for over 3,000 years, originating in India and spreading across the globe. They’ve been enjoyed by emperors and commoners alike, and their refreshing taste has made them a staple in cuisines worldwide. But even with centuries of cultivation, maximizing your cucumber yield can still feel like a bit of a mystery. That’s where these simple DIY tricks and hacks come in!
I’m here to share some easy-to-implement strategies that will help you improve cucumber harvest significantly. Whether you’re a seasoned gardener or just starting out, these tips will empower you to get the most out of your cucumber plants. We’ll cover everything from soil preparation and watering techniques to pollination and pest control. Get ready to enjoy a summer filled with delicious, homegrown cucumbers!
Growing Water Spinach (Kangkong) at Home: A DIY Guide
Hey there, fellow gardening enthusiasts! I’m so excited to share my experience growing water spinach, also known as kangkong or ong choy, right in my backyard. It’s surprisingly easy, incredibly rewarding, and you’ll have fresh, delicious greens in no time. This guide will walk you through everything you need to know, from choosing the right container to harvesting your bounty. Let’s get started!
Choosing Your Growing Method
Before we dive into the nitty-gritty, let’s decide how you want to grow your water spinach. You have a couple of options:
* Container Gardening: This is perfect if you have limited space, like a balcony or patio. You can use pots, tubs, or even repurposed containers.
* In-Ground Planting: If you have a garden bed or a designated area, you can plant directly into the ground. Just make sure the soil is suitable.
* Hydroponics: For the more adventurous, hydroponics offers a soilless growing method. This requires a bit more setup but can yield impressive results.
I’ll be focusing on container gardening in this guide, as it’s the most accessible for most people. But the basic principles apply to all methods.
Materials You’ll Need
Okay, let’s gather our supplies. Here’s what you’ll need to grow water spinach in a container:
* Water Spinach Seeds or Cuttings: You can find seeds online or at your local garden center. Cuttings can be taken from mature plants. I personally prefer seeds for starting out.
* A Container: Choose a container that’s at least 12 inches deep and wide. A plastic tub, a large pot, or even a repurposed bucket will work. Make sure it has drainage holes.
* Potting Mix: Use a well-draining potting mix. You can also amend it with compost or aged manure for extra nutrients.
* Water: Obviously! You’ll need plenty of water to keep your water spinach happy.
* Fertilizer (Optional): A balanced liquid fertilizer can help boost growth, but it’s not essential.
* Sunlight: Water spinach loves sunlight, so choose a sunny spot for your container.
* Water Tray (Optional): If you want to keep the area around your container clean, use a water tray to catch any excess water.
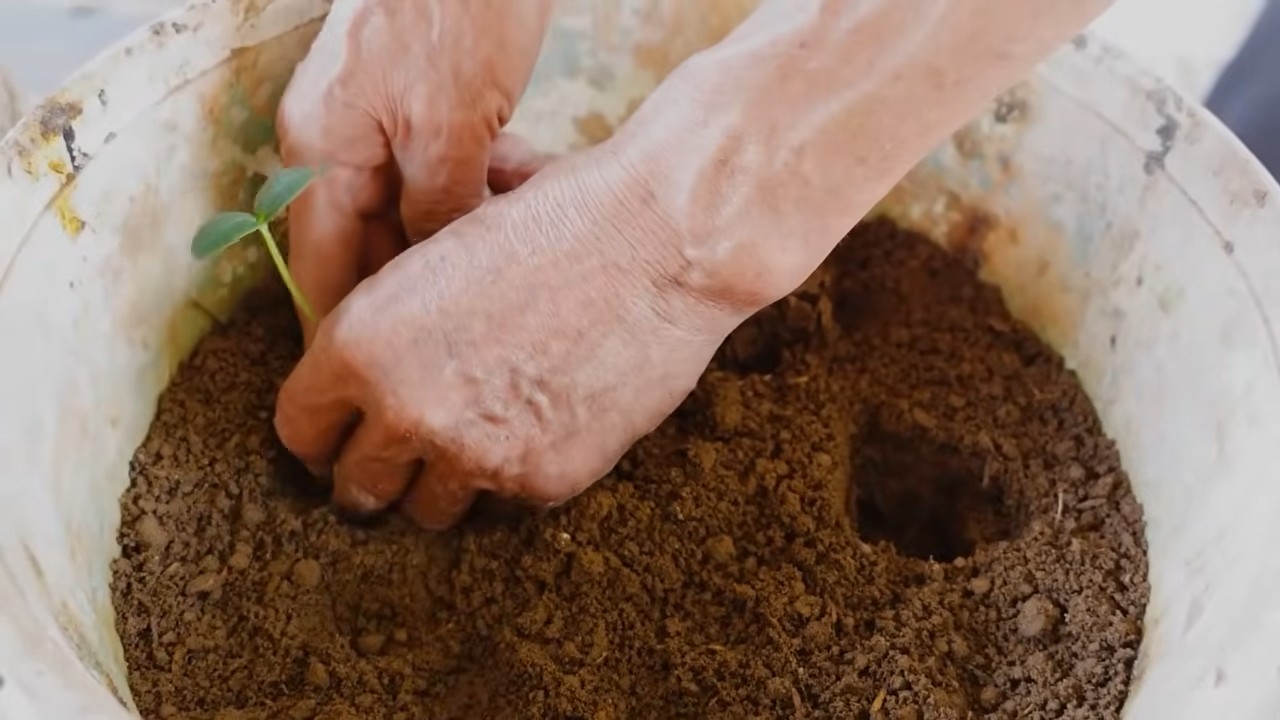
Step-by-Step Instructions: Planting Your Water Spinach
Alright, let’s get our hands dirty! Here’s how to plant your water spinach seeds or cuttings:
1. Prepare Your Container:
* First, make sure your container is clean and has drainage holes.
* Then, fill it with your chosen potting mix, leaving about an inch or two of space at the top.
* Water the soil thoroughly until it’s evenly moist.
2. Sowing Seeds (My Preferred Method):
* If you’re using seeds, sprinkle them evenly over the surface of the soil.
* Gently press the seeds into the soil.
* Cover them with a thin layer of potting mix (about ¼ inch).
* Water gently again, being careful not to dislodge the seeds.
3. Planting Cuttings (Alternative Method):
* If you’re using cuttings, choose healthy stems that are about 6-8 inches long.
* Remove the leaves from the bottom half of the cutting.
* Insert the cuttings into the soil, spacing them a few inches apart.
* Make sure at least half of the cutting is buried in the soil.
* Water thoroughly.
4. Finding the Perfect Spot:
* Place your container in a sunny location that receives at least 6 hours of direct sunlight per day.
* Water spinach can tolerate partial shade, but it will grow best in full sun.
5. Maintaining Moisture:
* Water spinach loves moisture, so keep the soil consistently moist.
* Check the soil daily and water whenever the top inch feels dry.
* In hot weather, you may need to water more frequently.
* Consider placing a water tray under the container to help retain moisture.
Caring for Your Water Spinach
Now that your water spinach is planted, it’s time to nurture it and watch it grow! Here’s what you need to do to keep it thriving:
1. Watering:
* As I mentioned before, water spinach needs plenty of water.
* Check the soil moisture daily and water as needed.
* Avoid letting the soil dry out completely.
* I like to water in the morning so the leaves have time to dry before nightfall, which can help prevent fungal diseases.
2. Fertilizing (Optional):
* If you want to give your water spinach a boost, you can fertilize it every 2-3 weeks with a balanced liquid fertilizer.
* Follow the instructions on the fertilizer label.
* Avoid over-fertilizing, as this can burn the roots.
* I sometimes use compost tea as a natural fertilizer.
3. Pest Control:
* Water spinach is generally pest-resistant, but it can occasionally be affected by aphids or spider mites.
* If you notice any pests, you can try spraying them off with a strong stream of water.
* You can also use insecticidal soap or neem oil if the infestation is severe.
* I always prefer organic pest control methods whenever possible.
4. Weed Control:
* Keep an eye out for weeds growing in your container.
* Remove them promptly to prevent them from competing with your water spinach for nutrients and water.
* Mulching around the plants can help suppress weed growth.
Harvesting Your Water Spinach
The best part! Harvesting your own homegrown water spinach is incredibly satisfying. Here’s how to do it:
1. When to Harvest:
* You can start harvesting your water spinach about 4-6 weeks after planting.
* The stems should be about 10-12 inches long.
2. How to Harvest:
* Use a sharp knife or scissors to cut the stems about 4-6 inches above the soil line.
* This will encourage the plant to produce new shoots.
* You can harvest regularly, as needed.
3. Post-Harvest Care:
* After harvesting, water the plants well.
* You can also fertilize them to encourage new growth.
4. Enjoying Your Harvest:
* Water spinach is delicious in stir-fries, soups, and salads.
* It has a mild, slightly sweet flavor.
* Store your harvested water spinach in the refrigerator for up to a week.
Troubleshooting Common Problems
Even with the best care, you might encounter a few challenges along the way. Here are some common problems and how to address them:
* Yellowing Leaves: This could be a sign of overwatering, underwatering, or nutrient deficiency. Adjust your watering schedule and consider fertilizing.
* Slow Growth: This could be due to insufficient sunlight, poor soil, or lack of nutrients. Make sure your plants are getting enough sunlight and fertilize if needed.
* Pests: As mentioned earlier, aphids and spider mites can sometimes be a problem. Use organic pest control methods to get rid of them.
* Fungal Diseases: These can occur in humid conditions. Ensure good air circulation and avoid overwatering.
Tips for Success
Here are a few extra tips to help you grow the best water spinach possible:
* Choose the Right Variety: Some varieties of water spinach are better suited for certain climates. Do some research to find the best variety for your area.
* Start with Good Quality Seeds or Cuttings: This will give your plants the best chance of success.
* Provide Consistent Care: Water spinach needs consistent watering and sunlight to thrive.
* Don’t Be Afraid to Experiment: Gardening is all about learning and experimenting. Try different techniques and see what works best for you.
* Enjoy the Process: Growing your own food is a rewarding experience. Take the time to appreciate the beauty of nature and the satisfaction of harvesting your own crops.
Extending Your Harvest
Want to keep the water spinach coming? Here’s how to extend your harvest:
* Succession Planting: Plant new seeds or cuttings every few weeks to ensure a continuous supply of water spinach.
* Overwintering: In mild climates, you may be able to overwinter your water spinach by protecting it from frost.
* Saving Seeds: If you want to save seeds for next year, allow some of your plants to flower
Conclusion
So, there you have it! This simple, yet incredibly effective DIY trick to improve cucumber harvest is a game-changer for any gardener, regardless of experience level. We’ve walked you through the process, highlighting the ease and affordability of implementation. But why is this a must-try?
Firstly, it addresses a common frustration: the disappointment of a meager cucumber yield despite your best efforts. This method tackles the root causes of poor production, such as inadequate pollination and nutrient deficiencies, head-on. By providing targeted support and optimizing the growing environment, you’re essentially giving your cucumber plants the boost they need to thrive and produce an abundance of delicious, crisp cucumbers.
Secondly, the beauty of this DIY approach lies in its adaptability. Feel free to experiment with variations to suit your specific needs and resources. For instance, if you don’t have access to coffee grounds, consider using other nitrogen-rich organic materials like composted manure or grass clippings. If you’re growing your cucumbers in containers, adjust the amount of Epsom salt accordingly to avoid over-fertilization. You could also try different types of supports, such as trellises or cages, to maximize vertical growth and air circulation.
Furthermore, this method isn’t just about quantity; it’s about quality too. By ensuring proper pollination and nutrient uptake, you’ll notice a significant improvement in the taste and texture of your cucumbers. Expect crisper, more flavorful fruits that are perfect for salads, pickles, or simply enjoying fresh from the garden.
Don’t let another season pass with underwhelming cucumber harvests. Embrace this DIY trick and witness the transformation in your garden. We’re confident that you’ll be amazed by the results.
Now, it’s your turn! We wholeheartedly encourage you to try this method and share your experiences with us. Did you notice a significant increase in your cucumber yield? Did you experiment with any variations? What challenges did you encounter, and how did you overcome them? Your feedback is invaluable and will help us refine and improve this technique for future gardeners. Share your photos, tips, and stories in the comments section below. Let’s build a community of thriving cucumber growers! Happy gardening!
Frequently Asked Questions (FAQ)
Q: How often should I apply the Epsom salt solution?
A: The Epsom salt solution should be applied every two to three weeks during the growing season. Avoid over-application, as excessive magnesium can lead to nutrient imbalances in the soil. A good rule of thumb is to observe your plants closely. If you notice signs of magnesium deficiency, such as yellowing leaves with green veins, you can increase the frequency of application slightly. However, if your plants appear healthy and vigorous, stick to the recommended schedule. Remember, less is often more when it comes to fertilization.
Q: Can I use this trick on other vegetables besides cucumbers?
A: While this DIY trick is specifically tailored to improve cucumber harvest, the principles behind it can be applied to other vegetables as well. The Epsom salt solution, for example, can benefit tomatoes, peppers, and eggplants, as they are also prone to magnesium deficiencies. The coffee grounds provide nitrogen, which is essential for leafy greens like lettuce and spinach. However, it’s important to research the specific nutrient requirements of each vegetable before applying these techniques. Some plants may require different ratios of nutrients or may be sensitive to certain amendments. Always err on the side of caution and start with small amounts to avoid over-fertilization.
Q: What if I don’t have coffee grounds? What can I use as a substitute?
A: If you don’t have coffee grounds readily available, there are several excellent substitutes you can use to provide nitrogen to your cucumber plants. Composted manure is a fantastic option, as it’s rich in nutrients and beneficial microbes. Grass clippings are another readily available source of nitrogen, but be sure to use clippings that haven’t been treated with herbicides or pesticides. You can also use other organic materials like shredded leaves or vegetable scraps, but these may take longer to decompose and release their nutrients. Alternatively, you can purchase a nitrogen-rich fertilizer from your local garden center. Just be sure to follow the instructions carefully to avoid over-fertilization.
Q: My cucumber plants are already producing fruit, is it too late to try this trick?
A: No, it’s not too late to try this trick even if your cucumber plants are already producing fruit. In fact, applying the Epsom salt solution and coffee grounds can help to improve the quality and size of the existing fruits, as well as encourage the production of new ones. The Epsom salt will provide magnesium, which is essential for fruit development, while the coffee grounds will provide nitrogen, which is needed for overall plant growth. Just be sure to apply these amendments carefully and avoid disturbing the roots of your plants. You should start to see positive results within a few weeks.
Q: How do I know if my cucumber plants have a magnesium deficiency?
A: The most common sign of magnesium deficiency in cucumber plants is yellowing leaves with green veins, a condition known as interveinal chlorosis. This usually starts on the older leaves and gradually progresses to the younger ones. Other symptoms may include stunted growth, reduced fruit production, and bitter-tasting cucumbers. If you suspect a magnesium deficiency, it’s a good idea to test your soil to confirm. You can purchase a soil testing kit from your local garden center or send a sample to a professional lab. If the test confirms a deficiency, you can apply the Epsom salt solution as directed.
Q: Can I use too much Epsom salt? What are the signs of over-fertilization?
A: Yes, it is possible to use too much Epsom salt, and over-fertilization can be detrimental to your cucumber plants. Signs of over-fertilization include leaf burn (browning or scorching of the leaf edges), stunted growth, and a buildup of salts on the soil surface. In severe cases, over-fertilization can even kill your plants. To avoid over-fertilization, always follow the recommended dosage and frequency of application. If you’re unsure, it’s always better to err on the side of caution and use less rather than more. You can also monitor your plants closely for any signs of distress and adjust your fertilization schedule accordingly.
Q: Will this trick work for all varieties of cucumbers?
A: Yes, this DIY trick should work for most varieties of cucumbers. However, some varieties may be more responsive to it than others. For example, varieties that are known to be heavy feeders, such as slicing cucumbers, may benefit more from the added nutrients provided by the coffee grounds and Epsom salt. Similarly, varieties that are prone to magnesium deficiencies may show a more dramatic improvement after being treated with the Epsom salt solution. Ultimately, the best way to determine if this trick will work for your specific variety of cucumbers is to try it and observe the results.
Q: How important is proper watering for cucumber harvest?
A: Proper watering is absolutely crucial for a successful cucumber harvest. Cucumbers are thirsty plants and require consistent moisture, especially during hot weather and fruit development. Inadequate watering can lead to stunted growth, reduced fruit production, and bitter-tasting cucumbers. Aim to water your cucumber plants deeply and regularly, ensuring that the soil is consistently moist but not waterlogged. The frequency of watering will depend on factors such as the weather, soil type, and drainage. A good rule of thumb is to water when the top inch of soil feels dry to the touch. You can also use a moisture meter to monitor the soil moisture levels more accurately. Mulching around your cucumber plants can help to retain moisture and reduce the need for frequent watering.

Leave a Comment