
Home tomato garden dreams are within your reach, even if you think you have a black thumb! Let’s face it, store-bought tomatoes just don’t compare to the juicy, sun-ripened flavor of homegrown ones. But the thought of starting a garden can be daunting, right? Don’t worry, this isn’t your grandma’s complicated gardening guide. We’re diving into simple, effective DIY tricks and hacks that will have you harvesting delicious tomatoes in no time.
Growing your own food has a rich history, dating back to ancient civilizations. For centuries, people have cultivated their own gardens, connecting with nature and providing sustenance for their families. While large-scale agriculture has become the norm, the desire to nurture our own food source remains strong. There’s something incredibly satisfying about watching a tiny seed transform into a bountiful plant, and then enjoying the fruits (or vegetables!) of your labor.
Why do you need these DIY tricks for your home tomato garden? Because let’s be honest, gardening can be tricky! Pests, diseases, and unpredictable weather can all sabotage your efforts. But with a few clever hacks and DIY solutions, you can overcome these challenges and create a thriving tomato patch. I’m going to share some of my favorite tips and tricks that have helped me grow amazing tomatoes year after year, even with limited space and time. Get ready to roll up your sleeves and transform your backyard (or balcony!) into a tomato paradise!
Creating Your Dream Home Tomato Garden: A Step-by-Step Guide
Hey there, fellow gardening enthusiasts! I’m so excited to share my tried-and-true method for creating a thriving tomato garden right in your own backyard (or even on your balcony!). Nothing beats the taste of a sun-ripened, homegrown tomato, and trust me, it’s easier than you think to achieve tomato-growing success. Let’s get started!
Choosing the Right Tomato Variety
Before we even think about soil, let’s talk tomatoes! The variety you choose will significantly impact your success, so it’s worth doing a little research.
* Determinate vs. Indeterminate: This is crucial! Determinate tomatoes grow to a certain size and produce all their fruit at once, making them great for canning. Indeterminate tomatoes keep growing and producing fruit throughout the season. I personally prefer indeterminate varieties for a continuous harvest.
* Heirloom vs. Hybrid: Heirloom tomatoes are open-pollinated varieties that have been passed down for generations. They often have unique flavors and colors, but can be more susceptible to diseases. Hybrid tomatoes are bred for specific traits like disease resistance and higher yields.
* Consider Your Climate: Some varieties are better suited for cooler climates, while others thrive in hot weather. Check the seed packet or plant label for information on the best growing conditions for your chosen variety.
* My Personal Favorites: I’ve had great success with ‘Early Girl’ (early producer), ‘Beefsteak’ (large and juicy), ‘Roma’ (great for sauces), and ‘Cherry Tomatoes’ (perfect for snacking).
Preparing the Soil: The Foundation of Success
Tomatoes are heavy feeders, meaning they need nutrient-rich soil to thrive. Proper soil preparation is absolutely essential for a bountiful harvest.
* Sunlight is Key: Tomatoes need at least 6-8 hours of direct sunlight per day. Choose a location in your yard that gets plenty of sun.
* Soil Testing (Optional but Recommended): A soil test will tell you the pH level and nutrient content of your soil. You can purchase a soil testing kit at most garden centers or send a sample to your local agricultural extension office. Tomatoes prefer a slightly acidic soil pH of around 6.0 to 6.8.
* Amending the Soil: Regardless of your soil type, you’ll likely need to amend it with organic matter. This will improve drainage, aeration, and nutrient content.
* Compost: This is my go-to amendment! Compost adds essential nutrients and improves soil structure. I usually add a generous layer of compost (about 2-3 inches) to the planting area.
* Aged Manure: Another excellent source of nutrients. Make sure it’s well-aged to avoid burning the plants.
* Peat Moss: Helps retain moisture and improve drainage, especially in sandy soils.
* Other Amendments: Depending on your soil test results, you may need to add other amendments like lime (to raise pH) or sulfur (to lower pH).
* Tilling or Digging: Loosen the soil to a depth of at least 12 inches. This will allow the roots to penetrate easily and access nutrients. I prefer using a garden fork to avoid disturbing the soil structure too much.
* Creating Raised Beds (Optional): Raised beds are a great option if you have poor drainage or compacted soil. They also warm up faster in the spring, allowing you to start planting earlier.
Starting Your Tomato Plants: Seeds vs. Seedlings
You have two options for starting your tomato plants: from seeds or from seedlings (also known as transplants).
* Starting from Seeds: This gives you more control over the varieties you grow and can be more cost-effective. However, it requires more time and effort.
1. Timing: Start your seeds indoors 6-8 weeks before the last expected frost in your area.
2. Seed Starting Mix: Use a seed starting mix, not regular potting soil. Seed starting mix is lighter and provides better drainage.
3. Planting: Sow the seeds about ¼ inch deep in small pots or seed trays.
4. Watering: Keep the soil consistently moist but not soggy.
5. Light: Provide plenty of light. A sunny windowsill may not be enough, so consider using a grow light.
6. Hardening Off: Before transplanting your seedlings outdoors, you need to “harden them off.” This means gradually exposing them to outdoor conditions over a period of 1-2 weeks. Start by placing them in a sheltered location for a few hours each day, gradually increasing the amount of time they spend outdoors.
* Buying Seedlings: This is the easier option, especially for beginners. You can find tomato seedlings at most garden centers in the spring.
1. Choosing Healthy Seedlings: Look for plants that are healthy, stocky, and have dark green leaves. Avoid plants that are leggy, yellowing, or have signs of disease or pests.
2. Size Matters: Choose seedlings that are about 6-8 inches tall.
3. Root Bound: Gently check the roots. If they are tightly circling the pot, the plant is root-bound. You can still plant it, but gently loosen the roots before planting.
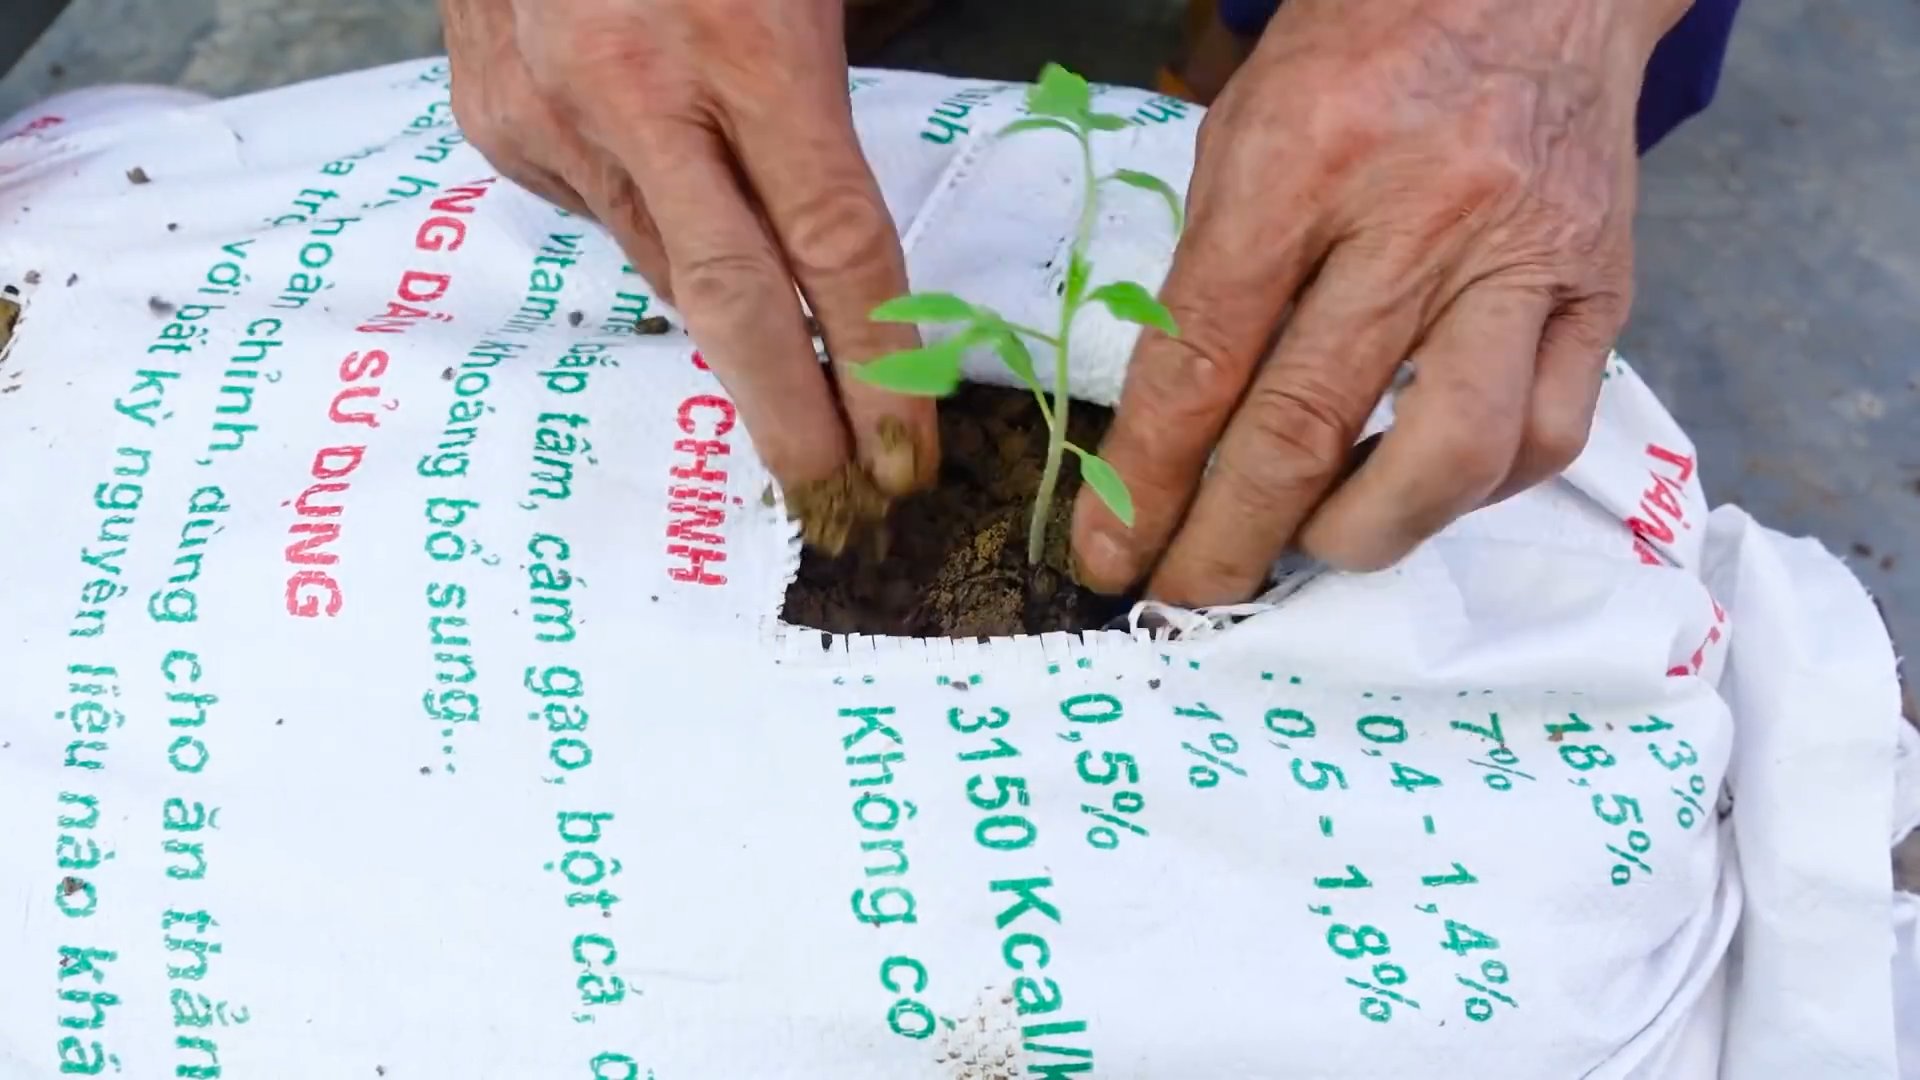
Planting Your Tomato Plants: Getting Them in the Ground
Now for the exciting part – planting your tomato plants!
1. Timing: Wait until the danger of frost has passed and the soil has warmed up to at least 60°F (15°C).
2. Spacing: Space determinate tomato plants about 2-3 feet apart and indeterminate tomato plants about 3-4 feet apart.
3. Planting Depth: This is where the magic happens! Tomatoes can be planted deeper than most other plants. In fact, you can bury the stem up to the first set of leaves. This encourages the plant to develop more roots along the buried stem, resulting in a stronger, healthier plant.
4. Planting Procedure:
* Dig a hole that is deep enough to bury the stem as described above.
* Gently remove the plant from its container.
* Loosen the roots if they are root-bound.
* Place the plant in the hole and backfill with soil.
* Water thoroughly.
5. Staking or Caging: This is essential for indeterminate tomato varieties, as they can get quite tall and heavy. Staking or caging will provide support and prevent the plants from falling over.
* Staking: Drive a sturdy stake into the ground next to the plant. As the plant grows, tie the stem to the stake with soft twine or plant ties.
* Caging: Place a tomato cage around the plant at planting time. Make sure the cage is tall enough to accommodate the plant’s mature size.
Caring for Your Tomato Plants: Watering, Fertilizing, and Pruning
Once your tomato plants are in the ground, it’s important to provide them with proper care to ensure a bountiful harvest.
* Watering: Tomatoes need consistent watering, especially during hot, dry weather. Water deeply and regularly, aiming for about 1-2 inches of water per week. Avoid overhead watering, as this can promote fungal diseases. Drip irrigation or soaker hoses are ideal.
* Fertilizing: Tomatoes are heavy feeders and benefit from regular fertilization.
* At Planting Time: Add a slow-release fertilizer to the planting hole.
* During the Growing Season: Fertilize every 2-3 weeks with a balanced fertilizer or a tomato-specific fertilizer. Follow the instructions on the fertilizer label.
* Mulching: Apply a layer of mulch around the plants to help retain moisture, suppress weeds, and regulate soil temperature. Organic mulches like straw, hay, or wood chips are ideal.
* Pruning: Pruning is important for indeterminate tomato varieties.
* Suckers: Remove the suckers that grow in the “armpit” between the main stem and the branches. These suckers will steal energy from the plant and reduce fruit production.
* Lower Leaves: Remove the lower leaves that touch the ground. This will improve air circulation and reduce the risk of fungal diseases.
* Pest and Disease Control: Keep an eye out for pests and diseases.
* Common Pests: Aphids, tomato hornworms, whiteflies.
* Common Diseases: Early blight, late blight, blossom end rot.
* Prevention: Good air circulation, proper watering, and healthy soil can help prevent many pest and disease problems.
* Treatment: If you do encounter pests or diseases, there are many organic and conventional treatments available. Consult your local garden center for recommendations.
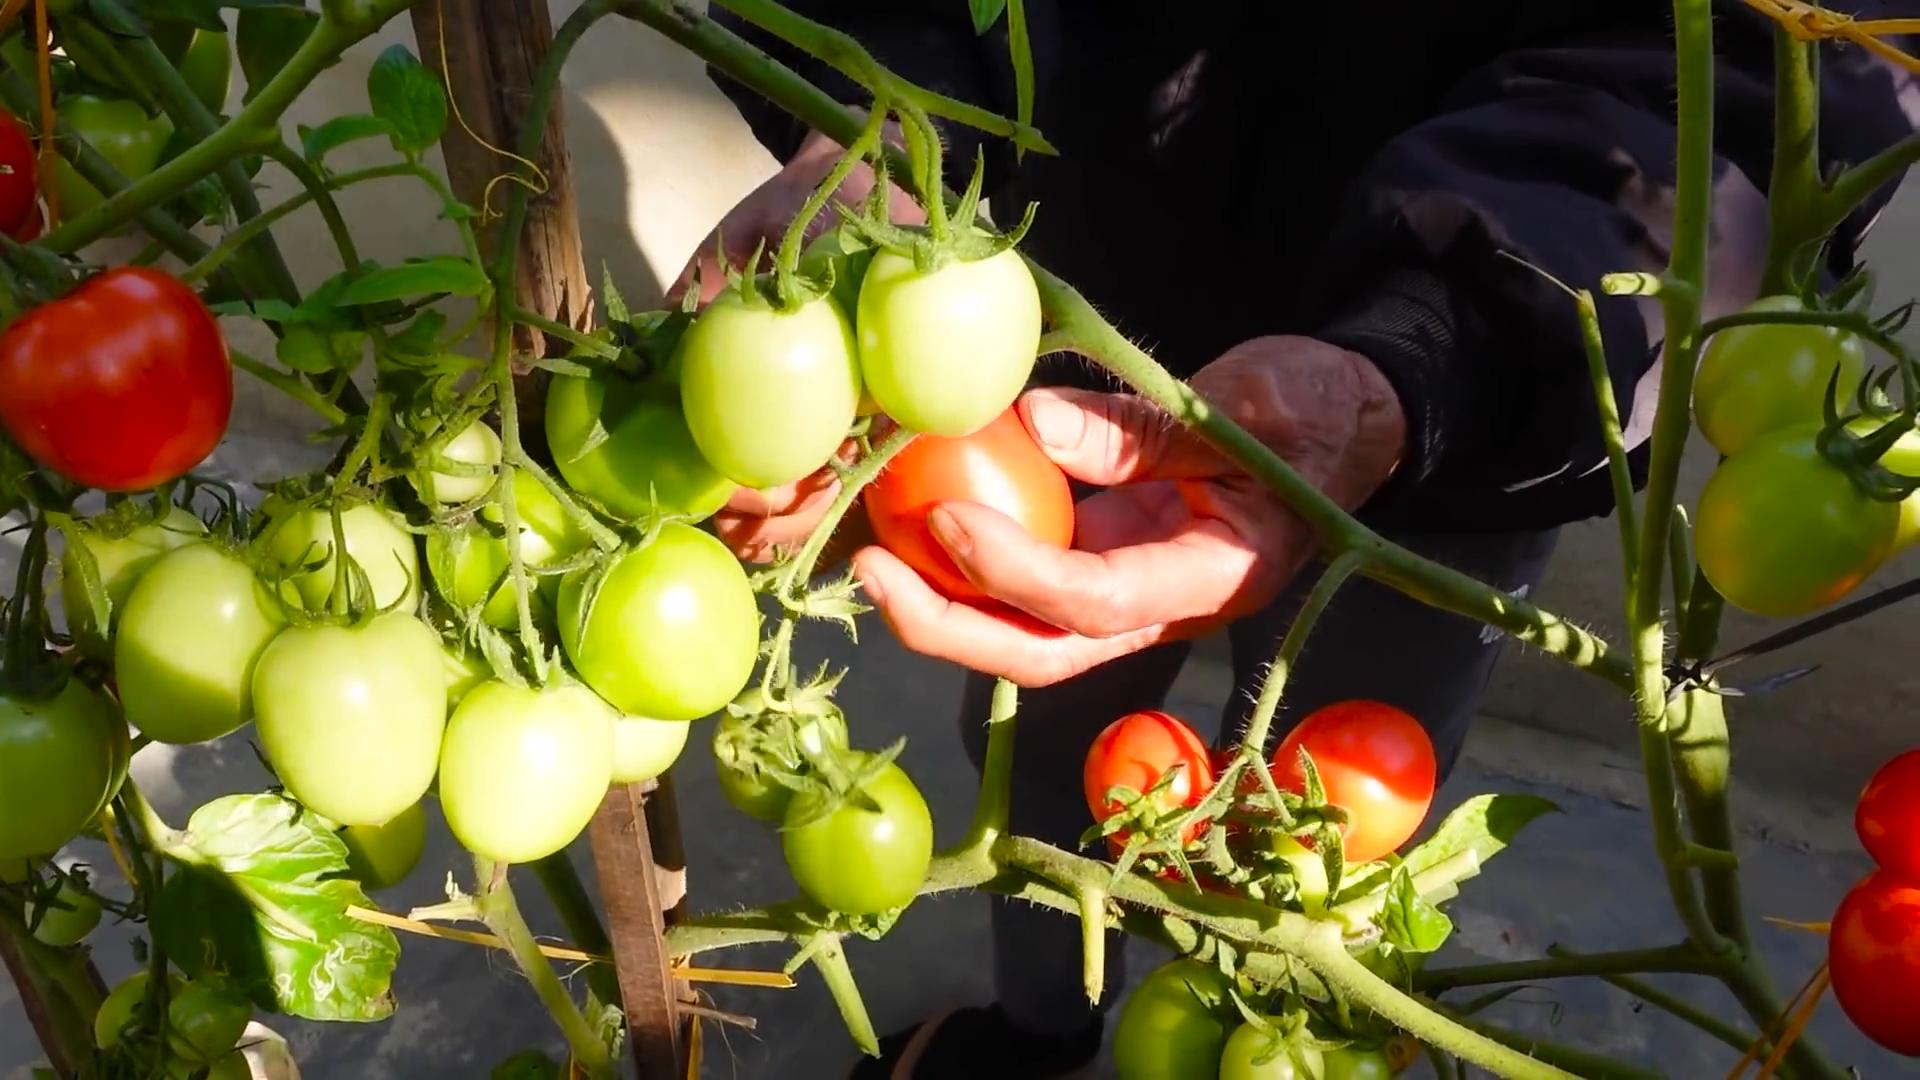
Harvesting Your Tomatoes: The Sweet Reward
The moment you’ve been waiting for! Harvesting your
Conclusion
So, there you have it! Mastering the art of creating your own nutrient-rich tomato feed from readily available kitchen scraps is not just a cost-effective alternative to store-bought fertilizers; it’s a game-changer for your home tomato garden. We’ve explored a simple yet powerful method to unlock the potential of discarded resources, transforming them into a potent elixir that will have your tomato plants thriving.
Why is this DIY trick a must-try? Because it’s sustainable, economical, and incredibly effective. You’re reducing waste, saving money, and providing your plants with a balanced diet of essential nutrients, all while knowing exactly what’s going into your garden. Commercial fertilizers can be expensive and often contain synthetic chemicals. This homemade solution allows you to control the ingredients, ensuring your tomatoes are grown organically and naturally.
But the benefits don’t stop there. This method encourages a deeper connection with your garden. You’ll be more attuned to your plants’ needs, observing their growth and adjusting your feeding schedule accordingly. It’s a rewarding experience that fosters a sense of accomplishment and pride in your gardening endeavors.
Ready to take your tomato growing to the next level?
Consider these variations to personalize your homemade tomato feed:
* Banana Peel Boost: Add dried and crushed banana peels to your compost tea for an extra dose of potassium, crucial for fruit development.
* Eggshell Enrichment: Incorporate crushed eggshells for calcium, preventing blossom-end rot and strengthening cell walls.
* Coffee Ground Kick: Sprinkle used coffee grounds around the base of your tomato plants to improve soil drainage and add nitrogen. Be mindful of the acidity, especially if your soil is already acidic.
* Comfrey Power: If you have access to comfrey, steep the leaves in water to create a nutrient-rich liquid fertilizer. Comfrey is a dynamic accumulator, drawing nutrients from the soil and making them available to your plants.
Don’t be afraid to experiment and find what works best for your specific soil conditions and tomato varieties. Remember to observe your plants closely and adjust your feeding schedule as needed. A little trial and error can go a long way in perfecting your homemade tomato feed recipe.
We’re confident that this DIY trick will transform your home tomato garden. The vibrant green foliage, abundant blossoms, and juicy, flavorful tomatoes will be a testament to your efforts. So, gather your kitchen scraps, follow the simple steps outlined, and prepare to be amazed by the results.
Now, we want to hear from you! Have you tried making your own tomato feed before? What ingredients did you use? What were your results? Share your experiences, tips, and variations in the comments below. Let’s create a community of passionate gardeners who are committed to sustainable and effective gardening practices. Your insights could inspire others to embark on their own DIY tomato feed journey. Let’s cultivate a greener, more bountiful world, one tomato plant at a time!
Frequently Asked Questions (FAQ)
What exactly are the benefits of using homemade tomato feed compared to store-bought fertilizers?
Homemade tomato feed offers a multitude of advantages. Firstly, it’s incredibly cost-effective. You’re utilizing kitchen scraps that would otherwise be discarded, saving you money on expensive commercial fertilizers. Secondly, it’s environmentally friendly. You’re reducing waste and minimizing your reliance on synthetic chemicals that can harm the environment. Thirdly, you have complete control over the ingredients. You know exactly what’s going into your garden, ensuring your tomatoes are grown organically and naturally. Finally, it fosters a deeper connection with your garden, allowing you to observe your plants’ needs and adjust your feeding schedule accordingly. Store-bought fertilizers, while convenient, can be expensive, contain synthetic chemicals, and lack the personalized touch of a homemade solution.
How often should I feed my tomato plants with this homemade solution?
The frequency of feeding depends on several factors, including the age of your plants, the type of soil, and the weather conditions. As a general guideline, start feeding your tomato plants with the homemade solution every two weeks once they begin to flower. Increase the frequency to once a week when the fruits start to develop. During periods of heavy rain, you may need to reapply the feed more frequently as the nutrients can be leached from the soil. Observe your plants closely for signs of nutrient deficiencies, such as yellowing leaves or stunted growth, and adjust your feeding schedule accordingly. Remember, it’s always better to err on the side of caution and avoid over-fertilizing, which can damage your plants.
Can I use this homemade tomato feed on other plants in my garden?
While this homemade tomato feed is specifically formulated for tomatoes, it can also be beneficial for other fruiting vegetables, such as peppers, eggplants, and cucumbers. These plants have similar nutrient requirements to tomatoes and can benefit from the balanced blend of nitrogen, phosphorus, and potassium found in the feed. However, it’s important to note that some plants may have different nutrient needs. For example, leafy greens typically require more nitrogen than fruiting vegetables. Therefore, it’s best to research the specific nutrient requirements of each plant before applying the homemade feed. You may need to adjust the recipe or supplement with other fertilizers to meet their needs.
What if I don’t have all the kitchen scraps mentioned in the recipe? Can I still make the tomato feed?
Absolutely! The beauty of this DIY trick is its flexibility. You can adapt the recipe based on the kitchen scraps you have available. While a combination of vegetable scraps, coffee grounds, eggshells, and banana peels is ideal, you can still create a potent tomato feed with just a few ingredients. For example, if you only have vegetable scraps, you can still create a nutrient-rich compost tea. The key is to focus on providing a balanced blend of nutrients. Don’t be afraid to experiment and see what works best for your plants.
How do I know if my tomato plants are getting too much or not enough nutrients from the homemade feed?
Observing your plants closely is crucial for determining if they’re receiving the right amount of nutrients. Signs of nutrient deficiency include yellowing leaves (especially older leaves), stunted growth, weak stems, and poor fruit development. Conversely, signs of over-fertilization include dark green leaves, excessive foliage growth, and a lack of flowers or fruits. If you notice any of these symptoms, adjust your feeding schedule accordingly. If you suspect a deficiency, increase the frequency of feeding. If you suspect over-fertilization, reduce the frequency or dilute the feed with water. Soil testing can also provide valuable insights into the nutrient levels in your soil and help you fine-tune your feeding strategy.
Is there a risk of attracting pests or diseases by using kitchen scraps in my garden?
While there is a slight risk of attracting pests or diseases, it can be minimized by following proper composting practices. Ensure that you bury the kitchen scraps deep enough in the soil to prevent them from attracting rodents or insects. Avoid using meat, dairy, or oily foods in your compost, as these can attract unwanted pests and create unpleasant odors. Additionally, make sure your compost pile is well-aerated to prevent anaerobic conditions, which can promote the growth of harmful bacteria. If you’re concerned about diseases, avoid using scraps from diseased plants in your compost. By following these simple precautions, you can minimize the risk of attracting pests or diseases and create a healthy and thriving garden.
Leave a Comment