
Growing Okra in Containers might seem daunting, but trust me, it’s easier than you think! Have you ever dreamed of stepping outside your door and harvesting fresh, vibrant okra for your favorite gumbo or stir-fry? I know I have! For generations, okra has been a staple in Southern cuisine and a symbol of resourcefulness, with its roots tracing back to Africa. It’s a plant that thrives in warm climates, and while a sprawling garden is ideal, container gardening opens up a world of possibilities, even if you only have a small balcony or patio.
Many people shy away from growing okra because they believe it requires vast amounts of space. But that’s where this DIY guide comes in! I’m going to show you how to successfully cultivate this delicious and nutritious vegetable in pots, maximizing your yield and minimizing your effort. Imagine the satisfaction of nurturing your own okra plants from tiny seedlings to bountiful producers, all within the confines of a container. This isn’t just about growing food; it’s about connecting with nature, embracing sustainability, and enjoying the freshest ingredients right at your fingertips. So, let’s dive in and discover the secrets to growing okra in containers like a pro!
Growing Asparagus: A Beginner’s Guide to Delicious Homegrown Spears
Asparagus, with its delicate flavor and nutritional benefits, is a fantastic addition to any garden. While it might seem intimidating to grow, trust me, it’s totally achievable, even for beginner gardeners! The key is patience, as asparagus takes a few years to mature, but the rewards – years of fresh, delicious spears – are well worth the wait. This guide will walk you through everything you need to know to successfully grow asparagus in your own backyard.
Choosing the Right Asparagus Variety
Before you even think about digging, you need to select the right asparagus variety for your climate and preferences. Here are a few popular and reliable choices:
* ‘Jersey Knight’: This is an all-male hybrid, meaning it produces primarily male plants. Male plants are more productive because they don’t expend energy on seed production. ‘Jersey Knight’ is known for its high yields and disease resistance. It’s a great choice for beginners.
* ‘Jersey Giant’: Similar to ‘Jersey Knight,’ ‘Jersey Giant’ is another all-male hybrid that offers excellent yields and disease resistance. It tends to produce slightly thicker spears.
* ‘Purple Passion’: If you’re looking for something a little different, ‘Purple Passion’ is a great option. It produces beautiful purple spears that turn green when cooked. It’s also sweeter and more tender than green varieties.
* ‘Mary Washington’: This is an older, heirloom variety that’s still popular for its reliability and flavor. It’s a good choice if you prefer a more traditional asparagus taste.
Consider your local climate and soil conditions when making your selection. Your local garden center can provide valuable advice on the best varieties for your area.
Preparing the Asparagus Bed: The Foundation for Success
Asparagus is a perennial, meaning it will live for many years in the same spot. Therefore, proper bed preparation is absolutely crucial. Think of it as building a solid foundation for a long-term investment.
* Sunlight: Asparagus needs at least 6-8 hours of direct sunlight per day. Choose a location that receives plenty of sun.
* Soil: Asparagus thrives in well-drained soil that’s rich in organic matter. Heavy clay soil can lead to root rot, so amending the soil is essential.
* Drainage: Good drainage is critical. Asparagus crowns don’t like to sit in waterlogged soil.
* Weed Control: Clear the area of all weeds, grasses, and other vegetation. Asparagus is a slow grower, especially in its early years, and weeds can easily outcompete it.
Step-by-Step Planting Guide
Now for the fun part – planting your asparagus! You can start asparagus from seed, but it’s much easier and faster to plant crowns (one-year-old plants).
1. Timing is Key: The best time to plant asparagus crowns is in early spring, as soon as the soil can be worked.
2. Dig a Trench: Dig a trench that’s about 12-18 inches wide and 6-8 inches deep. The length of the trench will depend on how many crowns you’re planting.
3. Amend the Soil: Mix plenty of compost or well-rotted manure into the soil you removed from the trench. This will provide the asparagus with the nutrients it needs to thrive. I like to add a little bone meal as well, as it’s a great source of phosphorus, which promotes root growth.
4. Create a Ridge: Create a small ridge of amended soil down the center of the trench. This ridge will support the asparagus crowns.
5. Space the Crowns: Place the asparagus crowns on the ridge, spacing them about 12-18 inches apart. Make sure the roots are spread out evenly.
6. Cover the Crowns: Gently cover the crowns with about 2-3 inches of soil. Don’t bury them too deep at first.
7. Water Thoroughly: Water the newly planted crowns thoroughly. This will help settle the soil and encourage root growth.
8. Gradually Fill the Trench: As the asparagus shoots emerge, gradually fill in the trench with soil. This process is called “hilling.” Continue hilling until the trench is completely filled. This encourages the development of a strong root system.
Caring for Your Asparagus Patch: Patience is a Virtue
Asparagus requires patience. You won’t be harvesting spears in the first year, or even the second. This allows the plants to establish a strong root system.
* Watering: Keep the soil consistently moist, especially during dry periods. Asparagus needs plenty of water to thrive.
* Weeding: Regularly weed the asparagus bed to prevent weeds from competing for nutrients and water. Hand-weeding is best to avoid damaging the asparagus plants.
* Fertilizing: Fertilize your asparagus bed in early spring with a balanced fertilizer. I like to use a fertilizer that’s specifically formulated for vegetables. You can also side-dress with compost throughout the growing season.
* Mulching: Apply a layer of mulch around the asparagus plants to help retain moisture, suppress weeds, and regulate soil temperature. Organic mulches like straw or wood chips are excellent choices.
* Pest and Disease Control: Asparagus is generally resistant to pests and diseases, but keep an eye out for common problems like asparagus beetles and crown rot. If you notice any problems, take action promptly to prevent them from spreading.
Harvesting Your Asparagus: The Sweet Reward
After two to three years of patience, you’ll finally be able to harvest your asparagus!
* Harvesting Time: Begin harvesting spears in the spring, when they are about 6-8 inches tall and about as thick as your finger.
* Harvesting Technique: Use a sharp knife to cut the spears at ground level. Be careful not to damage the crown.
* Harvesting Frequency: Harvest spears every day or two during the peak harvesting season.
* Harvesting Period: In the third year, harvest for only about 2-3 weeks. In subsequent years, you can harvest for 6-8 weeks.
* Stop Harvesting: Stop harvesting when the spears become thin and spindly. This indicates that the plants need to replenish their energy reserves.
Post-Harvest Care: Preparing for Next Year
After the harvesting season is over, it’s important to continue caring for your asparagus patch to ensure a bountiful harvest next year.
* Let the Ferns Grow: Allow the asparagus ferns to grow and mature. These ferns will photosynthesize and store energy in the roots, which will fuel next year’s growth.
* Fertilize Again: Fertilize the asparagus bed again in late summer to provide the plants with the nutrients they need to prepare for winter.
* Cut Back the Ferns: In late fall or early winter, after the ferns have turned brown, cut them back to ground level. This will help prevent disease and pests from overwintering in the asparagus patch.
* Mulch Again: Apply a fresh layer of mulch to protect the asparagus crowns from the cold winter weather.
Troubleshooting Common Asparagus Problems
Even with the best care, you might encounter some problems when growing asparagus. Here are a few common issues and how to address them:
* Thin Spears: Thin spears can be a sign of nutrient deficiency, lack of water, or over-harvesting. Make sure you’re fertilizing regularly, watering adequately, and not harvesting for too long.
* Yellowing Ferns: Yellowing ferns can be caused by nutrient deficiency, disease, or pests. Check the soil pH and nutrient levels, and look for signs of disease or pests.
* Asparagus Beetles: Asparagus beetles are small, colorful beetles that can damage asparagus spears and ferns. Hand-picking the beetles or using an insecticidal soap can help control them.
* Crown Rot: Crown rot is a fungal disease that can cause the asparagus crowns to rot. Good drainage is essential to prevent crown rot. If you suspect crown rot, remove the affected plants and improve drainage in the area.
Enjoying Your Homegrown Asparagus
Growing your own asparagus is a rewarding experience. There’s nothing quite like the taste of freshly harvested asparagus, and knowing that you grew it yourself makes it even more special. Enjoy your homegrown asparagus steamed, grilled, roasted, or added to your favorite recipes. You’ve earned it!
Conclusion
So, there you have it! Growing okra in containers isn’t just a possibility; it’s a rewarding and surprisingly simple way to bring the taste of the South (or wherever you crave it!) right to your doorstep. We’ve walked through the essential steps, from selecting the right container and soil to nurturing your okra plants to a bountiful harvest. But why is this DIY trick a must-try?
Firstly, container gardening offers unparalleled flexibility. Whether you have a sprawling backyard or a tiny balcony, you can cultivate your own okra. This is especially beneficial for those with limited space or poor soil conditions, as you have complete control over the growing environment. Imagine fresh, homegrown okra just steps away, ready to be transformed into delicious gumbos, fried okra, or pickled delights.
Secondly, growing okra in containers allows for easier pest control and management. You can readily inspect your plants for any signs of trouble and take swift action, minimizing the risk of widespread infestation. Plus, moving your containers to sheltered locations during extreme weather events, like unexpected frosts or scorching heat waves, becomes a breeze. This level of control significantly increases your chances of a successful harvest.
Thirdly, and perhaps most importantly, growing your own okra is incredibly satisfying. There’s something truly special about nurturing a plant from seed to table, witnessing its growth, and ultimately enjoying the fruits (or in this case, the pods!) of your labor. It’s a connection to nature that can be both therapeutic and educational.
Now, let’s talk about variations and suggestions. While we’ve focused on the basics, feel free to experiment! Consider trying different okra varieties, such as ‘Clemson Spineless’ for its smooth pods or ‘Burgundy’ for its beautiful red stems and pods. You can also companion plant your okra with herbs like basil or marigolds to deter pests and attract beneficial insects. Another great tip is to add a layer of mulch to your containers to help retain moisture and suppress weeds.
Don’t be afraid to get creative with your container choices, too. While we recommended larger pots, you can repurpose old buckets, tubs, or even grow bags as long as they provide adequate drainage. Just ensure that whatever container you choose is clean and food-safe.
Ultimately, the best way to learn is by doing. So, we wholeheartedly encourage you to give growing okra in containers a try. It’s a fun, rewarding, and delicious experience that you won’t regret. And once you’ve harvested your first batch of okra, we’d love to hear about your experience! Share your tips, tricks, and photos in the comments below. Let’s build a community of okra-loving container gardeners! What worked for you? What challenges did you face? Your insights can help others succeed in their own okra-growing adventures. Happy gardening!
Frequently Asked Questions (FAQ)
1. What is the best size container for growing okra?
The ideal container size for growing okra is at least 10-15 gallons. Okra plants have deep taproots, and a larger container provides ample space for the roots to develop properly. This ensures the plant has access to sufficient nutrients and water, leading to healthier growth and a more abundant harvest. Smaller containers may restrict root growth, resulting in stunted plants and reduced yields. If you’re planning to grow multiple okra plants in a single container, opt for an even larger size, such as a half-barrel or a large raised bed.
2. What type of soil is best for growing okra in containers?
Okra thrives in well-draining, fertile soil. A good potting mix specifically formulated for vegetables is an excellent choice. Avoid using garden soil directly in containers, as it tends to compact and doesn’t provide adequate drainage. You can also create your own potting mix by combining equal parts of compost, peat moss (or coconut coir), and perlite or vermiculite. Compost provides essential nutrients, peat moss or coconut coir helps retain moisture, and perlite or vermiculite improves drainage and aeration. Adding a slow-release fertilizer to the potting mix at planting time will provide a steady supply of nutrients throughout the growing season.
3. How often should I water my okra plants in containers?
Okra plants in containers require regular watering, especially during hot and dry weather. Check the soil moisture daily by sticking your finger about an inch deep into the soil. If the soil feels dry to the touch, it’s time to water. Water deeply until excess water drains out of the bottom of the container. Avoid overwatering, as this can lead to root rot. As a general guideline, water your okra plants every 1-3 days, depending on the weather conditions and the size of the container. Mulching around the base of the plants can help retain moisture and reduce the frequency of watering.
4. How much sunlight do okra plants need?
Okra plants need at least 6-8 hours of direct sunlight per day to thrive. Choose a location for your containers that receives plenty of sunlight throughout the day. If you live in a particularly hot climate, providing some afternoon shade can help prevent the plants from overheating. Insufficient sunlight can result in leggy growth, reduced flowering, and lower yields. If you don’t have a sunny spot, you can supplement with grow lights.
5. How do I fertilize okra plants in containers?
Okra plants are heavy feeders and benefit from regular fertilization. Start by incorporating a slow-release fertilizer into the potting mix at planting time. Then, supplement with a liquid fertilizer every 2-3 weeks throughout the growing season. Choose a fertilizer that is high in phosphorus and potassium, as these nutrients are essential for flowering and fruit production. You can also use organic fertilizers, such as compost tea or fish emulsion. Follow the instructions on the fertilizer label carefully to avoid over-fertilizing, which can damage the plants.
6. When and how should I harvest okra pods?
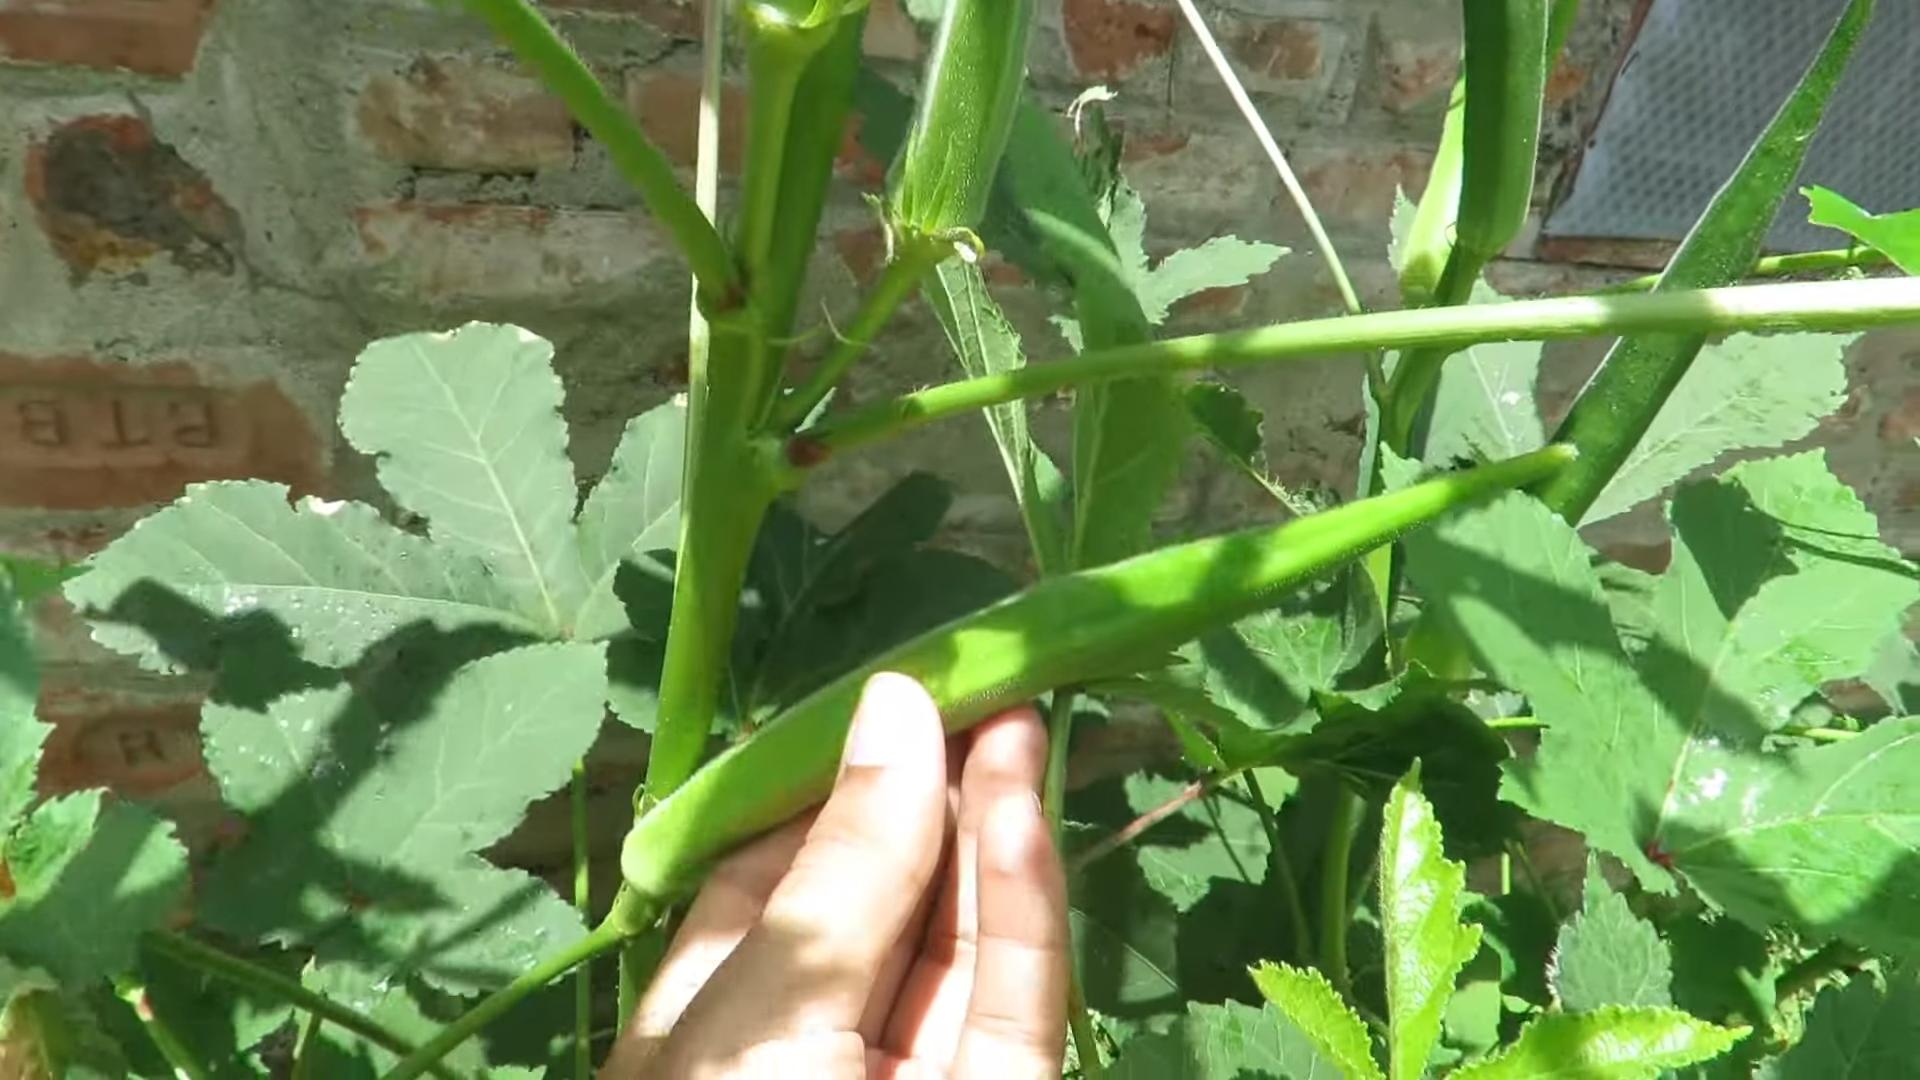
Okra pods are typically ready to harvest 50-65 days after planting. Harvest the pods when they are 2-4 inches long and still tender. Use a sharp knife or pruning shears to cut the pods from the plant. Wear gloves when harvesting okra, as the pods can be prickly and irritating to the skin. Harvest okra pods regularly, every 1-2 days, to encourage continued production. If you allow the pods to grow too large, they will become tough and fibrous.
7. What are some common pests and diseases that affect okra plants in containers?
Common pests that can affect okra plants include aphids, spider mites, and flea beetles. These pests can be controlled with insecticidal soap or neem oil. Diseases that can affect okra plants include powdery mildew and root rot. Powdery mildew can be treated with a fungicide, while root rot can be prevented by ensuring proper drainage and avoiding overwatering. Regularly inspect your plants for any signs of pests or diseases and take action promptly to prevent them from spreading.
8. Can I grow okra in containers indoors?
While it’s possible to grow okra indoors, it can be challenging. Okra plants require a lot of sunlight, so you’ll need to provide supplemental lighting with grow lights. You’ll also need to ensure that the plants have adequate ventilation and humidity. Indoor-grown okra plants may not produce as many pods as those grown outdoors. If you’re determined to grow okra indoors, choose a compact variety and provide the best possible growing conditions.
9. How do I prevent my okra plants from getting too tall?
Okra plants can grow quite tall, sometimes reaching 6-8 feet in height. To prevent them from getting too tall, you can pinch off the top of the plant when it reaches about 3-4 feet tall. This will encourage the plant to branch out and produce more pods. You can also choose a compact okra variety that is naturally shorter. Staking the plants can also help support them and prevent them from falling over.
10. Can I save okra seeds from my container-grown plants?
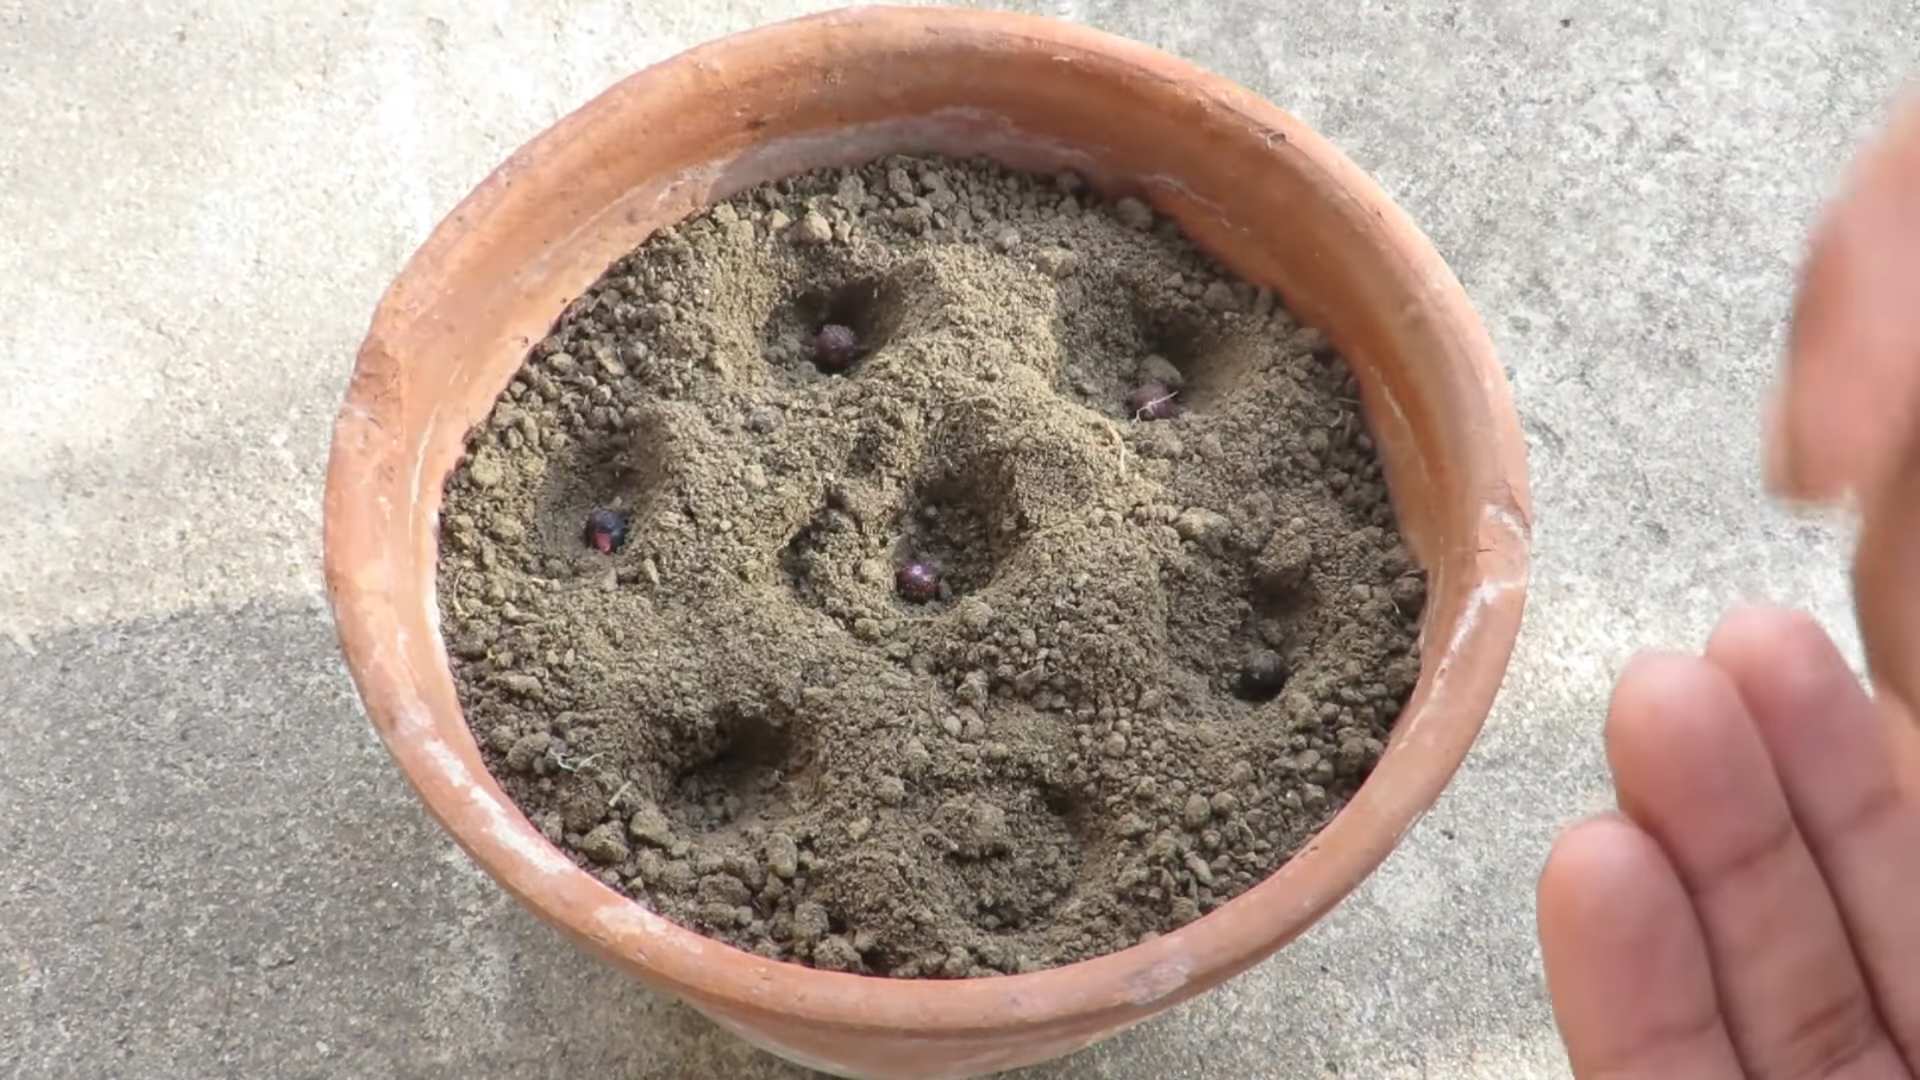
Yes, you can save okra seeds from your container-grown plants. Allow a few pods to mature fully on the plant, until they are dry and brown. Then, harvest the pods and remove the seeds. Spread the seeds out on a tray to dry completely before storing them in an airtight container in a cool, dry place. Okra seeds can remain viable for several years if stored properly.


Leave a Comment