
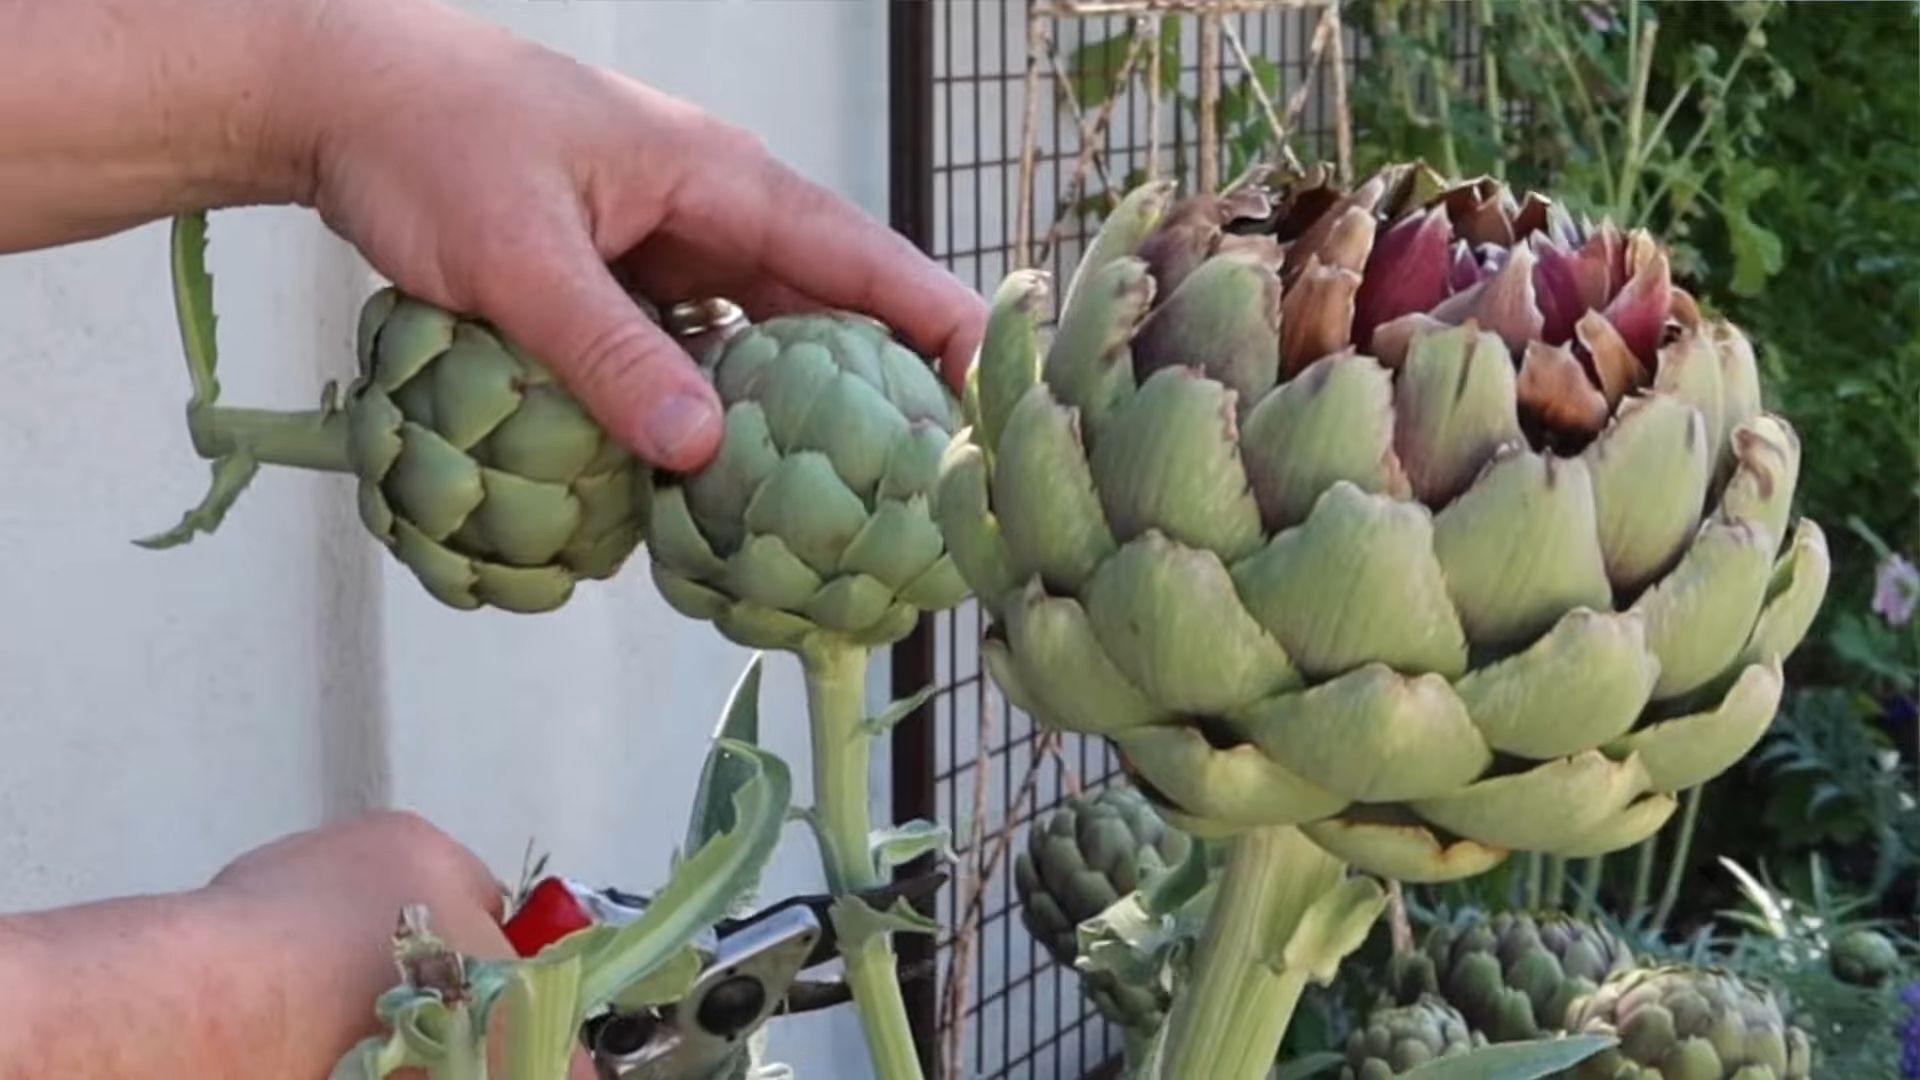
Grow Artichokes Easily
Have you ever dreamed of harvesting your own plump, delicious artichokes, bursting with flavor? I know I have! For years, I thought growing artichokes was some sort of mystical gardening feat, reserved only for experienced horticulturalists. But let me tell you, after a bit of research and experimentation, I discovered that growing artichokes easily is entirely within reach, even for beginner gardeners like myself. This article is packed with simple, effective DIY tricks and hacks that will transform your gardening experience and bring the joy of homegrown artichokes to your table.
The history of the artichoke is fascinating! Cultivated for centuries, these thistle-like beauties have a rich cultural heritage, appearing in ancient Greek and Roman writings. They’ve been a culinary staple in Mediterranean cuisine for ages, and now, thanks to these easy-to-follow techniques, you can enjoy this delicious vegetable straight from your own garden.
Why bother with all this effort? Well, there’s nothing quite like the taste of a freshly picked artichoke. Store-bought artichokes just can’t compare to the intense flavor and satisfying texture of homegrown ones. Plus, growing your own artichokes is incredibly rewarding. It’s a fantastic way to connect with nature, learn about sustainable living, and impress your friends and family with your green thumb! This article will guide you through every step, from selecting the right variety to harvesting your bountiful crop. So, let’s get started and learn how to grow artichokes easily!
Ready to get your hands dirty? Let’s dive in!
My Super Easy DIY Oven Cleaning Guide
Let’s face it, cleaning the oven is nobody’s favorite chore. But with this DIY method, you can tackle that grime without harsh chemicals and a lot of scrubbing! I’ve been using this technique for years, and it’s a lifesaver. Here’s how I do it:
Gathering Your Supplies
- Baking soda
- White vinegar
- Spray bottle
- Warm water
- Scrub brush or sponge (non-abrasive is best!)
- Microfiber cloths or paper towels
- Rubber gloves (optional, but recommended)
- Small bowl
Preparing the Oven
- Remove the oven racks: This is crucial. You’ll clean them separately. Set them aside in your bathtub or a large sink.
- Clear out loose debris: Use a spatula or scraper to remove any large food particles or spills from the oven floor and walls. Don’t worry about getting everything perfectly clean at this stage; we’re just prepping for the paste.
Making the Cleaning Paste
- In your small bowl, combine about 1 cup of baking soda with just enough warm water to create a thick paste. Think of the consistency of toothpaste. You might need a little more or less water depending on the baking soda.
- Apply the paste: Using your hands (wearing gloves, of course!), generously spread the paste all over the interior surfaces of your oven. Pay special attention to areas with baked-on grease and grime. Don’t be shy! The thicker the paste, the better it works.
- Let it sit: This is the magic part. Let the paste sit overnight (or for at least 6-8 hours). The baking soda will work its magic, absorbing grease and loosening grime.
The Vinegar Spray
- Prepare the vinegar spray: Fill your spray bottle with undiluted white vinegar.
- Spray the paste: After the paste has sat for the recommended time, lightly spray the entire paste-covered oven interior with the vinegar. You’ll hear a gentle fizzing sound – that’s the baking soda and vinegar reacting to break down the grime.
- Let it sit (again!): Allow the vinegar to sit for about 15-20 minutes. This allows the reaction to continue and further loosen the grime.
Scrubbing and Wiping
- Start scrubbing: Using your scrub brush or sponge, gently scrub the oven’s interior. The paste should easily wipe away, taking the grime with it. For stubborn spots, you might need to scrub a little harder, but remember to be gentle to avoid scratching the oven’s surface.
- Wipe clean: Use your microfiber cloths or paper towels to wipe away the remaining paste and loosened grime. You might need to rinse your cloths frequently, especially if there’s a lot of grime.
- Rinse (if necessary): If you have any lingering residue, you can lightly dampen a cloth with warm water and wipe again. However, in most cases, the baking soda and vinegar will do the job without needing extra water.
Cleaning the Oven Racks
- Prepare the rack cleaning solution: Fill your bathtub or sink with warm water and add about 1 cup of white vinegar. If your racks are extremely dirty, you can also add a cup of baking soda to the water.
- Soak the racks: Submerge the oven racks in the water and let them soak for at least 30 minutes, or even longer if they’re heavily soiled. The soaking will loosen the baked-on food and grease.
- Scrub the racks: After soaking, use your scrub brush or sponge to scrub the racks. The grime should come off relatively easily. For stubborn spots, you can use a little more elbow grease.
- Rinse and dry: Rinse the racks thoroughly with clean water and dry them completely before putting them back in the oven.
Finishing Touches
- Inspect your work: Once you’ve cleaned the oven interior and racks, take a moment to inspect your work. Are there any spots you missed? If so, give them a quick scrub.
- Replace the racks: Carefully place the clean, dry oven racks back into the oven.
- Admire your work: Stand back and admire your sparkling clean oven! You did it!
Important Note:
Always check your oven’s manual for specific cleaning instructions. This method is generally safe for most ovens, but it’s always best to err on the side of caution. Avoid using abrasive cleaners or scouring pads, as these can scratch the oven’s surface.
Pro Tip:
For extra stubborn grease, you can apply the baking soda paste to the affected areas and let it sit for a longer period, even up to 24 hours. You can also repeat the vinegar spray and scrubbing process if needed.
Conclusion
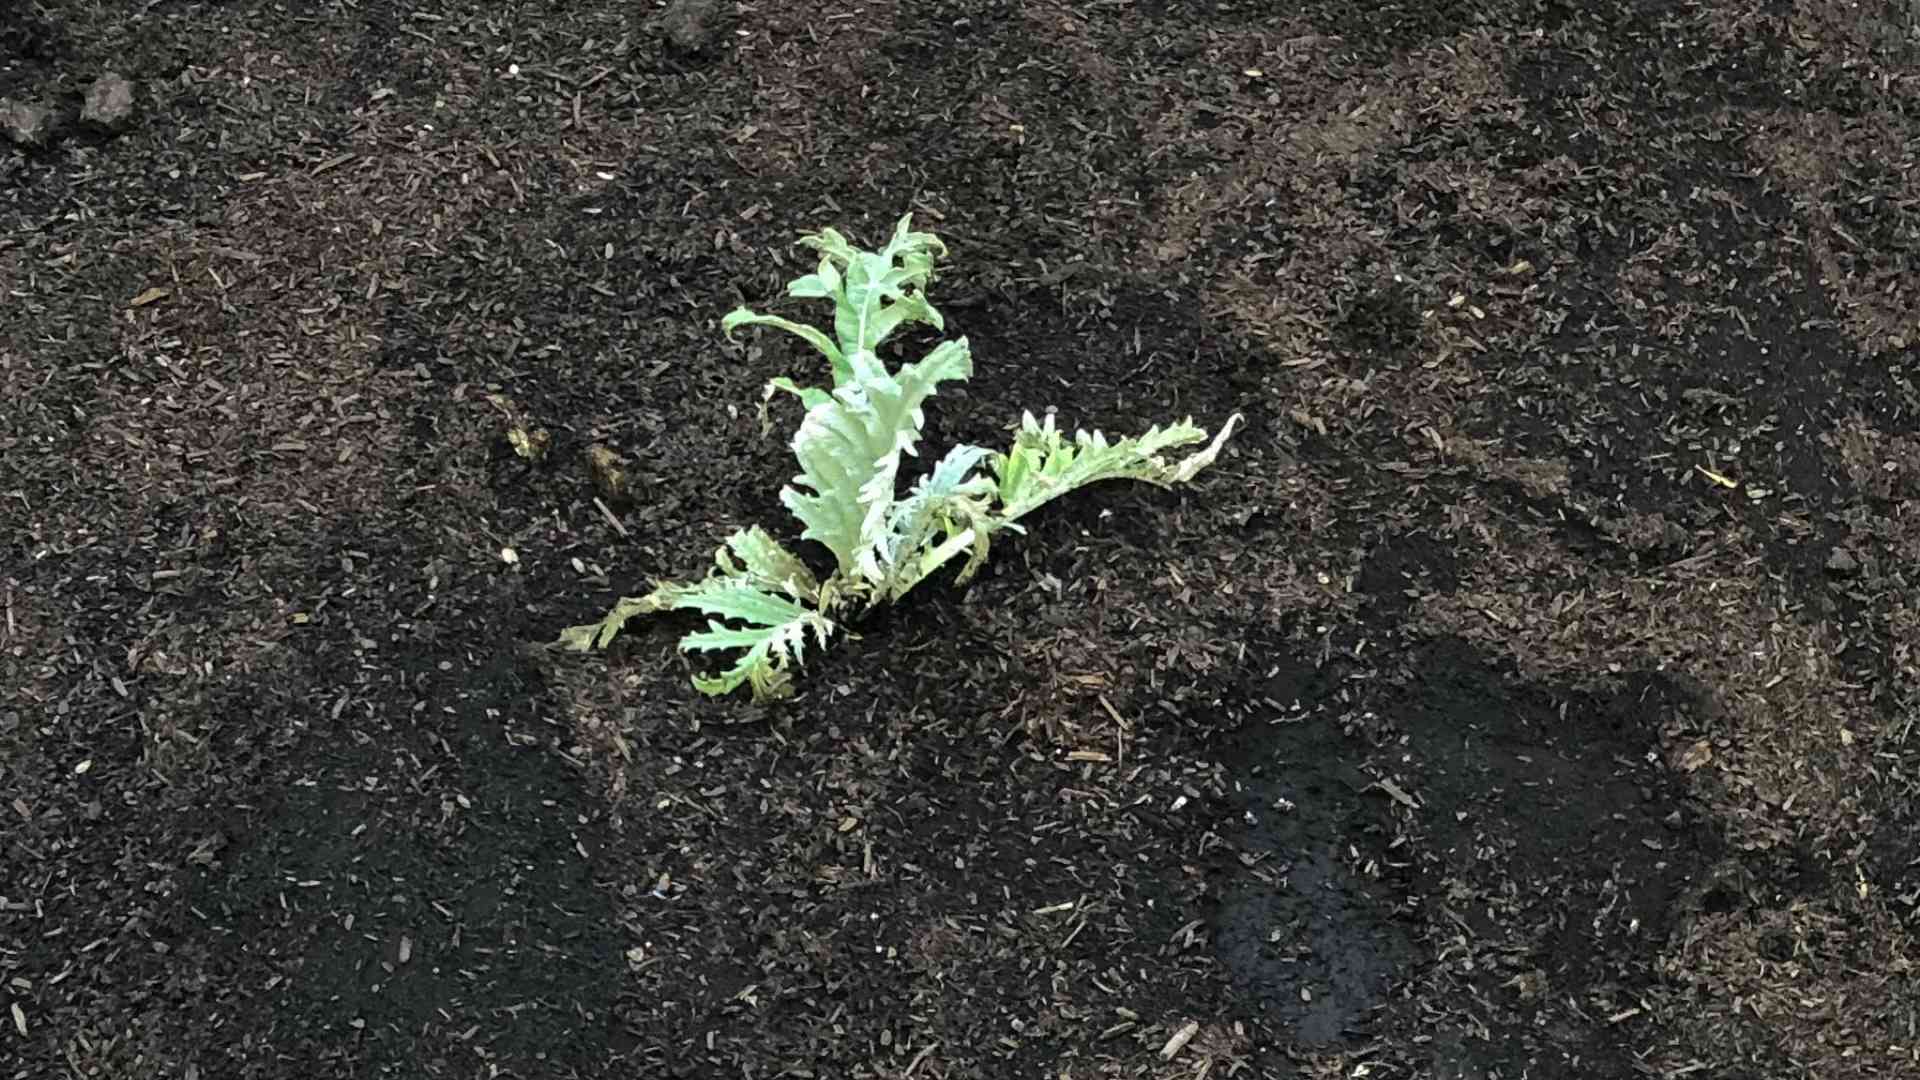
So there you have it – a simple, yet remarkably effective method for growing artichokes easily in your own garden! This DIY approach bypasses the complexities and potential disappointments of starting from seed or relying on store-bought plants. By utilizing readily available materials and following these straightforward steps, you’ll be well on your way to harvesting your own delicious, homegrown artichokes. This method is a must-try for anyone, regardless of gardening experience, who dreams of enjoying the unique flavor and texture of fresh artichokes. The satisfaction of nurturing these plants from cuttings, watching them thrive, and ultimately reaping the rewards is unparalleled.
The beauty of this DIY artichoke propagation technique lies in its adaptability. You can easily adjust the process to suit your specific needs and available resources. For instance, if you have limited space, consider growing your artichokes in large containers. This allows for greater control over soil conditions and makes it easier to move the plants as needed. Experiment with different types of artichoke varieties to discover your favorites. Some varieties are known for their larger heads, while others are prized for their tender hearts. Don’t be afraid to get creative! You can also incorporate companion planting techniques, such as planting herbs like rosemary or thyme nearby, to deter pests and enhance the overall health of your artichoke plants. The possibilities are endless!
We strongly encourage you to try this DIY artichoke propagation method and experience the joy of growing your own. Share your successes (and even your challenges!) with us and the wider gardening community. Post pictures of your thriving artichoke plants on social media using the hashtag #GrowArtichokesEasily. Let’s build a supportive network of home gardeners who are passionate about cultivating these delicious and rewarding plants. Your feedback and experiences will inspire others to embark on their own artichoke-growing adventures. Remember, even small successes contribute to the collective knowledge and enthusiasm surrounding this rewarding gardening endeavor. Don’t hesitate – start growing your own artichokes today!
Frequently Asked Questions
What type of artichoke is best for this method?
This propagation method works well with most common artichoke varieties. However, some varieties may be more vigorous growers than others. It’s always a good idea to research the specific needs of the artichoke variety you choose to ensure optimal growth. Local nurseries or gardening centers can provide valuable advice on varieties that thrive in your region.
How often should I water my artichoke cuttings?
Consistent moisture is key to successful rooting. Water the cuttings regularly, keeping the soil consistently moist but not waterlogged. Check the soil moisture daily, especially during hot and dry weather. Overwatering can lead to root rot, while underwatering can stunt growth. Adjust your watering schedule based on the weather conditions and the soil’s drainage capabilities.
What should I do if my artichoke cuttings don’t root?
Several factors can affect rooting success. Ensure you’re using healthy, disease-free cuttings from a vigorous mother plant. Proper soil preparation, including good drainage and aeration, is also crucial. If your cuttings fail to root, consider adjusting your technique. Try using a rooting hormone to stimulate root development. You might also experiment with different propagation methods, such as air layering, if the cutting method proves unsuccessful.
When can I expect to harvest my homegrown artichokes?
Harvesting time depends on the artichoke variety and growing conditions. Generally, you can expect to harvest your first artichokes about 12-18 months after planting the rooted cuttings. The artichokes are ready for harvest when the buds are firm, tightly closed, and the bracts are dark green and slightly purplish. Harvesting too early will result in smaller artichokes, while harvesting too late will lead to tough, woody buds.
Can I grow artichokes in containers?
Absolutely! Container gardening is a great option for growing artichokes, especially if you have limited space. Use large containers (at least 15 gallons) with well-draining potting mix. Ensure the containers receive adequate sunlight and water regularly. Container-grown artichokes may require more frequent watering than those planted directly in the ground.
What are some common pests and diseases that affect artichokes?
Artichokes are susceptible to various pests and diseases, including aphids, spider mites, and fungal diseases. Regularly inspect your plants for signs of infestation or disease. Implement preventative measures, such as companion planting and proper sanitation, to minimize the risk of problems. If pests or diseases occur, use appropriate organic or chemical controls according to the instructions on the product label.
How do I overwinter my artichoke plants?
Artichokes are generally hardy plants, but they may require protection during harsh winters. In colder climates, mulch the base of the plants heavily to insulate the roots. You can also cover the plants with a row cover or other protective material to shield them from frost and freezing temperatures. In extremely cold areas, consider digging up the plants and storing them in a cool, dark place over the winter, replanting them in the spring.
What is the best soil for growing artichokes?
Artichokes thrive in well-drained, fertile soil with a slightly acidic to neutral pH (6.0-7.0). Amend heavy clay soils with organic matter, such as compost or well-rotted manure, to improve drainage and aeration. Sandy soils may benefit from the addition of organic matter to retain moisture. A soil test can help determine the existing pH and nutrient levels, allowing you to make necessary adjustments before planting.

Leave a Comment