
Harvesting Beets DIY: Unlock the secrets to a bountiful beet harvest right in your own backyard! Have you ever pulled a beet from the ground, only to find it’s either too small or woody? Or perhaps you’ve let them sit too long, resulting in tough, flavorless roots? I know I have! It’s a common gardening woe, but fear not, because this guide is your ticket to perfectly timed and executed beet harvesting.
Beets have a rich history, dating back to ancient times where their leafy greens were prized more than the root itself. Over centuries, selective breeding transformed the humble beet into the sweet, vibrant vegetable we know and love today. From borscht in Eastern Europe to roasted beet salads worldwide, this root vegetable has nourished and delighted cultures across the globe.
But knowing when and how to harvest your beets is crucial for maximizing their flavor and texture. This Harvesting Beets DIY guide will walk you through everything you need to know, from identifying the signs of ripeness to the best tools and techniques for a successful harvest. Imagine enjoying sweet, tender beets in your favorite recipes, all thanks to your own green thumb! Plus, we’ll cover proper storage to keep your harvest fresh for weeks. Let’s get started and turn your beet patch into a source of delicious, homegrown goodness!

Harvesting Beets Like a Pro: A DIY Guide
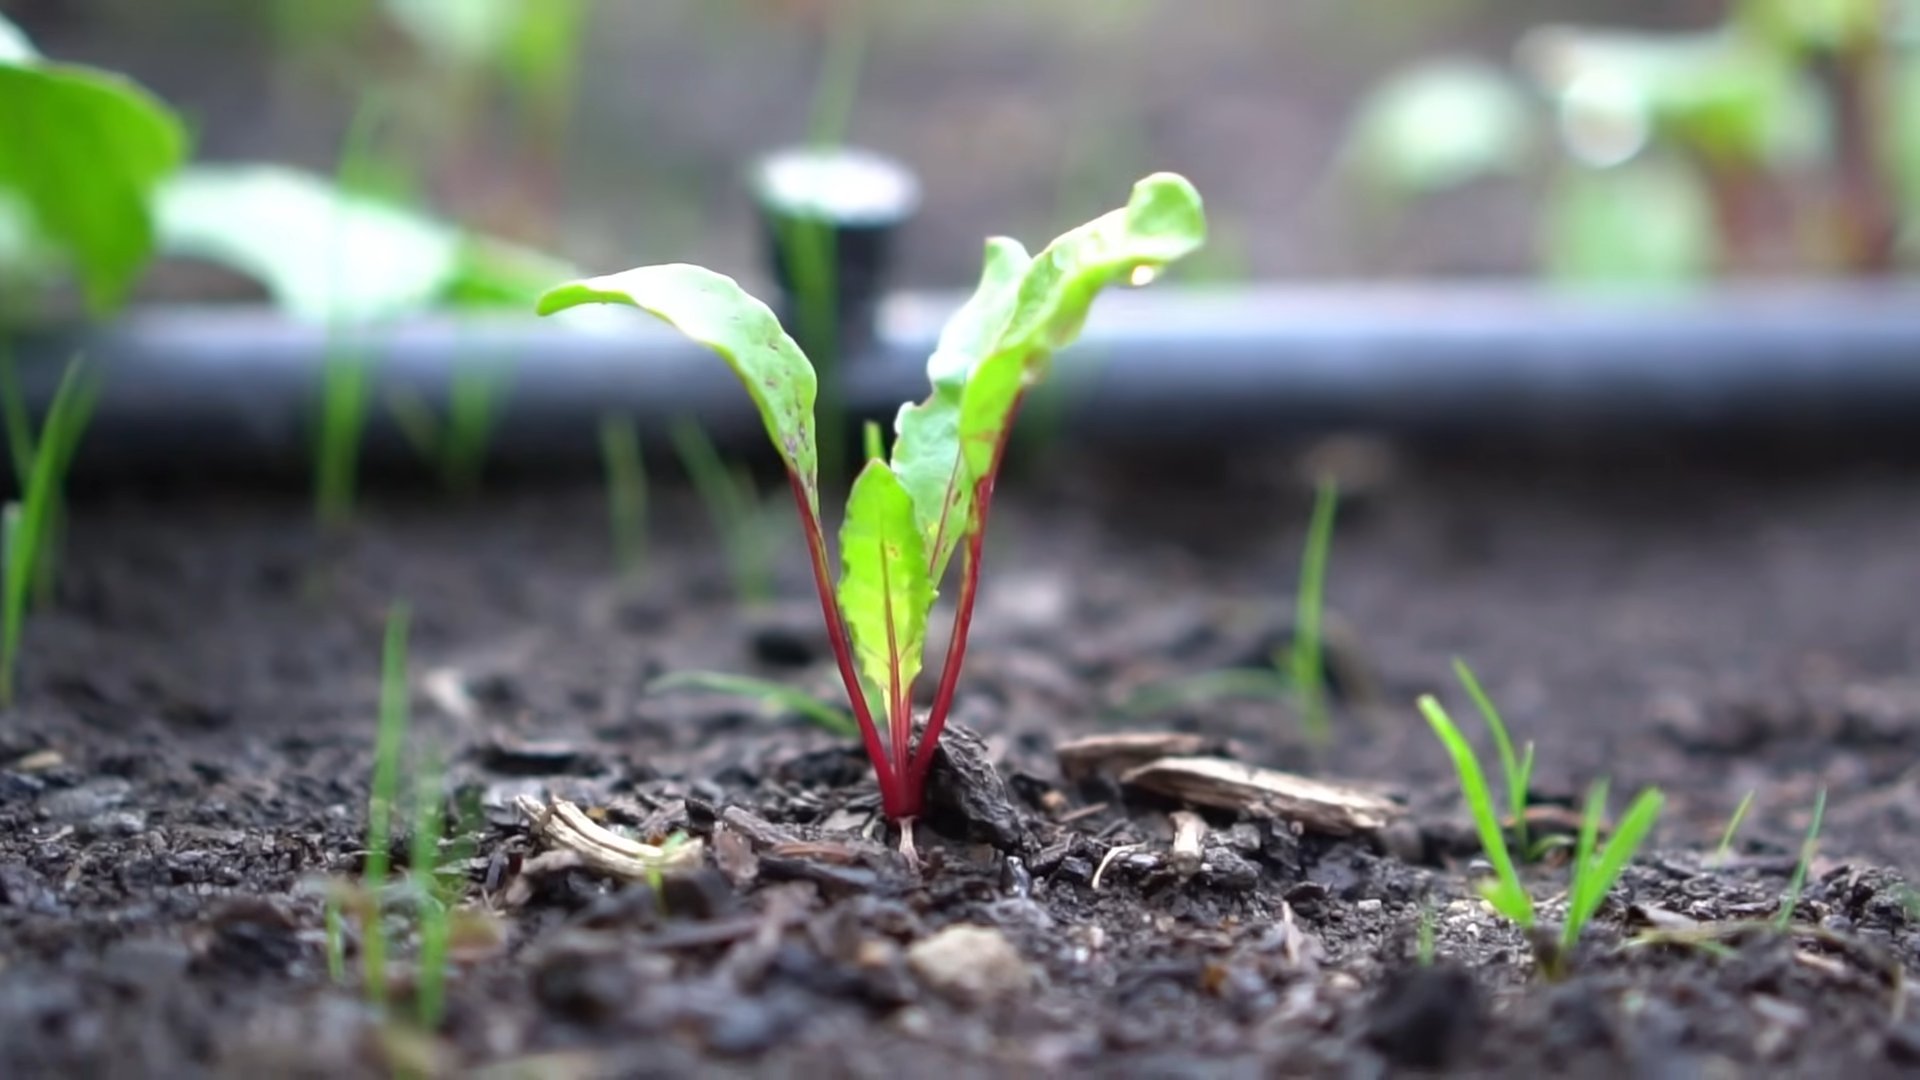
Okay, so you’ve nurtured your beet babies from tiny seeds to leafy wonders, and now it’s time to reap the rewards! Harvesting beets might seem straightforward, but there’s a little finesse involved to ensure you get the best flavor and storage life. Don’t worry, I’m here to guide you through the process, step-by-step. Let’s get digging!
When to Harvest Your Beets
Knowing when to harvest is crucial. You don’t want to pull them too early and end up with tiny, flavorless beets, or wait too long and have them become woody and tough. Here’s what to look for:
* Size Matters: Generally, beets are ready to harvest when the roots are 1-3 inches in diameter. Check your seed packet for the specific variety’s recommended size. Some varieties are meant to be harvested smaller, like baby beets.
* Shoulder Check: The “shoulder” of the beet, where the root meets the leaves, should be visible above the soil line. This gives you a good indication of the beet’s size.
* Days to Maturity: Your seed packet will also tell you the approximate “days to maturity.” This is a good guideline, but remember that weather and growing conditions can affect this.
* Taste Test (Optional): If you’re unsure, you can always pull one beet as a test. Cook it up and see if it’s to your liking. If it’s too small or not flavorful enough, give the rest of the crop a little more time.
* Before a Frost: This is super important! Harvest your beets before the first hard frost. Frost can damage the roots and affect their storage quality.
Tools You’ll Need
Before you head out to the garden, gather these essential tools:
* Garden Fork or Trowel: A garden fork is ideal for loosening the soil around the beets, especially if you have heavy clay soil. A trowel works well for smaller harvests or looser soil.
* Gloves: Beet juice can stain your hands, so gloves are a good idea.
* Sharp Knife or Scissors: For trimming the beet greens.
* Bucket or Basket: To collect your harvested beets.
* Water Hose or Bucket of Water: For washing off the dirt.
* Optional: A tarp or old sheet to lay the beets on while you’re working.
Harvesting the Beets: Step-by-Step
Alright, let’s get those beets out of the ground!
1. Loosen the Soil: This is the most important step to avoid breaking the beet roots. Using your garden fork, carefully insert the tines into the soil about 4-6 inches away from the beet. Gently rock the fork back and forth to loosen the soil around the beet. If you’re using a trowel, insert it into the soil at an angle and loosen the soil around the beet.
2. Gently Pull: Grasp the beet greens firmly near the base of the plant. Gently pull upwards, wiggling the beet slightly if needed. The loosened soil should allow the beet to come out relatively easily. Don’t yank! You don’t want to break the root.
3. If It’s Stubborn: If the beet is still resisting, use the garden fork or trowel to loosen the soil a little more. You might need to dig down a bit deeper around the beet.
4. Remove Excess Soil: Once you’ve pulled the beet, gently shake off as much soil as possible. Avoid banging the beet against anything, as this can bruise it.
5. Trim the Greens: Using your sharp knife or scissors, trim the beet greens about 1-2 inches above the root. Don’t cut too close to the beet! This can damage the crown and shorten its storage life.
6. Save the Greens! Beet greens are delicious and nutritious! Don’t throw them away. You can sauté them, add them to salads, or use them in soups.
7. Clean the Beets: Rinse the beets with water to remove any remaining soil. You can use a hose or a bucket of water. Gently scrub the beets with your hands to remove stubborn dirt.
8. Let Them Dry: Lay the cleaned beets on a tarp or old sheet to dry completely. This is important for preventing rot during storage.
9. Inspect for Damage: Before storing, inspect each beet for any cuts, bruises, or signs of disease. Discard any damaged beets, as they will not store well.
Storing Your Harvested Beets
Proper storage is key to keeping your beets fresh and flavorful for months. Here’s how I do it:
* Cool and Humid: Beets store best in a cool, humid environment. The ideal temperature is between 32-40°F (0-4°C) with a humidity level of 90-95%.
* The Root Cellar Method: If you have a root cellar, you’re in luck! This is the perfect place to store beets. Simply layer the beets in a box or bin with damp sand or sawdust. Make sure the beets are not touching each other.
* The Refrigerator Method: If you don’t have a root cellar, the refrigerator is your next best option.
1. Prepare the Beets: Make sure the beets are clean and dry.
2. Wrap Them Up: Wrap each beet individually in a paper towel.
3. Bag It: Place the wrapped beets in a plastic bag or container. Leave the bag slightly open to allow for air circulation.
4. Store in the Crisper Drawer: Store the bag of beets in the crisper drawer of your refrigerator.
* Check Regularly: Check your stored beets regularly for any signs of spoilage. Remove any beets that are starting to rot to prevent the rot from spreading to the other beets.
* How Long Will They Last? Properly stored beets can last for several months in the refrigerator or root cellar.
Using Your Beet Greens
As I mentioned earlier, don’t toss those beet greens! They’re packed with vitamins and minerals and are delicious in a variety of dishes. Here are a few ideas:
* Sautéed Beet Greens: Sauté beet greens with garlic, olive oil, and a pinch of salt and pepper.
* Beet Green Salad: Add beet greens to your favorite salad for a boost of nutrients.
* Beet Green Soup: Use beet greens in soups and stews.
* Beet Green Smoothies: Add beet greens to your smoothies for a healthy and delicious drink.
* Beet Green Chips: Bake beet greens in the oven to make crispy chips.
Troubleshooting Common Beet Harvesting Problems
Sometimes, things don’t go exactly as planned. Here are a few common problems you might encounter when harvesting beets and how to deal with them:
* Beets are too small: If your beets are too small, it could be due to several factors, such as poor soil, lack of sunlight, or overcrowding. Make sure your beets are planted in well-drained soil, get at least 6 hours of sunlight per day, and are properly thinned.
* Beets are woody and tough: If your beets are woody and tough, it could be because they were left in the ground too long. Harvest your beets when they are the appropriate size and before they become overripe.
* Beets are cracked: Cracked beets can be caused by inconsistent watering. Make sure to water your beets regularly, especially during dry periods.
* Beets are misshapen: Misshapen beets can be caused by rocks or other obstacles in the soil. Remove any rocks or debris from the soil before planting your beets.
* Beet greens are yellowing: Yellowing beet greens can be a sign of nutrient deficiency. Fertilize your beets with a balanced fertilizer according to package directions.
Enjoying Your Beet Harvest
Now that you’ve harvested and stored your beets, it’s time to enjoy the fruits (or rather, roots!) of your labor. Beets are incredibly versatile and can be used in a wide variety of dishes. Here are a few of my favorite ways to enjoy beets:
* Roasted Beets: Roasting beets brings out their natural sweetness. Simply toss the beets with olive oil, salt, and pepper, and roast them in the oven until tender.
* Pickled Beets: Pickled beets are a classic and delicious way to preserve your beet harvest.
* Beet Salad: Combine roasted or boiled beets with goat cheese, walnuts, and a balsamic vinaigrette for a delicious and colorful salad.
* Beet Soup (Borscht): Borscht is a traditional Eastern European soup made with beets, cabbage, and other vegetables.
* Beet Juice:
Conclusion
So, there you have it! Mastering the art of harvesting beets doesn’t require a green thumb or years of gardening experience. It’s a simple, rewarding process that puts you in direct connection with the food you eat. This DIY approach to harvesting beets is more than just pulling vegetables from the ground; it’s about understanding the growth cycle, appreciating the freshness, and minimizing waste.
Why is this DIY trick a must-try? Because it empowers you to control the quality and timing of your harvest. Store-bought beets, while convenient, often lack the vibrant flavor and crisp texture of freshly picked ones. By harvesting your own, you ensure peak ripeness and maximum nutritional value. Plus, there’s an undeniable satisfaction in enjoying the fruits (or rather, roots!) of your labor.
But the benefits extend beyond just taste and nutrition. Harvesting your own beets reduces your reliance on commercially grown produce, which often travels long distances and contributes to carbon emissions. It’s a small step towards a more sustainable lifestyle. Furthermore, it can be a fun and educational activity for the whole family, teaching children about where their food comes from and fostering a love for gardening.
Now, let’s talk about variations and suggestions. While the basic technique remains the same, you can adapt it to suit your specific needs and preferences. For instance, if you’re growing different varieties of beets, you might want to keep a record of their individual maturation times to ensure optimal harvesting. You can also experiment with different tools, such as a garden fork or trowel, to find what works best for your soil type.
Consider using the beet greens in your cooking as well. They are incredibly nutritious and versatile, adding a vibrant touch to salads, stir-fries, and soups. Don’t let them go to waste! You can also pickle your harvested beets for a tangy and flavorful treat that will last for months. Or, roast them with other root vegetables for a hearty and satisfying side dish. The possibilities are endless!
Don’t be afraid to experiment and find what works best for you. Gardening is a journey of learning and discovery, and there’s no one-size-fits-all approach. The most important thing is to have fun and enjoy the process.
We wholeheartedly encourage you to try this DIY trick for harvesting beets. It’s a simple, rewarding, and sustainable way to enjoy fresh, delicious vegetables. Once you’ve experienced the joy of harvesting your own beets, you’ll never look at store-bought ones the same way again.
So, grab your gloves, head out to your garden, and get ready to harvest some beets! And don’t forget to share your experience with us. We’d love to hear about your successes, challenges, and any tips or tricks you’ve discovered along the way. Share your photos and stories on social media using #HarvestingBeetsDIY. Let’s inspire others to embrace the joys of gardening and the satisfaction of growing their own food. Happy harvesting!
Frequently Asked Questions (FAQ)
What is the best time of day to harvest beets?
The best time to harvest beets is generally in the morning, after the dew has dried but before the heat of the day sets in. This helps to prevent wilting and ensures that the beets are at their freshest. However, you can harvest them at any time of day as long as the soil isn’t overly wet or muddy. Avoid harvesting during or immediately after heavy rain, as this can make the beets difficult to handle and increase the risk of damage.
How do I know when my beets are ready to harvest?
The size of the beet root is a good indicator of readiness. Most varieties are ready to harvest when the roots are 2-3 inches in diameter. You can also check the maturity date on your seed packet or plant tag, but remember that this is just an estimate and actual maturity may vary depending on growing conditions. Another way to tell if your beets are ready is to gently brush away some of the soil around the base of the plant and check the size of the root. If it looks plump and well-formed, it’s likely ready to harvest. Don’t wait too long to harvest, as overgrown beets can become tough and woody.
What tools do I need to harvest beets?
You don’t need a lot of fancy equipment to harvest beets. A good pair of gardening gloves is essential to protect your hands from dirt and scratches. A garden fork or trowel can be helpful for loosening the soil around the beets, especially if your soil is compacted. A sharp knife or pair of scissors is useful for trimming the beet greens. And a bucket or basket is needed to collect your harvested beets.
How do I store harvested beets?
To store harvested beets, first trim the greens, leaving about an inch of stem attached to the root. Gently brush off any excess soil, but don’t wash the beets until you’re ready to use them. Store the beets in a cool, dark, and humid place, such as a refrigerator crisper drawer or a root cellar. Place them in a perforated plastic bag or wrap them in a damp cloth to help maintain humidity. Beets stored properly can last for several weeks or even months.
Can I eat the beet greens?
Absolutely! Beet greens are highly nutritious and delicious. They can be used in salads, stir-fries, soups, and other dishes. To prepare beet greens, wash them thoroughly and remove any tough stems. You can then cook them like spinach or other leafy greens. Beet greens are a great source of vitamins A and C, as well as iron and fiber.
What if my beets are growing too close together?
If your beets are growing too close together, you can thin them out by carefully pulling up some of the smaller plants. This will give the remaining beets more room to grow and develop. You can eat the thinned-out beet greens as baby greens.
My beet roots are small, what could be the reason?
Several factors can contribute to small beet roots. Insufficient sunlight, poor soil quality, overcrowding, and inadequate watering are common culprits. Ensure your beets receive at least 6 hours of direct sunlight per day. Amend the soil with compost or other organic matter to improve drainage and fertility. Thin out the seedlings to provide adequate spacing. And water regularly, especially during dry periods.
Can I grow beets in containers?
Yes, beets can be successfully grown in containers. Choose a container that is at least 8-10 inches deep and wide. Use a well-draining potting mix. And provide adequate sunlight and water. Container-grown beets may require more frequent watering and fertilization than those grown in the ground.
What are some common pests and diseases that affect beets?
Common pests that affect beets include aphids, flea beetles, and leafminers. Diseases include leaf spot and damping-off. You can control pests by handpicking them off the plants, using insecticidal soap, or introducing beneficial insects. Prevent diseases by providing good air circulation, avoiding overwatering, and using disease-resistant varieties.
How can I improve the flavor of my beets?
The flavor of beets can be enhanced by roasting them, pickling them, or adding them to dishes with complementary flavors, such as goat cheese, walnuts, and citrus. Roasting beets brings out their natural sweetness. Pickling them adds a tangy and refreshing twist. And pairing them with other flavorful ingredients creates a more complex and satisfying dish.
Leave a Comment