
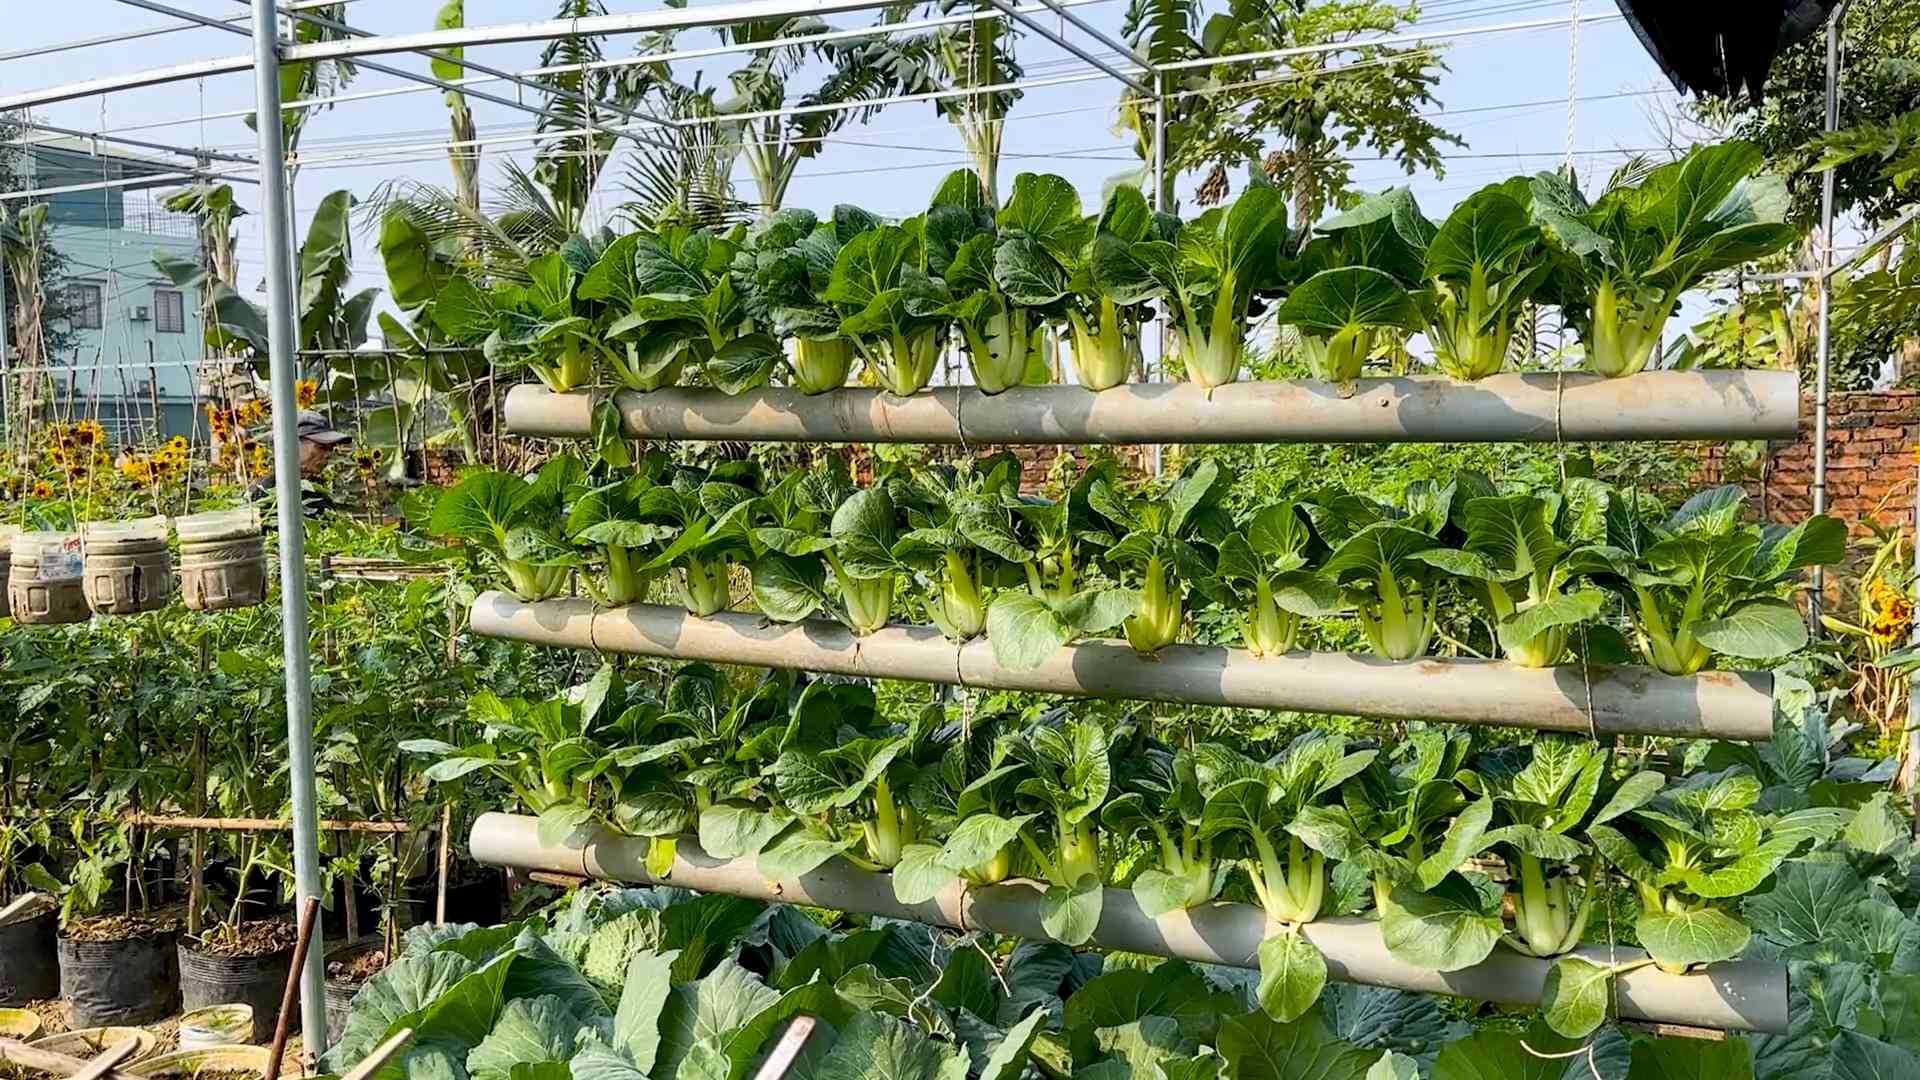
Harvest Bok Choy at Home: Imagine stepping into your backyard, not to mow the lawn, but to gather fresh, crisp Bok Choy for tonight’s stir-fry. Sounds idyllic, right? Well, it’s more achievable than you think! For centuries, cultivating your own food has been a cornerstone of self-sufficiency and a connection to the earth. From ancient Chinese gardens where Bok Choy thrived to modern-day urban farms, the practice of growing your own vegetables has deep roots.
But let’s be honest, sometimes gardening feels more like a chore than a joy. That’s where this DIY guide comes in! I’m here to share some simple, effective tricks to help you successfully harvest Bok Choy at home, even if you’re a complete beginner. We’ll cover everything from knowing when your Bok Choy is perfectly ripe to the best harvesting techniques that encourage continued growth.
Why is this important? Because fresh, homegrown Bok Choy tastes infinitely better than anything you’ll find at the grocery store. Plus, you’ll know exactly where your food comes from and what’s gone into growing it. So, ditch the store-bought veggies and let’s get our hands dirty! I promise, with these tips, you’ll be enjoying delicious, homegrown Bok Choy in no time.

Harvesting Bok Choy Like a Pro: A DIY Guide
Hey there, fellow gardeners! So, you’ve nurtured your bok choy from tiny seedlings to leafy greens, and now you’re wondering, “When and how do I harvest this deliciousness?” Don’t worry, I’m here to guide you through the process. Harvesting bok choy is actually quite simple, and with a few tips and tricks, you’ll be enjoying fresh, homegrown bok choy in no time.
Knowing When to Harvest
The beauty of bok choy is that you can harvest it at different stages of maturity, depending on your preference.
* Baby Bok Choy: If you prefer tender, smaller leaves, you can harvest baby bok choy when the plants are about 4-6 inches tall. These are great for salads or quick stir-fries.
* Mature Bok Choy: For larger, more robust leaves, wait until the plants are 6-12 inches tall. The stalks will be thicker, and the leaves will have a slightly stronger flavor.
* Avoid Overmaturity: Keep an eye on your bok choy. If it starts to bolt (send up a flower stalk), the leaves can become bitter. Harvest immediately if you see signs of bolting.
Tools You’ll Need
Before you head out to the garden, gather these essential tools:
* Sharp Knife or Garden Shears: A sharp blade is crucial for a clean cut, which helps prevent disease and encourages regrowth.
* Gloves (Optional): While not strictly necessary, gloves can protect your hands from dirt and any potential irritants.
* Basket or Bag: To collect your harvested bok choy.
* Water (Optional): A bucket of water to wash the bok choy immediately after harvesting.
Harvesting Methods: Two Ways to Go
There are two main ways to harvest bok choy: harvesting the entire head or harvesting individual leaves. I’ll walk you through both.
Harvesting the Entire Head
This method is best when you want to harvest the entire plant at once, especially if it’s reaching maturity or showing signs of bolting.
Step-by-Step Instructions:
1. Choose Your Plant: Select a bok choy plant that is the desired size and maturity. Make sure it looks healthy and free from pests or diseases.
2. Prepare Your Cutting Tool: Ensure your knife or garden shears are clean and sharp. A dull blade can damage the plant and make it more susceptible to disease.
3. Make the Cut: Using your sharp knife or shears, cut the bok choy at the base of the plant, about 1-2 inches above the soil line. This will allow for potential regrowth if you choose to try for a second harvest.
4. Clean and Store: Gently remove any loose soil or debris from the harvested bok choy. You can wash it immediately or store it in the refrigerator for a few days before washing.
Harvesting Individual Leaves
This method allows you to harvest bok choy gradually, extending your harvest period. It’s perfect for when you only need a few leaves at a time.
Step-by-Step Instructions:
1. Select Outer Leaves: Choose the outer, more mature leaves of the bok choy plant. These are usually the largest and most developed.
2. Cut or Snap the Leaves: Using your fingers or a sharp knife, carefully cut or snap the leaves from the base of the plant, near the stem. Be careful not to damage the central bud, as this is where new leaves will grow.
3. Leave the Inner Leaves: Allow the inner, smaller leaves to continue growing. This will ensure a continuous supply of fresh bok choy.
4. Repeat as Needed: Harvest individual leaves as needed, allowing the plant to continue producing new growth.
Post-Harvest Care: Keeping Your Bok Choy Fresh
Once you’ve harvested your bok choy, proper storage is key to maintaining its freshness and flavor.
* Washing: Gently wash the bok choy under cool, running water to remove any dirt or debris.
* Drying: Thoroughly dry the bok choy before storing it. You can use a salad spinner or pat it dry with paper towels. Moisture can lead to spoilage.
* Storage: Wrap the dry bok choy in a paper towel and place it in a plastic bag or container. Store it in the refrigerator crisper drawer. This will help keep it fresh for up to a week.
Encouraging Regrowth (Optional)
If you’ve harvested the entire head of bok choy, you can try to encourage regrowth for a second harvest.
1. Leave the Base: When harvesting, leave about 1-2 inches of the base of the plant in the ground.
2. Water Regularly: Continue to water the remaining base regularly, keeping the soil moist but not waterlogged.
3. Fertilize Lightly: You can apply a light dose of fertilizer to encourage new growth.
4. Monitor for New Growth: Keep an eye on the base of the plant for new leaves to emerge. It may take a few weeks, but with proper care, you may be able to harvest a second, smaller crop.
Troubleshooting: Common Issues and Solutions
Even with the best intentions, you might encounter a few challenges when harvesting bok choy. Here are some common issues and how to address them:
* Bolting: If your bok choy starts to bolt (send up a flower stalk), the leaves can become bitter. Harvest immediately to salvage as much as possible. Bolting is often caused by hot weather or stress.
* Pest Damage: Check your bok choy for signs of pests, such as aphids or cabbage worms. Treat any infestations promptly with organic pest control methods.
* Disease: Look for signs of disease, such as yellowing or spotting on the leaves. Remove any affected leaves and ensure good air circulation around the plants.
* Slow Growth: If your bok choy is growing slowly, it may need more sunlight or fertilizer. Ensure it’s getting at least 6 hours of sunlight per day and fertilize regularly with a balanced fertilizer.
Cooking with Your Harvested Bok Choy
Now for the best part: enjoying the fruits (or rather, vegetables) of your labor! Bok choy is incredibly versatile and can be used in a variety of dishes.
* Stir-fries: Bok choy is a classic ingredient in stir-fries. Its crisp texture and mild flavor pair well with a variety of sauces and proteins.
* Soups: Add bok choy to soups for a boost of nutrients and flavor. It’s especially delicious in Asian-inspired soups like miso soup or ramen.
* Salads: Baby bok choy is perfect for salads. Its tender leaves add a refreshing crunch.
* Steaming: Steaming bok choy is a simple and healthy way to prepare it. Serve it as a side dish with a drizzle of soy sauce or sesame oil.
* Grilling: Grilling bok choy adds a smoky flavor that’s surprisingly delicious. Simply brush it with oil and grill it until slightly charred.
Final Thoughts
Harvesting bok choy is a rewarding experience that allows you to enjoy fresh, homegrown vegetables. By following these simple steps, you can ensure a successful harvest and enjoy the delicious flavor of bok choy in your favorite dishes. Happy gardening!
Conclusion
So, there you have it! Mastering the art of harvesting bok choy at home is not just a gardening task; it’s a gateway to fresher, more flavorful meals and a deeper connection with the food you consume. We’ve walked you through the simple steps, from identifying the perfect moment for harvest to employing the cut-and-come-again method for continuous yields.
But why is this DIY trick a must-try? Beyond the obvious benefit of having readily available, pesticide-free greens, harvesting your own bok choy offers a unique sense of accomplishment. It’s a tangible reward for your gardening efforts, a reminder that you can cultivate your own sustenance, even in a small space. Plus, freshly harvested bok choy boasts a superior taste and texture compared to store-bought varieties that have traveled miles and sat on shelves. The crispness is unparalleled, and the subtle sweetness is truly enhanced.
Don’t be afraid to experiment with variations! Perhaps you want to try growing different varieties of bok choy, such as the baby bok choy for smaller, more tender leaves, or the Shanghai bok choy with its light green stalks. You can also adjust your harvesting schedule based on your needs. If you prefer smaller, more delicate leaves for salads, harvest earlier. If you want larger, more mature leaves for stir-fries, wait a bit longer. Consider companion planting to enhance the growth and flavor of your bok choy. Marigolds, for example, can deter pests, while dill can attract beneficial insects.
Harvesting bok choy at home is an incredibly rewarding experience. It’s a simple yet profound way to connect with nature, improve your diet, and reduce your environmental impact. It’s also a fantastic way to introduce children to the joys of gardening and healthy eating. Imagine the pride they’ll feel when they harvest their own bok choy and help prepare a delicious meal!
We wholeheartedly encourage you to give this DIY trick a try. Whether you’re a seasoned gardener or a complete beginner, you’ll find that harvesting bok choy at home is surprisingly easy and incredibly satisfying. And once you taste the difference between homegrown and store-bought, you’ll never look back.
But the journey doesn’t end here! We want to hear about your experiences. Did you find the cut-and-come-again method successful? Did you encounter any challenges along the way? What are your favorite ways to use your freshly harvested bok choy? Share your tips, tricks, and recipes in the comments below. Let’s create a community of bok choy enthusiasts and learn from each other’s successes and failures. Together, we can cultivate a greener, healthier, and more delicious world, one bok choy harvest at a time. So, grab your gardening shears and get ready to enjoy the bounty of your own backyard!
Frequently Asked Questions (FAQ)
What is the best time of day to harvest bok choy?
The best time to harvest bok choy is in the morning, after the dew has dried but before the sun gets too hot. This is when the leaves are at their crispest and most hydrated. Harvesting in the heat of the day can cause the leaves to wilt more quickly. If you can’t harvest in the morning, aim for the late afternoon or early evening when the temperature has cooled down. Regardless of the time, make sure the leaves are dry to prevent the spread of disease.
How do I know when my bok choy is ready to harvest?
Bok choy is typically ready to harvest about 45-50 days after planting. However, the exact timing will depend on the variety and growing conditions. Look for plants that have reached a desirable size, typically 6-12 inches tall. The leaves should be firm and crisp, with a vibrant green color. Avoid harvesting bok choy that is bolting (producing a flower stalk), as the leaves will become bitter. You can also harvest individual leaves as needed, using the cut-and-come-again method.
What is the “cut-and-come-again” method, and how does it work?
The “cut-and-come-again” method is a harvesting technique that allows you to harvest bok choy multiple times from the same plant. Instead of harvesting the entire plant at once, you selectively harvest the outer leaves, leaving the inner leaves to continue growing. To use this method, simply cut the outer leaves about an inch above the soil level, being careful not to damage the central bud. The plant will then produce new leaves from the center, allowing you to harvest again in a few weeks. This method extends the harvest period and maximizes your yield.
How should I store freshly harvested bok choy?
To store freshly harvested bok choy, gently rinse the leaves under cool water and pat them dry with a clean towel or salad spinner. Wrap the bok choy in a slightly damp paper towel and place it in a plastic bag or container. Store it in the crisper drawer of your refrigerator. Bok choy stored in this way should last for up to a week. Avoid storing bok choy near fruits that produce ethylene gas, such as apples and bananas, as this can cause the leaves to yellow and spoil more quickly.
Can I freeze bok choy?
Yes, you can freeze bok choy, but it’s important to blanch it first to preserve its color, texture, and flavor. To blanch bok choy, wash and chop the leaves, then submerge them in boiling water for 2-3 minutes. Immediately transfer the bok choy to an ice bath to stop the cooking process. Drain the bok choy thoroughly and pat it dry. Spread the bok choy in a single layer on a baking sheet and freeze for a few hours. Once frozen, transfer the bok choy to a freezer bag or container. Frozen bok choy can be stored for up to 8-12 months. Keep in mind that frozen bok choy will be softer than fresh bok choy, so it’s best used in cooked dishes like stir-fries and soups.
What are some common pests and diseases that affect bok choy, and how can I prevent them?
Some common pests that affect bok choy include aphids, cabbage worms, and flea beetles. To prevent these pests, you can use row covers to protect your plants, handpick pests off the leaves, or use organic insecticides like neem oil or insecticidal soap. Common diseases that affect bok choy include downy mildew and clubroot. To prevent these diseases, ensure good air circulation around your plants, avoid overwatering, and practice crop rotation. You can also use disease-resistant varieties of bok choy.
Is bok choy a cool-season crop?
Yes, bok choy is a cool-season crop, meaning it grows best in temperatures between 55°F and 70°F (13°C and 21°C). It can tolerate light frost, but prolonged exposure to freezing temperatures can damage the leaves. Bok choy is typically planted in the spring or fall, depending on your climate. In warmer climates, it can be grown throughout the winter. Avoid planting bok choy in the heat of summer, as high temperatures can cause it to bolt (produce a flower stalk) and become bitter.
Can I grow bok choy in containers?
Yes, bok choy can be successfully grown in containers. Choose a container that is at least 6-8 inches deep and wide, with drainage holes. Use a well-draining potting mix and water regularly, especially during hot weather. Fertilize your bok choy every few weeks with a balanced fertilizer. Place the container in a location that receives at least 6 hours of sunlight per day. Container-grown bok choy may need to be watered more frequently than bok choy grown in the ground.
Leave a Comment