
Growing squash with styrofoam might sound a little unconventional, right? But trust me, this quirky DIY trick could be the secret weapon your garden needs this season! For centuries, gardeners have been experimenting with different methods to coax the best yields from their squash plants. From ancient civilizations relying on companion planting to modern-day innovations in soil science, the quest for bigger, healthier squash has always been a driving force.
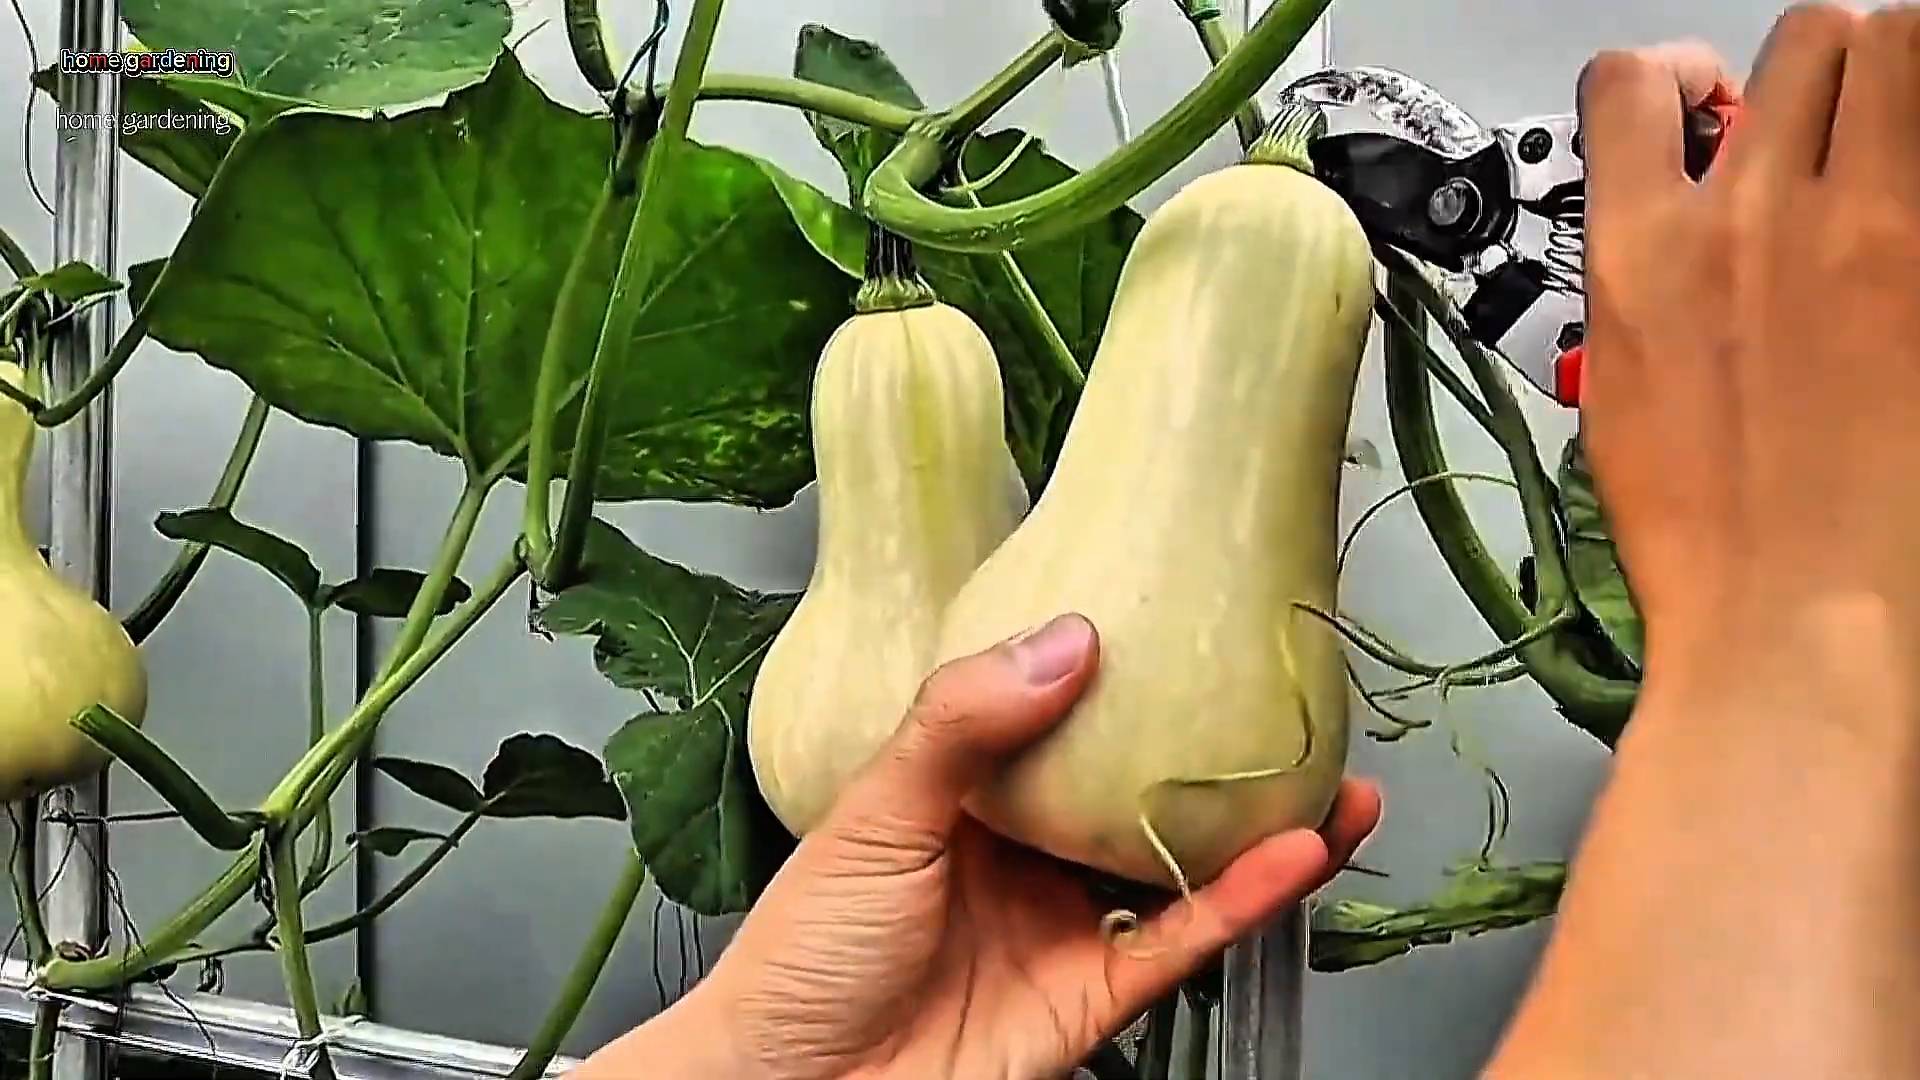
But why styrofoam? Well, have you ever noticed your beautiful squash starting to rot on the underside, especially after a good rain? It’s heartbreaking! That’s where this simple hack comes in. By elevating your squash off the damp soil with a small piece of styrofoam, you’re creating a barrier against moisture and pests, preventing rot and promoting better air circulation. Think of it as a tiny, comfy cushion for your precious produce! This simple trick can drastically improve your harvest, saving you from the disappointment of losing your hard-earned squash to rot. Plus, it’s a fantastic way to repurpose styrofoam packaging that might otherwise end up in the landfill. So, let’s dive into this easy and effective method for growing squash with styrofoam and get ready for a bumper crop!
Growing Bountiful Squash with a Styrofoam Boost: A DIY Guide
Hey there, fellow gardeners! Are you tired of squash plants succumbing to squash vine borers or just struggling to thrive? I’ve got a fantastic DIY hack that’s worked wonders for me: using styrofoam to give your squash a leg up (or rather, a root up!). This method helps protect the vulnerable stem, encourages extra root growth, and can significantly boost your squash yield. Let’s dive in!
Why Styrofoam? The Benefits Explained
Before we get our hands dirty, let’s talk about why this works. Squash vine borers are the bane of many gardeners’ existence. These pesky insects lay their eggs at the base of the squash stem, and when the larvae hatch, they burrow into the stem, effectively cutting off the plant’s water and nutrient supply. Styrofoam acts as a physical barrier, making it harder for the borers to reach the stem.
But that’s not all! When you bury part of the squash stem in soil, it encourages the plant to develop additional roots along the buried section. These extra roots provide the plant with more access to water and nutrients, leading to stronger growth and more abundant fruit. The styrofoam helps keep the soil around the stem loose and aerated, creating an ideal environment for root development.
Materials You’ll Need
* Squash seedlings (your favorite variety!)
* Styrofoam cups (the thicker, the better) or sheets of styrofoam
* Sharp knife or scissors
* Potting soil or compost
* Gardening gloves (optional, but recommended)
* Watering can or hose
Preparing the Styrofoam
This is a crucial step, so pay close attention! We need to create a protective collar for the squash stem.
1. Choose Your Styrofoam: I prefer using styrofoam cups because they’re readily available and the perfect size for young squash plants. You can also use sheets of styrofoam, but you’ll need to cut them into strips and form them into a collar.
2. Cut the Styrofoam: If you’re using cups, carefully cut a slit from the rim down to the base. This slit will allow you to slip the cup around the squash stem. If you’re using sheets, cut strips about 2-3 inches wide and long enough to wrap around the stem with a little overlap.
3. Shape the Collar (if using sheets): If you’re using styrofoam sheets, gently bend the strips into a circular shape, overlapping the ends slightly. You can secure the overlap with tape if desired, but it’s not strictly necessary.
Planting Your Squash with the Styrofoam Hack
Now for the fun part – getting those squash plants in the ground!
1. Prepare the Planting Hole: Dig a hole that’s slightly larger than the root ball of your squash seedling. Make sure the hole is deep enough to accommodate the styrofoam collar and bury a portion of the stem.
2. Amend the Soil (Optional): If your soil is poor, amend it with compost or well-rotted manure to provide your squash plants with the nutrients they need.
3. Gently Remove the Seedling: Carefully remove the squash seedling from its container, being careful not to damage the roots. Gently loosen the roots if they’re tightly bound.
4. Position the Seedling: Place the seedling in the planting hole, ensuring that the base of the stem is at the desired depth. You want to bury a few inches of the stem, but don’t bury the leaves!
5. Install the Styrofoam Collar: Now, carefully slip the styrofoam collar around the base of the stem. If you’re using a cup, gently open the slit and slide it around the stem. If you’re using a sheet, wrap the strip around the stem and secure the overlap. The bottom edge of the styrofoam should be at or slightly below the soil line.
6. Backfill with Soil: Fill the planting hole with soil, gently packing it around the roots and the styrofoam collar. Make sure the soil is firm but not compacted.
7. Water Thoroughly: Water the newly planted squash seedling thoroughly to help settle the soil and encourage root growth.
Ongoing Care and Maintenance
Your squash plants are now planted with a styrofoam shield! But the work doesn’t stop there. Here’s how to keep them thriving:
* Watering: Squash plants need consistent moisture, especially during hot weather. Water deeply and regularly, aiming for about an inch of water per week. Avoid watering the leaves, as this can promote fungal diseases.
* Fertilizing: Feed your squash plants with a balanced fertilizer every few weeks to provide them with the nutrients they need to produce abundant fruit.
* Weeding: Keep the area around your squash plants free of weeds, as weeds can compete for water and nutrients.
* Pest Control: While the styrofoam helps prevent squash vine borers, it’s still a good idea to monitor your plants for other pests, such as squash bugs and aphids. Treat any infestations promptly with appropriate insecticides or organic pest control methods.
* Pollination: Squash plants require pollination to produce fruit. If you’re not seeing many bees or other pollinators in your garden, you may need to hand-pollinate the flowers. This involves transferring pollen from the male flowers to the female flowers.
* Harvesting: Harvest your squash when it’s mature and the skin is firm. The exact timing will depend on the variety of squash you’re growing.
Troubleshooting
Even with the styrofoam hack, you might encounter some challenges. Here are a few common problems and how to address them:
* Styrofoam Collar Too Tight: As your squash plant grows, the stem may thicken and the styrofoam collar may become too tight. If this happens, carefully remove the collar or enlarge the slit to provide more room for the stem to grow.
* Styrofoam Collar Dislodged: Strong winds or curious animals may dislodge the styrofoam collar. Simply re-position it around the stem.
* Fungal Diseases: Squash plants are susceptible to fungal diseases, such as powdery mildew. To prevent these diseases, provide good air circulation, avoid watering the leaves, and treat any infections promptly with fungicides.
* Squash Vine Borers (Despite the Styrofoam): While the styrofoam helps, it’s not foolproof. If you suspect squash vine borers, look for small holes in the stem or wilting leaves. You can try to remove the borers manually by slitting the stem and extracting them, or you can use insecticides specifically designed to control squash vine borers.
Alternative Styrofoam Applications
While using styrofoam cups or sheets is the most common method, here are a few other ways you can incorporate styrofoam into your squash growing:
* Styrofoam Peanuts: Mix styrofoam peanuts into your potting mix to improve drainage and aeration.
* Styrofoam Blocks: Place styrofoam blocks under your squash fruits to keep them off the ground and prevent rot.
* Styrofoam Insulation: Use styrofoam insulation boards to create a warm microclimate for your squash plants, especially in cooler regions.
Section: Advanced Techniques for Maximizing Your Squash Harvest
Okay, so you’ve got the basics down. Now let’s talk about some advanced techniques to really supercharge your squash growing!
1. Succession Planting: Don’t just plant all your squash at once! Plant a new batch of seedlings every few weeks to extend your harvest season. This ensures you’ll have a continuous supply of fresh squash throughout the summer and fall.
2. Companion Planting: Squash loves company! Plant it alongside beneficial companions like marigolds (to deter pests), nasturtiums (to attract pollinators), and beans (to fix nitrogen in the soil).
3. Vertical Growing: If you’re short on space, consider growing your squash vertically on a trellis or fence. This not only saves space but also improves air circulation and reduces the risk of fungal diseases. Make sure to choose a variety that’s suitable for vertical growing, such as zucchini or yellow squash.
4. Pruning: Pruning your squash plants can help improve air circulation, encourage fruit production, and prevent overcrowding. Remove any yellowing or diseased leaves, as well as any non-productive vines.
5. Soil Testing: Before planting, test your soil to determine its pH and nutrient levels. This will help you identify any deficiencies and amend the soil accordingly. Squash plants prefer a slightly acidic soil with a pH of around 6.0 to 6.8.
6. Watering Deeply and Less Frequently: Instead of watering your squash plants lightly every day, water them deeply and less frequently. This encourages the roots to grow deeper, making the plants more drought-tolerant.
7. Mulching: Apply a layer of mulch around your squash plants to help retain moisture, suppress weeds, and regulate soil temperature. Organic mulches like straw, wood chips, or shredded leaves are ideal.
8. Hand Pollination (When Necessary):

Conclusion
So, there you have it! Growing squash with styrofoam isn’t just a quirky gardening hack; it’s a game-changer that can significantly improve your harvest and protect your precious fruits from rot and pests. We’ve explored the science behind it, the practical steps involved, and the undeniable benefits it offers. From preventing ground contact rot to deterring slugs and snails, this simple technique can make a world of difference, especially in damp or humid climates.
Think about it: no more heartbreaking discoveries of squash riddled with blemishes or succumbing to decay before they even reach their peak ripeness. Instead, imagine a bountiful harvest of healthy, vibrant squash, ready to be transformed into delicious meals and culinary creations. That’s the promise of this simple yet effective method.
But don’t just take our word for it. The real magic happens when you try it for yourself. Experiment with different types of styrofoam – from recycled packaging to purpose-bought sheets – to see what works best in your garden. Consider variations like using small terracotta pots or even plastic containers as alternatives to styrofoam, especially if you’re looking for more eco-friendly options. You could also try combining this technique with other pest control methods, such as companion planting or organic sprays, for even greater protection.
Perhaps you’ll find that elevating your butternut squash a few inches off the ground makes all the difference in its sweetness and texture. Or maybe you’ll discover that your zucchini plants produce an abundance of unblemished fruits, thanks to the added air circulation. The possibilities are endless, and the rewards are well worth the effort.
This DIY trick is a must-try for any squash enthusiast looking to maximize their yield and minimize losses. It’s a cost-effective, environmentally conscious, and surprisingly simple way to elevate your gardening game.
We wholeheartedly encourage you to give growing squash with styrofoam a try this season. Embrace the experiment, observe the results, and share your experiences with us and the wider gardening community. Let us know what works for you, what challenges you encounter, and any tips or tricks you discover along the way. Together, we can unlock the full potential of this innovative technique and cultivate a world of healthy, delicious squash.
Don’t delay! Head out to your garden, gather your styrofoam, and get ready to witness the transformative power of this simple yet effective method. Your squash plants – and your taste buds – will thank you for it!
Frequently Asked Questions (FAQ)
What exactly is the benefit of using styrofoam when growing squash?
The primary benefit of using styrofoam when growing squash is to prevent the fruits from direct contact with the soil. This reduces the risk of ground contact rot, a common problem that occurs when squash sits on damp earth, leading to fungal infections and decay. Additionally, the styrofoam acts as a barrier against slugs, snails, and other ground-dwelling pests that can damage the squash. It also improves air circulation around the fruit, further minimizing the risk of rot and promoting even ripening. Finally, the styrofoam can reflect sunlight, potentially aiding in the ripening process and increasing the overall yield.
What kind of styrofoam should I use? Is there a specific type that works best?
You can use a variety of styrofoam types for growing squash. Recycled styrofoam packaging, such as those used for electronics or appliances, works well and is an environmentally friendly option. Styrofoam sheets or blocks purchased from craft stores or hardware stores are also suitable. The key is to ensure the styrofoam is clean and free of any harmful chemicals or contaminants. Avoid using styrofoam that has been treated with pesticides or herbicides. The thickness of the styrofoam isn’t critical, but a piece that’s at least an inch thick provides adequate protection and support.
How do I actually use the styrofoam? Do I just place the squash on top of it?
Yes, it’s that simple! Once the squash fruits begin to develop and start to rest on the ground, gently lift each fruit and place a piece of styrofoam underneath it. Ensure the styrofoam is large enough to fully support the squash and prevent it from touching the soil. You may need to adjust the styrofoam as the squash grows larger. For larger squash varieties, you might need to use multiple pieces of styrofoam or a larger, more substantial support.
Will the styrofoam harm the soil or the plant in any way?
Styrofoam is generally inert and won’t harm the soil or the plant. It doesn’t leach harmful chemicals into the ground. However, it’s important to use clean styrofoam that hasn’t been treated with pesticides or herbicides. Also, be mindful of the environmental impact of styrofoam disposal. Consider reusing the styrofoam for multiple seasons or exploring more eco-friendly alternatives like terracotta pots or wooden planks.
Are there any alternatives to styrofoam that I can use?
Yes, several alternatives to styrofoam can be used to elevate squash fruits. These include:
* **Terracotta pots:** Small terracotta pots turned upside down provide a stable and breathable platform for the squash.
* **Wooden planks:** Untreated wooden planks can be used to create a raised surface for the squash.
* **Plastic containers:** Recycled plastic containers, such as yogurt tubs or margarine containers, can be used as supports.
* **Rocks or bricks:** Clean rocks or bricks can also be used to elevate the squash, but be mindful of potential heat absorption.
* **Straw or mulch:** While not as effective as solid supports, a thick layer of straw or mulch can provide some protection against ground contact rot.
Can I use this method for all types of squash?
Yes, this method is suitable for all types of squash, including zucchini, butternut squash, pumpkins, and spaghetti squash. The size of the styrofoam or alternative support may need to be adjusted depending on the size and weight of the squash variety. For larger pumpkins, you might need to use a more robust support system, such as a wooden pallet or a custom-built frame.
How often should I check the squash and the styrofoam?
It’s a good idea to check the squash and the styrofoam regularly, especially after periods of heavy rain. Ensure the styrofoam is still in place and hasn’t been displaced by wind or animals. Also, inspect the squash for any signs of rot or pest damage. If you notice any problems, address them promptly to prevent further damage.
Does this method attract more pests to my garden?
Using styrofoam itself shouldn’t attract more pests to your garden. However, it’s important to keep the area around the squash plants clean and free of debris, as this can attract pests. Regularly inspect your plants for signs of infestation and take appropriate measures to control any pests that you find. Consider using companion planting or organic pest control methods to deter pests naturally.
What if the styrofoam gets moldy or dirty?
If the styrofoam gets moldy or dirty, simply clean it with a mild soap and water solution. Rinse thoroughly and allow it to dry completely before placing it back under the squash. You can also disinfect the styrofoam with a diluted bleach solution (1 part bleach to 10 parts water) to kill any mold or bacteria.
Will this method guarantee that my squash won’t rot?
While growing squash with styrofoam significantly reduces the risk of ground contact rot, it doesn’t guarantee that your squash won’t rot. Other factors, such as excessive humidity, poor air circulation, and fungal diseases, can also contribute to rot. It’s important to provide your squash plants with proper care, including adequate sunlight, well-draining soil, and regular watering, to minimize the risk of rot. Also, consider using preventative measures, such as applying organic fungicides, to protect your plants from fungal diseases.

Leave a Comment