
Growing Potatoes in Styrofoam: Unlock the secrets to a bountiful harvest, even without a sprawling garden! Have you ever dreamed of harvesting your own fresh, earthy potatoes, but thought you lacked the space? Well, dream no more! This DIY guide will revolutionize your gardening game, showing you how to cultivate delicious potatoes using a surprisingly simple and readily available resource: styrofoam containers.
The practice of container gardening, a resourceful adaptation born from necessity, has roots stretching back centuries. From ancient rooftop gardens in Babylon to modern urban farming initiatives, humans have always found ways to nurture life in limited spaces. Today, with increasing urbanization and a growing desire for sustainable living, container gardening is experiencing a vibrant resurgence. And what better way to embrace this trend than by repurposing materials and growing your own food?
But why growing potatoes in styrofoam, you might ask? The answer is simple: it’s incredibly efficient, space-saving, and surprisingly effective! Styrofoam containers provide excellent drainage and insulation, creating the perfect environment for potato growth. Plus, it’s a fantastic way to recycle those bulky styrofoam boxes that often end up in landfills. Imagine the satisfaction of turning waste into a delicious and nutritious meal! This DIY trick is a game-changer for apartment dwellers, balcony gardeners, and anyone looking to maximize their yield in a small area. I’m excited to share this easy and rewarding method with you, so let’s get started and transform those styrofoam containers into potato-growing powerhouses!
Growing Potatoes in Styrofoam Containers: A Bumper Crop on Your Patio!
Hey there, fellow garden enthusiasts! I’m super excited to share one of my favorite gardening hacks with you: growing potatoes in styrofoam containers. It’s a fantastic way to get a huge potato harvest, even if you don’t have a lot of space. Plus, it’s incredibly satisfying to watch those spuds grow and then easily harvest them. Let’s dive in!
Why Styrofoam?
Before we get started, you might be wondering why styrofoam containers are so great for growing potatoes. Here’s the lowdown:
* Excellent Drainage: Styrofoam is naturally porous, which helps prevent waterlogging. Potatoes hate sitting in soggy soil, so this is a big win.
* Insulation: Styrofoam provides insulation, keeping the soil warmer in cooler climates and protecting the roots from extreme temperature fluctuations.
* Lightweight: Even when filled with soil, styrofoam containers are relatively lightweight, making them easy to move around your patio or garden.
* Readily Available and Affordable: You can often find styrofoam containers for free from local businesses or restaurants.
* Easy Harvesting: The best part! Harvesting is a breeze. You can simply tip the container over and sift through the soil to collect your potatoes. No digging required!
What You’ll Need
Okay, let’s gather our supplies. Here’s what you’ll need to get started:
* Styrofoam Containers: The bigger, the better! I recommend containers that are at least 2 feet deep and 1.5 feet wide. You can use the kind that restaurants use for takeout, but make sure they are clean. Larger coolers work great too!
* Seed Potatoes: These are potatoes specifically grown for planting. You can find them at your local garden center or online. Choose a variety that you enjoy eating!
* Potting Mix: A good quality potting mix is essential for healthy potato growth. Avoid using garden soil, as it can be too heavy and compact.
* Compost: Compost adds nutrients and improves soil drainage.
* Water: Of course!
* Knife or Drill: For drainage holes.
* Optional: Fertilizer: A balanced fertilizer can help boost potato growth.
Getting Started: Preparing Your Styrofoam Container
This is a crucial step to ensure proper drainage and prevent your potatoes from drowning.
1. Drill Drainage Holes: Using a knife or drill, create several drainage holes in the bottom of your styrofoam container. I usually aim for about 6-8 holes, evenly spaced. Make sure the holes are large enough to allow water to drain freely, but not so large that the soil will fall out.
2. Clean the Container: If you’re using a recycled container, give it a good cleaning with soap and water to remove any residue.
3. Optional: Line the Bottom: You can line the bottom of the container with landscape fabric or burlap to prevent soil from washing out through the drainage holes. This isn’t strictly necessary, but it can help keep things tidy.
Planting Your Seed Potatoes
Now for the fun part! Planting your seed potatoes is the first step towards a bountiful harvest.
1. Chitting (Optional): Chitting is the process of encouraging your seed potatoes to sprout before planting. This gives them a head start and can result in an earlier harvest. To chit your potatoes, place them in a cool, bright location for a few weeks until they develop short, green sprouts.
2. Cut the Seed Potatoes (If Necessary): If your seed potatoes are large (bigger than an egg), you can cut them into smaller pieces, making sure each piece has at least one “eye” (the small buds where sprouts will emerge). Let the cut pieces dry for a day or two to prevent rotting.
3. Add Soil to the Container: Fill the bottom of the container with about 4-6 inches of potting mix and compost. Mix the two together well.
4. Plant the Seed Potatoes: Place the seed potatoes on top of the soil, with the eyes facing upwards. Space them about 10-12 inches apart. If you’re using smaller containers, you may only be able to plant one or two seed potatoes.
5. Cover with Soil: Cover the seed potatoes with another 4-6 inches of potting mix and compost. Gently water the soil until it’s moist but not soggy.
Hilling Your Potatoes
Hilling is a crucial technique for maximizing your potato harvest. It encourages the plants to produce more potatoes along the stems.
1. Wait for Sprouts: Once the potato plants have grown about 6-8 inches tall, it’s time to start hilling.
2. Add More Soil: Add a layer of potting mix and compost around the base of the plants, burying the stems up to the bottom leaves. Leave about 2-3 inches of the plant exposed.
3. Repeat the Process: Continue hilling every few weeks as the plants grow, until the container is almost full. This encourages the plants to produce more potatoes along the buried stems.
Caring for Your Potato Plants
Proper care is essential for healthy potato growth and a good harvest.
1. Watering: Water your potato plants regularly, especially during dry periods. The soil should be consistently moist, but not waterlogged. Check the soil moisture by sticking your finger into the soil. If it feels dry an inch or two below the surface, it’s time to water.
2. Fertilizing (Optional): If you want to give your potato plants an extra boost, you can fertilize them every few weeks with a balanced fertilizer. Follow the instructions on the fertilizer package.
3. Sunlight: Potato plants need at least 6-8 hours of sunlight per day. Place your styrofoam containers in a sunny location.
4. Pest Control: Keep an eye out for pests such as aphids, potato beetles, and flea beetles. If you notice any pests, you can treat them with insecticidal soap or neem oil.
5. Weed Control: Remove any weeds that pop up in the container. Weeds can compete with your potato plants for nutrients and water.
Harvesting Your Potatoes
This is the moment you’ve been waiting for! Harvesting your potatoes is the most rewarding part of the process.
1. When to Harvest: You can start harvesting “new potatoes” (small, immature potatoes) about 2-3 weeks after the plants flower. For a larger harvest of mature potatoes, wait until the plants start to die back and the foliage turns yellow or brown. This usually takes about 80-100 days after planting.
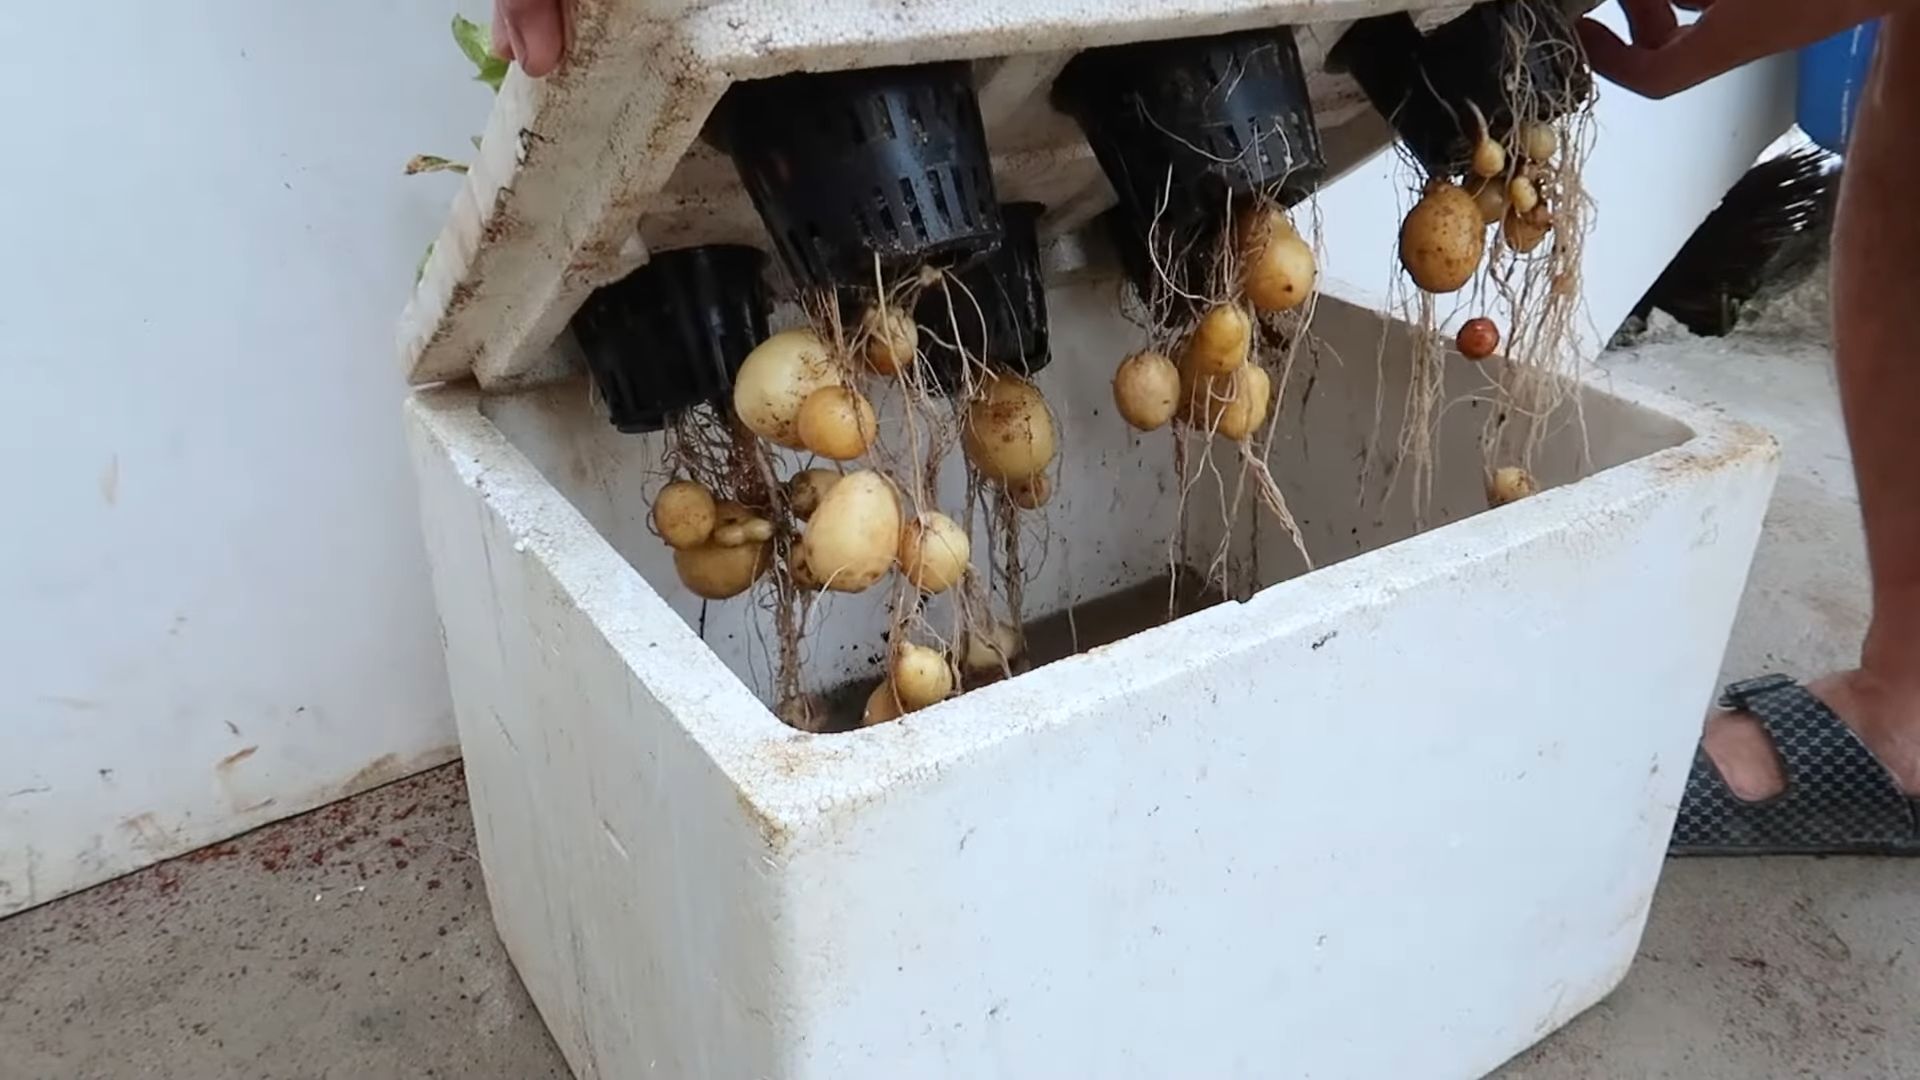
2. Harvesting: The beauty of growing potatoes in styrofoam containers is that harvesting is incredibly easy. Simply tip the container over and sift through the soil to collect your potatoes. You can also reach into the container and gently pull out the potatoes by hand.
3. Curing (Optional): If you plan to store your potatoes for a longer period, you can cure them for a week or two. To cure potatoes, spread them out in a cool, dark, and well-ventilated location. This helps to toughen the skins and prevent rotting.
Troubleshooting
Even with the best care, you might encounter some problems along the way. Here are a few common issues and how to address them:
* Potato Blight: This fungal disease can cause brown spots on the leaves and stems. To prevent potato blight, choose disease-resistant varieties and avoid overhead watering. If you notice signs of blight, remove the affected foliage and treat the plants with a fungicide.
* Scab: This disease causes rough, scabby patches on the potato skins. Scab is more common in alkaline soils. To prevent scab, maintain a slightly acidic soil pH and avoid overwatering.
* Pests: As mentioned earlier, aphids, potato beetles, and flea beetles can be a problem. Treat them with insecticidal soap or neem oil.
Tips for Success
Here are a few extra tips to help you grow a bumper crop of potatoes in styrofoam containers:
* Choose the Right Variety: Some potato varieties are better suited for container growing than others. Look for varieties that are compact and early-maturing.
* Use High-Quality Potting Mix: A good quality potting mix is essential for healthy potato growth. Avoid using garden soil, as it can be too heavy and compact.
* Don’t Overwater: Overwatering can lead to root rot and other problems. Water your potato plants regularly, but allow the soil to dry out slightly between waterings.
* Rotate Your Crops: Avoid planting potatoes in the same container year after year. This can help prevent soilborne diseases and pests.
* Have Fun! Gardening should be enjoyable. Experiment with different varieties and techniques to find what works best for you.
Growing potatoes in styrofoam containers is a rewarding and easy way to enjoy fresh, homegrown potatoes, even if you have

Conclusion
So, there you have it! Growing potatoes in styrofoam containers is not just a quirky gardening experiment; it’s a genuinely effective and rewarding way to cultivate your own delicious spuds, even with limited space. We’ve explored the ins and outs of this method, highlighting its advantages over traditional in-ground planting, especially for urban gardeners or those with poor soil conditions. The ability to easily monitor and harvest your potatoes by simply tipping the container is a game-changer, eliminating the guesswork and back-breaking digging often associated with potato harvesting.
But why is this DIY trick a must-try? Firstly, it’s incredibly space-efficient. You can stack styrofoam containers vertically, maximizing your yield in a small area like a balcony, patio, or even a sunny rooftop. Secondly, it offers superior drainage compared to some garden soils, preventing waterlogging and reducing the risk of potato rot. Thirdly, the controlled environment allows you to tailor the soil composition and nutrient levels to perfectly suit your potato plants’ needs, resulting in healthier and more productive growth. Finally, the ease of harvesting is simply unmatched. No more accidentally slicing through potatoes with a shovel!
Looking for variations? Absolutely! Consider experimenting with different potato varieties. Some, like Yukon Gold or fingerling potatoes, tend to thrive in containers. You can also try adding companion plants like marigolds or basil around the edges of the styrofoam container to deter pests and attract beneficial insects. Another variation involves using different types of growing mediums. While a mix of compost, potting soil, and perlite is ideal, you can also incorporate other organic materials like coconut coir or worm castings to further enrich the soil. For those in colder climates, consider using dark-colored styrofoam containers to absorb more heat and extend the growing season. You can also move the containers indoors during unexpected frosts.
Don’t be afraid to get creative with your styrofoam containers! You can paint them to add a touch of personality to your garden or even decorate them with mosaic tiles. Just be sure to use non-toxic paints and sealants to avoid contaminating the soil. Remember to drill adequate drainage holes in the bottom of the containers to prevent water from pooling.
Growing potatoes in styrofoam is a fantastic way to connect with nature, enjoy fresh, homegrown produce, and learn more about the fascinating process of plant growth. It’s a project that’s suitable for gardeners of all skill levels, from beginners to seasoned pros. The satisfaction of harvesting your own potatoes, knowing that you nurtured them from seed to table, is truly unparalleled.
So, what are you waiting for? Gather your styrofoam containers, potato seed pieces, and growing medium, and embark on this exciting gardening adventure. We are confident that you’ll be amazed by the results. We encourage you to try this DIY potato growing method and share your experiences with us! Post photos of your styrofoam potato gardens on social media using #StyrofoamPotatoes and tag us. We can’t wait to see your thriving potato plants and hear about your successes (and any challenges you encounter along the way). Happy growing!
Frequently Asked Questions (FAQ)
1. What kind of styrofoam containers are best for growing potatoes?
The ideal styrofoam containers are those that are relatively deep (at least 12 inches) and wide (at least 18 inches in diameter). This provides ample space for the potato plants to develop their root systems and produce a good yield of tubers. Avoid using styrofoam containers that have been used to store harsh chemicals or pesticides, as these could contaminate the soil and harm your plants. Food-grade styrofoam containers are generally safe to use. Also, make sure the styrofoam is sturdy enough to hold the weight of the soil and plants, especially when the potatoes start to grow.
2. How many drainage holes should I drill in the styrofoam container?
Adequate drainage is crucial for preventing waterlogging and root rot. We recommend drilling at least 4-6 drainage holes in the bottom of the styrofoam container, spaced evenly apart. The holes should be at least 1/2 inch in diameter to allow for proper water flow. You can also add a layer of gravel or small stones to the bottom of the container to further improve drainage. Check the drainage after watering to ensure that water is flowing freely. If the water is pooling, you may need to drill additional holes.
3. What type of soil mix is best for growing potatoes in styrofoam containers?
A well-draining and nutrient-rich soil mix is essential for healthy potato growth. A good option is to combine equal parts of compost, potting soil, and perlite. Compost provides essential nutrients and improves soil structure, potting soil provides a good base for root growth, and perlite improves drainage and aeration. You can also add other organic materials like coconut coir or worm castings to further enrich the soil. Avoid using garden soil, as it can be too heavy and compacted for container gardening.
4. How often should I water my potato plants in styrofoam containers?
The frequency of watering will depend on the weather conditions, the size of the container, and the type of soil mix you are using. Generally, you should water your potato plants when the top inch of soil feels dry to the touch. Avoid overwatering, as this can lead to root rot. During hot and dry weather, you may need to water your plants more frequently. Check the soil moisture regularly and adjust your watering schedule accordingly.
5. How much sunlight do potato plants need?
Potato plants need at least 6-8 hours of direct sunlight per day to thrive. Choose a location for your styrofoam containers that receives plenty of sunlight. If you live in a hot climate, you may need to provide some afternoon shade to prevent the plants from overheating. If you are growing your potatoes indoors, you will need to supplement with artificial lighting.
6. How do I “hill” the potatoes in a styrofoam container?
“Hilling” is the process of adding more soil around the stems of the potato plants as they grow. This encourages the plants to produce more tubers along the buried stems. As your potato plants grow, gradually add more soil mix to the styrofoam container, covering the lower portion of the stems. Leave the top few inches of the plant exposed. Repeat this process every few weeks until the container is nearly full.
7. When are the potatoes ready to harvest?
Potatoes are typically ready to harvest about 70-90 days after planting, depending on the variety. You can start harvesting “new potatoes” (small, immature potatoes) earlier in the season. To harvest, simply tip the styrofoam container onto its side and gently remove the potatoes from the soil. Be careful not to damage the tubers.
8. What are some common pests and diseases that affect potato plants?
Some common pests that affect potato plants include aphids, potato beetles, and flea beetles. Common diseases include early blight, late blight, and potato scab. You can prevent pests and diseases by using healthy seed potatoes, providing good air circulation, and avoiding overwatering. If you notice any signs of pests or diseases, treat them promptly with appropriate organic or chemical controls.
9. Can I reuse the soil from my styrofoam potato containers?
It is generally not recommended to reuse the soil from your styrofoam potato containers for growing potatoes again, as it may contain disease pathogens or pests. However, you can reuse the soil for other plants, such as flowers or vegetables that are not susceptible to the same diseases. Before reusing the soil, amend it with fresh compost and other organic materials to replenish nutrients.
10. What should I do with the styrofoam containers after harvesting the potatoes?
You can reuse the styrofoam containers for growing other plants, or you can recycle them if your local recycling program accepts styrofoam. If you are not able to recycle the containers, you can dispose of them properly in the trash. Consider cutting them up to take up less space in the landfill.

Leave a Comment