
Growing Kohlrabi Easily can seem daunting, but trust me, it’s more achievable than you think! Have you ever walked through a farmers market and been intrigued by that alien-looking vegetable with the leafy antennae? That’s kohlrabi, and it’s surprisingly easy to cultivate in your own backyard. For centuries, kohlrabi has been a staple in European and Asian cuisines, prized for its crisp texture and mild, slightly sweet flavor. In fact, its name comes from the German words “kohl” (cabbage) and “rabi” (turnip), hinting at its delicious versatility.
But why should you bother learning how to grow kohlrabi easily? Well, for starters, it’s packed with nutrients like Vitamin C and fiber, making it a healthy addition to your diet. More importantly, growing your own kohlrabi means you get to enjoy fresh, organic produce without the hefty price tag or the mystery of where it came from. Plus, let’s be honest, there’s something incredibly satisfying about harvesting something you’ve nurtured from a tiny seed.
This DIY guide is your roadmap to success. I’ll share my tried-and-true tips and tricks for growing kohlrabi easily, even if you’re a complete beginner. We’ll cover everything from seed starting to harvesting, ensuring you have a bountiful crop of this unique and delicious vegetable. Get ready to impress your friends and family with your newfound gardening skills!

Growing Kohlrabi: A Beginner’s Guide to This Underrated Veggie
Hey there, fellow gardeners! Ever heard of kohlrabi? It’s that quirky-looking vegetable that resembles a spaceship more than something you’d eat. But trust me, once you try it, you’ll be hooked! It’s got a mild, slightly sweet flavor, somewhere between a turnip and a cabbage, and it’s incredibly versatile. Plus, it’s surprisingly easy to grow, even if you’re a complete beginner. So, let’s dive into how you can cultivate your own kohlrabi crop!
What You’ll Need
Before we get started, let’s gather our supplies. Here’s what you’ll need to grow kohlrabi successfully:
* Kohlrabi Seeds: Choose a variety that suits your climate and taste. ‘Early White Vienna’ and ‘Purple Vienna’ are popular choices.
* Seed Starting Trays or Pots: If you’re starting indoors.
* Seed Starting Mix: A light, well-draining mix is essential for healthy seedlings.
* Garden Soil: Rich, well-drained soil is ideal for kohlrabi. Amend with compost if necessary.
* Compost or Aged Manure: To enrich the soil and provide nutrients.
* Fertilizer: A balanced fertilizer (e.g., 10-10-10) can help boost growth.
* Watering Can or Hose: For regular watering.
* Gardening Gloves: To protect your hands.
* Trowel or Garden Fork: For planting and cultivating.
* Row Covers (Optional): To protect against pests and frost.
* Measuring Tape or Ruler: To ensure proper spacing.
When to Plant Kohlrabi
Timing is key when it comes to kohlrabi. It’s a cool-season crop, meaning it thrives in cooler temperatures.
* Spring Planting: Start seeds indoors 4-6 weeks before the last expected frost. Transplant seedlings outdoors 2-3 weeks before the last frost.
* Fall Planting: Direct sow seeds in the garden 6-8 weeks before the first expected frost.
Starting Seeds Indoors (Optional)
If you live in an area with a short growing season, starting seeds indoors is a great way to get a head start.
1. Prepare the Seed Starting Trays: Fill your seed starting trays or pots with seed starting mix. Moisten the mix thoroughly.
2. Sow the Seeds: Sow 2-3 kohlrabi seeds per cell or pot, about ¼ inch deep.
3. Cover the Seeds: Gently cover the seeds with more seed starting mix.
4. Water Gently: Water the trays or pots gently to avoid disturbing the seeds.
5. Provide Light: Place the trays or pots in a warm, sunny location or under grow lights. Kohlrabi seeds need light to germinate.
6. Keep Moist: Keep the soil consistently moist, but not waterlogged.
7. Thin Seedlings: Once the seedlings emerge and have a few true leaves, thin them to one seedling per cell or pot. Choose the strongest, healthiest seedling.
Preparing the Garden Bed
Kohlrabi needs a sunny spot with well-drained soil. Here’s how to prepare your garden bed:
1. Choose a Sunny Location: Select a spot in your garden that receives at least 6 hours of sunlight per day.
2. Clear the Area: Remove any weeds, rocks, or debris from the planting area.
3. Amend the Soil: Kohlrabi prefers rich, well-drained soil. Amend the soil with compost or aged manure to improve its fertility and drainage. Work the compost into the top 6-8 inches of soil.
4. Check the Soil pH: Kohlrabi grows best in soil with a pH between 6.0 and 7.5. You can test your soil pH using a soil testing kit. If the pH is too low (acidic), add lime to raise it. If the pH is too high (alkaline), add sulfur to lower it.
5. Rake the Soil: Rake the soil smooth to create a level planting surface.
Transplanting Seedlings Outdoors
Once your seedlings are ready, it’s time to transplant them into the garden.
1. Harden Off Seedlings: Before transplanting, you’ll need to harden off the seedlings. This means gradually exposing them to outdoor conditions over a period of 7-10 days. Start by placing the seedlings in a sheltered location outdoors for a few hours each day, gradually increasing the amount of time they spend outside.
2. Choose a Cloudy Day: Transplant seedlings on a cloudy day or in the late afternoon to minimize stress.
3. Dig Holes: Dig holes in the prepared garden bed, spacing them 6-8 inches apart.
4. Remove Seedlings from Trays: Gently remove the seedlings from their trays or pots. Be careful not to damage the roots.
5. Plant Seedlings: Place the seedlings in the holes, making sure the top of the root ball is level with the soil surface.
6. Fill Holes: Fill the holes with soil and gently firm the soil around the seedlings.
7. Water Thoroughly: Water the seedlings thoroughly after transplanting.
Direct Sowing Seeds
If you’re direct sowing seeds, follow these steps:
1. Prepare the Soil: Prepare the garden bed as described above.
2. Sow the Seeds: Sow the seeds directly into the soil, about ¼ inch deep and 1-2 inches apart.
3. Cover the Seeds: Gently cover the seeds with soil.
4. Water Gently: Water the area gently to avoid washing away the seeds.
5. Thin Seedlings: Once the seedlings emerge and have a few true leaves, thin them to 6-8 inches apart.
Caring for Your Kohlrabi Plants
Once your kohlrabi plants are established, here’s how to care for them:
* Watering: Kohlrabi needs consistent moisture to thrive. Water regularly, especially during dry periods. Aim for about 1 inch of water per week.
* Fertilizing: Fertilize your kohlrabi plants every 2-3 weeks with a balanced fertilizer. Follow the instructions on the fertilizer package.
* Weeding: Keep the garden bed free of weeds. Weeds compete with kohlrabi plants for nutrients and water.
* Mulching: Apply a layer of mulch around the plants to help retain moisture, suppress weeds, and regulate soil temperature.
* Pest Control: Kohlrabi can be susceptible to pests such as cabbage worms, aphids, and flea beetles. Inspect your plants regularly for signs of pests. Use organic pest control methods, such as insecticidal soap or neem oil, to control pests. Row covers can also help protect your plants from pests.
* Bolting Prevention: Bolting (premature flowering) can occur if kohlrabi plants are exposed to prolonged periods of hot weather. To prevent bolting, plant kohlrabi in the spring or fall, when temperatures are cooler. You can also provide shade for your plants during hot weather.
Harvesting Kohlrabi
Kohlrabi is ready to harvest when the bulb is about 2-3 inches in diameter.
1. Check the Size: The size of the bulb is the best indicator of maturity. Don’t let the bulbs get too large, as they can become tough and woody.
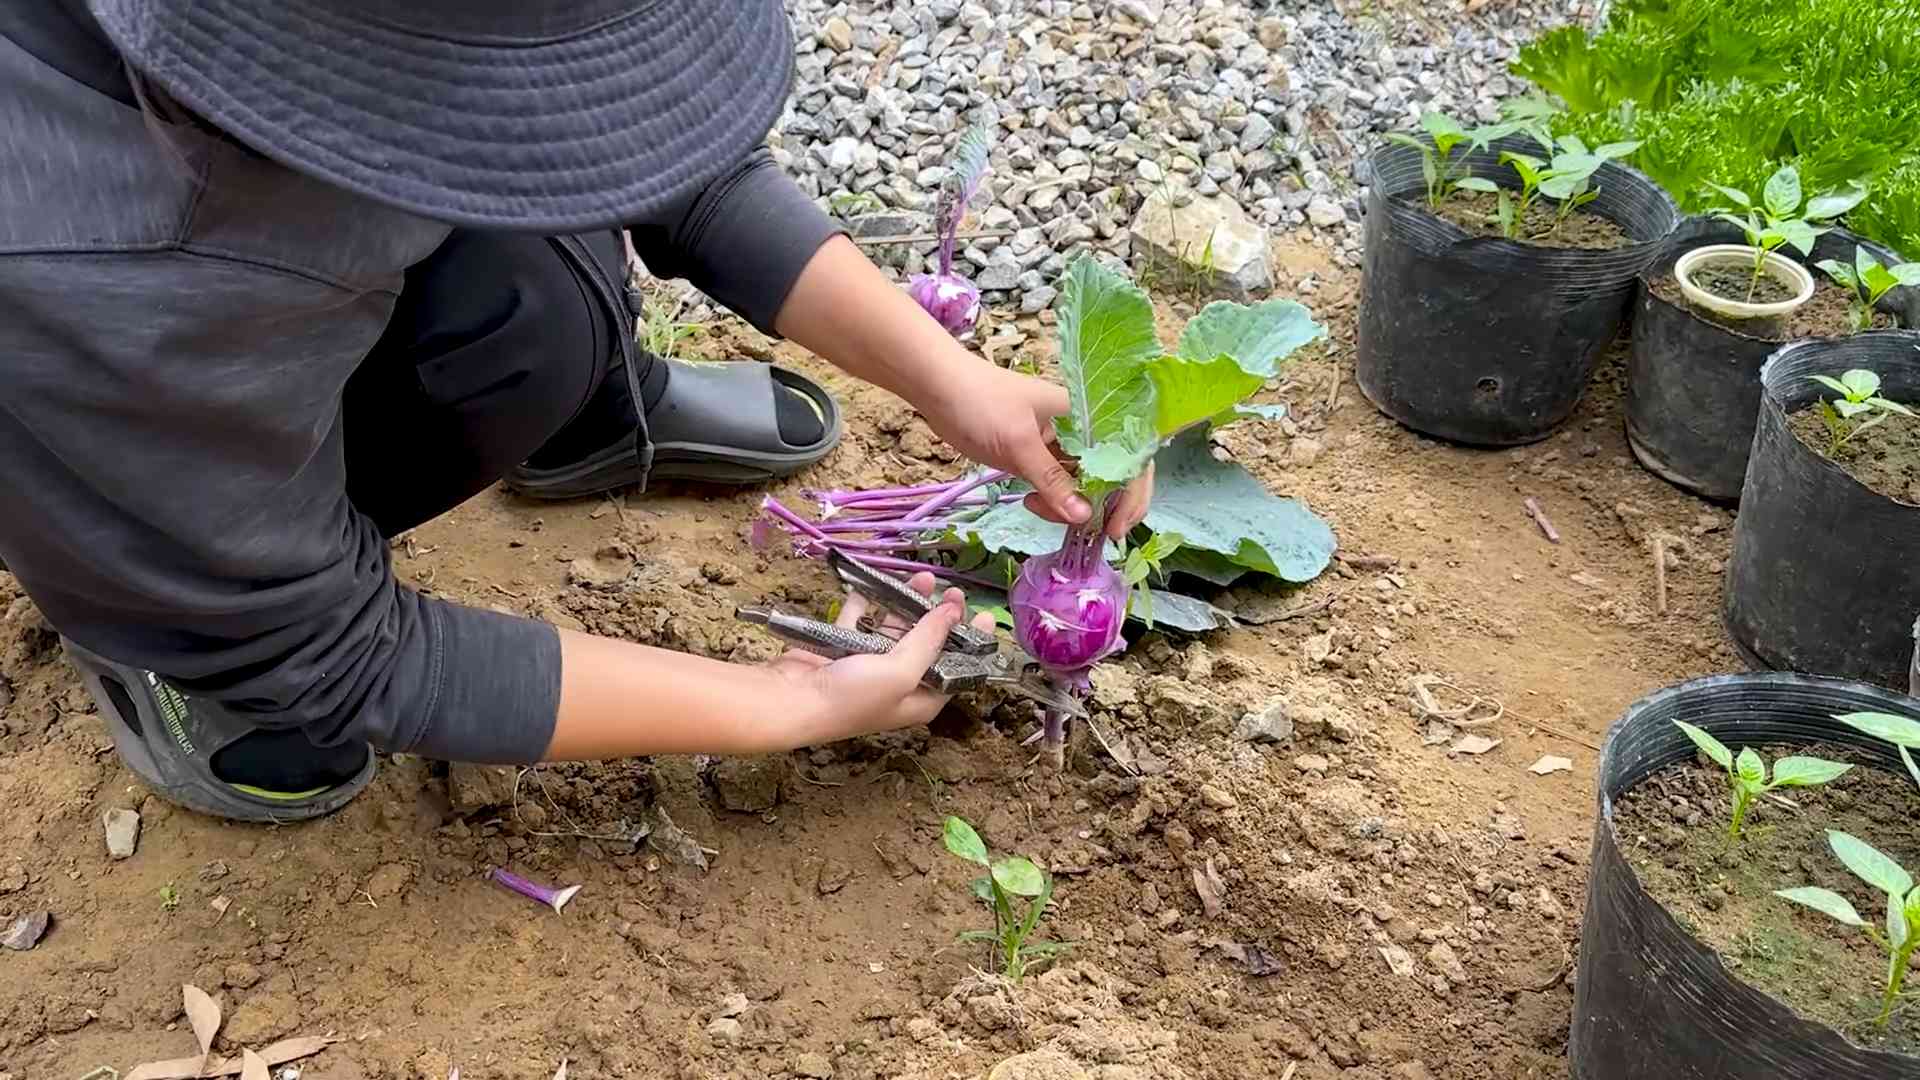
2. Harvest Carefully: Use a sharp knife to cut the kohlrabi bulb from the stem, just above the soil surface.
3. Remove Leaves: Remove the leaves from the bulb. The leaves are also edible and can be cooked like spinach or kale.
4. Store Properly: Store kohlrabi bulbs in the refrigerator for up to several weeks.
Enjoying Your Harvest
Now comes the best part – enjoying your homegrown kohlrabi! Here are a few ideas:
* Raw: Peel and slice kohlrabi and eat it raw in salads or as a snack. It’s crisp and refreshing.
* Roasted: Roast kohlrabi with other vegetables like carrots, potatoes, and onions.
* Steamed: Steam kohlrabi until tender and serve with butter or your favorite sauce.
* Mashed: Mash kohlrabi like potatoes and season with butter, salt, and pepper.
* Soup: Add kohlrabi to soups and stews for a mild, slightly sweet flavor.
* Pickled: Pickle kohlrabi for a tangy and crunchy treat.
Troubleshooting
Even with the best planning,
Conclusion
So, there you have it! Growing kohlrabi easily at home is not only achievable but also incredibly rewarding. From the crisp, refreshing bulb to the nutritious leaves, every part of this unique vegetable offers a culinary adventure. We’ve walked you through the essential steps, from selecting the right variety and preparing your soil to nurturing your plants and harvesting your bounty.
But why should you bother with this DIY project? Because growing your own kohlrabi puts you in control. You know exactly what goes into your food, avoiding harmful pesticides and ensuring the freshest, most flavorful results. Store-bought kohlrabi simply can’t compare to the vibrant taste and satisfying crunch of a homegrown bulb. Plus, the process itself is incredibly therapeutic. There’s something deeply satisfying about nurturing a plant from seed to table, connecting with nature, and reaping the rewards of your hard work.
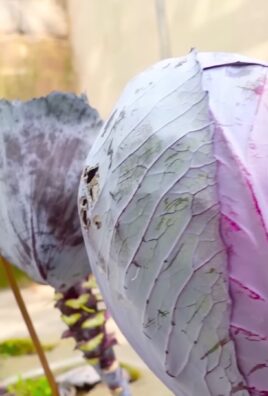
Don’t be afraid to experiment! Try different varieties of kohlrabi to discover your favorites. The ‘Early White Vienna’ is a classic choice, while the ‘Purple Vienna’ adds a splash of color to your garden and plate. For a milder flavor, consider the ‘Superschmelz’ variety, known for its large size and tender flesh.
Consider companion planting to further enhance your kohlrabi growing experience. Planting kohlrabi alongside herbs like dill, chamomile, and rosemary can help deter pests and attract beneficial insects. Marigolds are also excellent companions, adding a vibrant touch to your garden while repelling nematodes.
And the possibilities don’t end with the bulb! The leaves of kohlrabi are just as versatile and delicious. Sauté them like spinach, add them to soups and stews, or even use them in salads for a peppery kick. Don’t let any part of this amazing vegetable go to waste!
We encourage you to take the plunge and embark on your own kohlrabi growing adventure. It’s easier than you might think, and the rewards are well worth the effort. Whether you have a sprawling garden or a small balcony, there’s a place for kohlrabi in your life.
So grab some seeds, prepare your soil, and get ready to experience the joy of growing your own food. And most importantly, don’t forget to share your experiences with us! We’d love to hear about your successes, your challenges, and your favorite ways to enjoy your homegrown kohlrabi. Share your photos, tips, and recipes in the comments below. Let’s build a community of kohlrabi enthusiasts and inspire others to discover the magic of growing their own food. Happy gardening!
Frequently Asked Questions (FAQ)
What is the best time of year to plant kohlrabi?
The timing for planting kohlrabi depends on your climate. Generally, it’s best to plant kohlrabi in early spring or late summer for a fall harvest. For a spring crop, start seeds indoors 4-6 weeks before the last expected frost. Transplant seedlings outdoors once the soil has warmed up and the risk of frost has passed. For a fall crop, sow seeds directly into the garden in late summer, about 6-8 weeks before the first expected frost. In warmer climates, you can grow kohlrabi throughout the winter.
How much sunlight does kohlrabi need?
Kohlrabi thrives in full sun, requiring at least 6 hours of direct sunlight per day. While it can tolerate partial shade, especially in hotter climates, insufficient sunlight can lead to leggy growth and smaller bulbs. Choose a location in your garden that receives ample sunlight throughout the day.
What kind of s
So, there you have it! Growing kohlrabi easily at home is not only achievable but also incredibly rewarding. From the crisp, refreshing bulb to the nutritious leaves, every part of this unique vegetable offers a culinary adventure. We’ve walked you through the essential steps, from selecting the right variety and preparing your soil to nurturing your plants and harvesting your bounty.
But why should you bother with this DIY project? Because growing your own kohlrabi puts you in control. You know exactly what goes into your food, avoiding harmful pesticides and ensuring the freshest, most flavorful results. Store-bought kohlrabi simply can’t compare to the vibrant taste and satisfying crunch of a homegrown bulb. Plus, the process itself is incredibly therapeutic. There’s something deeply satisfying about nurturing a plant from seed to table, connecting with nature, and reaping the rewards of your hard work.
Don’t be afraid to experiment! Try different varieties of kohlrabi to discover your favorites. The ‘Early White Vienna’ is a classic choice, while the ‘Purple Vienna’ adds a splash of color to your garden and plate. For a milder flavor, consider the ‘Superschmelz’ variety, known for its large size and tender flesh.
Consider companion planting to further enhance your kohlrabi growing experience. Planting kohlrabi alongside herbs like dill, chamomile, and rosemary can help deter pests and attract beneficial insects. Marigolds are also excellent companions, adding a vibrant touch to your garden while repelling nematodes.
And the possibilities don’t end with the bulb! The leaves of kohlrabi are just as versatile and delicious. Sauté them like spinach, add them to soups and stews, or even use them in salads for a peppery kick. Don’t let any part of this amazing vegetable go to waste!
We encourage you to take the plunge and embark on your own kohlrabi growing adventure. It’s easier than you might think, and the rewards are well worth the effort. Whether you have a sprawling garden or a small balcony, there’s a place for kohlrabi in your life.
So grab some seeds, prepare your soil, and get ready to experience the joy of growing your own food. And most importantly, don’t forget to share your experiences with us! We’d love to hear about your successes, your challenges, and your favorite ways to enjoy your homegrown kohlrabi. Share your photos, tips, and recipes in the comments below. Let’s build a community of kohlrabi enthusiasts and inspire others to discover the magic of growing their own food. Happy gardening!
Frequently Asked Questions (FAQ)
What is the best time of year to plant kohlrabi?
The timing for planting kohlrabi depends on your climate. Generally, it’s best to plant kohlrabi in early spring or late summer for a fall harvest. For a spring crop, start seeds indoors 4-6 weeks before the last expected frost. Transplant seedlings outdoors once the soil has warmed up and the risk of frost has passed. For a fall crop, sow seeds directly into the garden in late summer, about 6-8 weeks before the first expected frost. In warmer climates, you can grow kohlrabi throughout the winter.
How much sunlight does kohlrabi need?
Kohlrabi thrives in full sun, requiring at least 6 hours of direct sunlight per day. While it can tolerate partial shade, especially in hotter climates, insufficient sunlight can lead to leggy growth and smaller bulbs. Choose a location in your garden that receives ample sunlight throughout the day.
What kind of soil is best for growing kohlrabi?
Kohlrabi prefers well-drained, fertile soil that is rich in organic matter. The ideal soil pH is between 6.0 and 7.5. Before planting, amend your soil with compost or well-rotted manure to improve drainage, fertility, and water retention. Avoid heavy clay soils, as they can become waterlogged and hinder bulb development.
How often should I water kohlrabi?
Kohlrabi needs consistent moisture to thrive. Water deeply and regularly, especially during dry periods. Aim to keep the soil consistently moist but not waterlogged. Mulching around the plants can help retain moisture and suppress weeds. A good rule of thumb is to water when the top inch of soil feels dry to the touch.
What are some common pests and diseases that affect kohlrabi?
Kohlrabi can be susceptible to several pests and diseases, including cabbage worms, aphids, flea beetles, and clubroot. To prevent pest infestations, consider using row covers to protect your plants. Regularly inspect your plants for signs of pests and diseases, and take action promptly if you notice any problems. Organic pest control methods, such as insecticidal soap or neem oil, can be effective in controlling many common pests. Crop rotation and good sanitation practices can help prevent soilborne diseases like clubroot.
How do I know when my kohlrabi is ready to harvest?
Kohlrabi is typically ready to harvest when the bulbs are about 2-3 inches in diameter. Larger bulbs can become tough and woody. Check the seed packet for specific maturity dates for your chosen variety. To harvest, simply cut the bulb from the stem just above the soil line. The leaves can also be harvested and eaten at any time.
Can I eat the leaves of kohlrabi?
Yes, the leaves of kohlrabi are edible and nutritious. They have a similar flavor to kale or collard greens. You can sauté them, add them to soups and stews, or use them in salads. Choose young, tender leaves for the best flavor and texture.
How do I store kohlrabi after harvesting?
Kohlrabi can be stored in the refrigerator for several weeks. Remove the leaves and store them separately in a plastic bag. Store the bulbs in a plastic bag in the crisper drawer of your refrigerator. For longer storage, you can also freeze kohlrabi. Blanch the bulbs and leaves for a few minutes before freezing to preserve their color and flavor.
My kohlrabi bulbs are cracking. What could be the cause?
Cracking in kohlrabi bulbs is often caused by inconsistent watering. Periods of drought followed by heavy watering can cause the bulbs to swell rapidly, leading to cracks. To prevent cracking, ensure consistent moisture levels throughout the growing season. Mulching around the plants can help retain moisture and prevent the soil from drying out too quickly.
Can I grow kohlrabi in containers?
Yes, kohlrabi can be successfully grown in containers. Choose a container that is at least 12 inches deep and wide to provide enough room for the roots to develop. Use a well-draining potting mix and water regularly. Container-grown kohlrabi may need more frequent watering and fertilization than plants grown in the ground.
Leave a Comment