
Grow Celery at Home? Absolutely! Imagine stepping into your backyard and snipping fresh, crisp celery stalks for your salads, soups, or even a healthy snack. No more wilted, store-bought celery – just vibrant, homegrown goodness. I’m excited to share some simple and effective DIY tricks that will have you harvesting your own celery in no time, even if you have limited space or gardening experience.
Celery, with its refreshing crunch, has a surprisingly rich history. Originating in the Mediterranean, it was initially valued for its medicinal properties before becoming a culinary staple. Ancient Greeks used it to crown victors in athletic games, symbolizing triumph and resilience. Today, we appreciate celery for its versatility and nutritional benefits, but growing it yourself takes that appreciation to a whole new level.
Why should you bother with this DIY project? Well, for starters, homegrown celery tastes significantly better than anything you’ll find in the supermarket. Plus, you’ll know exactly what went into growing it – no harmful pesticides or chemicals. More importantly, learning to grow celery at home is incredibly rewarding. It’s a fantastic way to connect with nature, reduce your carbon footprint, and enjoy the satisfaction of nurturing something from seed to harvest. So, let’s dive in and discover the secrets to successful celery cultivation!
Growing Butternut Squash: A Beginner’s Guide to a Bountiful Harvest
Hey there, fellow gardening enthusiasts! I’m so excited to share my experience with growing butternut squash. It’s surprisingly easy, rewarding, and nothing beats the taste of homegrown squash in your favorite fall recipes. This guide will walk you through everything you need to know, from seed to table. Let’s get started!
Choosing Your Butternut Squash Variety
Before we dive into the nitty-gritty, let’s talk varieties. While ‘Waltham Butternut’ is the classic and most widely available, there are other options to consider depending on your space and preferences.
* **Waltham Butternut:** This is the standard, reliable choice. It produces medium-sized squash with excellent flavor and good storage capabilities.
* **Butterscotch PMR:** If powdery mildew is a concern in your area, this variety is a great option. It’s resistant to the disease and produces smaller, sweeter squash.
* **Early Butternut:** As the name suggests, this variety matures earlier than others, making it ideal for shorter growing seasons.
* **Honey Nut:** This is a smaller, more compact variety with a rich, nutty flavor. Perfect for smaller gardens or single servings.
Starting Your Butternut Squash Seeds
Butternut squash needs a long growing season, so starting seeds indoors is often the best approach, especially if you live in a cooler climate.
* **Timing is Key:** Start your seeds about 3-4 weeks before the last expected frost in your area.
* **Materials You’ll Need:**
* Butternut squash seeds
* Seed starting trays or small pots (peat pots are great because you can plant them directly into the ground, minimizing root disturbance)
* Seed starting mix (a light, well-draining mix is crucial)
* Watering can or spray bottle
* Heat mat (optional, but helpful for germination)
* Grow lights (optional, but recommended if you don’t have a sunny windowsill)
**Step-by-Step Instructions:**
1. **Prepare Your Seed Starting Trays:** Fill your seed starting trays or pots with seed starting mix. Gently tap the trays to settle the mix.
2. Sow the Seeds: Make a small hole (about 1 inch deep) in the center of each cell or pot. Place one or two seeds in each hole. Covering with two seeds increases the chance of germination.
3. **Cover and Water:** Gently cover the seeds with more seed starting mix. Water thoroughly using a watering can or spray bottle until the mix is evenly moist.
4. **Provide Warmth:** Place the seed starting trays on a heat mat (if using) or in a warm location. Butternut squash seeds germinate best at temperatures between 70-80°F (21-27°C).
5. **Maintain Moisture:** Keep the seed starting mix consistently moist, but not soggy. Check the moisture level daily and water as needed.
6. **Provide Light:** Once the seedlings emerge (usually within 5-10 days), provide them with plenty of light. Place them under grow lights or on a sunny windowsill. If using a windowsill, rotate the trays regularly to prevent the seedlings from leaning towards the light.
7. **Thin Seedlings (If Necessary):** If you planted two seeds per cell and both germinate, thin them out by snipping off the weaker seedling at the soil line. This will give the remaining seedling more room to grow.
Preparing Your Garden Bed
While your seedlings are growing indoors, it’s time to prepare your garden bed. Butternut squash are heavy feeders, so rich, well-drained soil is essential.
* **Sunlight is Crucial:** Choose a location that receives at least 6-8 hours of direct sunlight per day.
* **Soil Preparation:**
* **Amend the Soil:** Dig in plenty of compost or well-rotted manure to improve soil fertility and drainage. Butternut squash loves nutrient-rich soil.
* **Check the pH:** Butternut squash prefers a soil pH between 6.0 and 7.0. You can test your soil pH using a soil testing kit and amend it accordingly.
* **Create Mounds or Rows:** Butternut squash vines can spread quite a bit, so give them plenty of room. You can plant them in mounds or rows. If planting in mounds, space them about 3-4 feet apart. If planting in rows, space the rows about 6-8 feet apart.
Transplanting Your Butternut Squash Seedlings
Once the danger of frost has passed and your seedlings have developed a few sets of true leaves, it’s time to transplant them into the garden.
* **Hardening Off:** Before transplanting, you’ll need to harden off your seedlings. This means gradually acclimating them to outdoor conditions. Start by placing them outside in a sheltered location for a few hours each day, gradually increasing the amount of time they spend outdoors over the course of a week.
* **Transplanting Time:** Choose a cloudy day or late afternoon to transplant your seedlings. This will help prevent them from getting stressed by the sun.
**Step-by-Step Instructions:**
1. **Dig Holes:** Dig holes in your prepared garden bed that are slightly larger than the root balls of your seedlings.
2. **Gently Remove Seedlings:** Carefully remove the seedlings from their seed starting trays or pots. If you used peat pots, you can plant them directly into the ground.
3. **Plant Seedlings:** Place the seedlings in the holes and gently backfill with soil. Make sure the top of the root ball is level with the surrounding soil.
4. **Water Thoroughly:** Water the seedlings thoroughly after planting.
5. **Mulch:** Apply a layer of mulch around the plants to help retain moisture, suppress weeds, and regulate soil temperature. Straw, wood chips, or shredded leaves are all good options.
Caring for Your Butternut Squash Plants
Once your butternut squash plants are in the ground, it’s important to provide them with proper care to ensure a bountiful harvest.
* **Watering:** Butternut squash needs consistent moisture, especially during fruit development. Water deeply and regularly, especially during dry spells. Avoid overhead watering, as this can lead to fungal diseases. Soaker hoses or drip irrigation are ideal.
* **Fertilizing:** Butternut squash are heavy feeders, so fertilize them regularly throughout the growing season. Use a balanced fertilizer or side-dress with compost or well-rotted manure.
* **Weeding:** Keep the garden bed free of weeds, as they can compete with your butternut squash plants for nutrients and water.
* **Pest and Disease Control:** Keep an eye out for common pests and diseases, such as squash bugs, squash vine borers, and powdery mildew. Take action promptly if you notice any problems. Insecticidal soap, neem oil, and copper fungicide are all effective treatments.
* **Pollination:** Butternut squash plants produce both male and female flowers. The female flowers need to be pollinated in order to produce fruit. If you’re not seeing many bees in your garden, you may need to hand-pollinate the flowers. To do this, simply use a small paintbrush to transfer pollen from the male flowers to the female flowers.
Harvesting Your Butternut Squash
The moment you’ve been waiting for! Knowing when to harvest your butternut squash is crucial for optimal flavor and storage.
* **Timing is Everything:** Butternut squash are typically ready to harvest in the fall, about 90-100 days after planting.
* **Signs of Ripeness:**
* **Hard Rind:** The rind should be hard and difficult to pierce with your fingernail.
* **Deep Tan Color:** The skin should be a deep tan color.
* **Dry Stem:** The stem should be dry and brown.
* **Harvesting Technique:** Use a sharp knife or pruning shears to cut the squash from the vine, leaving about 2-3 inches of stem attached. This will help prevent rot.
**Step-by-Step Instructions:**
1. **Inspect the Squash:** Check the squash for signs of ripeness.
2. **Cut the Stem:** Using a sharp knife or pruning shears, cut the squash from the vine, leaving about 2-3 inches of stem attached.
3. **Handle with Care:** Handle the squash carefully to avoid bruising or damaging the rind.
4. **Cure the Squash:** Cure the squash in a warm, dry place for about 1-2 weeks. This will help harden the rind and improve its storage life.
Storing Your Butternut Squash
Proper storage is essential for enjoying your butternut squash throughout the winter.
* **Ideal Storage Conditions:** Store your cured butternut squash in a cool, dry, and well-ventilated place. The ideal temperature is between 50-55°F (10-13°C).
* **Storage Tips:**
* **Don’t Wash:** Don’t wash the squash before storing it.
* **Handle Carefully:** Handle the squash carefully to avoid bruising or
Conclusion
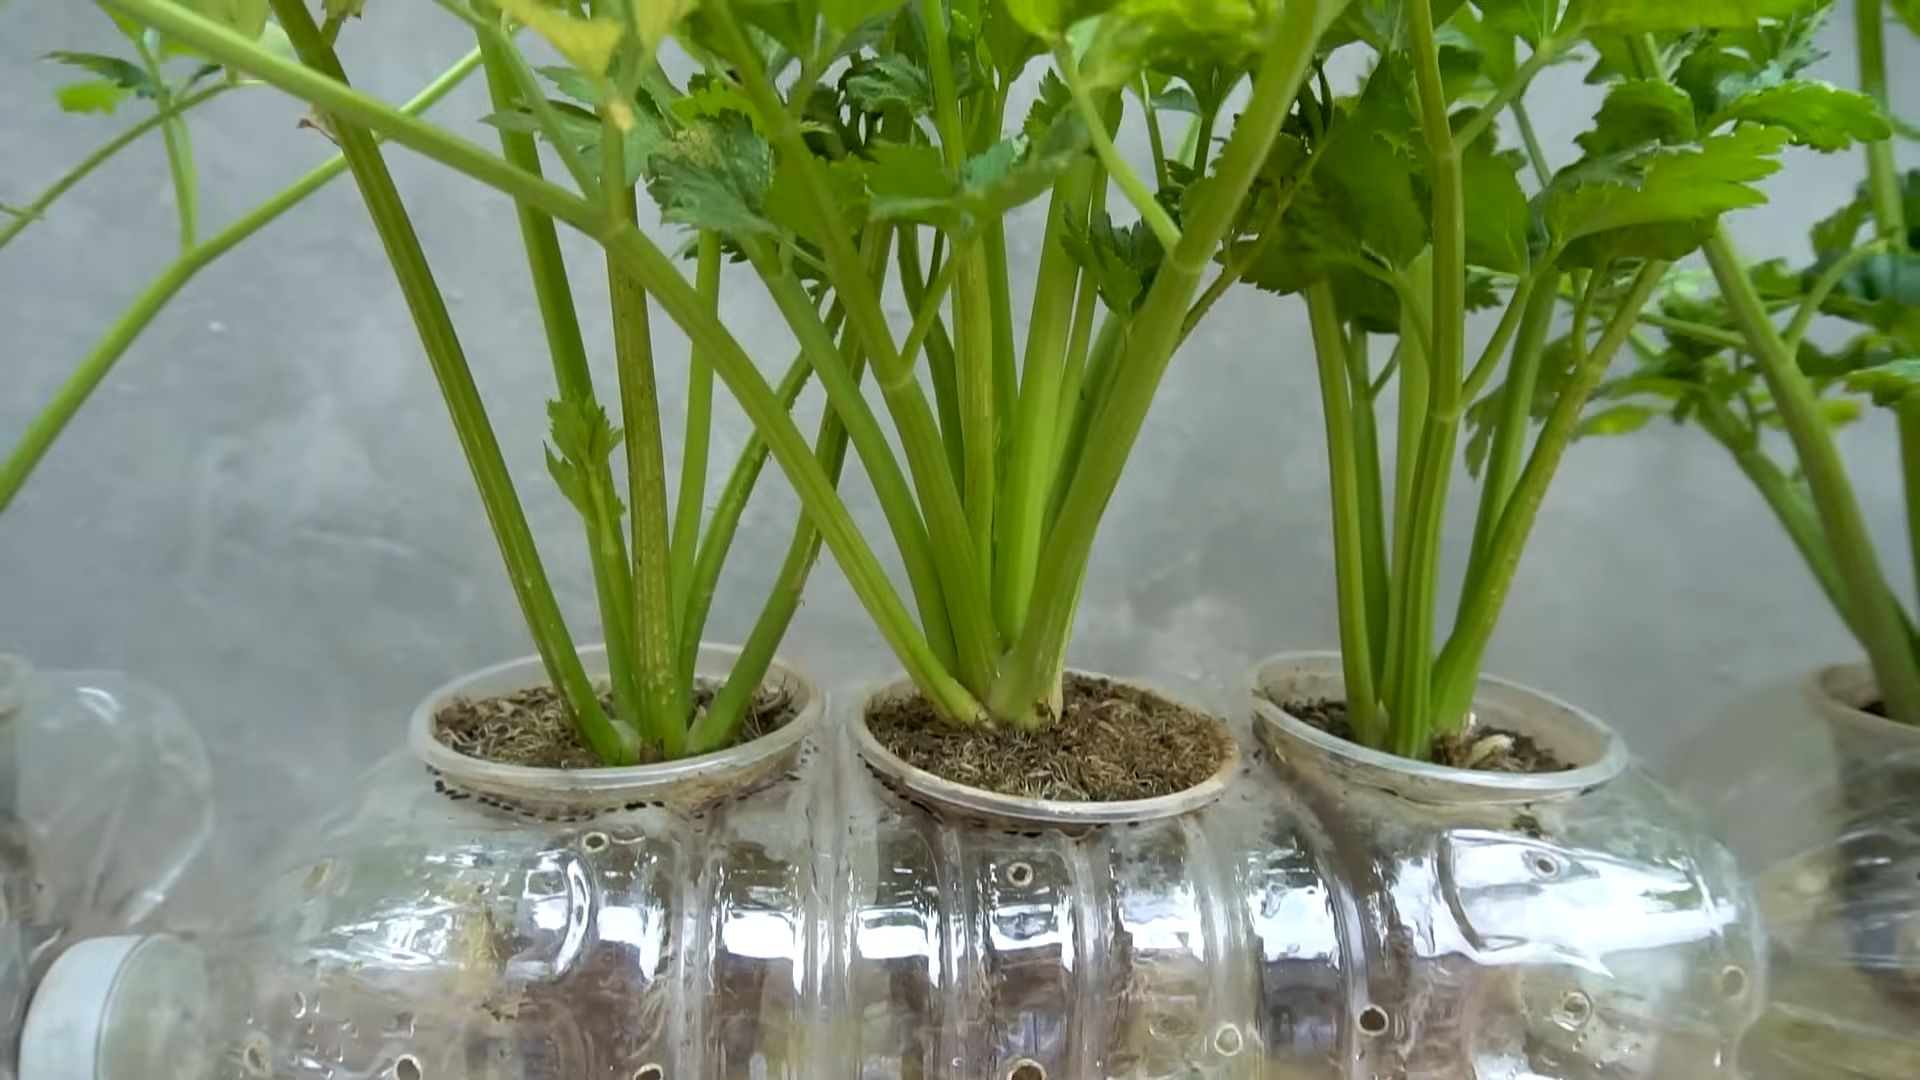
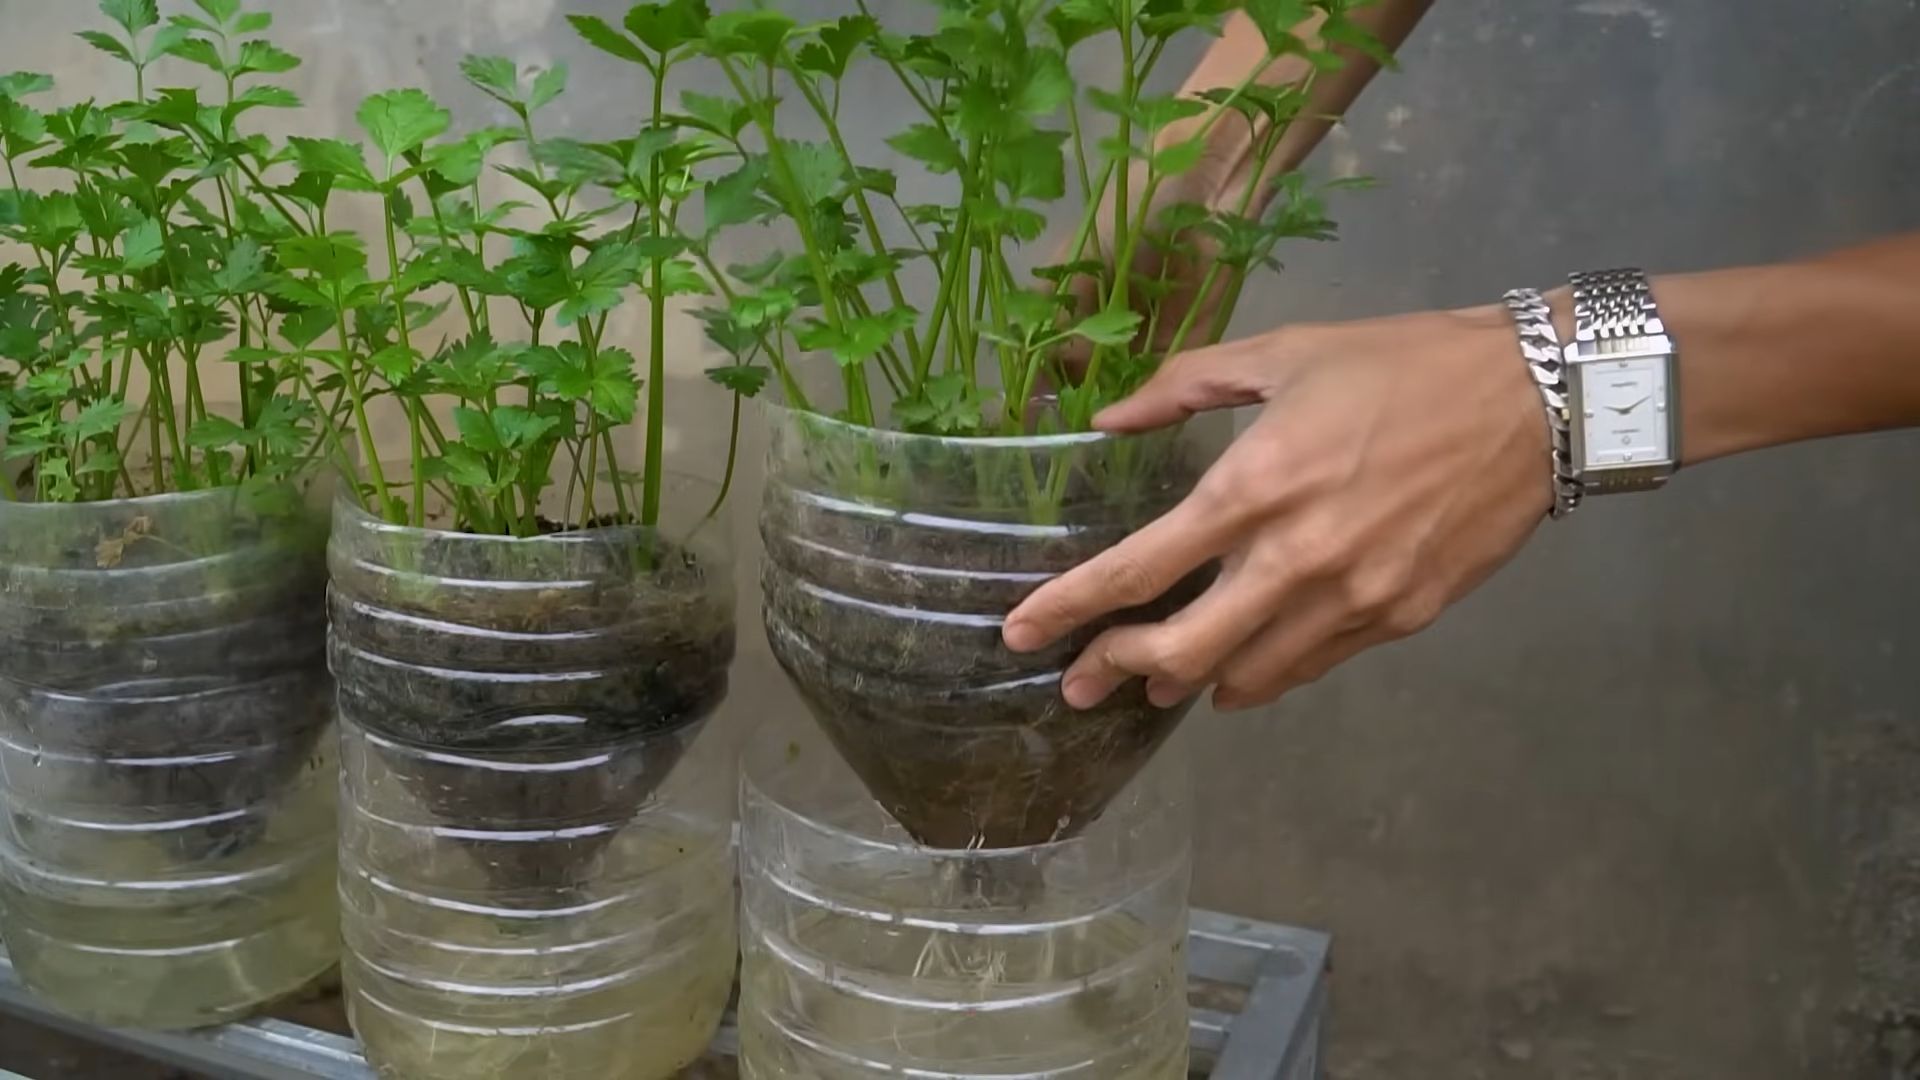
So, there you have it! Growing celery at home from kitchen scraps is not just a fun experiment; it’s a sustainable way to reduce food waste, enjoy fresh, flavorful celery, and connect with the natural world. It’s a surprisingly simple process that yields impressive results, even for those without a green thumb. Think about it: instead of tossing that celery base into the compost bin, you’re giving it a second life, transforming it into a vibrant, leafy stalk ready to enhance your soups, salads, and snacks.
This method of growing celery at home is particularly appealing because it requires minimal effort and resources. You don’t need a sprawling garden or expensive equipment. A sunny windowsill, a jar of water, and a little patience are all you need to embark on this rewarding journey. Plus, it’s a fantastic educational opportunity for kids, teaching them about plant life cycles and the importance of reducing waste.
But the benefits don’t stop there. Homegrown celery boasts a flavor that far surpasses its store-bought counterpart. The taste is crisper, cleaner, and more intensely celery-like. You’ll notice the difference immediately, and your dishes will thank you for it.
Looking for variations? Consider experimenting with different types of celery. While standard green celery is the most common, you can also try growing red celery or even celeriac (celery root) using similar propagation techniques, although celeriac will require more space and time to mature. You can also try different potting mixes once you transfer your celery to soil. Some gardeners swear by a mix of compost, perlite, and vermiculite for optimal drainage and nutrient retention. Others prefer a simple blend of garden soil and compost. The key is to find what works best for your local climate and growing conditions.
Another fun variation is to use the celery leaves in different ways. Don’t discard them! Celery leaves are packed with flavor and can be used in salads, soups, stews, or even as a garnish. They can also be dried and used as a seasoning. Get creative and explore the many culinary possibilities of this often-overlooked part of the plant.
Growing celery at home is a must-try for anyone looking to add a touch of freshness and sustainability to their lives. It’s a simple, rewarding, and delicious way to connect with nature and reduce food waste.
We encourage you to give this DIY trick a try. It’s easier than you think, and the results are well worth the effort. Once you’ve successfully regrown your celery, we’d love to hear about your experience! Share your photos, tips, and stories in the comments below. Let’s build a community of home gardeners and inspire others to embrace the joys of growing their own food. Happy growing!
Frequently Asked Questions (FAQ)
How long does it take to regrow celery from a base?
The initial regrowth phase, where you see new leaves sprouting from the celery base in water, typically takes about 1-2 weeks. After transplanting to soil, it will take several weeks to months for the celery to mature into a full-sized stalk, depending on the variety and growing conditions. Be patient, and remember that consistent watering and sunlight are crucial for healthy growth.
What kind of water should I use to regrow celery?
Tap water is generally fine for regrowing celery, but it’s best to let it sit out for a few hours to allow any chlorine to dissipate. Filtered water or rainwater are also excellent options. Avoid using distilled water, as it lacks the minerals that plants need to thrive. Change the water every 1-2 days to prevent bacterial growth and keep the celery base healthy.
How much sunlight does regrowing celery need?
Celery thrives in bright, indirect sunlight. A windowsill that receives several hours of sunlight each day is ideal. Avoid placing the celery in direct, intense sunlight, especially during the hottest part of the day, as this can scorch the leaves. If you don’t have a sunny windowsill, you can supplement with a grow light.
When should I transplant the celery base to soil?
You should transplant the celery base to soil when you see significant root growth, typically after about a week or two in water. The roots should be at least an inch or two long. Choose a pot that is at least 6 inches in diameter and fill it with well-draining potting mix. Gently remove the celery base from the water and plant it in the soil, burying the base up to the point where the leaves begin to sprout. Water thoroughly after planting.
What kind of soil is best for growing celery?
Celery prefers rich, well-draining soil that is high in organic matter. A good potting mix for celery would include a combination of compost, perlite, and vermiculite. You can also amend your garden soil with compost or other organic matter to improve its fertility and drainage. The ideal pH for celery is between 6.0 and 6.8.
How often should I water the celery after transplanting?
Celery needs consistent moisture to thrive. Water the celery regularly, keeping the soil consistently moist but not waterlogged. Check the soil moisture level daily and water when the top inch of soil feels dry to the touch. Avoid letting the soil dry out completely, as this can stress the plant and hinder its growth.
What are some common problems when growing celery, and how can I fix them?
Some common problems when growing celery include pests, diseases, and nutrient deficiencies. Pests such as aphids and slugs can be controlled with insecticidal soap or by handpicking them off the plants. Diseases such as celery blight can be prevented by providing good air circulation and avoiding overhead watering. Nutrient deficiencies can be addressed by fertilizing the celery with a balanced fertilizer.
Can I grow celery indoors year-round?
Yes, you can grow celery indoors year-round, provided you have adequate light and moisture. A sunny windowsill or a grow light can provide the necessary light, and regular watering will keep the soil moist. You may need to adjust your watering and fertilizing schedule depending on the season and the plant’s growth rate.
How do I harvest celery?
You can harvest celery when the stalks are at least 6-8 inches long. To harvest, simply cut the stalks off at the base of the plant with a sharp knife. You can harvest individual stalks as needed, or you can harvest the entire plant at once. After harvesting, store the celery in the refrigerator to keep it fresh.
Can I eat the celery leaves?
Yes, celery leaves are perfectly edible and are packed with flavor. They can be used in salads, soups, stews, or as a garnish. They can also be dried and used as a seasoning. Don’t discard them! Celery leaves are a valuable addition to any kitchen. They are more strongly flavored than the stalks, so use them sparingly at first until you get used to the taste.
What fertilizer should I use for my celery?
Celery benefits from regular fertilization, especially during its active growing phase. A balanced liquid fertilizer, diluted to half strength, applied every 2-3 weeks is a good starting point. Look for a fertilizer with an NPK ratio (nitrogen, phosphorus, potassium) that is relatively balanced, such as 10-10-10 or 20-20-20. You can also use organic fertilizers like compost tea or fish emulsion. Avoid over-fertilizing, as this can lead to leggy growth and bitter-tasting celery.
My celery stalks are thin and weak. What am I doing wrong?
Thin and weak celery stalks can be caused by several factors, including insufficient sunlight, lack of nutrients, or inconsistent watering. Make sure your celery is getting at least 6 hours of sunlight per day, fertilize regularly with a balanced fertilizer, and water consistently to keep the soil moist. You may also need to provide support for the stalks if they are particularly weak.
How can I prevent my celery from bolting (going to seed)?
Bolting, or premature flowering, can occur when celery is exposed to stress, such as extreme temperatures or inconsistent watering. To prevent bolting, try to maintain consistent growing conditions, avoid exposing the celery to extreme heat or cold, and water regularly to keep the soil moist. Choose bolt-resistant varieties of celery if you live in an area with hot summers.

Leave a Comment