
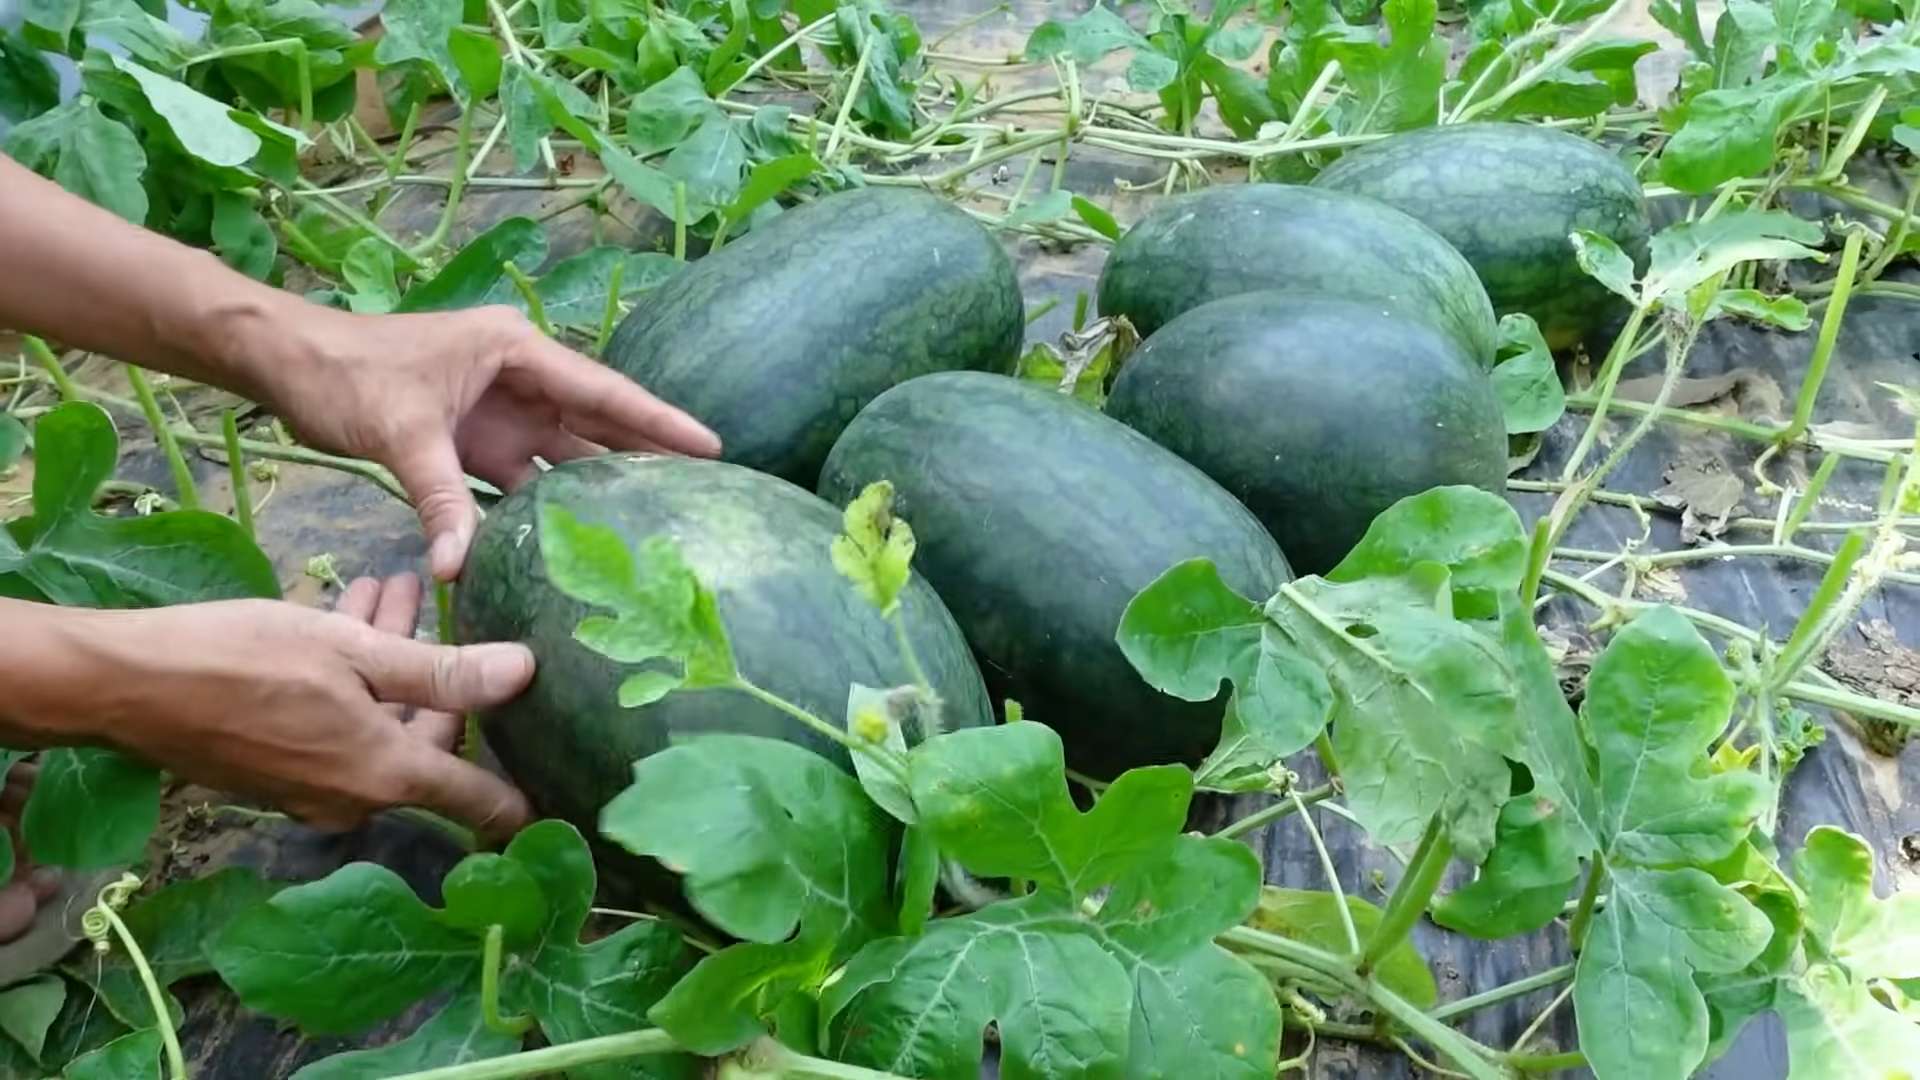
Grow Watermelons Backyard – sounds like a dream, right? Imagine biting into a juicy, sweet watermelon you nurtured from a tiny seed, all within the comfort of your own backyard. Forget those bland, store-bought melons; we’re talking about homegrown goodness bursting with flavor!
For centuries, watermelons have been a symbol of summer, abundance, and refreshment. Originating in Africa, they’ve traveled the globe, becoming a beloved treat in countless cultures. From picnics to festivals, watermelons are a quintessential part of warm-weather celebrations. But what if you could bring that joy and tradition right to your doorstep?
That’s where these DIY tricks and hacks come in. Let’s be honest, growing watermelons can seem intimidating. They’re big, they need space, and they have a reputation for being finicky. But fear not! I’m here to show you that with a little know-how and some clever techniques, you can absolutely grow watermelons backyard, even if you’re a beginner gardener. These simple, effective strategies will help you overcome common challenges, maximize your yield, and enjoy the satisfaction of harvesting your own delicious watermelons. So, grab your gardening gloves, and let’s get started!
Growing Strawberries at Home: A Beginner’s Guide
Hey there, fellow gardening enthusiasts! I’m so excited to share my experience with growing strawberries at home. There’s nothing quite like the taste of a freshly picked, sun-ripened strawberry, and trust me, it’s easier than you think to cultivate your own little strawberry patch. This guide will walk you through everything you need to know, from choosing the right variety to harvesting your delicious bounty.
Choosing Your Strawberry Plants
Before we dive into the nitty-gritty, let’s talk about choosing the right strawberry plants. There are three main types:
* June-Bearing: These produce one large crop of strawberries, usually in late spring or early summer (hence the name!). They’re great if you want a big batch for jam-making or freezing.
* Everbearing: Don’t let the name fool you; they don’t bear fruit continuously. Instead, they produce two or three crops throughout the growing season – one in spring, one in late summer, and sometimes a smaller one in between.
* Day-Neutral: These are the most consistent producers, yielding strawberries throughout the growing season as long as the temperature is between 35°F and 85°F.
Consider your climate and how much time you want to dedicate to harvesting when making your choice. I personally love day-neutral varieties because I enjoy having fresh strawberries available for a longer period.
Preparing Your Strawberry Bed
Strawberries need a sunny spot and well-drained soil. Here’s how to get your garden bed ready:
1. Choose a Location: Select a spot that gets at least 6-8 hours of direct sunlight per day. Strawberries thrive in sunshine!
2. Test Your Soil: Strawberries prefer slightly acidic soil with a pH between 5.5 and 6.8. You can buy a soil testing kit at most garden centers. If your soil is too alkaline, you can amend it with sulfur or peat moss.
3. Clear the Area: Remove any weeds, grass, rocks, and debris from the planting area. Strawberries don’t like competition!
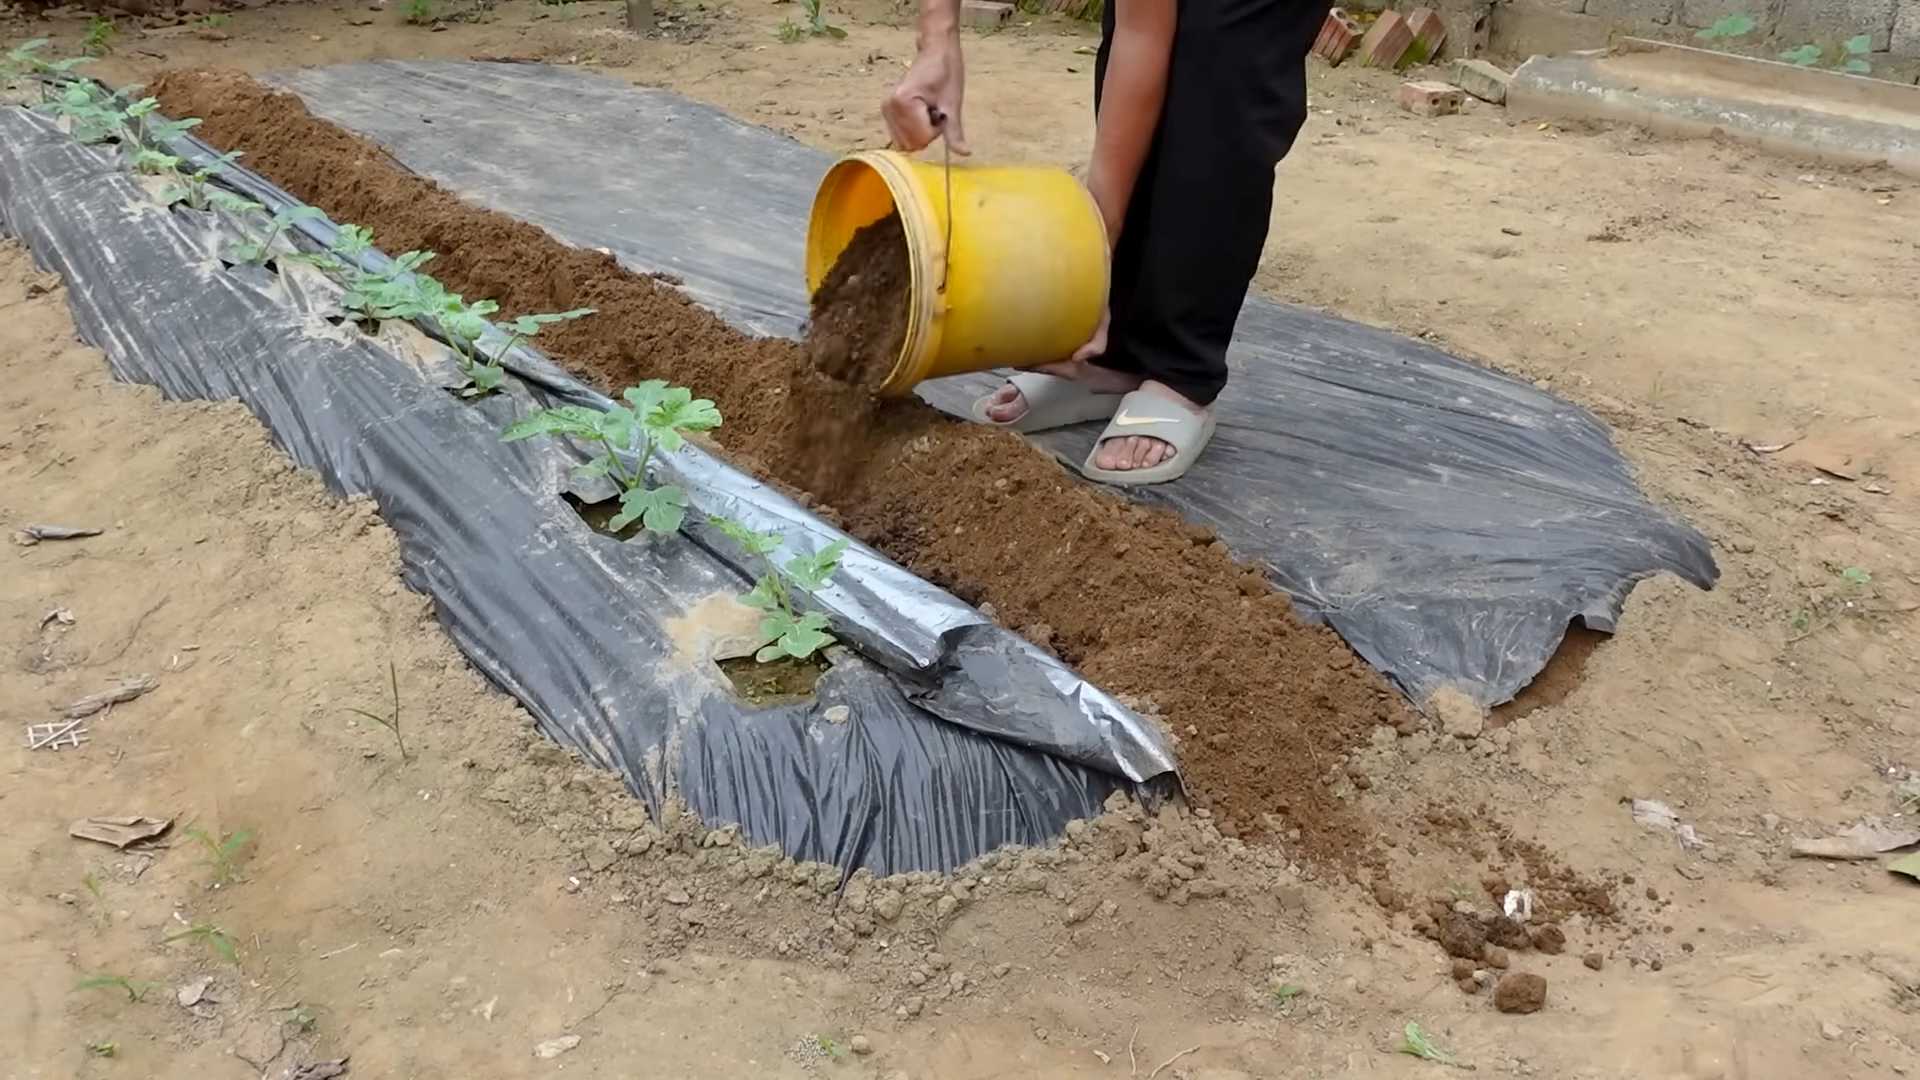
4. Amend the Soil: This is crucial! Strawberries need well-draining soil that’s rich in organic matter. I like to mix in compost, aged manure, or peat moss to improve drainage and fertility. Aim for a soil that crumbles easily in your hand.
5. Create Raised Beds (Optional): Raised beds are a great option, especially if you have heavy clay soil. They improve drainage and make it easier to manage your strawberry plants. You can build your own raised beds or purchase pre-made ones.
Planting Your Strawberries
Now for the fun part – planting!
1. Timing is Key: The best time to plant strawberries is in early spring or late fall. This gives them time to establish their roots before the hot summer or cold winter arrives.
2. Spacing: Space your strawberry plants about 12-18 inches apart in rows that are 3-4 feet apart. This allows for good air circulation, which helps prevent diseases.
3. Planting Depth: This is important! Make sure the crown of the plant (where the roots meet the stem) is level with the soil surface. Planting too deep can cause the crown to rot, while planting too shallow can dry out the roots.
4. Water Thoroughly: After planting, water your strawberry plants thoroughly. This helps settle the soil around the roots and encourages them to grow.
5. Mulch: Apply a layer of mulch around your strawberry plants. This helps retain moisture, suppress weeds, and keep the berries clean. Straw, pine needles, or wood chips are all good options.
Caring for Your Strawberry Plants
Once your strawberries are planted, they need regular care to thrive.
1. Watering: Strawberries need consistent moisture, especially during fruiting. Water deeply whenever the top inch of soil feels dry. Avoid overhead watering, as this can promote fungal diseases. Drip irrigation or a soaker hose is ideal.
2. Fertilizing: Fertilize your strawberry plants in early spring and again after the first harvest. Use a balanced fertilizer that’s specifically formulated for berries. Follow the instructions on the fertilizer package carefully.
3. Weeding: Keep your strawberry bed free of weeds. Weeds compete with your strawberry plants for nutrients and water. Hand-pull weeds regularly or use a hoe to cultivate the soil.
4. Pest Control: Strawberries can be susceptible to pests like slugs, snails, and aphids. Inspect your plants regularly and take action if you see any signs of infestation. You can use organic pest control methods like diatomaceous earth or insecticidal soap.
5. Disease Prevention: Strawberries can also be affected by fungal diseases like gray mold and leaf spot. To prevent these diseases, ensure good air circulation, avoid overhead watering, and remove any infected leaves promptly.
6. Renovating June-Bearing Plants: After your June-bearing strawberries have finished fruiting, it’s important to renovate the bed. This involves mowing the plants down to about an inch tall and thinning out the runners. This helps rejuvenate the plants and encourages them to produce a larger crop the following year.
7. Removing Runners: For everbearing and day-neutral varieties, you’ll want to remove the runners (the long stems that grow out from the main plant) during the first year. This encourages the plants to focus their energy on producing fruit rather than spreading. After the first year, you can let some runners grow to propagate new plants.
Protecting Your Strawberries
Protecting your strawberries from birds and other critters is essential to ensure a good harvest.
1. Bird Netting: Birds love strawberries just as much as we do! Cover your strawberry bed with bird netting to keep them away. Make sure the netting is securely anchored to the ground so birds can’t get underneath it.
2. Slugs and Snails: These slimy pests can wreak havoc on your strawberries. Use slug bait or beer traps to control them. You can also sprinkle diatomaceous earth around your plants.
3. Row Covers: Row covers can protect your strawberries from frost, insects, and birds. They’re especially useful in early spring when the weather is still unpredictable.
Harvesting Your Strawberries
The moment you’ve been waiting for – harvesting your delicious strawberries!
1. Ripeness: Strawberries are ready to harvest when they’re fully red and slightly soft to the touch. They should also detach easily from the stem.
2. Harvesting Technique: Gently grasp the strawberry and twist it off the stem. Avoid pulling or yanking, as this can damage the plant.
3. Timing: Harvest your strawberries in the morning, after the dew has dried. This is when they’re at their sweetest and most flavorful.
4. Storage: Store your freshly picked strawberries in the refrigerator. They’re best eaten within a few days.
Troubleshooting Common Problems
Even with the best care, you may encounter some problems when growing strawberries. Here are a few common issues and how to address them:
* Small Strawberries: This can be caused by a lack of water, nutrients, or sunlight. Make sure your plants are getting enough of all three.
* Deformed Strawberries: This can be caused by poor pollination or insect damage. Attract pollinators to your garden by planting flowers nearby.
* Rotting Strawberries: This can be caused by fungal diseases or excessive moisture. Ensure good air circulation and avoid overhead watering.
* No Strawberries: This can be caused by a variety of factors, including poor soil, lack of sunlight, or improper planting. Review the steps above to make sure you’re providing your plants with everything they need.
Growing Strawberries in Containers
If you don’t have a garden, you can still grow strawberries in containers!
1. Choose the Right Container: Select a container that’s at least 12 inches in diameter and 8 inches deep. Make sure it has drainage holes.
2. Use a Good Potting Mix: Use a high-quality potting mix that’s well-draining and rich in organic matter.
3. Planting: Plant your strawberry plants in the container, following the same spacing and planting depth guidelines as for garden beds.
4. Watering and Fertilizing: Water your container strawberries regularly, especially during hot weather. Fertilize them every few weeks with a balanced fertilizer.
5. Sunlight: Place your container strawberries in a sunny location that gets at least 6-8 hours of direct sunlight per day.
6. Overwintering: In cold climates, you’ll need to protect your container strawberries from freezing temperatures. You can move them to a sheltered location, such as a garage or shed, or wrap the containers in burlap.
Propagating New Strawberry Plants
Strawberries are easy to propagate from runners. Here’s how:
1.
Conclusion
So, there you have it! Growing watermelons in your backyard might seem daunting at first, but with a little planning, patience, and the right techniques, you can be harvesting your own juicy, sweet watermelons before you know it. This DIY approach, focusing on maximizing space and sunlight, is a must-try for anyone who dreams of farm-fresh produce without leaving their property.
Why is this method so compelling? Because it empowers you to control the entire process, from seed to slice. You know exactly what goes into your watermelons – no mystery chemicals or questionable practices. Plus, there’s an unparalleled satisfaction in nurturing a plant from a tiny seed into a sprawling vine laden with delicious fruit. It’s a rewarding experience that connects you to nature and provides a healthy, homegrown treat for your family and friends.
But don’t think you’re limited to just one type of watermelon! Experiment with different varieties to find your favorites. Consider growing smaller, personal-sized watermelons like Sugar Baby if space is truly limited. Or, try a yellow-fleshed variety for a unique twist. You can even explore seedless watermelons for added convenience. The possibilities are endless!
Beyond variety, you can also tweak the growing conditions to influence the flavor and texture of your watermelons. For example, reducing watering slightly as the fruit ripens can concentrate the sugars, resulting in an even sweeter taste. Adding compost tea regularly can boost nutrient uptake and promote vigorous growth.
This DIY watermelon growing trick is more than just a gardening project; it’s an investment in your health, your happiness, and your connection to the natural world. Imagine the pride you’ll feel when you serve a slice of your own homegrown watermelon at your next barbecue. Imagine the delight on your children’s faces as they bite into the sweet, refreshing fruit they helped you grow.
We encourage you to give this method a try. Don’t be afraid to get your hands dirty and experiment. Every garden is different, and every growing season brings new challenges and opportunities. The key is to learn from your experiences, adapt your techniques, and never give up on your dream of growing your own watermelons.
And most importantly, we want to hear about your experiences! Share your tips, your triumphs, and your tribulations in the comments below. Let us know what worked for you, what didn’t, and what you learned along the way. Together, we can create a community of backyard watermelon growers, sharing our knowledge and inspiring others to embark on this rewarding journey. So, grab your seeds, prepare your soil, and get ready to experience the joy of growing your own delicious watermelons!
Frequently Asked Questions (FAQ)
What is the best time to start growing watermelons?
The ideal time to start growing watermelons depends on your climate. Watermelons are warm-season crops and require a long growing season of at least 70-90 days. In general, you should start seeds indoors about 6-8 weeks before the last expected frost. If you live in a warmer climate with a longer growing season, you can direct sow seeds into the ground after the soil has warmed up to at least 70°F (21°C). Check your local frost dates and adjust your planting schedule accordingly. Starting too early can lead to transplant shock if you put seedlings out before the weather is consistently warm. Starting too late might not give the watermelons enough time to mature before the first frost.
How much space do watermelons need?
Watermelons are sprawling plants that require a significant amount of space. As a general rule, allow at least 4-6 feet between plants and 8-10 feet between rows. However, you can reduce the space requirements by using vertical gardening techniques, such as trellising. Trellising not only saves space but also improves air circulation and reduces the risk of fungal diseases. If you’re growing watermelons in containers, choose large containers that are at least 20 gallons in size. Remember that smaller watermelon varieties, like Sugar Baby, will require less space than larger varieties.
What kind of soil is best for watermelons?
Watermelons thrive in well-drained, sandy loam soil that is rich in organic matter. The soil should have a pH between 6.0 and 6.8. Before planting, amend the soil with compost, aged manure, or other organic materials to improve its fertility and drainage. Avoid heavy clay soils, as they can become waterlogged and inhibit root growth. If you have clay soil, consider growing watermelons in raised beds or containers filled with a suitable potting mix. Proper soil preparation is crucial for healthy watermelon growth and abundant fruit production.
How often should I water watermelons?
Watermelons need consistent watering, especially during hot, dry weather. Water deeply and regularly, aiming to keep the soil consistently moist but not waterlogged. Water at the base of the plants to avoid wetting the foliage, which can increase the risk of fungal diseases. As the fruits begin to ripen, you can reduce watering slightly to concentrate the sugars and improve the flavor. However, avoid letting the soil dry out completely, as this can stress the plants and affect fruit quality. A good rule of thumb is to water when the top inch of soil feels dry to the touch.
What are some common pests and diseases that affect watermelons?
Watermelons are susceptible to various pests and diseases, including aphids, squash bugs, vine borers, powdery mildew, and fusarium wilt. To prevent pest and disease problems, practice good garden hygiene, such as removing weeds and debris, and providing adequate air circulation. Inspect your plants regularly for signs of pests or diseases, and take action promptly if you notice any problems. You can use organic pest control methods, such as insecticidal soap or neem oil, to control aphids and squash bugs. For fungal diseases, use a copper-based fungicide or a baking soda solution. Choose disease-resistant watermelon varieties to minimize the risk of disease problems.
How do I know when a watermelon is ripe?
Determining when a watermelon is ripe can be tricky, but there are several indicators to look for. First, check the tendril closest to the fruit stem. When this tendril turns brown and dries out, it’s a sign that the watermelon is nearing ripeness. Second, look at the spot where the watermelon rests on the ground. This spot, known as the ground spot, should turn from white to a creamy yellow color. Third, thump the watermelon with your knuckles. A ripe watermelon will sound hollow and deep, while an unripe watermelon will sound dull and solid. Finally, consider the overall appearance of the watermelon. A ripe watermelon will have a dull, waxy appearance, while an unripe watermelon will be shiny and bright.
Can I grow watermelons in containers?
Yes, you can grow watermelons in containers, but you’ll need to choose a large container that is at least 20 gallons in size. Use a high-quality potting mix that is well-draining and rich in organic matter. Choose smaller watermelon varieties, such as Sugar Baby or Bush Sugar Baby, as they are better suited for container growing. Provide adequate support for the vines, such as a trellis or stake. Water regularly and fertilize every 2-3 weeks with a balanced fertilizer. Place the container in a sunny location that receives at least 6-8 hours of sunlight per day. Container-grown watermelons may require more frequent watering and fertilization than those grown in the ground.
How can I improve the sweetness of my watermelons?
Several factors can influence the sweetness of watermelons. First, choose a watermelon variety that is known for its sweetness. Second, provide adequate sunlight and warmth, as these are essential for sugar production. Third, water regularly and consistently, but reduce watering slightly as the fruits begin to ripen. Fourth, fertilize with a fertilizer that is high in potassium, as potassium is important for sugar transport. Finally, harvest the watermelons at the peak of ripeness, as the sugar content will continue to increase until harvest. Avoid over-watering or over-fertilizing, as this can dilute the sugars and reduce the sweetness.

Leave a Comment