
Grow Taro at Home: Ever dreamt of having your own little tropical oasis, right in your backyard? Imagine harvesting fresh, starchy taro roots, ready to be transformed into delicious poi or savory side dishes. It’s more achievable than you think! For centuries, taro has been a staple food in many cultures, particularly in Polynesia and Asia, holding deep cultural and nutritional significance. It’s not just a food source; it’s a symbol of sustenance and connection to the land.
But why should you bother learning to grow taro at home? Well, beyond the sheer satisfaction of nurturing your own food, growing taro offers a unique opportunity to connect with nature and enjoy a truly rewarding gardening experience. Plus, store-bought taro can sometimes be hard to find, and growing your own ensures you have a fresh, readily available supply. This DIY guide will provide you with simple, effective tricks and hacks to successfully grow taro at home, even if you’re a complete beginner. I’m excited to share these tips with you, making the process fun and accessible. Let’s get our hands dirty and bring a touch of the tropics to your garden!
Growing Taro at Home: A Beginner’s Guide
Hey there, plant enthusiasts! Ever thought about growing your own taro? It might seem a little exotic, but trust me, it’s totally doable, even if you don’t have a sprawling garden. I’m going to walk you through everything you need to know to cultivate this delicious and nutritious root vegetable right in your own home. Let’s get started!
Choosing Your Taro Variety
First things first, let’s talk taro varieties. There are tons of different types, each with its own unique characteristics. Some are better suited for certain climates, while others are prized for their flavor or texture. Here are a few popular options:
- Bun Long: This is a common variety, known for its large corms and mild flavor. It’s a great choice for beginners.
- Lehua: This variety has a reddish-purple hue and a slightly sweeter taste. It’s a bit more finicky than Bun Long, but the flavor is worth it!
- Chinese Taro: As the name suggests, this variety is popular in Chinese cuisine. It has a nutty flavor and a slightly drier texture.
When choosing your variety, consider your local climate and your personal preferences. If you’re unsure, ask your local nursery for recommendations. They’ll be able to point you in the right direction.
Preparing Your Taro Corm or Cutting
Okay, so you’ve chosen your taro variety. Now it’s time to prepare your corm (the main root) or cutting for planting. This step is crucial for ensuring successful growth.
- For Corms: Look for healthy corms that are firm and free from blemishes. If the corm has any sprouts, that’s a good sign!
- For Cuttings: If you’re using a cutting, make sure it has at least one node (the point where a leaf or root will grow).
Here’s how to prepare your corm or cutting:
- Clean the Corm/Cutting: Gently wash the corm or cutting with water to remove any dirt or debris.
- Trim the Roots (if applicable): If the corm has any long, straggly roots, trim them back to about an inch. This will encourage new root growth.
- Callus the Cutting (if applicable): If you’re using a cutting, allow the cut end to callus over for a few days before planting. This will help prevent rot. Simply leave it in a dry, well-ventilated place.
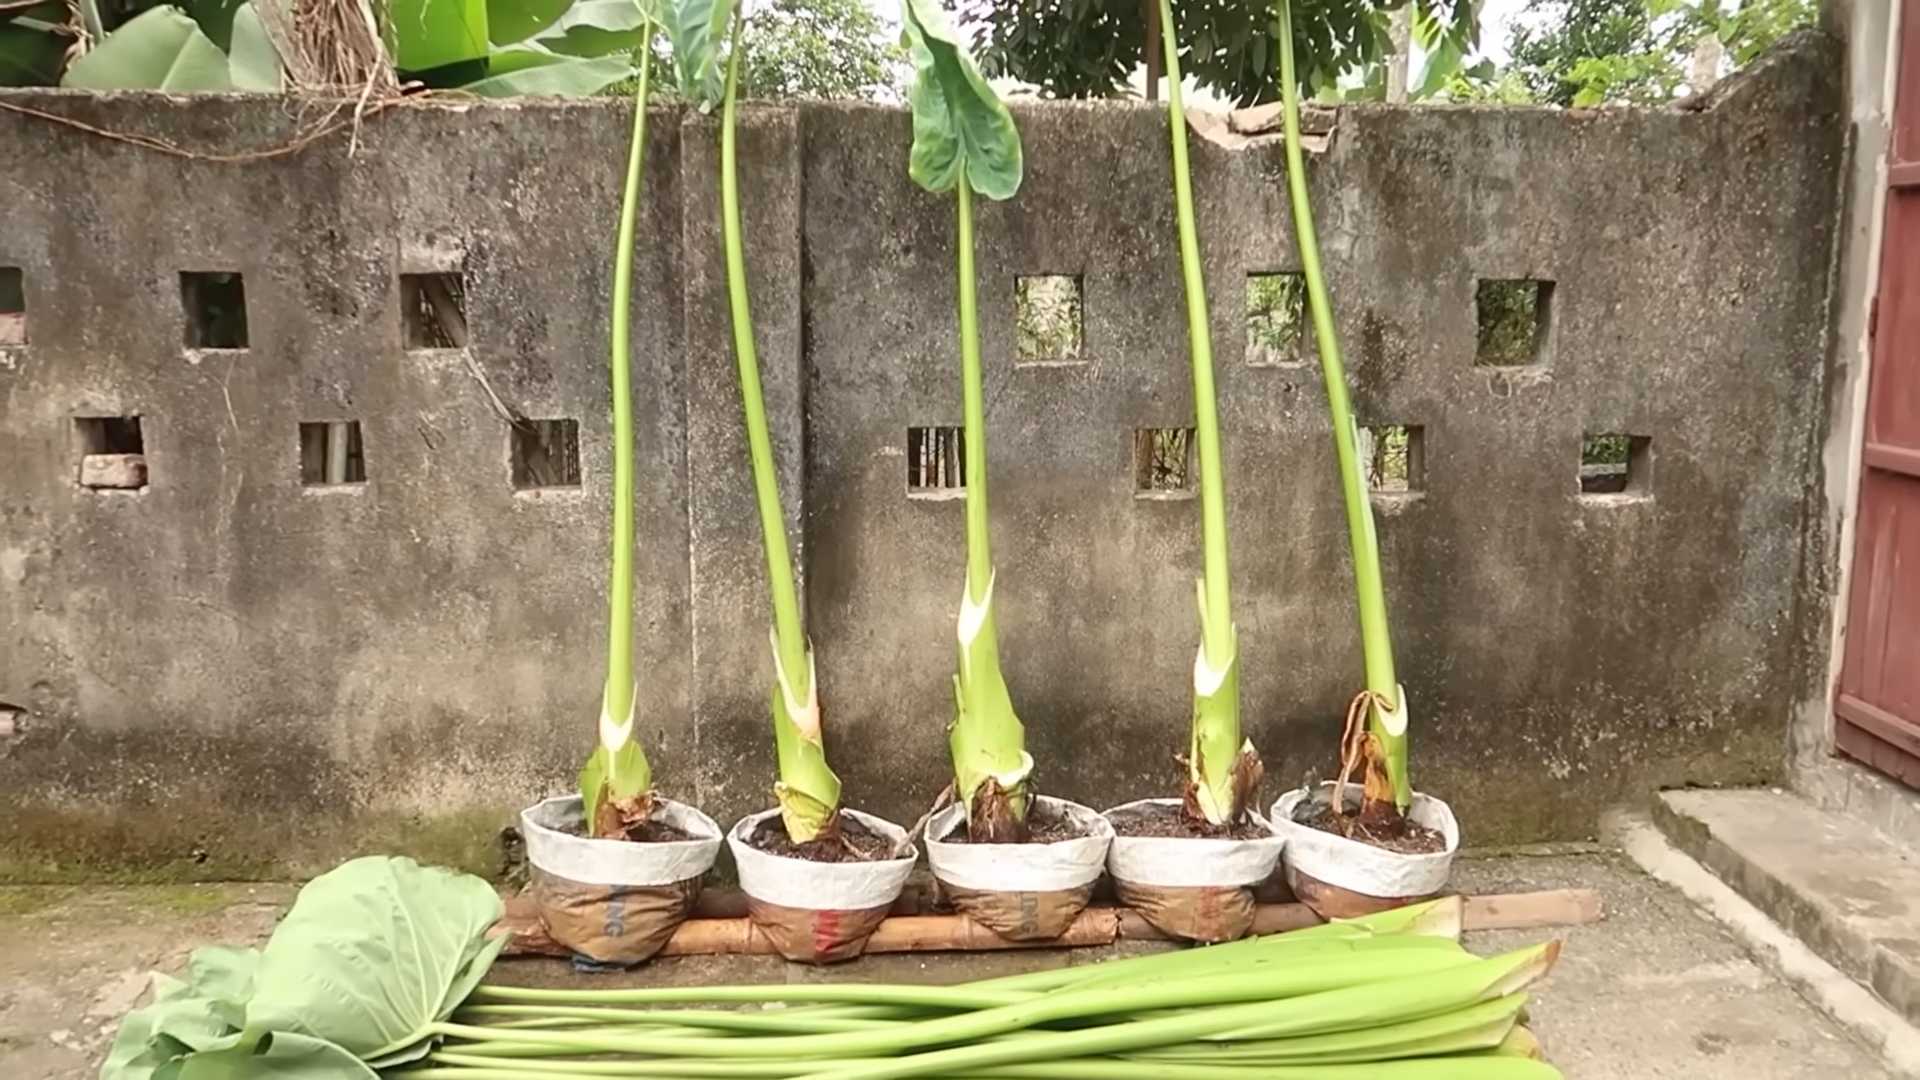
Planting Your Taro
Now for the fun part – planting! Taro loves moisture, so we’re going to create a nice, water-retentive environment for it.
- Choosing Your Container: Select a pot that’s at least 12 inches in diameter and 12 inches deep. Taro needs plenty of room to grow. Make sure the pot has drainage holes.
- Preparing Your Soil: Taro thrives in rich, well-draining soil that retains moisture. I like to use a mix of potting soil, compost, and peat moss. A good ratio is 1:1:1.
Here’s the planting process:
- Fill the Pot: Fill your pot with the soil mixture, leaving a few inches of space at the top.
- Plant the Corm/Cutting: Dig a hole in the center of the pot that’s deep enough to accommodate the corm or cutting. Place the corm or cutting in the hole, making sure the top of the corm or the node of the cutting is just below the soil surface.
- Cover with Soil: Gently cover the corm or cutting with soil and pat it down lightly.
- Water Thoroughly: Water the pot thoroughly until water drains out of the drainage holes.
Caring for Your Taro Plant
Okay, your taro is planted! Now it’s time to provide it with the care it needs to thrive.
Light
Taro loves bright, indirect light. Avoid placing it in direct sunlight, as this can scorch the leaves. A spot near a window that receives morning sun or filtered afternoon sun is ideal. If you don’t have enough natural light, you can supplement with a grow light.
Water
As I mentioned earlier, taro loves moisture. Keep the soil consistently moist, but not soggy. Water thoroughly whenever the top inch of soil feels dry to the touch. You can also place a saucer of water under the pot to increase humidity.
Humidity
Taro thrives in high humidity. If you live in a dry climate, you may need to increase the humidity around your plant. You can do this by:
- Misting the Leaves: Mist the leaves regularly with water.
- Using a Humidifier: Place a humidifier near your plant.
- Grouping Plants Together: Grouping plants together can create a more humid microclimate.
Fertilizer
Taro is a heavy feeder, so it needs regular fertilization. Fertilize your plant every two weeks during the growing season (spring and summer) with a balanced liquid fertilizer. Follow the instructions on the fertilizer label.
Temperature
Taro prefers warm temperatures, between 65°F and 85°F (18°C and 29°C). Avoid exposing your plant to temperatures below 50°F (10°C).
Pests and Diseases
Taro is generally pest-resistant, but it can be susceptible to aphids, spider mites, and mealybugs. If you notice any pests, treat your plant with insecticidal soap or neem oil. Taro can also be susceptible to root rot if the soil is too soggy. To prevent root rot, make sure your pot has good drainage and avoid overwatering.
Harvesting Your Taro
After several months of care, your taro plant will be ready for harvest! This is usually around 7-12 months after planting, depending on the variety and growing conditions.
Here’s how to harvest your taro:
- Check for Maturity: The leaves of the taro plant will start to turn yellow and die back when the corm is mature.
- Loosen the Soil: Gently loosen the soil around the base of the plant.
- Carefully Dig Up the Corm: Carefully dig up the corm, being careful not to damage it.
- Clean the Corm: Wash the corm with water to remove any dirt or debris.
- Cure the Corm: Cure the corm for a few days in a warm, dry place. This will help to improve its flavor and storage life.
Enjoying Your Homegrown Taro
Congratulations! You’ve successfully grown your own taro at home. Now it’s time to enjoy the fruits (or rather, roots) of your labor. Taro can be cooked in a variety of ways, including boiling, steaming, baking, and frying. It’s a staple ingredient in many cuisines around the world.
Important Note: Always cook taro before eating it. Raw taro contains calcium oxalate crystals, which can cause irritation and discomfort. Cooking breaks down these crystals, making the taro safe to eat.
Here are a few ideas for using your homegrown taro:
- Taro Chips: Slice the taro thinly and fry it into crispy chips.
- Taro Mash: Boil the taro until tender and mash it with butter and milk.
- Taro Stew: Add taro to your favorite stew or soup.
- Poi: In Hawaii, taro is traditionally pounded into a starchy paste called poi.
Troubleshooting
Even with the best care, you might encounter some problems while growing taro. Here are a few common issues and how to address them:
- Yellowing Leaves: This could be a sign of overwatering, underwatering, or nutrient deficiency. Check the soil moisture and adjust your watering schedule accordingly. Fertilize your plant regularly.
- Brown Spots on Leaves: This could be a sign of fungal disease. Improve air circulation around your plant and treat it with a fungicide.
- Choosing Your Taro Variety
First things first, let’s talk taro varieties. There are tons of different types, each with its own unique characteristics. Some are better suited for certain climates, while others are prized for their flavor or texture. Here are a few popular options:
- Bun Long: This is a common variety, known for its large corms and mild flavor. It’s a great choice for beginners.
- Lehua: This variety has a reddish-purple hue and a slightly sweeter taste. It’s a bit more finicky than Bun Long, but the flavor is worth it!
- Chinese Taro: As the name suggests, this variety is popular in Chinese cuisine. It has a nutty flavor and a slightly drier texture.
When choosing your variety, consider your local climate and your personal preferences. If you’re unsure, ask your local nursery for recommendations. They’ll be able to point you in the right direction.
Preparing Your Taro Corm or Cutting
Okay, so you’ve chosen your taro variety. Now it’s time to prepare your corm (the main root) or cutting for planting. This step is crucial for ensuring successful growth.
- For Corms: Look for healthy corms that are firm and free from blemishes. If the corm has any sprouts, that’s a good sign!
- For Cuttings: If you’re using a cutting, make sure it has at least one node (the point where a leaf or root will grow).
Here’s how to prepare your corm or cutting:
- Clean the Corm/Cutting: Gently wash the corm or cutting with water to remove any dirt or debris.
- Trim the Roots (if applicable): If the corm has any long, straggly roots, trim them back to about an inch. This will encourage new root growth.
- Callus the Cutting (if applicable): If you’re using a cutting, allow the cut end to callus over for a few days before planting. This will help prevent rot. Simply leave it in a dry, well-ventilated place.
Planting Your Taro
Now for the fun part – planting! Taro loves moisture, so we’re going to create a nice, water-retentive environment for it.
- Choosing Your Container: Select a pot that’s at least 12 inches in diameter and 12 inches deep. Taro needs plenty of room to grow. Make sure the pot has drainage holes.
- Preparing Your Soil: Taro thrives in rich, well-draining soil that retains moisture. I like to use a mix of potting soil, compost, and peat moss. A good ratio is 1:1:1.
Here’s the planting process:
- Fill the Pot: Fill your pot with the soil mixture, leaving a few inches of space at the top.
- Plant the Corm/Cutting: Dig a hole in the center of the pot that’s deep enough to accommodate the corm or cutting. Place the corm or cutting in the hole, making sure the top of the corm or the node of the cutting is just below the soil surface.
- Cover with Soil: Gently cover the corm or cutting with soil and pat it down lightly.
- Water Thoroughly: Water the pot thoroughly until water drains out of the drainage holes.
Caring for Your Taro Plant
Okay, your taro is planted! Now it’s time to provide it with the care it needs to thrive.
Light
Taro loves bright, indirect light. Avoid placing it in direct sunlight, as this can scorch the leaves. A spot near a window that receives morning sun or filtered afternoon sun is ideal. If you don’t have enough natural light, you can supplement with a grow light.
Water
As I mentioned earlier, taro loves moisture. Keep the soil consistently moist, but not soggy. Water thoroughly whenever the top inch of soil feels dry to the touch. You can also place a saucer of water under the pot to increase humidity.
Humidity
Taro thrives in high humidity. If you live in a dry climate, you may need to increase the humidity around your plant. You can do this by:
- Misting the Leaves: Mist the leaves regularly with water.
- Using a Humidifier: Place a humidifier near your plant.
- Grouping Plants Together: Grouping plants together can create a more humid microclimate.
Fertilizer
Taro is a heavy feeder, so it needs regular fertilization. Fertilize your plant every two weeks during the growing season (spring and summer) with a balanced liquid fertilizer. Follow the instructions on the fertilizer label.
Temperature
Taro prefers warm temperatures, between 65°F and 85°F (18°C and 29°C). Avoid exposing your plant to temperatures below 50°F (10°C).
Pests and Diseases
Taro is generally pest-resistant, but it can be susceptible to aphids, spider mites, and mealybugs. If you notice any pests, treat your plant with insecticidal soap or neem oil. Taro can also be susceptible to root rot if the soil is too soggy. To prevent root rot, make sure your pot has good drainage and avoid overwatering.
Harvesting Your Taro
After several months of care, your taro plant will be ready for harvest! This is usually around 7-12 months after planting, depending on the variety and growing conditions.
Here’s how to harvest your taro:
- Check for Maturity: The leaves of the taro plant will start to turn yellow and die back when the corm is mature.
- Loosen the Soil: Gently loosen the soil around the base of the plant.
- Carefully Dig Up the Corm: Carefully dig up the corm, being careful not to damage it.
- Clean the Corm: Wash the corm with water to remove any dirt or debris.
- Cure the Corm: Cure the corm for a few days in a warm, dry place. This will help to improve its flavor and storage life.
Enjoying Your Homegrown Taro
Congratulations! You’ve successfully grown your own taro at home. Now it’s time to enjoy the fruits (or rather, roots) of your labor. Taro can be cooked in a variety of ways, including boiling, steaming, baking, and frying. It’s a staple ingredient in many cuisines around the world.
Important Note: Always cook taro before eating it. Raw taro contains calcium oxalate crystals, which can cause irritation and discomfort. Cooking breaks down these crystals, making the taro safe to eat.
Here are a few ideas for using your homegrown taro:
- Taro Chips: Slice the taro thinly and fry it into crispy chips.
- Taro Mash: Boil the taro until tender and mash it with butter and milk.
- Taro Stew: Add taro to your favorite stew or soup.
- Poi: In Hawaii, taro is traditionally pounded into a starchy paste called poi.
Troubleshooting
Even with the best care, you might encounter some problems while growing taro. Here are a few common issues and how to address them:
- Yellowing Leaves: This could be a sign of overwatering, underwatering, or nutrient deficiency. Check the soil moisture and adjust your watering schedule accordingly. Fertilize your plant regularly.
- Brown Spots on Leaves: This could be a sign of fungal disease. Improve air circulation around your plant and treat it with a fungicide.
- Slow Growth: This could be a sign of insufficient light or nutrients. Move your plant to a brighter location and fertilize it regularly.
Propagating Taro
Once you’ve successfully grown taro, you can easily propagate it to create more plants. There are two main methods of propagation:
- From Corms: As your taro plant grows, it will produce smaller corms around the main corm. You can separate these smaller corms and plant them in their own pots.
- From Cuttings: You can also propagate taro from stem cuttings. Take a cutting that’s about 6 inches long and

Conclusion
So, there you have it! Growing taro at home is not only achievable but also a deeply rewarding experience. Forget the often-limited selection and sometimes questionable freshness of store-bought taro. With this simple DIY trick, you can cultivate your own supply of this versatile and nutritious root vegetable, ensuring its quality and enjoying the satisfaction of harvesting something you nurtured from start to finish.
Why is this a must-try? Because it empowers you to take control of your food source, connecting you more closely to the natural world. It’s a sustainable practice that reduces your carbon footprint and allows you to enjoy taro that is truly fresh and bursting with flavor. Plus, it’s a fantastic conversation starter! Imagine serving a dish made with taro you grew yourself – your guests will be impressed.
But the benefits don’t stop there. Growing your own taro allows for experimentation and customization. Want to try a different variety? Go for it! Interested in organic gardening practices? Now you have the perfect opportunity. You can tailor your growing methods to suit your specific needs and preferences, resulting in taro that is perfectly suited to your culinary creations.
Consider these variations to elevate your taro-growing game:
* **Container Gardening:** If you’re short on space, don’t despair! Taro thrives in large containers, making it ideal for patios, balconies, or even indoor growing with sufficient sunlight. Just ensure your container has adequate drainage.
* **Hydroponics:** For the more adventurous gardener, hydroponic taro cultivation is a fascinating option. This soilless method can lead to faster growth and higher yields.
* **Companion Planting:** Enhance your taro patch by planting beneficial companion plants like basil, which can deter pests, or legumes, which can fix nitrogen in the soil.
* **Different Varieties:** Explore the diverse world of taro varieties! From the classic Hawaiian taro to the smaller, more delicate eddoes, each variety offers a unique flavor and texture profile. Experiment to find your favorite!Ultimately, the success of your DIY taro growing endeavor hinges on your willingness to learn, adapt, and embrace the process. Don’t be afraid to make mistakes – they are valuable learning opportunities. Observe your plants closely, pay attention to their needs, and adjust your approach as necessary.
We wholeheartedly encourage you to try this DIY trick and embark on your own taro-growing adventure. The rewards are well worth the effort. And once you’ve harvested your first crop, we’d love to hear about your experience! Share your tips, tricks, and triumphs in the comments below. Let’s build a community of home taro growers and inspire others to connect with their food in a meaningful way. Let us know what kind of taro you grew and what you made with it!
Frequently Asked Questions (FAQ)
What are the ideal growing conditions for taro?
Taro thrives in warm, humid environments with plenty of sunlight. Aim for at least 6-8 hours of direct sunlight per day. The ideal temperature range is between 70°F and 85°F (21°C and 29°C). Taro also requires consistently moist soil, so regular watering is essential. If you live in a cooler climate, consider growing taro in containers that can be moved indoors during the winter months.
How long does it take to grow taro from start to harvest?
The time it takes to grow taro from planting to harvest can vary depending on the variety, growing conditions, and your specific climate. Generally, you can expect to harvest your taro corms in about 7-12 months. The leaves can be harvested earlier, usually after a few months, for use in dishes like laulau. Look for signs of maturity, such as yellowing leaves and a slight swelling of the corm at the base of the plant.
What kind of soil is best for growing taro?
Taro prefers rich, well-draining soil that is high in organic matter. A slightly acidic to neutral pH (around 6.0 to 7.0) is ideal. Amend your soil with compost, aged manure, or other organic materials to improve its fertility and drainage. If you’re growing taro in containers, use a high-quality potting mix that is specifically formulated for vegetables.
How often should I water my taro plants?
Taro requires consistently moist soil, so water your plants regularly, especially during hot, dry weather. Check the soil moisture level daily and water when the top inch feels dry to the touch. Avoid overwatering, which can lead to root rot. Ensure your soil or container has adequate drainage to prevent waterlogging.
What are some common pests and diseases that affect taro?
Some common pests that can affect taro include aphids, spider mites, and taro hornworms. These pests can be controlled with insecticidal soap, neem oil, or by handpicking them off the plants. Taro is also susceptible to certain diseases, such as root rot and leaf blight. Prevent these diseases by ensuring good drainage, avoiding overwatering, and providing adequate air circulation.
Is taro poisonous if eaten raw?
Yes, taro contains calcium oxalate crystals, which can cause irritation and discomfort if ingested raw. It is essential to cook taro thoroughly before eating it to break down these crystals. Cooking methods such as boiling, steaming, baking, or frying are all effective.
What are some ways to cook and use taro?
Taro is a versatile ingredient that can be used in a variety of dishes. It can be boiled, steamed, baked, or fried and used in soups, stews, curries, and desserts. In Hawaii, taro is traditionally pounded into poi, a staple food. The leaves can also be cooked and eaten, often wrapped around meat or fish in dishes like laulau.
Can I grow taro indoors?
Yes, you can grow taro indoors, but it requires sufficient sunlight and humidity. Place your taro plant near a sunny window or provide supplemental lighting with grow lights. Increase humidity by misting the plant regularly or placing it on a pebble tray filled with water.
How do I harvest taro?
To harvest taro, gently loosen the soil around the plant and carefully lift the corm out of the ground. Use a shovel or trowel to avoid damaging the corm. Wash off any excess soil and trim the roots and leaves. The corm is now ready to be cooked and enjoyed.
How do I store taro after harvesting?
Store unwashed taro corms in a cool, dry, and well-ventilated place. Avoid storing them in the refrigerator, as this can cause them to become mushy. Properly stored taro can last for several weeks. Once cooked, taro can be stored in the refrigerator for up to a few days.
What are the nutritional benefits of taro?
Taro is a nutritious root vegetable that is rich in fiber, vitamins, and minerals. It is a good source of vitamin C, vitamin B6, potassium, and manganese. Taro is also a complex carbohydrate, providing sustained energy. Its high fiber content can aid in digestion and promote gut health.
Can I grow taro from a store-bought corm?
Yes, you can often grow taro from a store-bought corm, but it’s important to choose a healthy, firm corm that is free from blemishes or signs of rot. Look for corms that have visible “eyes” or buds, as these are where the new shoots will emerge. Plant the corm in well-draining soil and keep it consistently moist.
What if my taro plant’s leaves are turning yellow?
Yellowing leaves on a taro plant can indicate several issues, including overwatering, underwatering, nutrient deficiencies, or pest infestations. Check the soil moisture level and adjust your watering accordingly. Ensure your plant is receiving adequate sunlight and fertilize it with a balanced fertilizer if necessary. Inspect the leaves for signs of pests and treat them as needed.
Is taro gluten-free?
Yes, taro is naturally gluten-free, making it a suitable alternative to wheat-based products for people with celiac disease or gluten intolerance. Taro flour can be used in baking and cooking as a gluten-free substitute.
Leave a Comment