
Grow Red Radish Winter? Absolutely! Imagine harvesting vibrant, peppery red radishes from your own garden, even when the snow is falling. It sounds like a dream, right? Well, it’s a dream that can easily become a reality with a few simple tricks and DIY techniques. For centuries, root vegetables like radishes have been a staple in winter diets across various cultures, providing essential vitamins and a burst of fresh flavor when other produce is scarce. From the humble peasant’s garden to royal feasts, radishes have held their own.
But let’s be honest, the thought of gardening in winter can be daunting. The cold, the shorter days鈥?it all seems to conspire against us. That’s where these DIY hacks come in! I’m going to share some easy-to-follow methods that will help you grow red radish winter, even if you’re a complete beginner. We’ll cover everything from choosing the right radish varieties to creating a protective environment for your little sprouts.
Why do you need these tricks? Because fresh, homegrown produce tastes infinitely better than anything you can buy at the store, and the satisfaction of nurturing your own food, especially during the challenging winter months, is simply unparalleled. Plus, knowing exactly where your food comes from and how it was grown gives you peace of mind. So, let’s ditch the winter blues and get our hands dirty (or at least, slightly chilly) as we embark on this exciting gardening adventure!
Growing Red Radishes Indoors During Winter: A DIY Guide
Hey there, fellow gardening enthusiasts! Winter doesn’t have to mean a break from fresh, homegrown veggies. I’m going to walk you through how to grow delicious, peppery red radishes right in your own home, even when the snow is piling up outside. Radishes are super fast growers, making them incredibly rewarding for impatient gardeners like myself!
Choosing the Right Radish Variety
First things first, let’s talk radishes. Not all radishes are created equal, especially when it comes to indoor growing. For indoor winter gardening, I recommend sticking with smaller, faster-maturing varieties. These tend to do better in containers and under artificial light.
* Cherry Belle: This is a classic, reliable choice. They mature quickly (around 22 days) and have a mild, slightly sweet flavor.
* French Breakfast: These elongated radishes have a mild flavor and a crisp texture. They’re ready in about 25 days.
* Easter Egg: A fun mix of red, pink, purple, and white radishes. They mature in about 28 days and add a splash of color to your winter garden.
* Sparkler: Another quick grower, maturing in around 22 days. They have a slightly spicier flavor than Cherry Belle.
Gathering Your Supplies
Okay, now that we’ve picked our radish champions, let’s gather our supplies. You’ll need:
* Radish seeds: Obviously! Choose your favorite variety from the list above.
* Containers: I prefer containers that are at least 6 inches deep. Radishes need room to grow downwards. You can use plastic pots, terracotta pots, or even repurposed containers like yogurt tubs (just make sure they have drainage holes!).
* Potting mix: Use a well-draining potting mix. Avoid using garden soil, as it can compact too much in containers. I like to use a mix of peat moss, perlite, and vermiculite.
* Grow lights (optional but recommended): While you can try growing radishes near a sunny window, they’ll do much better with supplemental grow lights, especially during the short days of winter.
* Watering can or spray bottle: For keeping the soil moist.
* Fertilizer (optional): A balanced liquid fertilizer can help boost growth, but it’s not essential.
* Small trowel or spoon: For planting the seeds.
Planting Your Radish Seeds
Alright, let’s get our hands dirty! Here’s how to plant your radish seeds:
1. Prepare your containers: Fill your containers with potting mix, leaving about an inch of space at the top. Gently pat down the soil.
2. Sow the seeds: Radish seeds are small, so be careful not to plant them too deep. I usually sow them about 陆 inch deep and about 1 inch apart. You can sow multiple seeds per container, but you’ll need to thin them out later.
3. Cover the seeds: Gently cover the seeds with potting mix.
4. Water thoroughly: Water the soil gently until it’s evenly moist. You don’t want to flood the seeds, just make sure the soil is damp.
5. Position your containers: Place your containers in a location where they’ll receive at least 6 hours of sunlight per day, or under grow lights. If using grow lights, position them a few inches above the soil surface.
Caring for Your Radishes
Now comes the waiting game, but don’t worry, it won’t be long! Here’s how to care for your radishes while they grow:
1. Watering: Keep the soil consistently moist, but not soggy. Water when the top inch of soil feels dry to the touch. Overwatering can lead to root rot.
2. Lighting: If you’re using grow lights, keep them on for about 12-14 hours per day. Adjust the height of the lights as the radishes grow, keeping them a few inches above the foliage.
3. Temperature: Radishes prefer cooler temperatures, ideally between 60-70掳F (15-21掳C). Avoid placing them near heat sources.
4. Thinning: Once the seedlings emerge and have a few true leaves, thin them out so that they’re about 1-2 inches apart. This will give them enough space to develop properly. Snip the unwanted seedlings at the soil line with scissors to avoid disturbing the roots of the remaining plants.
5. Fertilizing (optional): If you want to give your radishes a boost, you can fertilize them with a balanced liquid fertilizer every 2-3 weeks. Follow the instructions on the fertilizer label. I usually dilute the fertilizer to half strength to avoid burning the roots.
6. Pest control: Radishes are generally pest-resistant, but you might encounter aphids or flea beetles. If you spot any pests, you can try spraying them with insecticidal soap or neem oil.
Harvesting Your Radishes
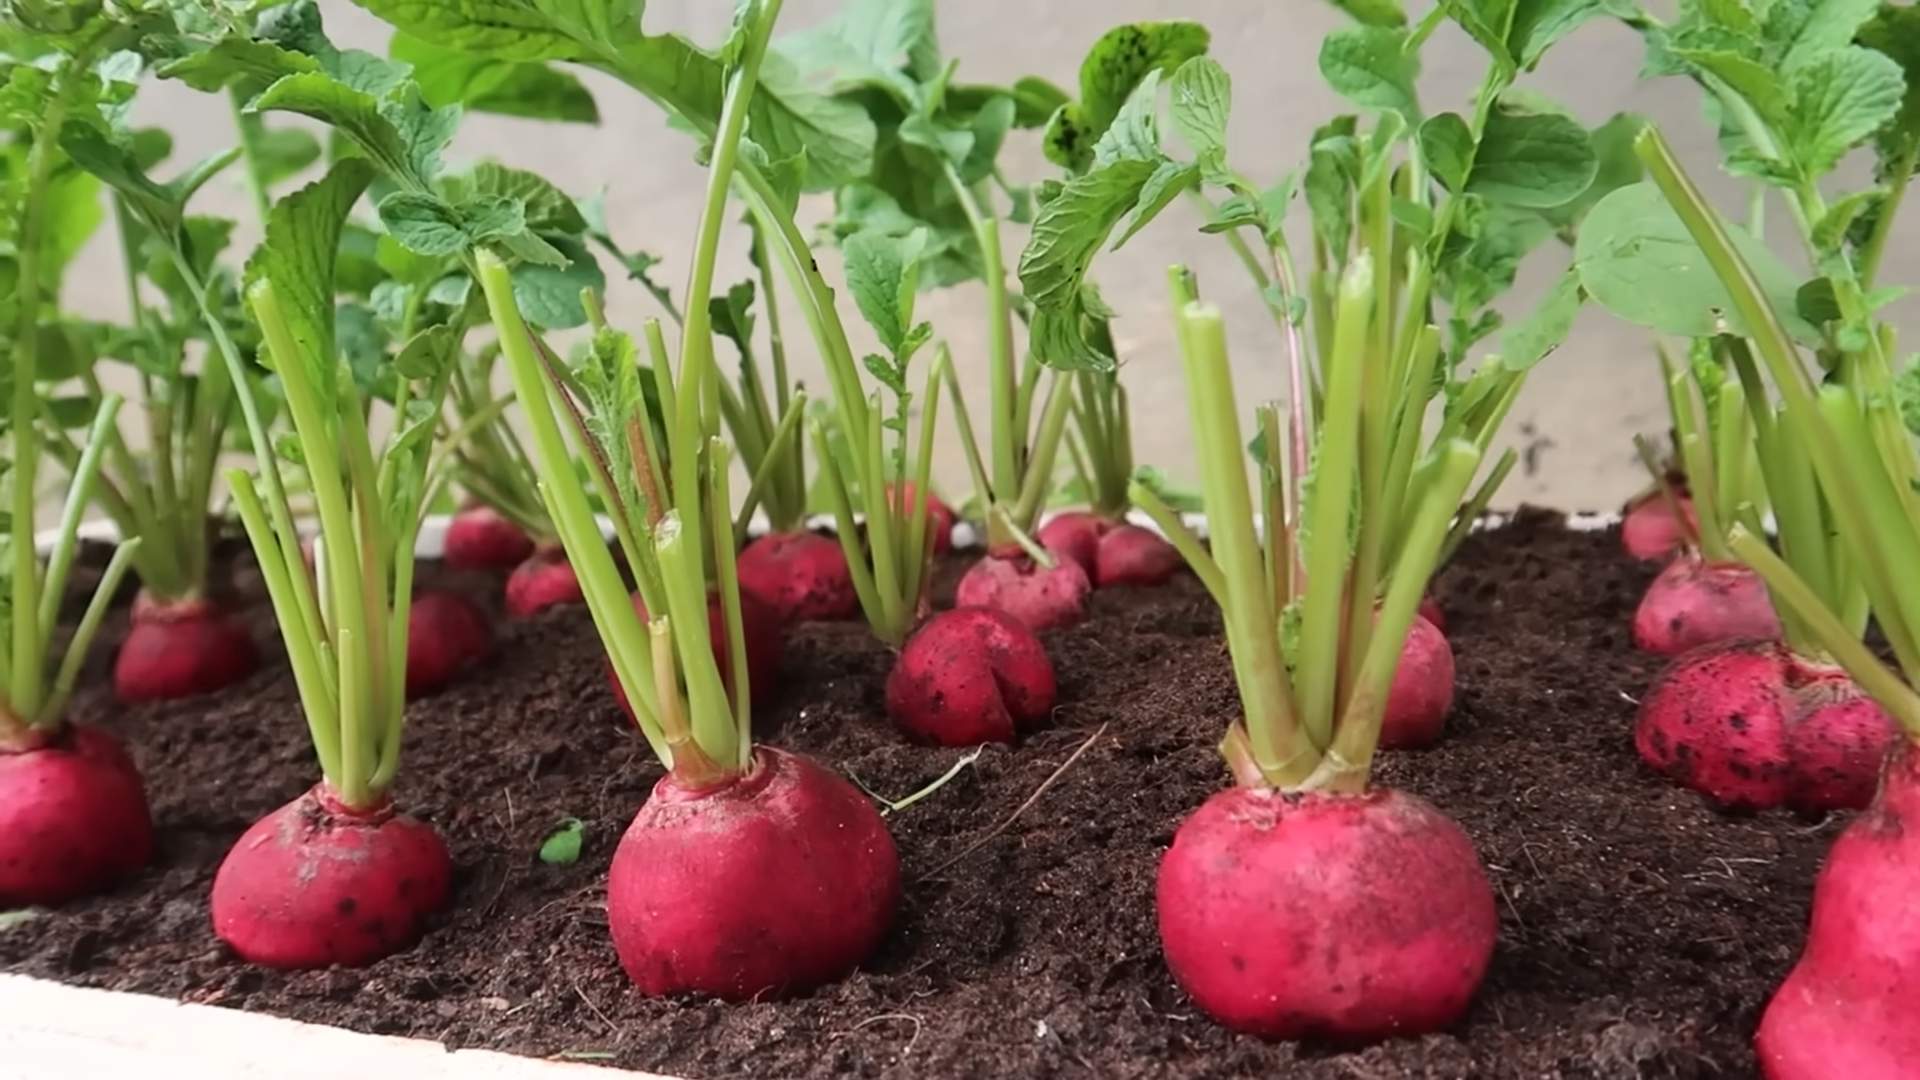
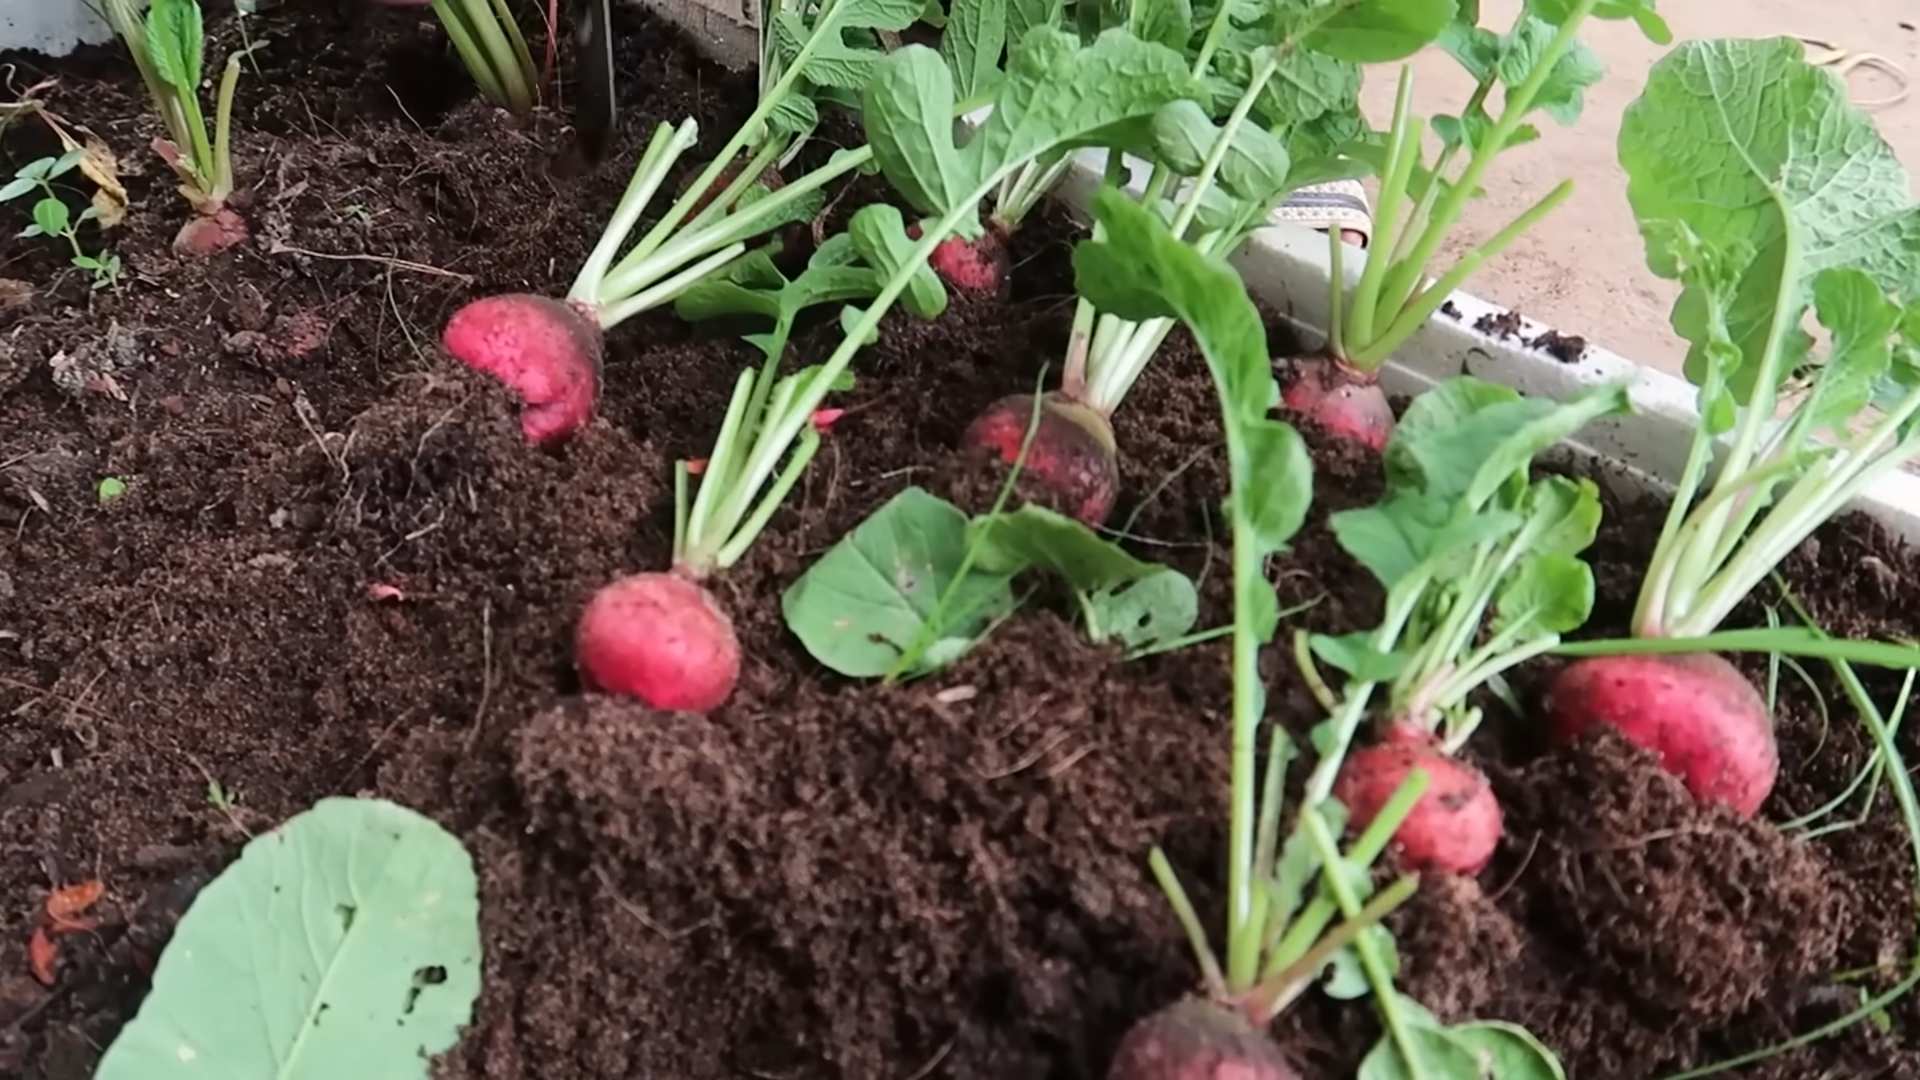
The best part! Radishes are ready to harvest when their roots are about 1 inch in diameter, depending on the variety.
1. Check for maturity: Gently brush away some of the soil around the base of the radish to check its size.
2. Harvest carefully: Gently pull the radish from the soil, holding it by the leaves. If it’s difficult to pull, you can loosen the soil around it with a trowel.
3. Wash and enjoy: Wash the radishes thoroughly and enjoy them fresh! You can eat them raw in salads, slice them on sandwiches, or roast them for a sweeter flavor. The greens are also edible and can be used in salads or stir-fries.
Troubleshooting
Even with the best care, you might encounter some problems while growing radishes indoors. Here are a few common issues and how to fix them:
* Leggy seedlings: This means your seedlings are stretching towards the light. Make sure they’re getting enough light, either from a sunny window or grow lights.
* Small roots: This could be due to overcrowding, lack of nutrients, or poor soil. Thin out the seedlings, fertilize them, and make sure the soil is well-draining.
* Bitter taste: This can be caused by hot weather or inconsistent watering. Keep the soil consistently moist and try to keep the temperature cool.
* Root rot: This is caused by overwatering. Make sure the soil is well-draining and avoid watering too frequently.
Extending Your Harvest
To keep a steady supply of radishes throughout the winter, I recommend succession planting. This means planting a new batch of seeds every 1-2 weeks. This way, you’ll always have radishes ready to harvest.
Choosing the Right Grow Lights (If Needed)
If you’re opting for grow lights, here’s a quick rundown to help you choose:
* LED Grow Lights: These are energy-efficient and produce very little heat, making them ideal for indoor growing. Look for full-spectrum LED lights to provide the radishes with the complete range of light they need.
* Fluorescent Grow Lights: These are a more affordable option, but they produce more heat than LEDs. T5 fluorescent lights are a good choice for radishes.
* Placement is Key: Position the lights a few inches above the plants. As the radishes grow, you’ll need to adjust the height of the lights to keep them close to the foliage.
Maximizing Space
If you’re short on space, consider these tips:
* Vertical Gardening: Use tiered planters or hanging baskets to maximize vertical space.
* Companion Planting: Radishes can be grown alongside other vegetables like carrots and lettuce. They actually help deter pests that might attack these other plants.
* Small Containers: While radishes need some depth, you don’t need huge containers. Several smaller containers can be easier to manage and move around.
Saving Seeds (For Next Year!)
If you want to save seeds from your radishes for next year, you’ll need to let a few plants bolt (go to seed). This means they’ll send up a flower stalk. Once the seed pods are dry and brown, you can harvest them and store the seeds in a cool, dry place. Keep in mind that if you’re growing multiple varieties of radishes, they may cross-pollinate, so the seeds you save might not be true to type.
Enjoying Your Homegrown Radishes
Growing radishes indoors during winter is a fun and rewarding experience. Not only will you have fresh, delicious veggies to enjoy, but you’ll also get to experience the joy of gardening, even when it’s cold and snowy outside. So, grab your seeds, get your hands dirty, and get ready to enjoy the taste of homegrown radishes! I hope this guide helps you have a successful radish-growing season! Happy
Conclusion
So, there you have it! Growing red radishes in winter might seem like a gardening impossibility, but with a little preparation and this simple DIY trick, you can enjoy the crisp, peppery bite of homegrown radishes even when the snow is falling. This isn’t just about having fresh vegetables; it’s about connecting with the earth, understanding the rhythms of nature, and experiencing the satisfaction of nurturing life even in the harshest conditions.
Why is this DIY trick a must-try? Because it empowers you to extend your growing season, reduce your reliance on store-bought produce (often shipped from far away), and add a vibrant splash of color and flavor to your winter meals. Imagine the delight of adding freshly harvested radishes to your salads, soups, or even just enjoying them as a crunchy snack, knowing you grew them yourself, defying the winter chill.
Beyond the basic method outlined, there’s plenty of room for experimentation. Consider using different types of containers 鈥?perhaps upcycled plastic tubs or even repurposed wooden crates. You could also try different soil mixes to see which yields the best results in your specific climate. For those in particularly cold regions, adding a layer of mulch around the base of your containers can provide extra insulation. Another variation is to experiment with different radish varieties. While the ‘Cherry Belle’ is a reliable choice, other fast-maturing varieties like ‘French Breakfast’ or ‘Sparkler’ might also thrive under these conditions. You can even try succession planting, sowing new seeds every few weeks to ensure a continuous harvest throughout the winter months.
Don’t be afraid to get creative and adapt this DIY trick to your own unique circumstances and preferences. The key is to provide your radishes with adequate light, consistent moisture, and protection from extreme cold.
We wholeheartedly encourage you to give this DIY trick a try. It’s a rewarding and surprisingly simple way to enjoy the taste of fresh, homegrown vegetables during the winter months. And once you’ve experienced the joy of harvesting your own winter radishes, we’d love to hear about it! Share your experiences, tips, and photos in the comments below. Let’s build a community of winter radish growers and inspire others to embrace the possibilities of year-round gardening. Let us know what worked for you, what challenges you faced, and any innovative solutions you discovered. Together, we can unlock the secrets to successful winter gardening and enjoy the delicious rewards of our efforts. Successfully **grow red radish winter** and share your experience with us!
Frequently Asked Questions (FAQ)
What is the best time to start growing red radishes in winter using this DIY trick?
The ideal time to start depends on your local climate and the severity of your winters. Generally, you should aim to sow your radish seeds indoors about 4-6 weeks before the first expected frost. This allows the seedlings to establish themselves before being moved to their winter growing location. If you live in a milder climate with less severe winters, you might be able to sow the seeds directly into containers outdoors, but be sure to provide adequate protection from frost. Monitor the weather forecast closely and be prepared to move your containers indoors or provide extra insulation if temperatures are predicted to drop significantly.
What type of soil is best for growing red radishes in winter?
Radishes prefer well-draining, loose soil that is rich in organic matter. A good potting mix specifically formulated for vegetables is an excellent choice. You can also create your own mix by combining equal parts of compost, peat moss (or coconut coir), and perlite or vermiculite. The compost provides essential nutrients, while the peat moss or coconut coir helps retain moisture, and the perlite or vermiculite improves drainage. Avoid using heavy clay soil, as it can become waterlogged and hinder root development. Before planting, amend the soil with a slow-release fertilizer to provide a steady supply of nutrients throughout the growing season.
How much sunlight do red radishes need in winter?
Radishes need at least 6 hours of direct sunlight per day to thrive. In winter, however, sunlight can be limited, especially in northern climates. If you don’t have a sunny south-facing window, you may need to supplement with artificial lighting. Grow lights, such as LED grow lights, are an excellent option for providing the necessary light intensity and spectrum. Position the grow lights about 6-12 inches above the plants and keep them on for 12-16 hours per day. Rotate the containers regularly to ensure that all sides of the plants receive adequate light.
How often should I water my red radishes in winter?
Watering frequency will depend on several factors, including the type of container, the soil mix, and the ambient temperature. Generally, you should water your radishes when the top inch of soil feels dry to the touch. Avoid overwatering, as this can lead to root rot. Water deeply, ensuring that the water drains out of the bottom of the container. In winter, the air tends to be drier, so you may need to water more frequently than you would during the summer months. Monitor the soil moisture levels regularly and adjust your watering schedule accordingly.
How do I protect my red radishes from frost in winter?
Protecting your radishes from frost is crucial for successful winter growing. If you are growing your radishes in containers, the easiest way to protect them is to move them indoors when temperatures are predicted to drop below freezing. If you cannot move the containers indoors, you can cover them with frost blankets, burlap sacks, or even old blankets. Make sure the covering extends to the ground to trap heat. You can also create a temporary greenhouse by covering the containers with plastic sheeting or a cold frame. Another option is to use a heat mat designed for seedlings to provide bottom heat.
What are some common pests and diseases that affect red radishes in winter, and how can I prevent them?
While winter growing tends to reduce pest pressure, radishes can still be susceptible to certain pests and diseases. Common pests include aphids, flea beetles, and root maggots. To prevent infestations, inspect your plants regularly for signs of pests. You can control aphids with insecticidal soap or neem oil. Flea beetles can be deterred by covering the plants with row covers. Root maggots can be prevented by using a floating row cover and practicing crop rotation. Common diseases include damping-off and root rot. To prevent these diseases, use well-draining soil, avoid overwatering, and provide good air circulation.
How long does it take for red radishes to mature in winter?
Radishes are known for their quick growth, but the maturation time can be slightly longer in winter due to cooler temperatures and reduced sunlight. Generally, radishes will be ready to harvest in about 3-4 weeks from sowing. However, this can vary depending on the variety and the growing conditions. To determine if your radishes are ready to harvest, gently brush away the soil around the base of the plant and check the size of the root. The root should be about 1 inch in diameter. You can also harvest a few radishes early to test their flavor and texture.
Can I grow other vegetables alongside red radishes in winter?
Yes, radishes can be grown alongside other cool-season vegetables in winter. Good companion plants for radishes include lettuce, spinach, carrots, and peas. These vegetables have similar growing requirements and can benefit from each other’s presence. For example, radishes can help break up the soil, making it easier for carrots to grow. Lettuce and spinach can provide shade for the radishes, helping to keep the soil cool and moist. Avoid planting radishes near members of the brassica family, such as cabbage and broccoli, as they can compete for nutrients.


Leave a Comment