
Grow Marigolds From Seed and unlock a vibrant explosion of color in your garden! Have you ever looked at a stunning display of marigolds and thought, “I wish I could do that?” Well, guess what? You absolutely can! This DIY guide will take you from tiny seed to blooming beauty, even if you’ve never considered yourself a green thumb.
Marigolds aren’t just pretty faces; they have a rich history. Originating in the Americas, they were used by the Aztecs for medicinal and ceremonial purposes. They eventually made their way to Europe and beyond, becoming a staple in gardens worldwide. For generations, gardeners have relied on marigolds not only for their cheerful appearance but also for their pest-repelling properties. They’re like little garden superheroes!
Why should you learn to grow marigolds from seed? Because it’s incredibly rewarding, cost-effective, and gives you complete control over the process. Buying seedlings can be expensive, and you’re limited to what the nursery offers. But when you start from seed, you can choose from a vast array of varieties, from the classic golden yellow to vibrant oranges and even bi-colored beauties. Plus, there’s nothing quite like the satisfaction of watching a tiny seed sprout and flourish into a thriving plant, all thanks to your care and attention. So, let’s get started and transform your garden into a marigold paradise!
Growing Marigolds From Seed: A Complete DIY Guide
Hey there, fellow gardening enthusiasts! I’m so excited to share my tried-and-true method for growing vibrant, cheerful marigolds from seed. It’s easier than you might think, and the reward of seeing those sunny blooms pop up is absolutely worth it. Plus, marigolds are fantastic companion plants, helping to deter pests and attract beneficial insects to your garden. Let’s get started!
What You’ll Need
Before we dive in, let’s gather all the necessary supplies. Having everything on hand will make the process smooth and enjoyable.
* **Marigold Seeds:** Choose your favorite variety! There are so many options, from dwarf French marigolds to tall African marigolds, in shades of yellow, orange, and even red. I personally love the ‘Crackerjack’ mix for its vibrant colors and large blooms.
* **Seed Starting Trays or Pots:** You can use plastic seed starting trays, peat pots, or even recycled containers like yogurt cups (just make sure to poke drainage holes!).
* **Seed Starting Mix:** This is crucial! Don’t use regular garden soil, as it’s too heavy and can harbor diseases. Seed starting mix is light, sterile, and provides the perfect environment for germination.
* **Watering Can or Spray Bottle:** Gentle watering is key to avoid disturbing the delicate seedlings.
* **Heat Mat (Optional):** Marigolds germinate best in warm temperatures, so a heat mat can speed up the process, especially if you’re starting seeds indoors in a cooler climate.
* **Grow Lights (Optional):** If you’re starting seeds indoors, grow lights will provide the necessary light for healthy growth. A sunny windowsill might work, but seedlings often become leggy without supplemental lighting.
* **Plant Labels:** Trust me, you’ll want to label your seedlings! It’s easy to forget which variety is which.
* **Small Trowel or Spoon:** For transplanting seedlings.
* **Well-Draining Potting Mix:** For transplanting seedlings into larger containers or directly into the garden.
When to Start Your Seeds
The timing depends on your climate and when you want your marigolds to bloom.
* **Indoors:** Start seeds 6-8 weeks before the last expected frost. This gives them a head start and allows you to enjoy blooms earlier in the season.
* **Directly in the Garden:** Sow seeds directly into the garden after the last frost, when the soil has warmed up to at least 65掳F (18掳C).
Starting Seeds Indoors: A Step-by-Step Guide
This is my preferred method, as it gives me more control over the growing environment and allows me to get a jump start on the season.
1. **Prepare Your Seed Starting Trays or Pots:** Fill your chosen containers with seed starting mix, leaving about half an inch of space at the top. Gently tap the containers to settle the mix.
2. **Moisten the Seed Starting Mix:** Water the mix thoroughly until it’s evenly moist but not soggy. You can use a spray bottle or a watering can with a gentle rose attachment.
3. **Sow the Seeds:** Sprinkle 2-3 marigold seeds on top of the mix in each cell or pot. Marigold seeds are relatively large and easy to handle.
4. **Cover the Seeds:** Lightly cover the seeds with a thin layer (about 1/4 inch) of seed starting mix.
5. **Water Again:** Gently water the surface to settle the mix and ensure good seed-to-soil contact.
6. **Provide Warmth:** Place the seed starting trays or pots on a heat mat, if using. The ideal germination temperature for marigolds is between 70-75掳F (21-24掳C).
7. **Cover with a Humidity Dome (Optional):** A humidity dome helps to retain moisture and create a favorable environment for germination. If you don’t have a dome, you can cover the trays with plastic wrap.
8. **Place Under Grow Lights:** If using grow lights, position them a few inches above the trays. If using a sunny windowsill, choose a south-facing window that receives at least 6 hours of direct sunlight per day.
9. **Monitor Moisture Levels:** Keep the seed starting mix consistently moist but not waterlogged. Check daily and water as needed.
10. **Wait for Germination:** Marigold seeds typically germinate within 5-10 days.
11. **Remove Humidity Dome/Plastic Wrap:** Once the seedlings emerge, remove the humidity dome or plastic wrap to prevent fungal diseases.
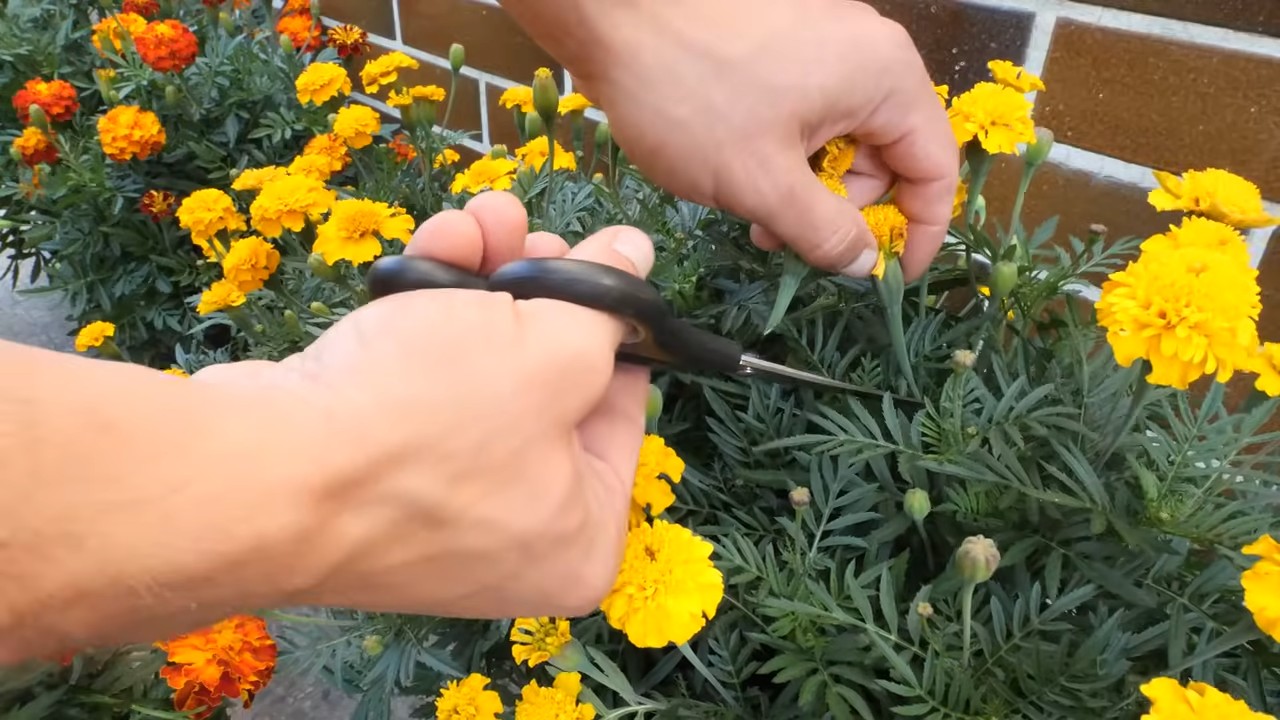
12. **Thin Seedlings (If Necessary):** If more than one seedling emerges in each cell or pot, thin them out by snipping off the weaker seedlings at the soil line with small scissors. Leave only the strongest seedling in each cell.
13. **Provide Adequate Light:** Continue to provide ample light to prevent the seedlings from becoming leggy. Adjust the height of the grow lights as the seedlings grow.
14. **Water Regularly:** Water the seedlings when the top inch of soil feels dry to the touch.
15. **Fertilize (Optional):** Once the seedlings have their first set of true leaves (the leaves that look like miniature versions of the adult leaves), you can start fertilizing them with a diluted liquid fertilizer. Follow the instructions on the fertilizer label.
Direct Sowing in the Garden: A Simpler Approach
This method is less work upfront, but you’ll need to be patient and protect the seedlings from pests and harsh weather.
1. **Prepare the Garden Bed:** Choose a sunny location with well-draining soil. Amend the soil with compost or other organic matter to improve its fertility and drainage.
2. **Loosen the Soil:** Rake the soil to create a smooth, even surface.
3. **Sow the Seeds:** Sow the marigold seeds directly into the soil, spacing them about 6-12 inches apart, depending on the variety.
4. **Cover the Seeds:** Lightly cover the seeds with about 1/4 inch of soil.
5. **Water Gently:** Water the soil thoroughly but gently, using a watering can with a rose attachment.
6. **Keep the Soil Moist:** Keep the soil consistently moist until the seedlings emerge.
7. **Protect from Pests:** Protect the seedlings from slugs, snails, and other pests by using organic pest control methods, such as diatomaceous earth or beer traps.
8. **Thin Seedlings (If Necessary):** Once the seedlings are a few inches tall, thin them out to the desired spacing.
Transplanting Your Marigold Seedlings
Whether you started your seeds indoors or purchased seedlings from a nursery, transplanting them into their final location is a crucial step.
1. **Harden Off Seedlings (If Started Indoors):** Before transplanting seedlings that were started indoors, you’ll need to “harden them off” to acclimate them to outdoor conditions. Gradually expose them to increasing amounts of sunlight and wind over a period of 7-10 days. Start by placing them in a sheltered location for a few hours each day, and gradually increase the amount of time they spend outdoors.
2. **Choose a Sunny Location:** Marigolds thrive in full sun, so choose a location that receives at least 6 hours of direct sunlight per day.
3. **Prepare the Planting Hole:** D
Hey there, fellow gardening enthusiasts! I’m so excited to share my tried-and-true method for growing vibrant, cheerful marigolds from seed. It’s easier than you might think, and the reward of seeing those sunny blooms pop up is absolutely worth it. Plus, marigolds are fantastic companion plants, helping to deter pests and attract beneficial insects to your garden. Let’s get started!
What You’ll Need
Before we dive in, let’s gather all the necessary supplies. Having everything on hand will make the process smooth and enjoyable.
* **Marigold Seeds:** Choose your favorite variety! There are so many options, from dwarf French marigolds to tall African marigolds, in shades of yellow, orange, and even red. I personally love the ‘Crackerjack’ mix for its vibrant colors and large blooms.
* **Seed Starting Trays or Pots:** You can use plastic seed starting trays, peat pots, or even recycled containers like yogurt cups (just make sure to poke drainage holes!).
* **Seed Starting Mix:** This is crucial! Don’t use regular garden soil, as it’s too heavy and can harbor diseases. Seed starting mix is light, sterile, and provides the perfect environment for germination.
* **Watering Can or Spray Bottle:** Gentle watering is key to avoid disturbing the delicate seedlings.
* **Heat Mat (Optional):** Marigolds germinate best in warm temperatures, so a heat mat can speed up the process, especially if you’re starting seeds indoors in a cooler climate.
* **Grow Lights (Optional):** If you’re starting seeds indoors, grow lights will provide the necessary light for healthy growth. A sunny windowsill might work, but seedlings often become leggy without supplemental lighting.
* **Plant Labels:** Trust me, you’ll want to label your seedlings! It’s easy to forget which variety is which.
* **Small Trowel or Spoon:** For transplanting seedlings.
* **Well-Draining Potting Mix:** For transplanting seedlings into larger containers or directly into the garden.
When to Start Your Seeds
The timing depends on your climate and when you want your marigolds to bloom.
* **Indoors:** Start seeds 6-8 weeks before the last expected frost. This gives them a head start and allows you to enjoy blooms earlier in the season.
* **Directly in the Garden:** Sow seeds directly into the garden after the last frost, when the soil has warmed up to at least 65掳F (18掳C).
Starting Seeds Indoors: A Step-by-Step Guide
This is my preferred method, as it gives me more control over the growing environment and allows me to get a jump start on the season.
1. **Prepare Your Seed Starting Trays or Pots:** Fill your chosen containers with seed starting mix, leaving about half an inch of space at the top. Gently tap the containers to settle the mix.
2. **Moisten the Seed Starting Mix:** Water the mix thoroughly until it’s evenly moist but not soggy. You can use a spray bottle or a watering can with a gentle rose attachment.
3. **Sow the Seeds:** Sprinkle 2-3 marigold seeds on top of the mix in each cell or pot. Marigold seeds are relatively large and easy to handle.
4. **Cover the Seeds:** Lightly cover the seeds with a thin layer (about 1/4 inch) of seed starting mix.
5. **Water Again:** Gently water the surface to settle the mix and ensure good seed-to-soil contact.
6. **Provide Warmth:** Place the seed starting trays or pots on a heat mat, if using. The ideal germination temperature for marigolds is between 70-75掳F (21-24掳C).
7. **Cover with a Humidity Dome (Optional):** A humidity dome helps to retain moisture and create a favorable environment for germination. If you don’t have a dome, you can cover the trays with plastic wrap.
8. **Place Under Grow Lights:** If using grow lights, position them a few inches above the trays. If using a sunny windowsill, choose a south-facing window that receives at least 6 hours of direct sunlight per day.
9. **Monitor Moisture Levels:** Keep the seed starting mix consistently moist but not waterlogged. Check daily and water as needed.
10. **Wait for Germination:** Marigold seeds typically germinate within 5-10 days.
11. **Remove Humidity Dome/Plastic Wrap:** Once the seedlings emerge, remove the humidity dome or plastic wrap to prevent fungal diseases.
12. **Thin Seedlings (If Necessary):** If more than one seedling emerges in each cell or pot, thin them out by snipping off the weaker seedlings at the soil line with small scissors. Leave only the strongest seedling in each cell.
13. **Provide Adequate Light:** Continue to provide ample light to prevent the seedlings from becoming leggy. Adjust the height of the grow lights as the seedlings grow.
14. **Water Regularly:** Water the seedlings when the top inch of soil feels dry to the touch.
15. **Fertilize (Optional):** Once the seedlings have their first set of true leaves (the leaves that look like miniature versions of the adult leaves), you can start fertilizing them with a diluted liquid fertilizer. Follow the instructions on the fertilizer label.
Direct Sowing in the Garden: A Simpler Approach
This method is less work upfront, but you’ll need to be patient and protect the seedlings from pests and harsh weather.
1. **Prepare the Garden Bed:** Choose a sunny location with well-draining soil. Amend the soil with compost or other organic matter to improve its fertility and drainage.
2. **Loosen the Soil:** Rake the soil to create a smooth, even surface.
3. **Sow the Seeds:** Sow the marigold seeds directly into the soil, spacing them about 6-12 inches apart, depending on the variety.
4. **Cover the Seeds:** Lightly cover the seeds with about 1/4 inch of soil.
5. **Water Gently:** Water the soil thoroughly but gently, using a watering can with a rose attachment.
6. **Keep the Soil Moist:** Keep the soil consistently moist until the seedlings emerge.
7. **Protect from Pests:** Protect the seedlings from slugs, snails, and other pests by using organic pest control methods, such as diatomaceous earth or beer traps.
8. **Thin Seedlings (If Necessary):** Once the seedlings are a few inches tall, thin them out to the desired spacing.
Transplanting Your Marigold Seedlings
Whether you started your seeds indoors or purchased seedlings from a nursery, transplanting them into their final location is a crucial step.
1. **Harden Off Seedlings (If Started Indoors):** Before transplanting seedlings that were started indoors, you’ll need to “harden them off” to acclimate them to outdoor conditions. Gradually expose them to increasing amounts of sunlight and wind over a period of 7-10 days. Start by placing them in a sheltered location for a few hours each day, and gradually increase the amount of time they spend outdoors.
2. **Choose a Sunny Location:** Marigolds thrive in full sun, so choose a location that receives at least 6 hours of direct sunlight per day.
3. **Prepare the Planting Hole:** Dig a hole that is slightly larger than the root ball of the seedling.
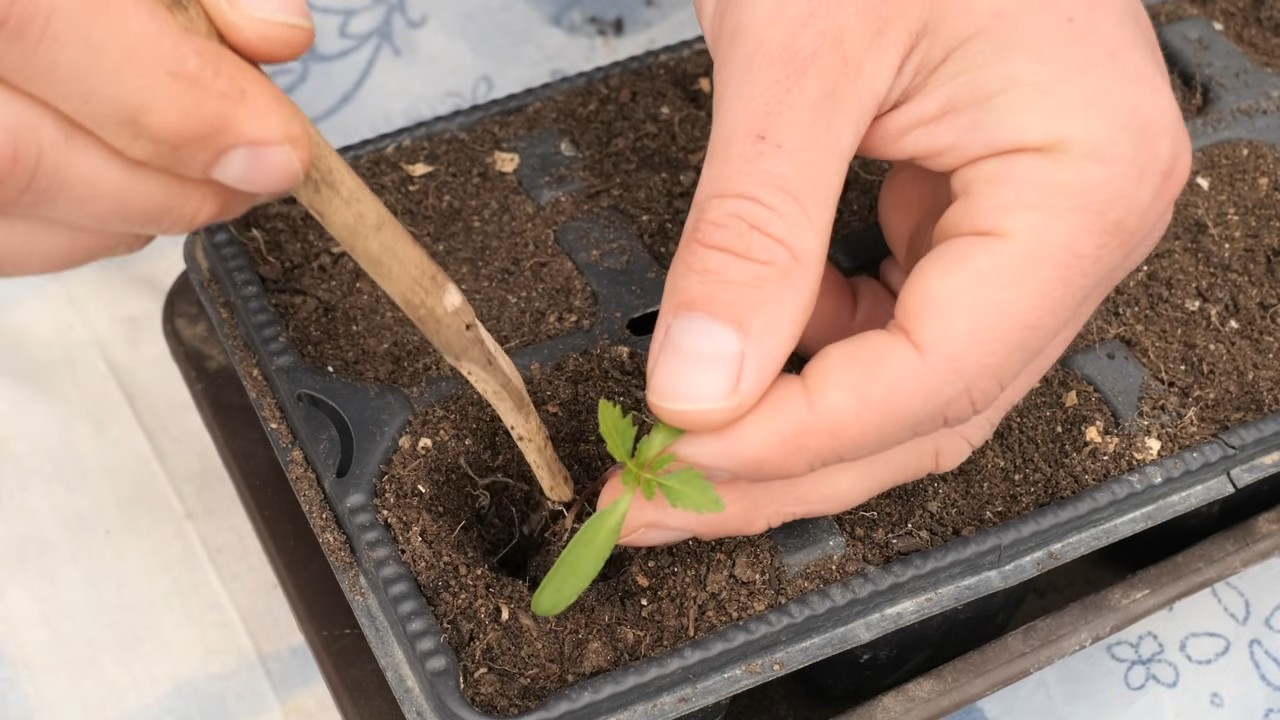
4. **Remove the Seedling from its Container:** Gently remove the seedling from its container, being careful not to damage the roots. If the seedling is root-bound (the roots are tightly circling the bottom of the container), gently loosen the roots before planting.
5. **Plant the Seedling:** Place the seedling in the planting hole, making sure that the top of the root ball is level with the surrounding soil.
6. **Fill the Hole:** Fill the hole with well-draining potting mix or garden soil, gently firming the soil around the seedling.
7. **Water Thoroughly:** Water the seedling thoroughly after planting.
8. **Mulch (Optional):** Apply a layer of mulch around the base of the plant to help retain moisture and suppress weeds.
Caring for Your Marigolds
Once your marigolds are established, they’re relatively low-maintenance.
* **Watering:** Water regularly, especially during dry spells. Avoid overwatering, as this can lead to root rot.
* **Fertilizing:** Fertilize every few weeks with a balanced liquid fertilizer to encourage continuous blooming.
* **Deadheading:** Deadhead spent flowers regularly to encourage more blooms. Simply pinch or cut off the faded flowers just below the flower head.
* **Pest Control:** Monitor your marigolds for pests, such as aphids and spider mites. Treat infestations with insecticidal soap or neem oil.
* **Disease Prevention:** Marigolds are generally disease-resistant, but they can be susceptible to fungal diseases in humid conditions. Ensure good air circulation around the plants and avoid overhead watering.
Enjoy Your Beautiful Marigolds!
And there
Conclusion
So, there you have it! Growing marigolds from seed isn’t just a cost-effective way to fill your garden with vibrant color; it’s a deeply rewarding experience that connects you to the natural world. From the tiny speck of a seed to the burst of sunshine that is a fully bloomed marigold, you’ll witness the magic of life unfolding right before your eyes.
This DIY trick is a must-try for several compelling reasons. First, it offers unparalleled control over the varieties you grow. Forget being limited to what’s available at your local nursery; with seeds, you can explore a vast array of marigold types, from the classic French marigolds with their intricate patterns to the towering African marigolds that make a bold statement. You can even seek out heirloom varieties, preserving genetic diversity and enjoying unique blooms that have been passed down through generations.
Second, starting from seed allows you to tailor the growing conditions to your specific climate and soil. You can choose the best time to sow, ensuring optimal germination and healthy seedling development. You can also amend your soil to provide the nutrients that marigolds need to thrive, resulting in stronger, more resilient plants.
Third, and perhaps most importantly, growing marigolds from seed is incredibly satisfying. There’s a sense of accomplishment that comes from nurturing a plant from its earliest stages, watching it grow and flourish under your care. It’s a tangible reminder of your connection to nature and a source of endless joy.
Ready to take your marigold game to the next level? Consider these variations and suggestions:
* Companion Planting Power: Marigolds are renowned for their pest-repelling properties. Plant them alongside tomatoes, peppers, and other vegetables to deter harmful insects and promote healthy growth. Experiment with different companion planting combinations to discover what works best in your garden.
* Edible Delights: Did you know that marigold petals are edible? They add a citrusy, slightly spicy flavor to salads, soups, and other dishes. Use them sparingly, as their flavor can be quite potent. Be sure to only use petals from marigolds that have not been treated with pesticides or herbicides.
* Container Gardening Champions: Marigolds are perfectly suited for container gardening. Choose a well-draining potting mix and a container that’s at least 6 inches deep. Place your container in a sunny location and water regularly. Container-grown marigolds are a great way to add color to patios, balconies, and other small spaces.
* Succession Planting for Continuous Blooms: To enjoy a continuous display of marigolds throughout the growing season, try succession planting. Sow seeds every few weeks, starting in early spring. This will ensure that you always have new blooms coming into their own.
* Seed Saving for Future Gardens: Once your marigolds have finished blooming, you can save the seeds for next year’s garden. Allow the flower heads to dry completely on the plant. Then, carefully remove the seeds and store them in a cool, dry place.
We are confident that you will find growing marigolds from seed to be a rewarding and enjoyable experience. Don’t be afraid to experiment, learn from your mistakes, and most importantly, have fun! We encourage you to try this DIY trick and share your experiences with us. Post photos of your marigolds on social media using #GrowMarigoldsFromSeed and tell us about your successes and challenges. We can’t wait to see what you create! Let’s spread the joy of marigolds, one seed at a time. Remember, even a small patch of marigolds can make a big difference in your garden and your well-being. So, grab some seeds, get your hands dirty, and prepare to be amazed by the beauty and resilience of these incredible flowers.
Frequently Asked Questions (FAQ)
How long does it take for marigold seeds to germinate?
Generally, marigold seeds germinate within 5 to 14 days, provided the soil temperature is consistently between 70-80掳F (21-27掳C). Cooler temperatures can significantly slow down the germination process. Ensure the soil remains consistently moist but not waterlogged during this period. Using a heat mat can help maintain optimal soil temperature, especially in cooler climates.
What is the best time to start marigold seeds indoors?
The ideal time to start marigold seeds indoors is about 4-6 weeks before the last expected frost in your area. This allows the seedlings to develop a strong root system before being transplanted outdoors. Check your local frost dates to determine the appropriate timing for your region. Starting seeds indoors gives you a head start on the growing season and allows you to enjoy blooms earlier.
What kind of soil is best for growing marigolds from seed?
Marigolds thrive in well-draining soil that is rich in organic matter. A good potting mix for starting seeds indoors should be light and airy, allowing for proper root development. When transplanting outdoors, amend your garden soil with compost or other organic materials to improve drainage and fertility. Marigolds are not particularly fussy about soil pH, but a slightly acidic to neutral pH (6.0-7.0) is ideal.
How much sunlight do marigolds need?
Marigolds are sun-loving plants and require at least 6-8 hours of direct sunlight per day to thrive. Insufficient sunlight can result in leggy growth, fewer blooms, and increased susceptibility to diseases. Choose a sunny location in your garden or on your patio for your marigolds. If growing indoors, supplement with grow lights if necessary.
How often should I water marigold seedlings?
Marigold seedlings need consistent moisture to establish a strong root system. Water them regularly, keeping the soil consistently moist but not waterlogged. Overwatering can lead to root rot, so be sure to allow the top inch of soil to dry out slightly between waterings. As the plants mature, you can reduce the frequency of watering, but still ensure they receive adequate moisture, especially during hot, dry weather.
Do marigolds need fertilizer?
While marigolds are not heavy feeders, they benefit from occasional fertilization. A balanced fertilizer (e.g., 10-10-10) applied every few weeks can promote healthy growth and abundant blooms. Avoid over-fertilizing, as this can lead to excessive foliage growth at the expense of flowers. Alternatively, you can amend your soil with compost or other organic materials to provide a slow-release source of nutrients.
How do I prevent pests and diseases from affecting my marigolds?
Marigolds are generally resistant to pests and diseases, but they can be susceptible to certain problems, such as spider mites, aphids, and powdery mildew. To prevent these issues, ensure good air circulation around your plants, avoid overwatering, and remove any dead or diseased foliage promptly. Companion planting with other pest-repelling plants, such as basil or garlic, can also help. If pests or diseases do occur, treat them with an appropriate organic insecticide or fungicide.
Can I grow marigolds in containers?
Yes, marigolds are excellent container plants. Choose a container that is at least 6 inches deep and has drainage holes. Use a well-draining potting mix and place the container in a sunny location. Water regularly and fertilize as needed. Container-grown marigolds are a great way to add color to patios, balconies, and other small spaces.
How do I deadhead marigolds?
Deadheading, or removing spent flowers, encourages marigolds to produce more blooms. Simply pinch or cut off the flower heads just below the spent flower, removing the entire stem down to the next set of leaves. Deadhead regularly throughout the growing season to keep your marigolds blooming profusely.
Are all parts of marigolds edible?
While the petals of some marigold varieties are edible, it’s important to only consume petals from marigolds that have not been treated with pesticides or herbicides. The leaves and stems are generally not considered edible. Use marigold petals sparingly, as their flavor can be quite potent. They add a citrusy, slightly spicy flavor to salads, soups, and other dishes.

Leave a Comment