
Grow Cauliflower Easily, you say? Absolutely! Imagine harvesting your own crisp, white cauliflower head, knowing you nurtured it from a tiny seedling to a culinary masterpiece. Forget those bland, overpriced heads at the grocery store; we’re talking about fresh, flavorful cauliflower straight from your backyard.
For centuries, cauliflower has been a staple in gardens and kitchens worldwide. Originating in the Mediterranean, this versatile vegetable has been cultivated and enjoyed for its unique taste and nutritional benefits. But let’s be honest, growing cauliflower can sometimes feel like a daunting task. That’s where these DIY tricks and hacks come in!
I’ve been there, struggling with bolting, pests, and tiny, disappointing heads. But through trial and error (and a whole lot of research!), I’ve discovered some simple yet effective methods to grow cauliflower easily, even if you’re a beginner gardener. This article is packed with practical tips and step-by-step instructions to help you avoid common pitfalls and achieve a bountiful harvest. Whether you have a sprawling garden or just a few containers on your balcony, these DIY solutions will empower you to cultivate your own delicious cauliflower. Get ready to impress your friends and family with your homegrown success!
Growing Cauliflower: A Beginner’s Guide to a Bountiful Harvest
Hey there, fellow gardening enthusiasts! Ever dreamt of harvesting your own crisp, delicious cauliflower heads right from your backyard? Well, you’re in the right place! Growing cauliflower might seem intimidating at first, but trust me, with a little know-how and patience, you can absolutely nail it. I’m going to walk you through everything you need to know, from choosing the right variety to troubleshooting common problems. Let’s get our hands dirty!
Choosing the Right Cauliflower Variety
Before we even think about planting, we need to pick the perfect cauliflower variety for your climate and growing season. Different varieties mature at different rates, and some are more heat-tolerant than others.
* Consider your climate: If you live in a warmer region, opt for heat-tolerant varieties like ‘Snow Crown’ or ‘Cheddar’. For cooler climates, ‘Snowball Y Improved’ or ‘Early White Vienna’ are excellent choices.
* Think about your growing season: Cauliflower needs a long growing season (around 55-100 days), so choose a variety that fits within your region’s frost-free period. If you have a short growing season, look for early-maturing varieties.
* Explore different colors: While white cauliflower is the most common, you can also find purple, orange, and green varieties. These add a fun pop of color to your garden and offer slightly different nutritional profiles. ‘Graffiti’ (purple), ‘Cheddar’ (orange), and ‘Romanesco’ (green) are all great options.
* Disease resistance: Some varieties are bred to be more resistant to common cauliflower diseases like black rot and clubroot. If these diseases are prevalent in your area, choose a resistant variety.
Preparing the Soil: The Foundation for Success
Cauliflower is a heavy feeder, meaning it needs nutrient-rich soil to thrive. Proper soil preparation is crucial for a healthy and productive crop.
* Soil Testing: Before you do anything, test your soil’s pH. Cauliflower prefers a slightly acidic to neutral pH of 6.0 to 7.0. You can purchase a soil testing kit at most garden centers or send a sample to your local agricultural extension office.
* Amending the Soil: Based on your soil test results, amend the soil accordingly. If your soil is too acidic, add lime to raise the pH. If it’s too alkaline, add sulfur to lower it.
* Adding Organic Matter: Incorporate plenty of organic matter, such as compost, well-rotted manure, or leaf mold, into the soil. This will improve drainage, aeration, and nutrient retention. Aim for at least 2-4 inches of organic matter.
* Fertilizing: Cauliflower needs a balanced fertilizer with plenty of nitrogen, phosphorus, and potassium. A 10-10-10 fertilizer is a good starting point. Follow the instructions on the fertilizer package for application rates. I like to work the fertilizer into the top few inches of soil before planting.
* Good Drainage: Cauliflower hates soggy soil. Make sure your planting area has good drainage. If your soil is heavy clay, consider planting in raised beds to improve drainage.
Starting Cauliflower Seeds: Indoors or Outdoors?
You can start cauliflower seeds either indoors or directly in the garden, depending on your climate and growing season.
Starting Seeds Indoors
Starting seeds indoors gives you a head start on the growing season, especially if you live in a colder climate.
1. Timing: Start seeds 4-6 weeks before the last expected frost.
2. Seed Starting Mix: Use a high-quality seed starting mix that is lightweight and well-draining.
3. Planting: Sow seeds ¼ inch deep in individual pots or seed trays.
4. Watering: Keep the soil consistently moist but not waterlogged.
5. Light: Provide plenty of light. A sunny windowsill might not be enough, so consider using grow lights.
6. Temperature: Maintain a temperature of 65-70°F (18-21°C).
7. Hardening Off: Before transplanting seedlings outdoors, you need to harden them off. This means gradually exposing them to outdoor conditions over a period of 7-10 days. Start by placing them in a sheltered location for a few hours each day, gradually increasing the amount of time they spend outdoors.
Direct Sowing
Direct sowing is an option if you have a long growing season and mild temperatures.
1. Timing: Sow seeds directly in the garden after the last expected frost.
2. Soil Preparation: Prepare the soil as described above.
3. Planting: Sow seeds ½ inch deep and 18-24 inches apart.
4. Watering: Keep the soil consistently moist until the seedlings emerge.
5. Thinning: Once the seedlings are a few inches tall, thin them to 18-24 inches apart.
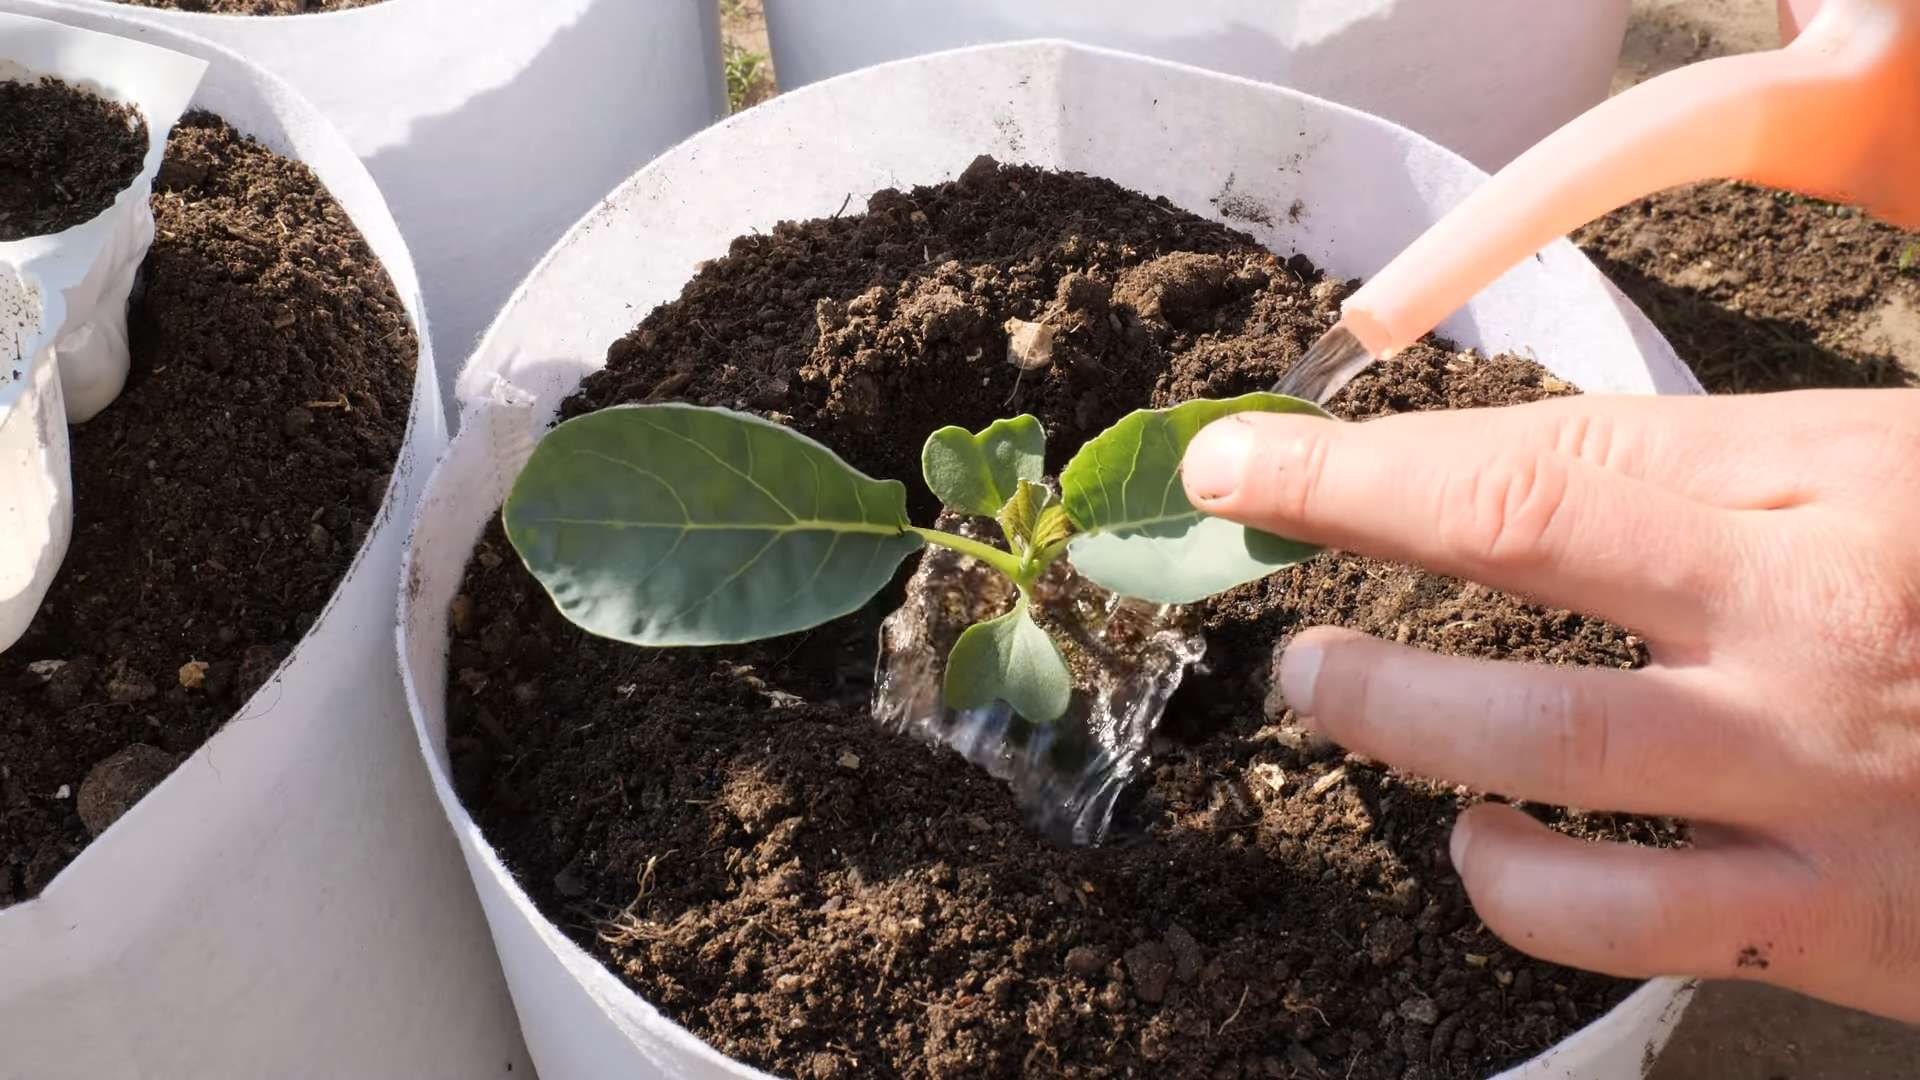
Transplanting Cauliflower Seedlings
Whether you started your seeds indoors or purchased seedlings from a nursery, transplanting them into the garden is a critical step.
1. Timing: Transplant seedlings after the last expected frost, when the soil has warmed up to at least 60°F (15°C).
2. Spacing: Space plants 18-24 inches apart in rows that are 24-36 inches apart. This gives them enough room to grow and prevents overcrowding.
3. Planting Depth: Plant seedlings at the same depth they were growing in their containers.
4. Watering: Water thoroughly after transplanting.
5. Mulching: Apply a layer of mulch around the plants to help retain moisture, suppress weeds, and regulate soil temperature. Straw, wood chips, or shredded leaves are all good options.
Caring for Your Cauliflower Plants: The Nitty-Gritty
Once your cauliflower plants are in the ground, it’s time to provide them with the care they need to thrive.
* Watering: Cauliflower needs consistent moisture, especially during head formation. Water deeply and regularly, aiming for about 1-1.5 inches of water per week. Avoid overhead watering, as this can promote fungal diseases. Drip irrigation is an excellent option.
* Fertilizing: Side-dress your plants with a nitrogen-rich fertilizer every 2-3 weeks. This will help promote leafy growth and head development. Fish emulsion or compost tea are good organic options.
* Weeding: Keep the area around your cauliflower plants free of weeds. Weeds compete with cauliflower for nutrients and water. Hand-pull weeds regularly or use a hoe to cultivate the soil.
* Pest Control: Cauliflower is susceptible to several pests, including cabbage worms, aphids, and flea beetles. Inspect your plants regularly for signs of infestation.
* Cabbage Worms: These green caterpillars can quickly devour cauliflower leaves. Handpick them off the plants or use Bacillus thuringiensis (Bt), a natural insecticide.
* Aphids: These tiny insects suck sap from plants, causing them to weaken and distort. Spray aphids with a strong stream of water or use insecticidal soap.
* Flea Beetles: These small, jumping beetles can create tiny holes in cauliflower leaves. Cover plants with row covers to prevent flea beetles from reaching them.
* Disease Prevention: Cauliflower is also susceptible to several diseases, including black rot and clubroot.
* Black Rot: This bacterial disease causes dark lesions on leaves and can eventually kill the plant. Plant disease-resistant varieties, practice crop rotation, and avoid overhead watering to prevent black rot.
* Clubroot: This fungal disease causes swollen, distorted roots and can stunt plant growth. Raise the soil pH to 7.0-7.2 with lime and practice crop rotation to prevent clubroot.
Blanching Cauliflower: Achieving That Perfect White Head
Blanching is the process of covering the developing cauliflower head to prevent it from turning yellow or brown. This results in a beautiful, white head.
1. Timing: When the cauliflower head is about 2-3 inches in diameter, it’s time to start blanching.
2. Method: There are several ways to blanch cauliflower:
* Tying the Leaves: Gently pull the large outer leaves over the head and tie them together with twine or rubber bands.
* Using Clips: Use clothespins or specially designed cauliflower clips to hold the leaves together.
* Covering with a Container: Place a dark container, such as a flowerpot, over the head.
3. Duration: Blanch the head for 4-7 days, or until it reaches the desired size.
4. Checking: Check the head regularly to make sure it’s not rotting or infested with pests.
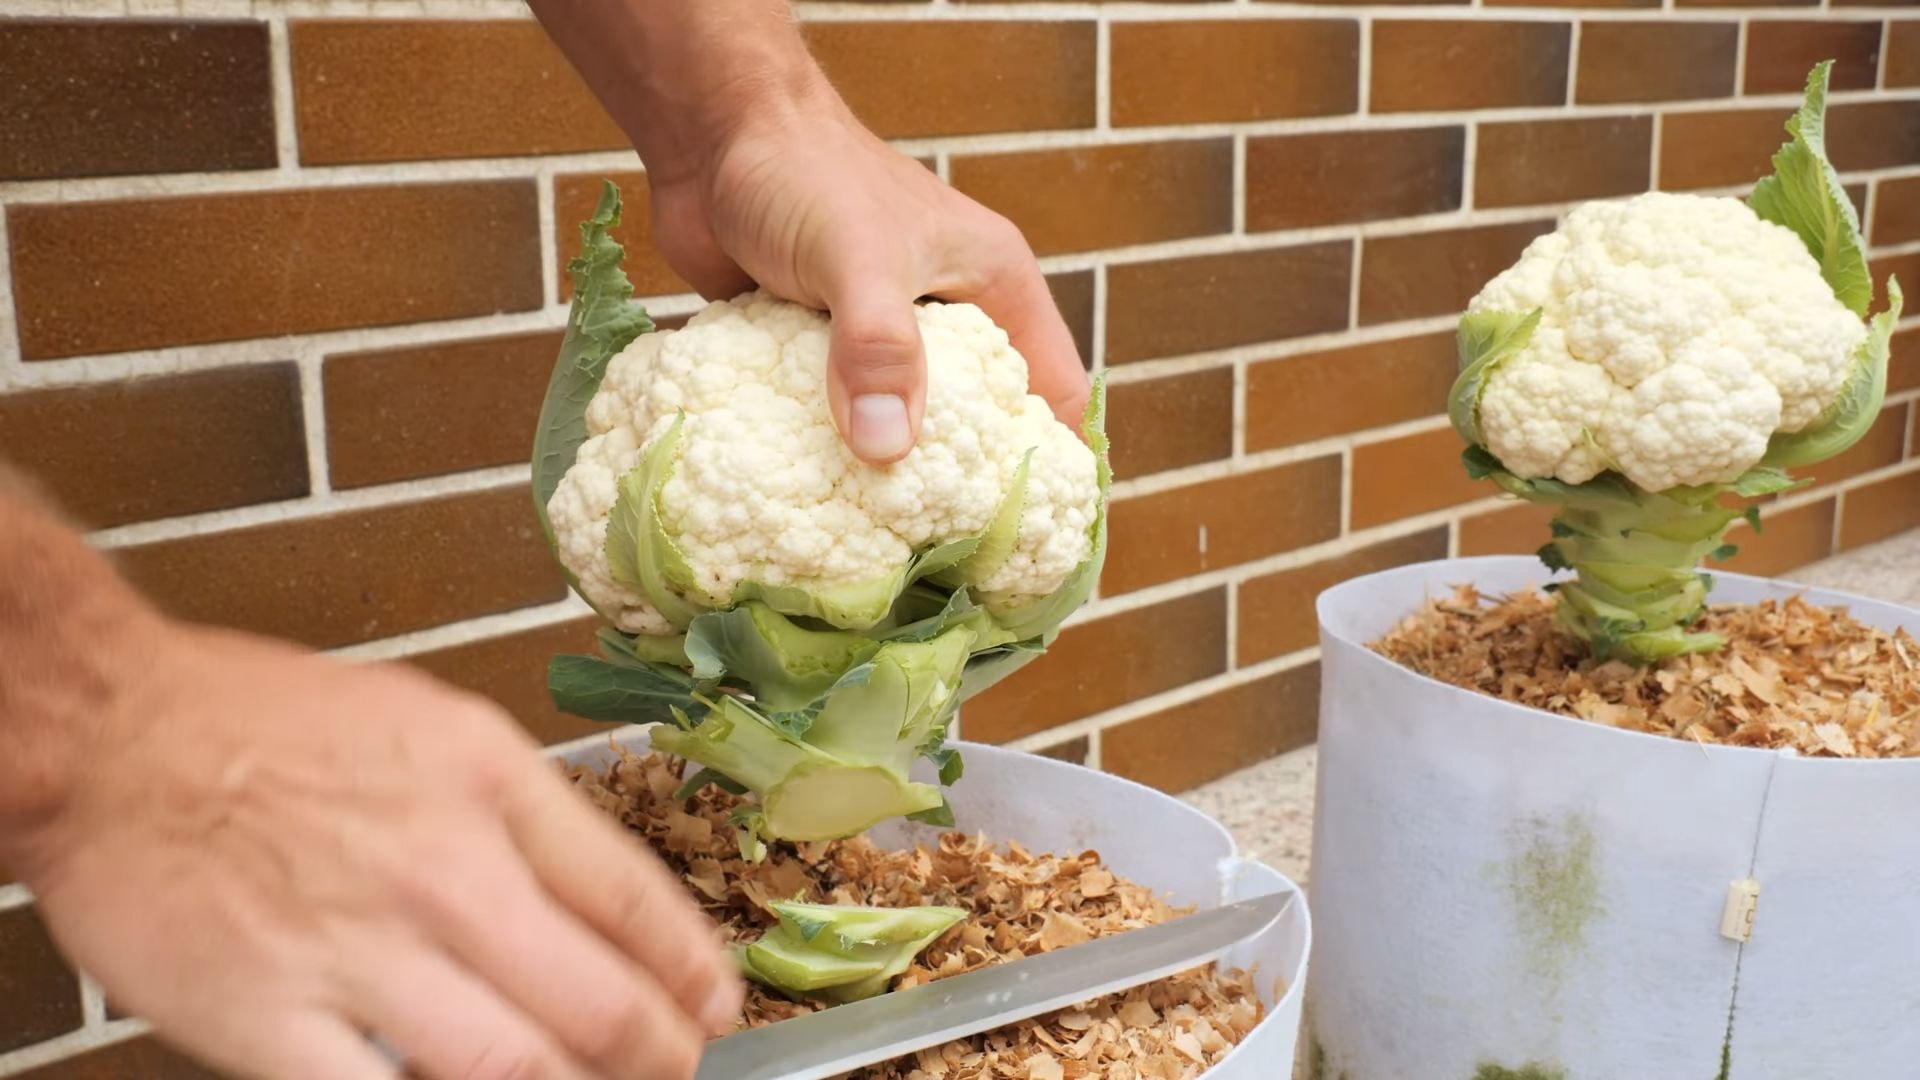
Harvesting Cauliflower: The Moment of Truth
Harvesting
Conclusion
So, there you have it! Growing cauliflower doesn’t have to be an intimidating endeavor relegated to experienced gardeners. With these simple, yet effective DIY tricks, you can cultivate your own thriving cauliflower patch, even if you’re a beginner. We’ve demystified the process, breaking down the essential steps and offering practical solutions to common challenges.
Why is this a must-try? Because the satisfaction of harvesting your own, perfectly formed cauliflower head, knowing you nurtured it from seed to table, is unparalleled. Store-bought cauliflower simply can’t compare to the fresh, vibrant flavor and the sense of accomplishment you’ll experience. Plus, you’ll have complete control over the growing process, ensuring your cauliflower is free from unwanted pesticides and chemicals. You’ll be enjoying truly organic, homegrown goodness.
But the benefits extend beyond just taste and peace of mind. Growing your own cauliflower is also a fantastic way to connect with nature, relieve stress, and learn new skills. It’s a rewarding hobby that can bring joy and purpose to your life. And let’s not forget the cost savings! Over time, you’ll significantly reduce your grocery bill by growing your own produce.
Ready to take your cauliflower cultivation to the next level? Consider these variations and suggestions:
* Experiment with different varieties: Beyond the classic white cauliflower, explore colorful options like purple, orange, and green varieties. Each offers a unique flavor profile and visual appeal.
* Succession planting: Plant cauliflower seeds or seedlings every few weeks to ensure a continuous harvest throughout the growing season.
* Companion planting: Plant cauliflower alongside beneficial companions like herbs (rosemary, thyme) and flowers (marigolds) to deter pests and attract pollinators.
* Ferment your cauliflower: Don’t let any part of the plant go to waste! Ferment the leaves and stems for a delicious and probiotic-rich treat.
* Cauliflower rice: Use your homegrown cauliflower to make fresh, healthy cauliflower rice as a low-carb alternative to traditional rice.
We’ve armed you with the knowledge and the tools to succeed. Now, it’s time to get your hands dirty and embark on your own cauliflower-growing adventure. Remember, gardening is a journey, not a destination. There will be challenges along the way, but don’t be discouraged. Learn from your mistakes, adapt your techniques, and celebrate your successes.
We are confident that with a little patience and dedication, you’ll be enjoying delicious, homegrown cauliflower in no time. So, grab your seeds, prepare your soil, and get ready to experience the joy of growing your own food.
Don’t forget to share your experiences with us! We’d love to hear about your successes, your challenges, and any tips or tricks you’ve discovered along the way. Share your photos and stories on our social media channels using #GrowCauliflowerEasily. Let’s build a community of passionate cauliflower growers and inspire others to join the fun! We can’t wait to see what you create!
Frequently Asked Questions
Q: What is the best time of year to plant cauliflower?
A: The best time to plant cauliflower depends on your climate. Cauliflower thrives in cool weather, so it’s typically planted in the spring or fall. For a spring crop, start seeds indoors 6-8 weeks before the last expected frost. Transplant seedlings outdoors 2-3 weeks before the last frost. For a fall crop, start seeds indoors in mid-summer and transplant seedlings outdoors in late summer or early fall. In warmer climates, you can grow cauliflower throughout the winter.
Q: What kind of soil does cauliflower need?
A: Cauliflower requires well-drained, fertile soil that is rich in organic matter. The ideal soil pH is between 6.0 and 7.0. Before planting, amend your soil with compost, aged manure, or other organic matter to improve its fertility and drainage. You can also add a slow-release fertilizer to provide essential nutrients.
Q: How much sunlight does cauliflower need?
A: Cauliflower needs at least 6 hours of direct sunlight per day to thrive. Choose a sunny location in your garden where your cauliflower plants will receive ample sunlight. If you live in a hot climate, provide some afternoon shade to protect your plants from scorching.
Q: How often should I water cauliflower?
A: Cauliflower needs consistent moisture to grow properly. Water your plants deeply and regularly, especially during dry periods. Aim to keep the soil consistently moist but not waterlogged. Mulching around your plants can help retain moisture and suppress weeds.
Q: What are some common pests and diseases that affect cauliflower?
A: Cauliflower is susceptible to several pests and diseases, including cabbage worms, aphids, flea beetles, clubroot, and black rot. To prevent pest and disease problems, practice good garden hygiene, such as removing plant debris and weeds. You can also use row covers to protect your plants from pests. If you encounter pests or diseases, treat them promptly with appropriate organic or chemical controls.
Q: How do I know when my cauliflower is ready to harvest?
A: Cauliflower is ready to harvest when the head is firm, compact, and reaches the desired size. The size of the head will vary depending on the variety. The curds should be tightly packed and white (or the appropriate color for the variety). If the curds start to separate or turn yellow, it’s time to harvest immediately.
Q: How do I prevent cauliflower from turning yellow?
A: Cauliflower heads can turn yellow if they are exposed to too much sunlight. To prevent yellowing, blanch the heads by tying the outer leaves together over the developing head. This will shield the head from the sun and keep it white.
Q: Can I grow cauliflower in containers?
A: Yes, you can grow cauliflower in containers, but you’ll need to choose a large container that is at least 12 inches in diameter and 12 inches deep. Use a high-quality potting mix and provide adequate drainage. Water and fertilize your container-grown cauliflower regularly.
Q: What are some good companion plants for cauliflower?
A: Good companion plants for cauliflower include herbs like rosemary, thyme, and sage, which can help deter pests. Marigolds are also beneficial as they attract beneficial insects. Other good companions include beans, peas, and onions. Avoid planting cauliflower near strawberries or tomatoes.
Q: How can I improve the flavor of my homegrown cauliflower?
A: The flavor of your homegrown cauliflower can be enhanced by providing it with optimal growing conditions. Make sure your soil is fertile and well-drained, and that your plants receive adequate sunlight and water. You can also add a side dressing of compost or fertilizer during the growing season. Harvesting your cauliflower at the peak of ripeness will also ensure the best flavor.
Leave a Comment