
Grow Brussel Sprouts Pots: Ever dreamt of harvesting your own delicious, miniature cabbages right from your patio? I know I have! There’s something incredibly satisfying about nurturing your own food, and Brussel sprouts are no exception. But let’s be honest, growing them can seem a little intimidating, especially if you’re short on space or new to gardening.
For centuries, Brussel sprouts have been a staple in European cuisine, with their cultivation dating back to 13th-century Belgium – hence the name! They were traditionally grown in large fields, requiring ample space and specific soil conditions. But times have changed, and so have our gardening methods.
That’s where this DIY guide comes in! I’m going to show you how to grow Brussel Sprouts Pots successfully, even if you only have a small balcony or a sunny windowsill. We’ll cover everything from choosing the right pot and soil to providing the perfect amount of sunlight and water. Forget the sprawling fields; we’re bringing the Brussel sprout harvest to your home, one pot at a time. This DIY trick will save you money, reduce your carbon footprint, and provide you with fresh, healthy vegetables. So, grab your gardening gloves, and let’s get started!
Growing Brussels Sprouts in Pots: A Beginner’s Guide
Hey there, fellow gardening enthusiasts! I’m so excited to share my experience with growing Brussels sprouts in pots. It’s totally doable, even if you don’t have a huge garden. I’ve found it’s a rewarding way to enjoy fresh, homegrown veggies, and it’s surprisingly easier than you might think. Let’s dive in!
Choosing the Right Brussels Sprouts Variety
Before we get our hands dirty, let’s talk about choosing the right Brussels sprouts variety. Not all varieties are created equal, especially when it comes to container gardening.
* Consider Size: Look for compact or dwarf varieties. These are bred to stay smaller, making them perfect for pots. Some great options include ‘Dwarf Gem,’ ‘Red Ball,’ and ‘Long Island Improved.’
* Days to Maturity: Pay attention to the “days to maturity” listed on the seed packet. Shorter maturity times are generally better for container growing, as you’ll harvest sooner.
* Disease Resistance: Choose varieties that are known to be resistant to common Brussels sprouts diseases, such as clubroot or powdery mildew. This will save you a lot of headaches later on.
Preparing Your Pots and Soil
Okay, now for the fun part! Getting our pots ready is crucial for success.
* Pot Size Matters: Brussels sprouts need plenty of room for their roots to grow. I recommend using pots that are at least 12 inches in diameter and 12 inches deep. Bigger is generally better!
* Drainage is Key: Make sure your pots have drainage holes. Brussels sprouts don’t like soggy feet. If your pot doesn’t have enough drainage, you can drill a few extra holes.
* Choosing the Right Soil: Don’t just use garden soil! It’s often too heavy and doesn’t drain well. I prefer a high-quality potting mix that’s specifically formulated for vegetables. You can also amend your potting mix with compost for added nutrients.
Planting Your Brussels Sprouts
Time to get those seeds or seedlings in the ground!
1. Starting from Seed (My Preferred Method): I love starting my Brussels sprouts from seed indoors about 4-6 weeks before the last expected frost.
* Fill seed trays or small pots with seed-starting mix.
* Sow the seeds about ½ inch deep.
* Keep the soil moist but not soggy.
* Once the seedlings have a few true leaves, you can transplant them into larger pots.
2. Buying Seedlings: If you’re short on time, you can buy Brussels sprouts seedlings from a local nursery.
* Choose healthy-looking seedlings with sturdy stems and no signs of disease.
* Gently remove the seedlings from their containers, being careful not to damage the roots.
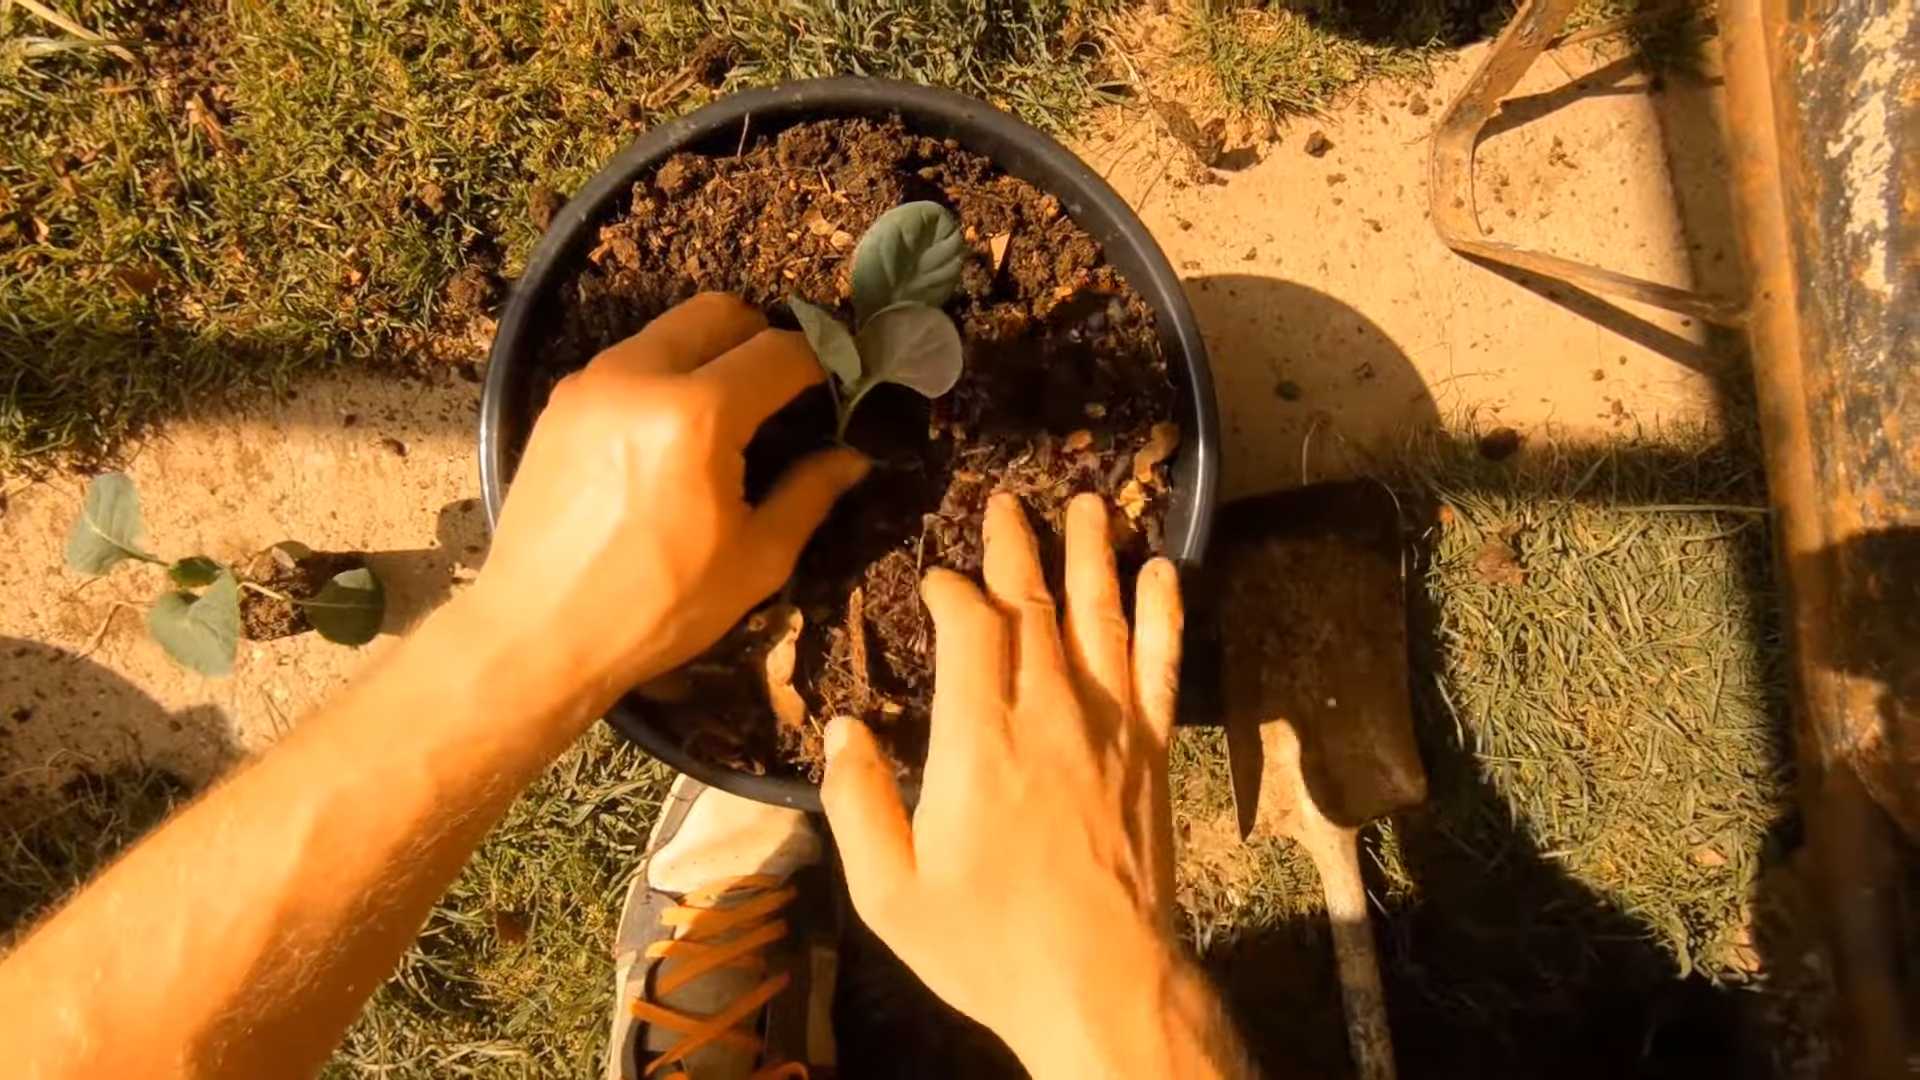
3. Planting in Pots: Whether you’re transplanting seedlings or your own starts, here’s how to plant them in your prepared pots:
* Fill the pot with potting mix, leaving a few inches of space at the top.
* Dig a hole in the center of the pot that’s large enough to accommodate the root ball.
* Gently place the seedling in the hole and backfill with potting mix.
* Water thoroughly.
* If planting multiple Brussels sprouts in a large container, space them at least 18 inches apart.
Caring for Your Brussels Sprouts
Now that your Brussels sprouts are planted, it’s time to give them the TLC they need to thrive.
1. Sunlight: Brussels sprouts need at least 6 hours of sunlight per day. Place your pots in a sunny location. If you don’t have a sunny spot, you can use grow lights.
2. Watering: Water your Brussels sprouts regularly, especially during hot, dry weather. The soil should be consistently moist but not waterlogged. Check the soil moisture by sticking your finger about an inch into the soil. If it feels dry, it’s time to water.
3. Fertilizing: Brussels sprouts are heavy feeders, so they need regular fertilization. I like to use a balanced liquid fertilizer every 2-3 weeks. You can also amend the soil with compost or aged manure.
4. Support: As your Brussels sprouts grow, they may need support to prevent them from falling over. You can use stakes or tomato cages to provide support.
5. Pest Control: Keep an eye out for common Brussels sprouts pests, such as aphids, cabbage worms, and flea beetles.
* Aphids: These tiny pests can suck the sap from your plants. You can control them with insecticidal soap or by blasting them off with a strong stream of water.
* Cabbage Worms: These green caterpillars can devour your Brussels sprouts leaves. Handpicking them off the plants is an effective way to control them. You can also use Bacillus thuringiensis (Bt), a natural insecticide that’s safe for humans and pets.
* Flea Beetles: These tiny beetles can create small holes in the leaves. You can control them with insecticidal soap or by covering your plants with row covers.
6. Dealing with Yellowing Leaves: As the plant matures, the lower leaves will naturally yellow and die off. This is normal. Simply remove the yellowed leaves to improve air circulation and prevent disease.
Harvesting Your Brussels Sprouts
The moment we’ve all been waiting for! Harvesting those delicious Brussels sprouts.
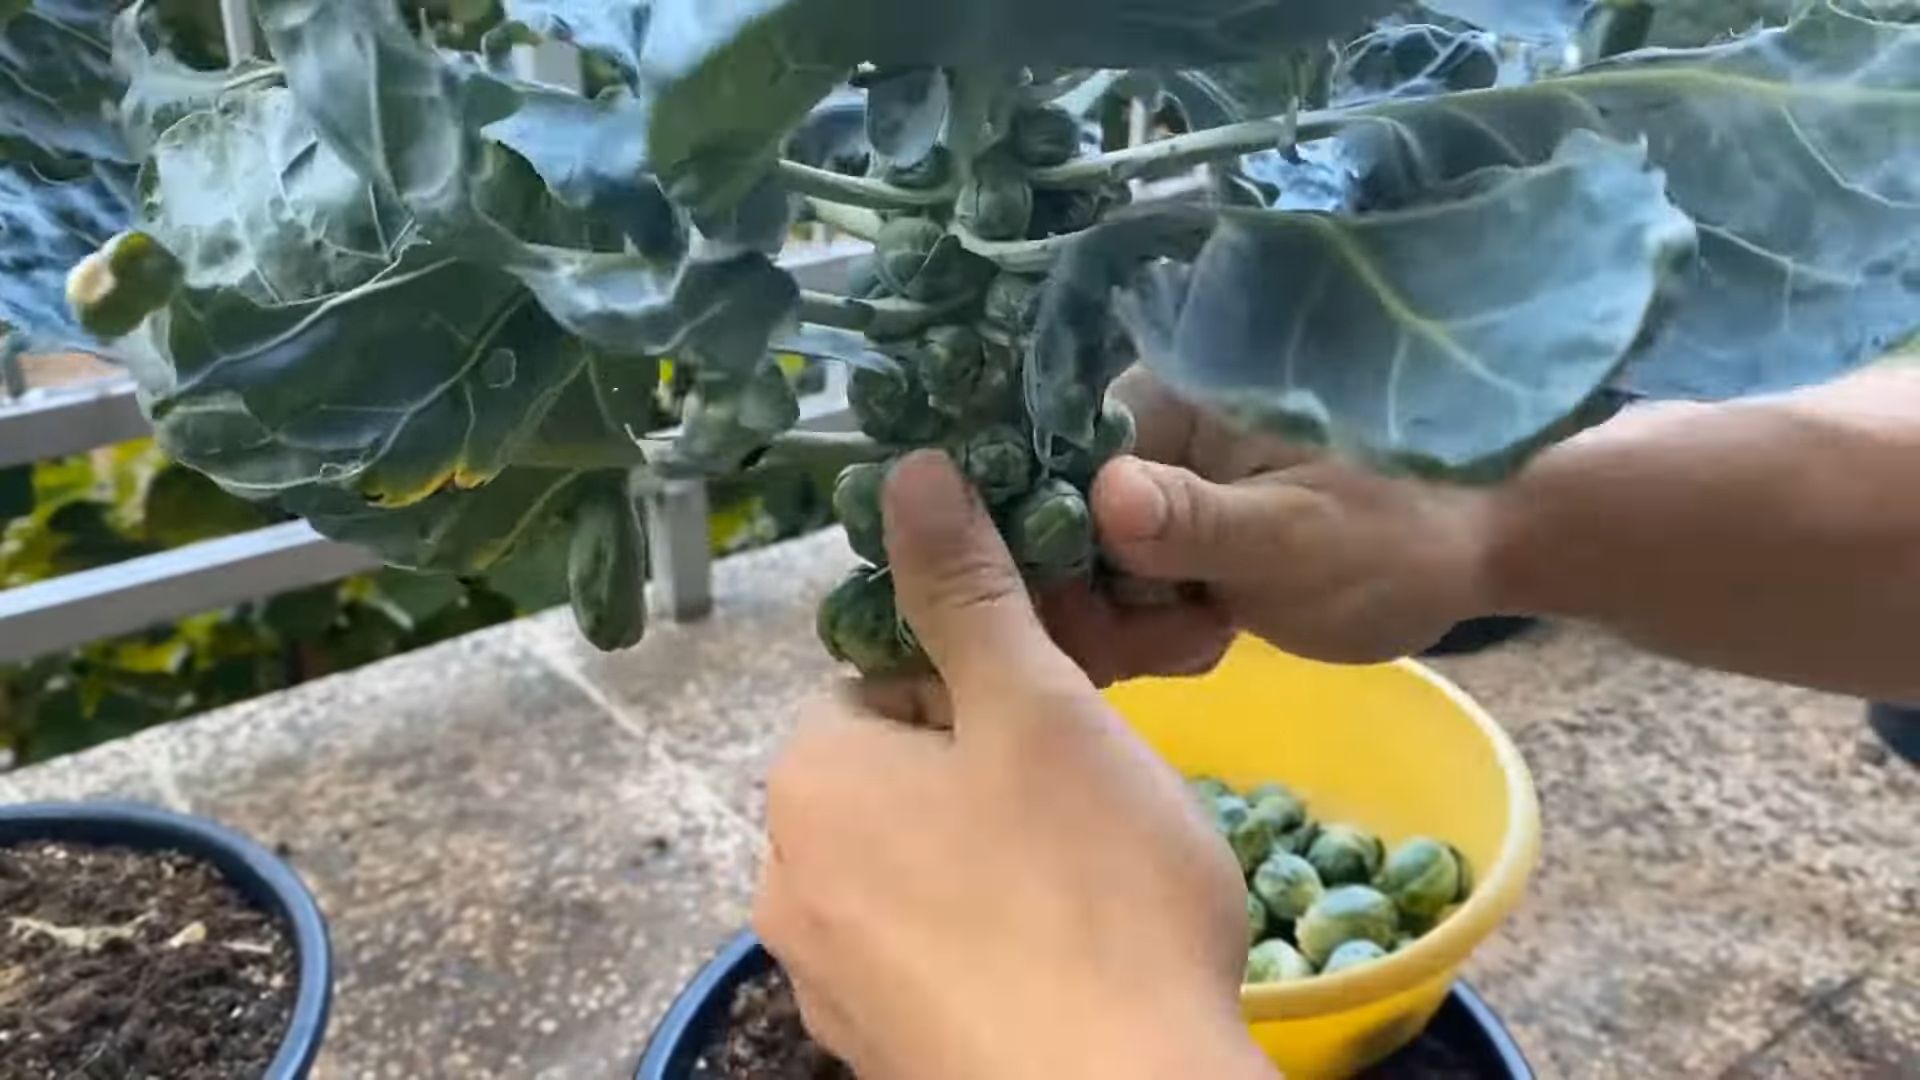
1. When to Harvest: Brussels sprouts are typically ready to harvest about 90-100 days after planting. The sprouts should be firm, green, and about 1-2 inches in diameter.
2. How to Harvest: Start harvesting from the bottom of the plant and work your way up. Simply twist or snap off the sprouts from the stem.
3. Continued Production: After harvesting the lower sprouts, you can pinch off the top of the plant to encourage the remaining sprouts to mature more quickly.
4. Enjoying Your Harvest: Brussels sprouts are best enjoyed fresh. You can roast them, sauté them, steam them, or even eat them raw in salads.
Troubleshooting Common Problems
Even with the best care, you might encounter some problems along the way. Here are a few common issues and how to address them:
* Sprouts are Loose and Open: This can be caused by inconsistent watering or nutrient deficiencies. Make sure you’re watering regularly and fertilizing as needed.
* Sprouts are Bitter: Brussels sprouts can become bitter if they’re exposed to too much heat or drought. Try to provide consistent moisture and shade during hot weather.
* Plants are Not Producing Sprouts: This can be caused by a lack of sunlight or nutrients. Make sure your plants are getting at least 6 hours of sunlight per day and fertilize regularly.
Extending the Growing Season
If you live in a colder climate, you can extend the growing season for your Brussels sprouts by using a few simple techniques:
* Cold Frames: A cold frame is a simple structure that protects plants from frost and cold weather. You can build your own cold frame or buy one from a garden supply store.
* Row Covers: Row covers are lightweight fabrics that you can drape over your plants to protect them from frost and pests.
* Moving Pots Indoors: If you have a sunny window or grow lights, you can move your Brussels sprouts pots indoors to protect them from freezing temperatures.
Additional Tips for Success
Here are a few extra tips that I’ve learned along the way:
* Rotate Your Crops: Don’t plant Brussels sprouts in the same pot year after year. Rotate your crops to prevent soilborne diseases.
* Companion Planting: Plant Brussels sprouts with companion plants, such as marigolds or nasturtiums, to deter pests.
* Mulch: Mulch around your Brussels sprouts plants to help retain moisture and suppress weeds.
* Record Keeping: Keep a gardening journal to track your progress and learn from your mistakes.
Growing Brussels sprouts in pots is a rewarding and enjoyable experience. With a little bit of planning and care, you can enjoy fresh, homegrown Brussels sprouts all season long. Happy gardening!
Conclusion
So, there you have it! Growing Brussel sprouts in pots isn’t just a gardening trend; it’s a practical and rewarding way to enjoy fresh, homegrown vegetables, even if you’re short on space. We’ve walked you through the process, from selecting the right pot and soil to nurturing your plants and harvesting those delicious sprouts.
Why is this DIY trick a must-try? Because it democratizes gardening. It removes the barrier of needing a large garden plot, making fresh, healthy food accessible to apartment dwellers, balcony gardeners, and anyone with a sunny patio. Imagine stepping outside your door and picking fresh Brussel sprouts for dinner – that’s the power of container gardening! Plus, growing your own food is incredibly satisfying. There’s a unique sense of accomplishment that comes from nurturing a plant from seedling to harvest, knowing you’ve provided it with everything it needs to thrive.
But the benefits don’t stop there. Growing Brussel sprouts in pots gives you greater control over the growing environment. You can easily move your plants to follow the sun, protect them from harsh weather, and monitor them closely for pests and diseases. This level of control often leads to healthier, more productive plants compared to those grown in the ground.
Looking for variations? Absolutely! Consider experimenting with different varieties of Brussel sprouts. Some are more compact and better suited for container growing than others. ‘Redarling’ offers beautiful red sprouts, while ‘Long Island Improved’ is a classic, reliable choice. You can also companion plant with herbs like thyme or rosemary to deter pests and enhance the flavor of your sprouts. Another variation is to try succession planting. Start a new batch of seedlings every few weeks to ensure a continuous harvest throughout the growing season.
Don’t be afraid to get creative with your container choices, too. While a standard plastic pot works perfectly well, you can also use repurposed containers like old buckets, tubs, or even grow bags. Just make sure your chosen container has adequate drainage holes.
We truly believe that anyone can successfully grow Brussel sprouts in pots with a little patience and attention. The key is to provide your plants with plenty of sunlight, well-draining soil, and regular watering. Don’t be discouraged if you encounter a few challenges along the way – gardening is a learning process!
We wholeheartedly encourage you to give this DIY trick a try. It’s a fun, rewarding, and delicious way to connect with nature and enjoy the fruits (or rather, vegetables) of your labor. And most importantly, we want to hear about your experience! Share your photos, tips, and challenges in the comments below. Let’s build a community of container gardeners and inspire others to grow their own food. Happy growing! This method of growing Brussel sprouts is a game changer for small spaces.
Frequently Asked Questions (FAQ)
What is the best size pot for growing Brussel sprouts?
A: The ideal pot size for growing Brussel sprouts is at least 12 inches in diameter and 12 inches deep. However, a larger pot, such as a 15-gallon container, is even better, as it provides more room for the roots to grow and supports the plant’s overall stability. Brussel sprouts can get quite tall and top-heavy, so a larger pot will help prevent them from tipping over. Ensure the pot has adequate drainage holes to prevent waterlogging, which can lead to root rot.
How much sunlight do Brussel sprouts need when grown in pots?
A: Brussel sprouts require at least 6-8 hours of direct sunlight per day to thrive. When growing them in pots, position them in a location that receives full sun. If you live in an area with intense summer heat, you might need to provide some afternoon shade to prevent the plants from scorching. If you don’t have a spot that gets enough natural sunlight, you can supplement with grow lights. Rotate the pots regularly to ensure even light exposure on all sides of the plant.
What type of soil is best for growing Brussel sprouts in containers?
A: The best soil for growing Brussel sprouts in containers is a well-draining, nutrient-rich potting mix. Avoid using garden soil, as it can be too heavy and compact in containers, hindering root growth. Look for a potting mix that contains ingredients like peat moss, perlite, and vermiculite to improve drainage and aeration. You can also amend the potting mix with compost or aged manure to provide additional nutrients. A slightly acidic to neutral pH (around 6.0 to 7.0) is ideal for Brussel sprouts.
How often should I water Brussel sprouts in pots?
A: Water Brussel sprouts regularly, keeping the soil consistently moist but not waterlogged. The frequency of watering will depend on factors like the weather, the size of the pot, and the type of potting mix you’re using. Check the soil moisture level daily by sticking your finger about an inch into the soil. If it feels dry, it’s time to water. Water deeply, until water drains out of the drainage holes. Avoid overhead watering, as it can promote fungal diseases. Instead, water at the base of the plant. During hot, dry weather, you may need to water daily or even twice a day.
Do I need to fertilize Brussel sprouts grown in pots?
A: Yes, Brussel sprouts are heavy feeders and require regular fertilization, especially when grown in pots. Start fertilizing about 2-3 weeks after transplanting the seedlings into the pots. Use a balanced, water-soluble fertilizer (e.g., 10-10-10) diluted to half strength. Fertilize every 2-3 weeks throughout the growing season. You can also supplement with organic fertilizers like compost tea or fish emulsion. Avoid over-fertilizing, as it can lead to excessive foliage growth at the expense of sprout development.
How do I deal with pests and diseases on Brussel sprouts in pots?
A: Monitor your Brussel sprouts regularly for pests and diseases. Common pests include aphids, cabbage worms, and flea beetles. You can control aphids with insecticidal soap or neem oil. Cabbage worms can be handpicked or treated with Bacillus thuringiensis (Bt). Flea beetles can be deterred with row covers or diatomaceous earth. Common diseases include clubroot and downy mildew. To prevent clubroot, ensure the soil is well-draining and avoid planting Brussel sprouts in the same pot year after year. Downy mildew can be prevented by providing good air circulation and avoiding overhead watering. If you notice any signs of disease, remove the affected leaves promptly.
When are Brussel sprouts ready to harvest from pots?
A: Brussel sprouts are typically ready to harvest about 90-100 days after planting. The sprouts should be firm, green, and about 1-2 inches in diameter. Start harvesting from the bottom of the plant upwards, as the lower sprouts mature first. Twist or cut the sprouts off the stem, leaving the upper sprouts to continue developing. You can harvest over several weeks as the sprouts mature. The flavor of Brussel sprouts improves after a light frost.
Can I grow Brussel sprouts in pots indoors?
A: While it’s possible to grow Brussel sprouts indoors, it can be challenging to provide them with the necessary conditions, especially adequate sunlight. If you want to try growing them indoors, you’ll need to provide them with at least 12-14 hours of artificial light per day using grow lights. You’ll also need to ensure good air circulation and maintain a consistent temperature. Indoor-grown Brussel sprouts may not be as productive as those grown outdoors.
What are some common problems when growing Brussel sprouts in pots and how can I fix them?
A: Some common problems include:
* **Yellowing leaves:** This can be caused by nutrient deficiencies, overwatering, or underwatering. Adjust your watering and fertilizing practices accordingly.
* **Small or loose sprouts:** This can be caused by insufficient sunlight, poor soil, or inadequate fertilization. Ensure your plants are getting enough sunlight, use a nutrient-rich potting mix, and fertilize regularly.
* **Pest infestations:** Monitor your plants regularly and take action promptly to control pests.
* **Disease:** Provide good air circulation, avoid overhead watering, and remove any affected leaves.
Can I reuse the potting mix from my Brussel sprouts pots for other plants?
A: It’s generally not recommended to reuse potting mix from Brussel sprouts pots for other plants, especially if the plants experienced any diseases or pest infestations. The potting mix may contain pathogens or pests that could affect other plants. If you do want to reuse the potting mix, you can sterilize it by baking it in the oven at 180°F (82°C) for 30 minutes. However, even after sterilization, the potting mix may have lost some of its nutrients and structure, so it’s best to amend it with fresh compost or other organic matter before reusing it.
Leave a Comment