
Growing Asparagus: Easy Gardening – ever dreamt of snipping fresh, vibrant asparagus spears right from your backyard? I know I have! There’s something incredibly satisfying about nurturing your own food, and asparagus, with its delicate flavor and impressive nutritional profile, is a fantastic place to start. For centuries, asparagus has been prized not only for its taste but also for its purported medicinal properties. The ancient Romans even cultivated it, considering it a delicacy fit for emperors.
But let’s be honest, the thought of growing asparagus can seem a little daunting. It’s often perceived as a crop that requires years of patience and expert knowledge. That’s where this DIY guide comes in! I’m here to demystify the process and show you that growing asparagus doesn’t have to be complicated. Whether you have a sprawling garden or just a small raised bed, I’ll share my favorite easy gardening tricks and hacks to help you cultivate a thriving asparagus patch. Imagine the joy of serving your family a delicious, homegrown asparagus dish – it’s easier than you think! Plus, with rising grocery prices, learning to grow your own food is not only rewarding but also a smart way to save money and enjoy the freshest produce possible. So, let’s get our hands dirty and embark on this exciting gardening adventure together!
Growing Artichokes: A Beginner’s Guide to Home Cultivation
Okay, artichoke lovers, listen up! I’m going to walk you through everything you need to know to grow your own delicious artichokes right in your backyard. It might seem intimidating, but trust me, with a little patience and the right know-how, you’ll be harvesting these beauties in no time.
Choosing Your Artichoke Variety
First things first, let’s talk varieties. Not all artichokes are created equal, and some are better suited for certain climates than others. Here are a few popular choices:
* Green Globe: This is the classic artichoke, known for its large, round buds and excellent flavor. It’s a reliable choice for many regions.
* Violetta: If you’re looking for something a little different, try Violetta. It has beautiful purple buds and a slightly sweeter taste.
* Imperial Star: This variety is known for its early maturity, making it a good option for areas with shorter growing seasons.
* Big Heart: As the name suggests, this artichoke produces large, meaty hearts.
Consider your local climate and growing conditions when making your selection. Your local nursery can also provide valuable advice on which varieties thrive in your area.
Preparing Your Garden Bed
Artichokes are hungry plants, so preparing your garden bed properly is crucial for success. They need well-draining soil that’s rich in organic matter.
* Sunlight: Artichokes need at least 6-8 hours of sunlight per day. Choose a location that gets plenty of sun.
* Soil: The ideal soil pH for artichokes is between 6.5 and 7.0. Amend your soil with compost or well-rotted manure to improve drainage and fertility.
* Drainage: Artichokes hate soggy roots, so make sure your soil drains well. If you have heavy clay soil, consider adding sand or perlite to improve drainage.
* Space: Artichokes can get quite large, so give them plenty of space. Allow at least 3-4 feet between plants.
Starting Artichokes from Seed (or Not!)
You have two main options for starting artichokes: from seed or from transplants. Starting from seed can be a bit more challenging, but it’s also more economical.
Starting from Seed
1. Start Seeds Indoors: Begin about 8-10 weeks before the last expected frost. Sow seeds about 1/4 inch deep in seed-starting trays or pots filled with seed-starting mix.
2. Provide Warmth and Light: Keep the soil consistently moist and provide warmth (around 70-75°F) for germination. Use a heat mat if needed. Once seedlings emerge, provide plenty of light with grow lights or a sunny windowsill.
3. Harden Off Seedlings: Gradually acclimate seedlings to outdoor conditions by exposing them to increasing amounts of sunlight and fresh air over a period of 1-2 weeks. This process is called “hardening off.”
4. Transplant Seedlings: Once the danger of frost has passed and the soil has warmed up, transplant seedlings into your prepared garden bed, spacing them 3-4 feet apart.
Using Transplants
This is the easier route, and what I usually recommend for beginners.
1. Purchase Healthy Transplants: Look for healthy, vigorous transplants with well-developed root systems.
2. Prepare Planting Holes: Dig holes that are slightly larger than the root balls of the transplants.
3. Plant Transplants: Gently remove the transplants from their containers and place them in the planting holes. Backfill with soil and water thoroughly.
Planting Your Artichokes
Whether you started from seed or used transplants, the planting process is the same.
1. Dig a Hole: Dig a hole that’s twice as wide as the root ball and just as deep.
2. Amend the Soil: Mix some compost or well-rotted manure into the soil you removed from the hole.
3. Plant the Artichoke: Gently remove the artichoke from its container and place it in the hole. Make sure the top of the root ball is level with the surrounding soil.
4. Backfill and Water: Backfill the hole with the amended soil and water thoroughly.
5. Mulch: Apply a layer of mulch around the base of the plant to help retain moisture and suppress weeds.
Caring for Your Artichokes
Once your artichokes are planted, it’s important to provide them with proper care to ensure a bountiful harvest.
* Watering: Artichokes need consistent moisture, especially during hot, dry weather. Water deeply and regularly, but avoid overwatering, which can lead to root rot.
* Fertilizing: Feed your artichokes regularly with a balanced fertilizer. Apply fertilizer every 4-6 weeks during the growing season.
* Weeding: Keep the area around your artichokes free of weeds, which can compete for nutrients and water.
* Pest Control: Artichokes can be susceptible to pests such as aphids, snails, and slugs. Monitor your plants regularly and take action if you see signs of infestation. I like using organic pest control methods whenever possible.
* Pruning: After harvesting the main bud, cut back the stem to encourage the growth of side shoots, which will produce smaller buds.
Overwintering Artichokes
Artichokes are perennials in mild climates (zones 7-10), meaning they can live for several years. In colder climates, they’re often grown as annuals. However, you can overwinter them to try and get them to come back the following year.
1. Cut Back Foliage: In late fall, after the first frost, cut back the foliage to about 6 inches above the ground.
2. Mulch Heavily: Apply a thick layer of mulch (straw, leaves, or compost) around the base of the plant to protect the roots from freezing temperatures.
3. Cover with a Protective Layer: For extra protection in very cold climates, you can cover the plant with a burlap sack or a plastic tarp.
4. Remove Protection in Spring: In early spring, after the danger of frost has passed, remove the mulch and protective covering.
Harvesting Your Artichokes
The moment you’ve been waiting for! Knowing when to harvest your artichokes is key to enjoying their delicious flavor.
1. Timing: Harvest artichokes when the buds are still tight and firm, but before the bracts (the outer leaves) begin to open.
2. Size: The size of the bud will vary depending on the variety, but generally, you should harvest when the bud is about 3-4 inches in diameter.
3. Stem: Cut the stem about 2-3 inches below the bud.
4. Enjoy: Artichokes are best enjoyed fresh. Steam, boil, or grill them and serve with your favorite dipping sauce.
Troubleshooting Common Problems
Even with the best care, you might encounter some problems along the way. Here are a few common issues and how to address them:
* Aphids: These tiny pests can suck the sap from your artichoke plants. Spray them with a strong stream of water or use insecticidal soap.
* Snails and Slugs: These slimy creatures can munch on the leaves of your artichokes. Use snail bait or handpick them off the plants.
* Root Rot: This fungal disease can occur in poorly drained soil. Make sure your soil drains well and avoid overwatering.
* Lack of Buds: If your artichoke plants aren’t producing buds, it could be due to a lack of sunlight, nutrients, or water. Make sure they’re getting enough of all three.
Enjoying Your Homegrown Artichokes
Congratulations! You’ve successfully grown your own artichokes. Now it’s time to enjoy the fruits (or rather, the buds) of your labor. There are countless ways to prepare and enjoy artichokes. Here are a few ideas:
* Steamed Artichokes: This is the classic way to prepare artichokes. Steam them until the bracts are tender and easily pulled off. Serve with melted butter or your favorite dipping sauce.
* Grilled Artichokes: Grilling artichokes gives them a smoky flavor. Cut them in half, brush them with olive oil, and grill them until tender.
* Artichoke Hearts: Artichoke hearts are delicious in salads, pasta dishes, and dips. You can buy them canned or jarred, but they’re even better when you make them yourself.
* Artichoke Dip: This is a crowd-pleasing appetizer. Combine artichoke hearts with cream cheese, mayonnaise, Parmesan cheese, and garlic, and bake until bubbly.
Growing artichokes at home is a rewarding experience. With a little effort, you can enjoy fresh, delicious
Conclusion
So, there you have it! Growing asparagus doesn’t have to be an intimidating endeavor reserved for seasoned gardeners. With a little patience, planning, and the simple techniques we’ve outlined, you can cultivate your own thriving asparagus patch and enjoy the unparalleled flavor of freshly harvested spears for years to come. This DIY approach to growing asparagus offers a multitude of benefits, from saving money compared to buying it at the store to ensuring you’re consuming a product free from unwanted pesticides. But beyond the practical advantages, there’s a unique satisfaction that comes from nurturing your own food source, connecting with nature, and reaping the rewards of your labor.
This method is a must-try because it empowers you to control the entire process, from soil preparation to harvesting. You’ll know exactly what goes into your asparagus, ensuring the highest quality and freshest taste. Imagine the delight of serving a dish featuring asparagus you grew yourself – a true testament to your gardening prowess!
Don’t be afraid to experiment with different varieties of asparagus to find your favorite flavor profile. ‘Jersey Knight’ is a popular choice for its high yield and disease resistance, while ‘Purple Passion’ offers a unique color and sweeter taste. Consider companion planting to enhance your asparagus bed. Herbs like basil and parsley can deter pests, while tomatoes and marigolds can improve soil health. You can also explore different mulching options, such as straw, wood chips, or compost, to suppress weeds and retain moisture.
We wholeheartedly encourage you to embark on this rewarding gardening journey. Growing asparagus is an investment in your health, your garden, and your culinary experiences. It’s a project that will continue to give back year after year.
Once you’ve established your asparagus bed, remember to be patient during the initial years. It takes time for the plants to mature and produce a substantial harvest. But trust us, the wait is well worth it! And remember, proper watering and fertilization are crucial for optimal growth.
We’re confident that with our guidance, you’ll be well on your way to enjoying a bountiful harvest of delicious, homegrown asparagus. So, grab your gardening gloves, prepare your soil, and get ready to experience the joy of growing your own food.
We’re eager to hear about your experiences! Share your tips, successes, and challenges in the comments below. Let’s create a community of asparagus enthusiasts and learn from each other. Happy gardening!
Frequently Asked Questions (FAQ)
What is the best time of year to plant asparagus?
The ideal time to plant asparagus crowns is in early spring, as soon as the ground can be worked. This allows the plants to establish themselves before the heat of summer arrives. In warmer climates, fall planting may also be successful. However, spring planting is generally recommended for most regions. Make sure the soil temperature is at least 50°F (10°C) before planting. This ensures that the crowns will begin to grow without being damaged by frost.
How much space does asparagus need?
Asparagus plants need ample space to spread their roots and grow. It is recommended to plant crowns about 12-18 inches apart in rows that are 4-5 feet apart. This spacing allows for adequate air circulation and sunlight penetration, which are essential for healthy growth. If you are planting in a raised bed, you can slightly reduce the spacing, but ensure that the plants still have enough room to develop. Overcrowding can lead to reduced yields and increased susceptibility to diseases.
How long does it take for asparagus to produce spears?
Patience is key when growing asparagus. It typically takes 2-3 years after planting crowns before you can begin harvesting spears. During the first year, allow the plants to establish a strong root system. In the second year, you can harvest a few spears for a short period (about 2 weeks). By the third year, you can enjoy a full harvest that lasts for 6-8 weeks. Resist the urge to harvest too early, as this can weaken the plants and reduce future yields.
What type of soil is best for growing asparagus?
Asparagus thrives in well-drained, fertile soil with a pH of 6.5-7.5. Amend the soil with plenty of organic matter, such as compost or well-rotted manure, to improve drainage and fertility. Avoid heavy clay soils, as they can become waterlogged and lead to root rot. If you have clay soil, consider planting asparagus in raised beds to improve drainage. Before planting, conduct a soil test to determine the pH and nutrient levels. Adjust the soil accordingly to ensure optimal growing conditions.
How often should I water asparagus?
Asparagus needs consistent moisture, especially during the growing season. Water deeply and regularly, especially during dry periods. Aim to keep the soil consistently moist but not waterlogged. Avoid overhead watering, as this can promote fungal diseases. Drip irrigation is an excellent option for delivering water directly to the roots. Mulching around the plants can help retain moisture and suppress weeds.
How do I fertilize asparagus?
Asparagus is a heavy feeder and benefits from regular fertilization. In early spring, apply a balanced fertilizer, such as 10-10-10, according to the package instructions. You can also side-dress with compost or well-rotted manure. After the harvest season, fertilize again to replenish the nutrients used during spear production. Avoid over-fertilizing, as this can lead to excessive foliage growth at the expense of spear production.
What are some common pests and diseases that affect asparagus?
Asparagus beetles are a common pest that can damage spears and foliage. Handpicking the beetles or using insecticidal soap can help control infestations. Asparagus rust is a fungal disease that can cause orange pustules on the foliage. Ensure good air circulation and avoid overhead watering to prevent rust. Crown rot is another fungal disease that can affect asparagus, especially in poorly drained soils. Improve drainage and avoid overwatering to prevent crown rot.
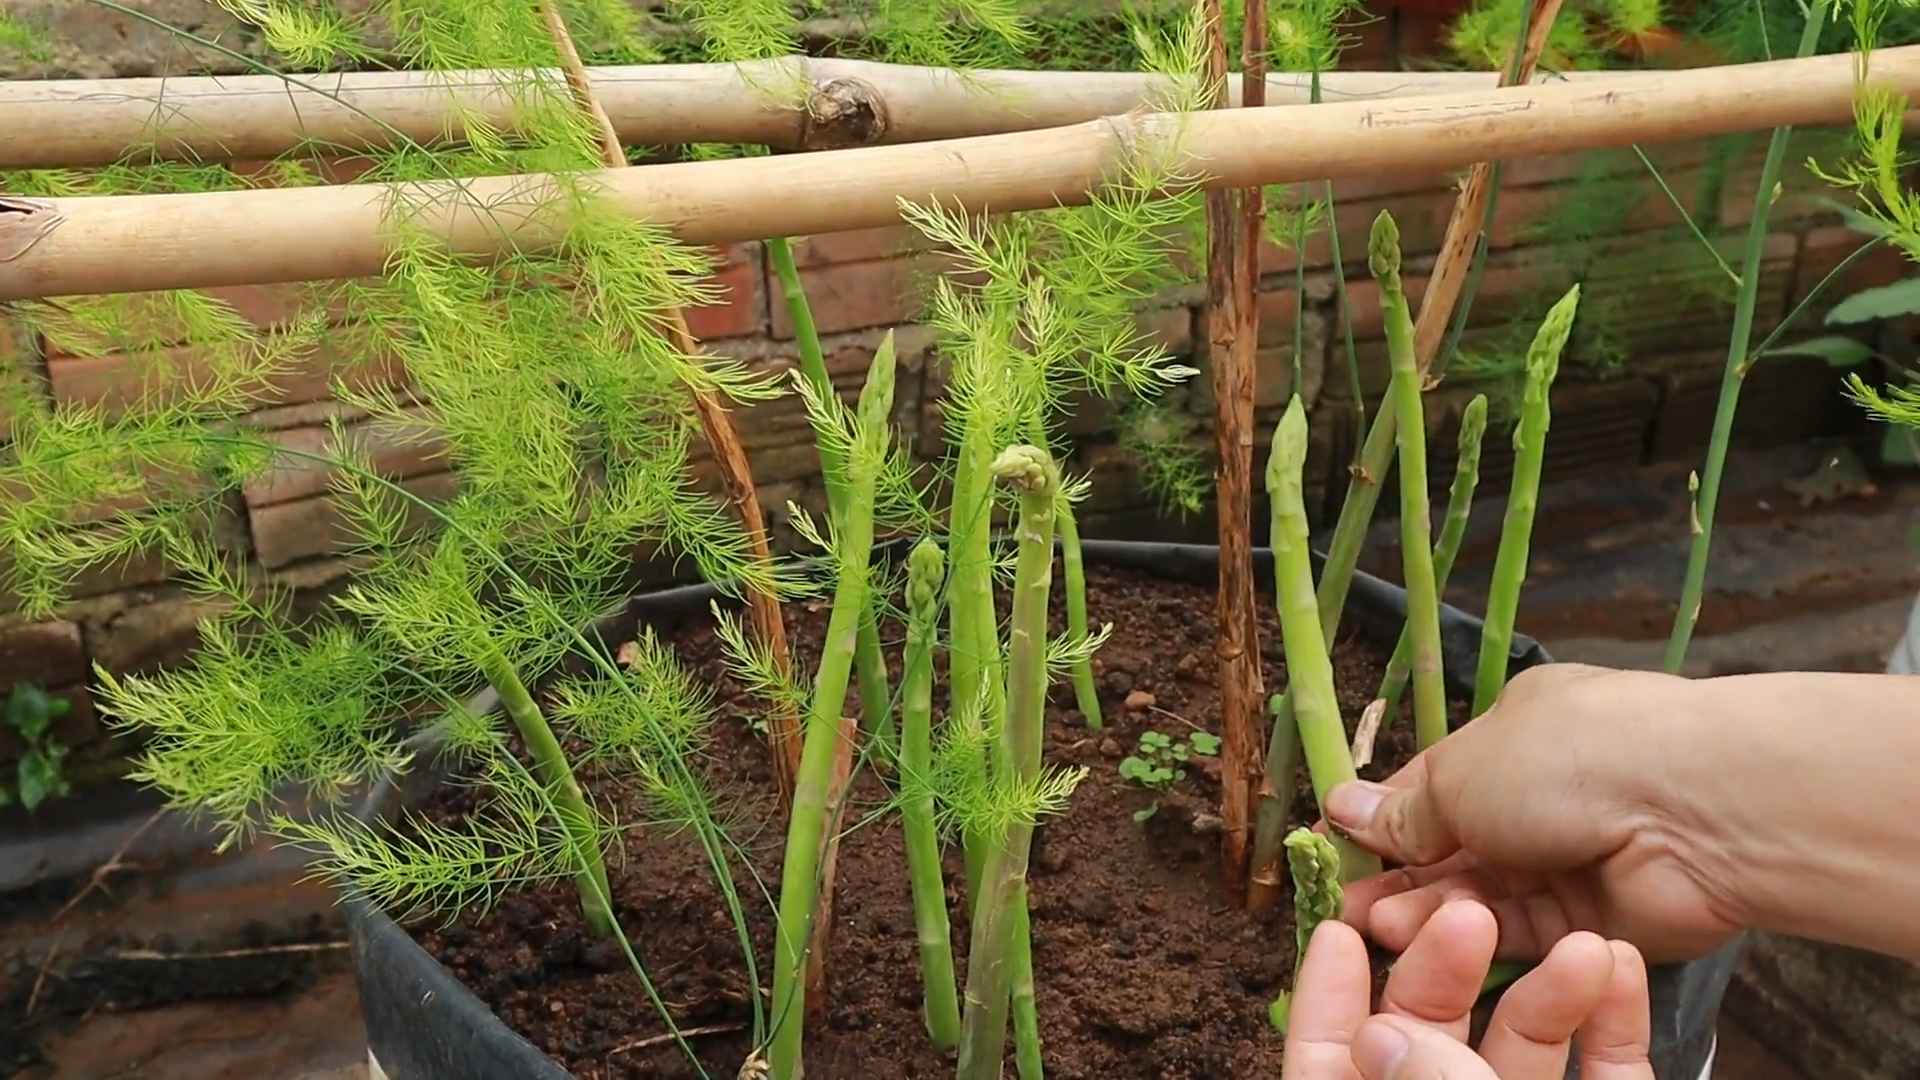
How do I harvest asparagus?
Harvest asparagus spears when they are 6-8 inches tall and about as thick as your finger. Use a sharp knife to cut the spears at ground level. Avoid damaging the surrounding spears or crowns. Harvest spears regularly during the harvest season to encourage continued production. As the harvest season comes to an end, allow some spears to fern out to replenish the plant’s energy reserves for the following year.
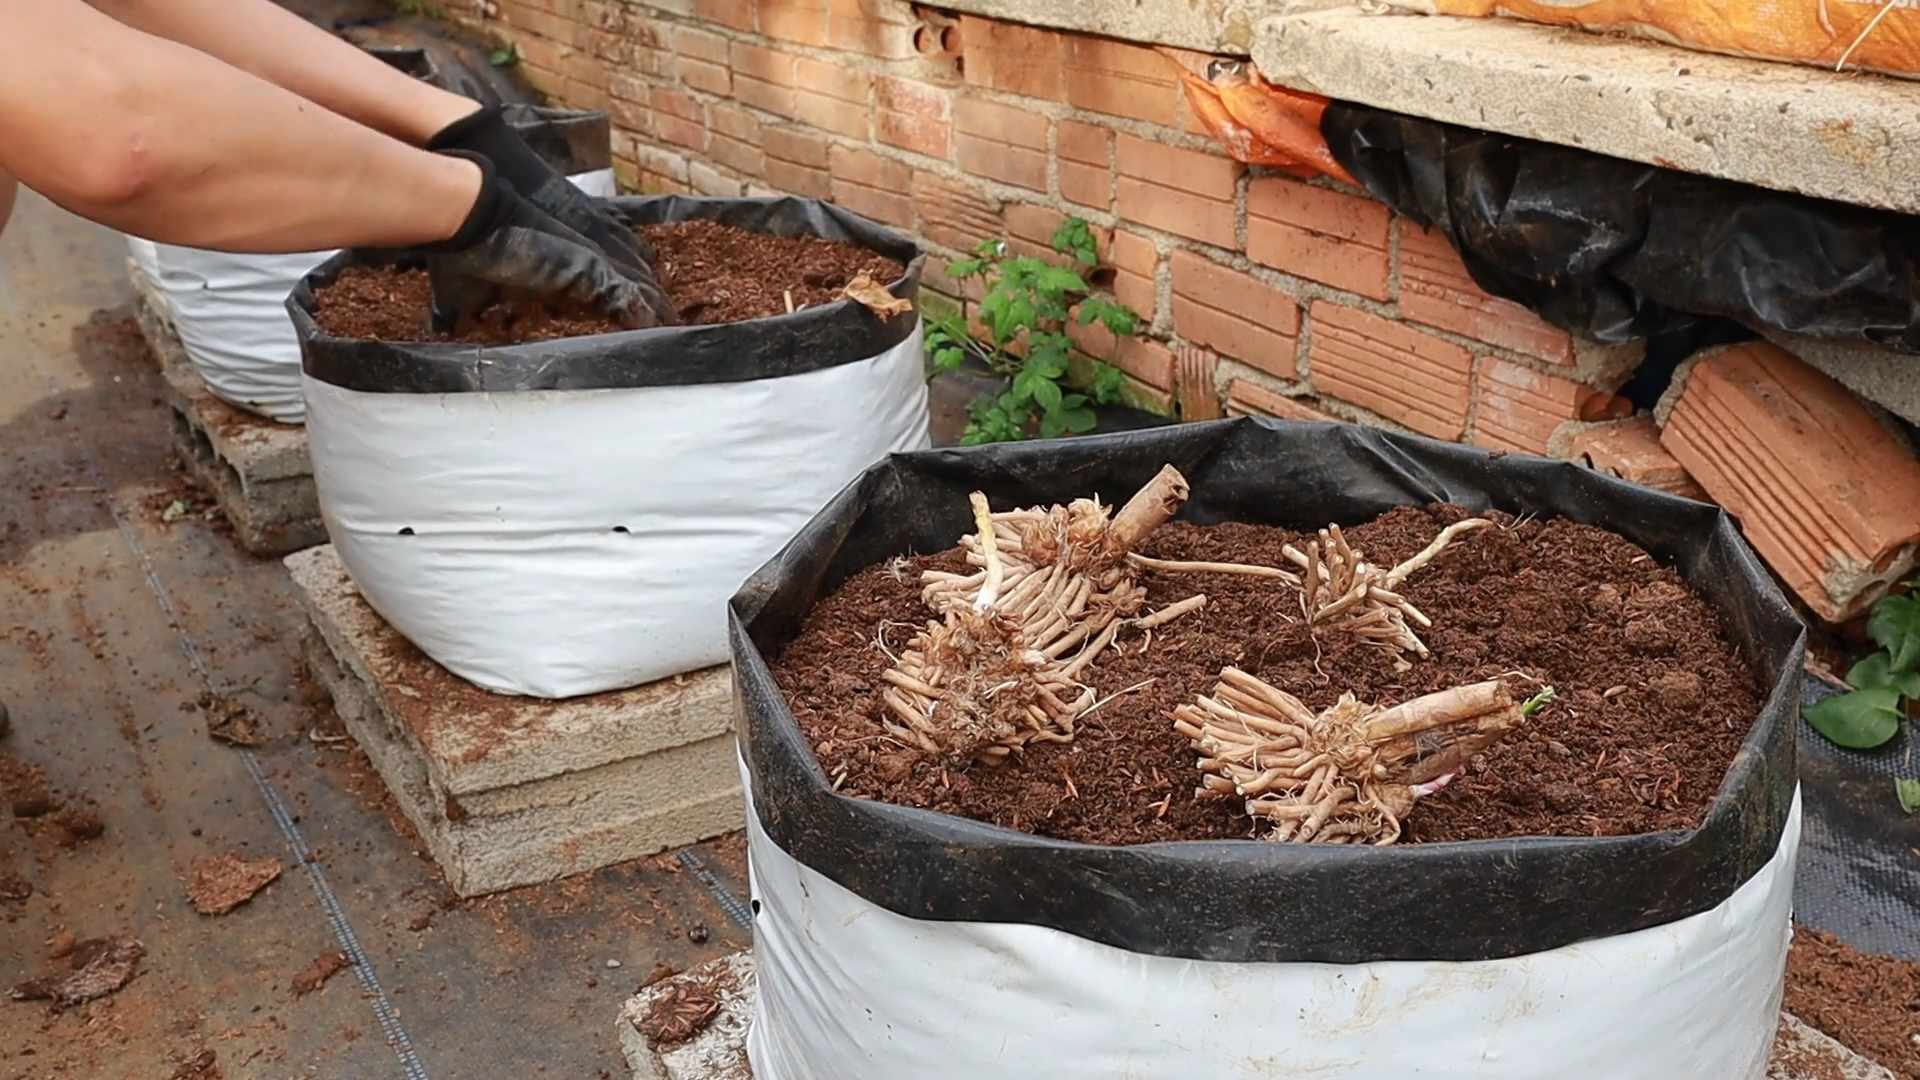
Can I grow asparagus in containers?
Yes, you can grow asparagus in containers, but it requires a large container (at least 18 inches in diameter and depth) and well-draining potting mix. Choose a sunny location and water regularly. Container-grown asparagus may not produce as many spears as plants grown in the ground, but it is a viable option for gardeners with limited space.
How long will my asparagus patch last?
With proper care, an asparagus patch can last for 15-20 years or even longer. Regular fertilization, watering, and weed control are essential for maintaining a healthy and productive asparagus bed. Avoid harvesting too early or too late in the season, as this can weaken the plants. By following these guidelines, you can enjoy a bountiful harvest of asparagus for many years to come.

Leave a Comment