
Microwave cleaning with lemon – sounds too good to be true, right? I know, I thought so too! But trust me, this simple DIY trick is a game-changer when it comes to banishing splatters and lingering odors from your microwave. Forget harsh chemicals and hours of scrubbing; this method harnesses the natural power of lemon to make your microwave sparkle.
Lemons have been valued for their cleaning properties for centuries. From ancient civilizations using citrus juices to disinfect surfaces to modern-day households relying on lemon-scented cleaners, the power of this fruit is undeniable. But did you know you can use it to effortlessly clean your microwave?
Let’s be honest, cleaning the microwave is one of those chores we all dread. Burnt food, splattered sauces, and mysterious stains seem to multiply overnight. And who has time to spend scrubbing away at hardened messes? That’s where this microwave cleaning with lemon hack comes in. It’s quick, easy, and uses ingredients you probably already have in your kitchen. Plus, it leaves your microwave smelling fresh and clean, not like harsh chemicals. I’m excited to share this simple yet effective method with you, so you can say goodbye to microwave grime and hello to a sparkling clean appliance!
DIY Microwave Cleaning with Lemon: A Zesty Fresh Start!
Hey there, fellow DIY enthusiasts! Are you tired of staring into your microwave and seeing a Jackson Pollock painting of splattered food? I know I was! Cleaning the microwave is one of those chores I always put off, but trust me, this lemon hack is a game-changer. It’s quick, easy, natural, and leaves your microwave smelling amazing. Let’s ditch the harsh chemicals and get that microwave sparkling with the power of lemon!
What You’ll Need
Before we dive in, let’s gather our supplies. This is a super simple project, so the list is short and sweet:
* A lemon (one is usually enough, but if your microwave is particularly grimy, grab two!)
* A microwave-safe bowl
* Water
* A clean sponge or cloth
* Optional: White vinegar (for extra cleaning power)
Step-by-Step Instructions: Lemon-Powered Microwave Cleaning
Okay, let’s get started! Follow these steps, and you’ll have a clean and fresh microwave in no time.
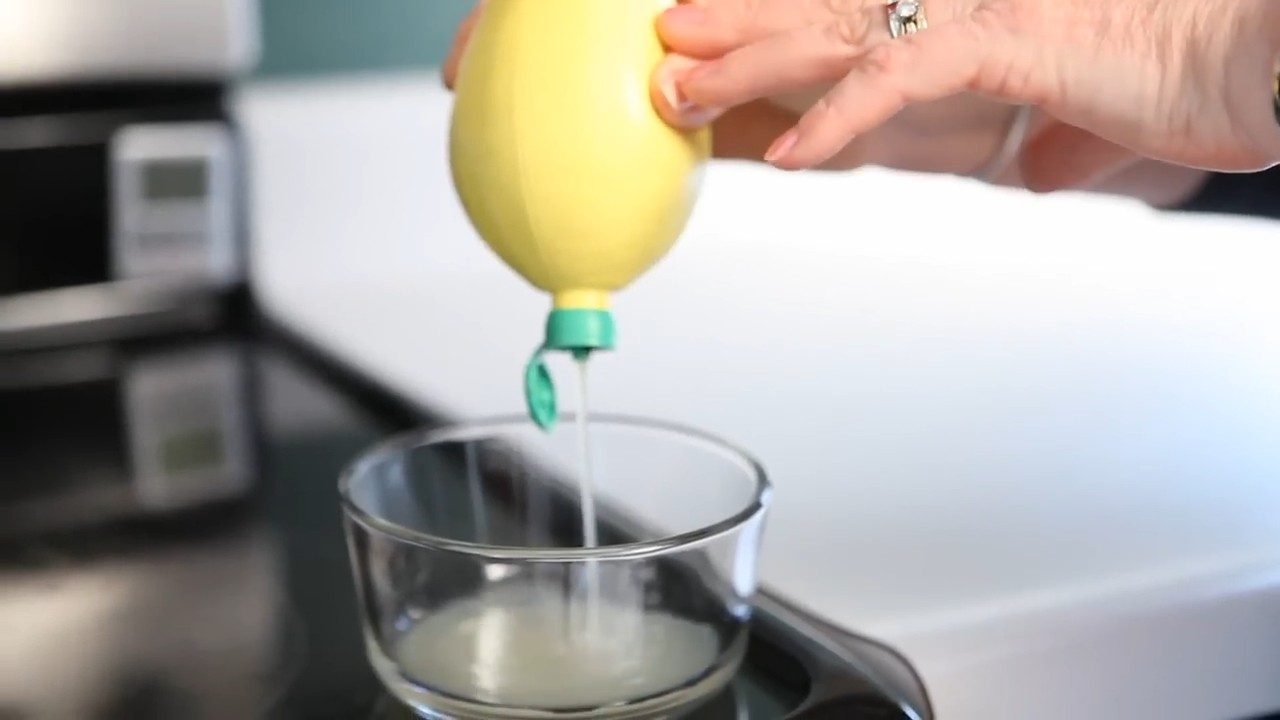
1. Prepare the Lemon: First, cut your lemon in half. You can either squeeze the juice from both halves into your microwave-safe bowl or simply place the lemon halves directly into the bowl. I usually squeeze the juice first because I feel like it maximizes the lemon’s cleaning power. If you’re using two lemons, repeat the process.
2. Add Water: Now, add about one cup of water to the bowl. The water will help create steam, which is key to loosening all that stuck-on food. If you want to add a little extra oomph, you can add a tablespoon or two of white vinegar to the water. Vinegar is a natural disinfectant and helps cut through grease.
3. Microwave Magic: Place the bowl with the lemon water (and vinegar, if you’re using it) into your microwave. Set the timer for 3-5 minutes on high. The goal is to get the water boiling and create a good amount of steam. The exact time will depend on the power of your microwave, so keep an eye on it. You want it to be steaming vigorously.
4. Let it Steam: Once the timer goes off, do not open the microwave door immediately! This is important. Let the steam work its magic for another 5-10 minutes. This allows the steam to really penetrate the dried food splatters and loosen them up. The longer you let it sit, the easier the next step will be.
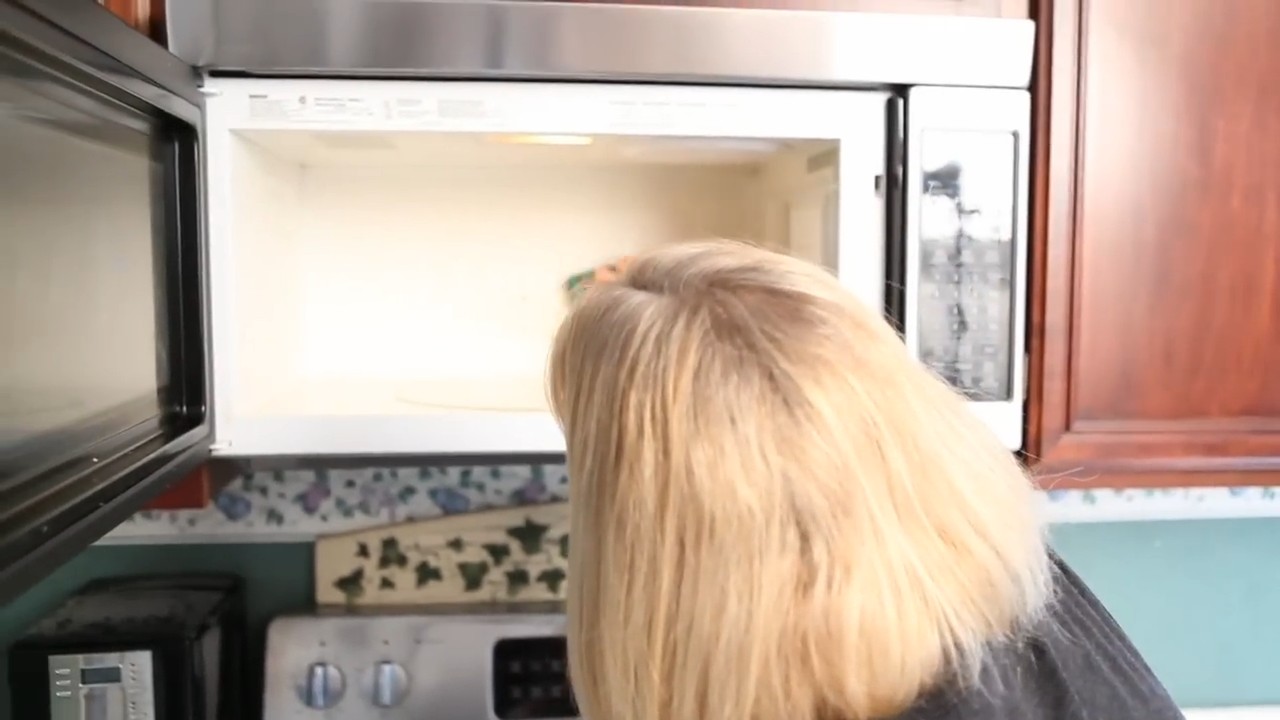
5. Wipe it Down: Carefully remove the bowl from the microwave (it will be hot!). Now, using your clean sponge or cloth, wipe down the inside of the microwave. You should find that the splatters wipe away with very little effort. Pay attention to the top, bottom, sides, and door of the microwave.
6. Tackle Stubborn Spots: If you encounter any stubborn spots that aren’t coming off easily, dip your sponge or cloth into the lemon water in the bowl and scrub a little harder. The acidity of the lemon will help break down the grime. You can also use the lemon halves themselves as scrubbers for those really tough areas.
7. Clean the Turntable and Roller Ring: Don’t forget to remove the turntable and roller ring from the microwave. Wash them with warm, soapy water. These parts often accumulate food debris and can contribute to unpleasant odors. Make sure they are completely dry before placing them back in the microwave.
8. Final Wipe Down: Once you’ve wiped down the entire inside of the microwave, give it one final wipe with a clean, damp cloth to remove any remaining lemon residue. This will leave your microwave sparkling and smelling fresh.
9. Enjoy Your Clean Microwave! That’s it! You’ve successfully cleaned your microwave with the power of lemon. Now you can enjoy heating up your food in a clean and fresh environment.
Tips and Tricks for a Sparkling Microwave
Here are a few extra tips to help you get the most out of this lemon cleaning hack:
* Preventative Measures: To keep your microwave cleaner for longer, try covering your food with a microwave-safe lid or plastic wrap when heating it up. This will help prevent splatters in the first place.
* Regular Cleaning: Don’t wait until your microwave is a disaster zone to clean it. A quick cleaning every week or two will prevent build-up and make the job much easier.
* Lemon Alternatives: If you don’t have a lemon on hand, you can use lime or orange instead. They both have similar cleaning properties.
* Vinegar Power: As mentioned earlier, adding vinegar to the lemon water can boost its cleaning power. Vinegar is a great natural cleaner and disinfectant.
* Baking Soda Paste: For really stubborn stains, you can make a paste of baking soda and water and apply it to the stain. Let it sit for a few minutes, then scrub with a sponge.
* Smelly Microwave? If your microwave has a lingering odor, try placing a small bowl of baking soda inside and leaving it overnight. Baking soda is a natural odor absorber.
* Don’t Overheat: Be careful not to overheat the lemon water in the microwave. If it starts to splatter excessively, stop the microwave and let it cool down before continuing.
* Safety First: Always use caution when handling hot bowls and steam. Wear oven mitts to protect your hands.
* Lemon Zest Boost: For an extra burst of lemon scent, add a few strips of lemon zest to the bowl of water.
* Reuse the Lemon: After cleaning your microwave, don’t throw away the lemon halves! You can use them to freshen up your garbage disposal or deodorize your refrigerator.
Troubleshooting Common Microwave Cleaning Issues
Sometimes, even with the best intentions, you might encounter a few snags. Here’s how to troubleshoot some common microwave cleaning issues:
* Food Still Stuck On: If you’re still struggling to remove food splatters, try repeating the steaming process. Add more water to the bowl and microwave for another 3-5 minutes. You can also try using a non-abrasive scrubbing pad to gently scrub the stubborn areas.
* Lingering Odor: If your microwave still smells after cleaning, try placing a bowl of coffee grounds inside overnight. Coffee grounds are excellent at absorbing odors. You can also try wiping down the inside of the microwave with a solution of water and essential oils, such as lemon or lavender.
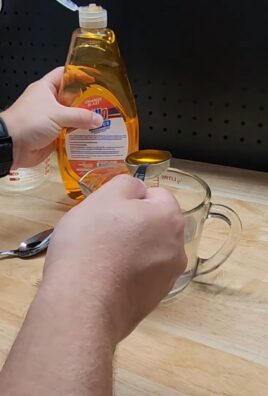
* Greasy Residue: If you’re dealing with greasy residue, try using a degreasing dish soap in addition to the lemon water. Apply the dish soap to a sponge and scrub the greasy areas. Rinse thoroughly with clean water.
* Burnt Food Smell: If your microwave smells like burnt food, try placing a damp cloth inside and microwaving it for a minute or two. The steam will help loosen the burnt food particles and absorb the odor.
* Discoloration: If your microwave has discoloration, try using a paste of baking soda and water to gently scrub the affected areas. Be careful not to scrub too hard, as this could damage the surface of the microwave.
Why This Hack Works: The Science Behind the Sparkle
So, why does this lemon hack work so well? It’s all about the power of steam and citric acid!
* Steam Power: The steam created by heating the lemon water helps to loosen dried food splatters and make them easier to wipe away. The steam penetrates the grime, softening it and breaking it down.
* Citric Acid: Lemons are naturally acidic, and citric acid is a powerful cleaning agent. It helps to dissolve grease, disinfect surfaces, and remove stains. The citric acid in the lemon juice helps to break down the food particles and make them easier to wipe away.
* Natural Deodorizer: Lemons have a fresh, clean scent that helps to neutralize unpleasant odors in the microwave. The lemon scent lingers after cleaning, leaving your microwave smelling fresh and inviting.
By combining the power of steam and citric acid, this lemon hack provides a natural and effective way to clean your microwave without the need for harsh chemicals. Plus, it’s a much more pleasant experience than using chemical cleaners!
I hope you found this guide helpful! Happy cleaning, and enjoy your sparkling clean microwave!
Conclusion
So, there you have it! This simple, all-natural microwave cleaning with lemon trick is a game-changer for anyone tired of scrubbing away at stubborn splatters and lingering odors. Forget harsh chemicals and endless elbow grease; this method harnesses the power of steam and citrus to effortlessly lift grime and leave your microwave sparkling clean and smelling fresh.
Why is this a must-try? Because it’s effective, eco-friendly, and incredibly easy. You’re likely to already have a lemon on hand, making it a cost-effective solution as well. Plus, the entire process takes just a few minutes, saving you valuable time and energy. Think of all the things you could do with the time you save not scrubbing your microwave!
But the beauty of this DIY trick lies in its versatility. While lemon is the star of the show, feel free to experiment with other citrus fruits. Orange peels work wonderfully for a sweeter scent, and lime can add a zesty twist. You can also add a teaspoon of vinegar to the water for extra cleaning power, especially if you’re dealing with particularly stubborn stains. For a more aromatic experience, try adding a few drops of your favorite essential oil to the water – lavender or eucalyptus can create a spa-like atmosphere in your kitchen. Just be sure to use microwave-safe containers for any variations you try.
This microwave cleaning with lemon method is not just about cleaning; it’s about creating a healthier and more pleasant cooking environment. A clean microwave means better food hygiene and a more enjoyable cooking experience.
We wholeheartedly encourage you to give this DIY trick a try. It’s a simple yet effective way to maintain a clean and fresh microwave without resorting to harsh chemicals. You’ll be amazed at how easily the grime wipes away after just a few minutes of steaming.
Once you’ve tried it, we’d love to hear about your experience! Share your results, variations, and any tips you’ve discovered in the comments below. Did you try a different citrus fruit? Did you add vinegar or essential oils? Let us know what worked best for you! Your feedback will help other readers discover the best ways to keep their microwaves sparkling clean. We are confident that this simple trick will become a staple in your cleaning routine. So go ahead, grab a lemon, and say goodbye to microwave grime forever!
Frequently Asked Questions (FAQ)
1. Can I use any type of lemon for this microwave cleaning trick?
Yes, you can use any type of lemon. Meyer lemons, Eureka lemons, or Lisbon lemons will all work effectively. The key is the citric acid content, which helps to loosen the grime and grease inside the microwave. Even lemons that are slightly past their prime can be used, making this a great way to use up lemons that might otherwise go to waste. Just ensure the lemon is still juicy enough to release its essential oils and citric acid into the water.
2. How often should I clean my microwave using this method?
The frequency of cleaning depends on how often you use your microwave and how prone it is to splatters. As a general guideline, cleaning your microwave with lemon every one to two weeks is a good practice to maintain cleanliness and prevent the buildup of stubborn stains. If you notice frequent splatters or lingering odors, you may want to clean it more often. Conversely, if you rarely use your microwave, you can extend the cleaning interval.
3. What if I don’t have a lemon? Can I use lemon juice instead?
Yes, you can use lemon juice if you don’t have a fresh lemon. Use about 2-3 tablespoons of lemon juice in a microwave-safe bowl filled with 1 cup of water. The lemon juice will provide the necessary citric acid to create the steam and loosen the grime. While fresh lemon is preferred for its natural oils and aroma, lemon juice is a perfectly acceptable substitute. You can also add the lemon peels after juicing for added cleaning power.
4. Is it safe to microwave lemon?
Yes, it is perfectly safe to microwave lemon. The microwave-safe bowl and the water will absorb most of the microwave energy. The lemon will release its oils and citric acid into the steam, which is what cleans the microwave. Just be sure to use a microwave-safe bowl and handle the bowl carefully after microwaving, as it will be hot.
5. What if the grime is really stubborn and doesn’t wipe away easily?
If you’re dealing with particularly stubborn grime, try these tips:
* Increase the microwaving time: Microwave the lemon water for an additional 1-2 minutes to generate more steam.
* Add vinegar: Add a tablespoon or two of white vinegar to the lemon water for extra cleaning power. Vinegar is a natural degreaser and can help break down tough stains.
* Let it sit longer: After microwaving, let the steam sit inside the microwave for a longer period (5-10 minutes) before wiping it down. This will allow the steam to penetrate the grime more effectively.
* Use a non-abrasive sponge: When wiping down the microwave, use a non-abrasive sponge or microfiber cloth to avoid scratching the interior.
6. Can I use this method to clean the outside of my microwave?
While this method is primarily designed for cleaning the interior of the microwave, you can use the lemon-infused water to clean the exterior as well. Simply dip a clean cloth into the water and wipe down the outside surfaces. Be sure to dry the exterior thoroughly after cleaning. For stubborn stains on the outside, you can also use a paste made from baking soda and water.
7. My microwave smells like lemon now. How do I get rid of the lemon smell?
The lemon scent should dissipate naturally within a few hours. If you find the scent too strong, you can leave the microwave door open for a while to allow it to air out. You can also place a small bowl of baking soda inside the microwave overnight to absorb any lingering odors.
8. Can I use this method on a convection microwave?
Yes, you can use this method on a convection microwave. However, be sure to disable the convection function before microwaving the lemon water. The convection function may dry out the water too quickly and prevent the steam from effectively cleaning the microwave.
9. What type of bowl should I use?
Always use a microwave-safe bowl. Glass or ceramic bowls are generally safe. Avoid using plastic bowls that are not specifically labeled as microwave-safe, as they may melt or leach chemicals into the water.
10. Is this method safe for all microwaves?
This method is generally safe for all microwaves. However, if you have any concerns about your specific microwave model, consult the manufacturer’s instructions or contact customer support. Always follow the safety precautions outlined in your microwave’s user manual.
11. Can I use other citrus fruits besides lemon?
Yes, you can experiment with other citrus fruits like oranges, limes, or grapefruits. Each citrus fruit will impart a slightly different scent and flavor to the steam. Orange peels are particularly effective for removing grease and leaving a pleasant citrus aroma.
12. What if I accidentally microwave the lemon water for too long and it boils over?
If the lemon water boils over, immediately turn off the microwave and carefully remove the bowl. Clean up any spills inside the microwave and allow it to cool down before wiping it down. Reduce the microwaving time in subsequent attempts to prevent boil-overs.

Leave a Comment