
CIF cleaning hacks are about to revolutionize your cleaning routine! I know, I know, cleaning isn’t exactly anyone’s favorite pastime. But what if I told you there were simple, effective, and even *fun* ways to tackle those stubborn stains and grimy surfaces using CIF products? We’re diving deep into the world of DIY cleaning solutions that will not only save you time and money but also leave your home sparkling.
For generations, resourceful homemakers have been concocting their own cleaning remedies, often drawing inspiration from natural ingredients and time-tested techniques. Think of your grandmother’s secret weapon for shining silverware or your great-aunt’s go-to solution for removing carpet stains. These traditions highlight a deep-seated desire to maintain a clean and healthy living environment without relying solely on harsh chemicals. Today, we’re building upon that legacy by combining the power of CIF with clever DIY approaches.
Let’s face it, life is busy! Who has hours to spend scrubbing and scouring? That’s precisely why you need these CIF cleaning hacks. They’re designed to be quick, efficient, and incredibly effective. Whether you’re battling soap scum in the bathroom, grease splatters in the kitchen, or stubborn stains on your countertops, these DIY tricks will provide you with the solutions you need to conquer any cleaning challenge. Get ready to unlock the full potential of your CIF products and transform your home into a spotless sanctuary!
DIY CIF Cleaning Hacks: Unleash the Power of Your Favorite Cream Cleaner!
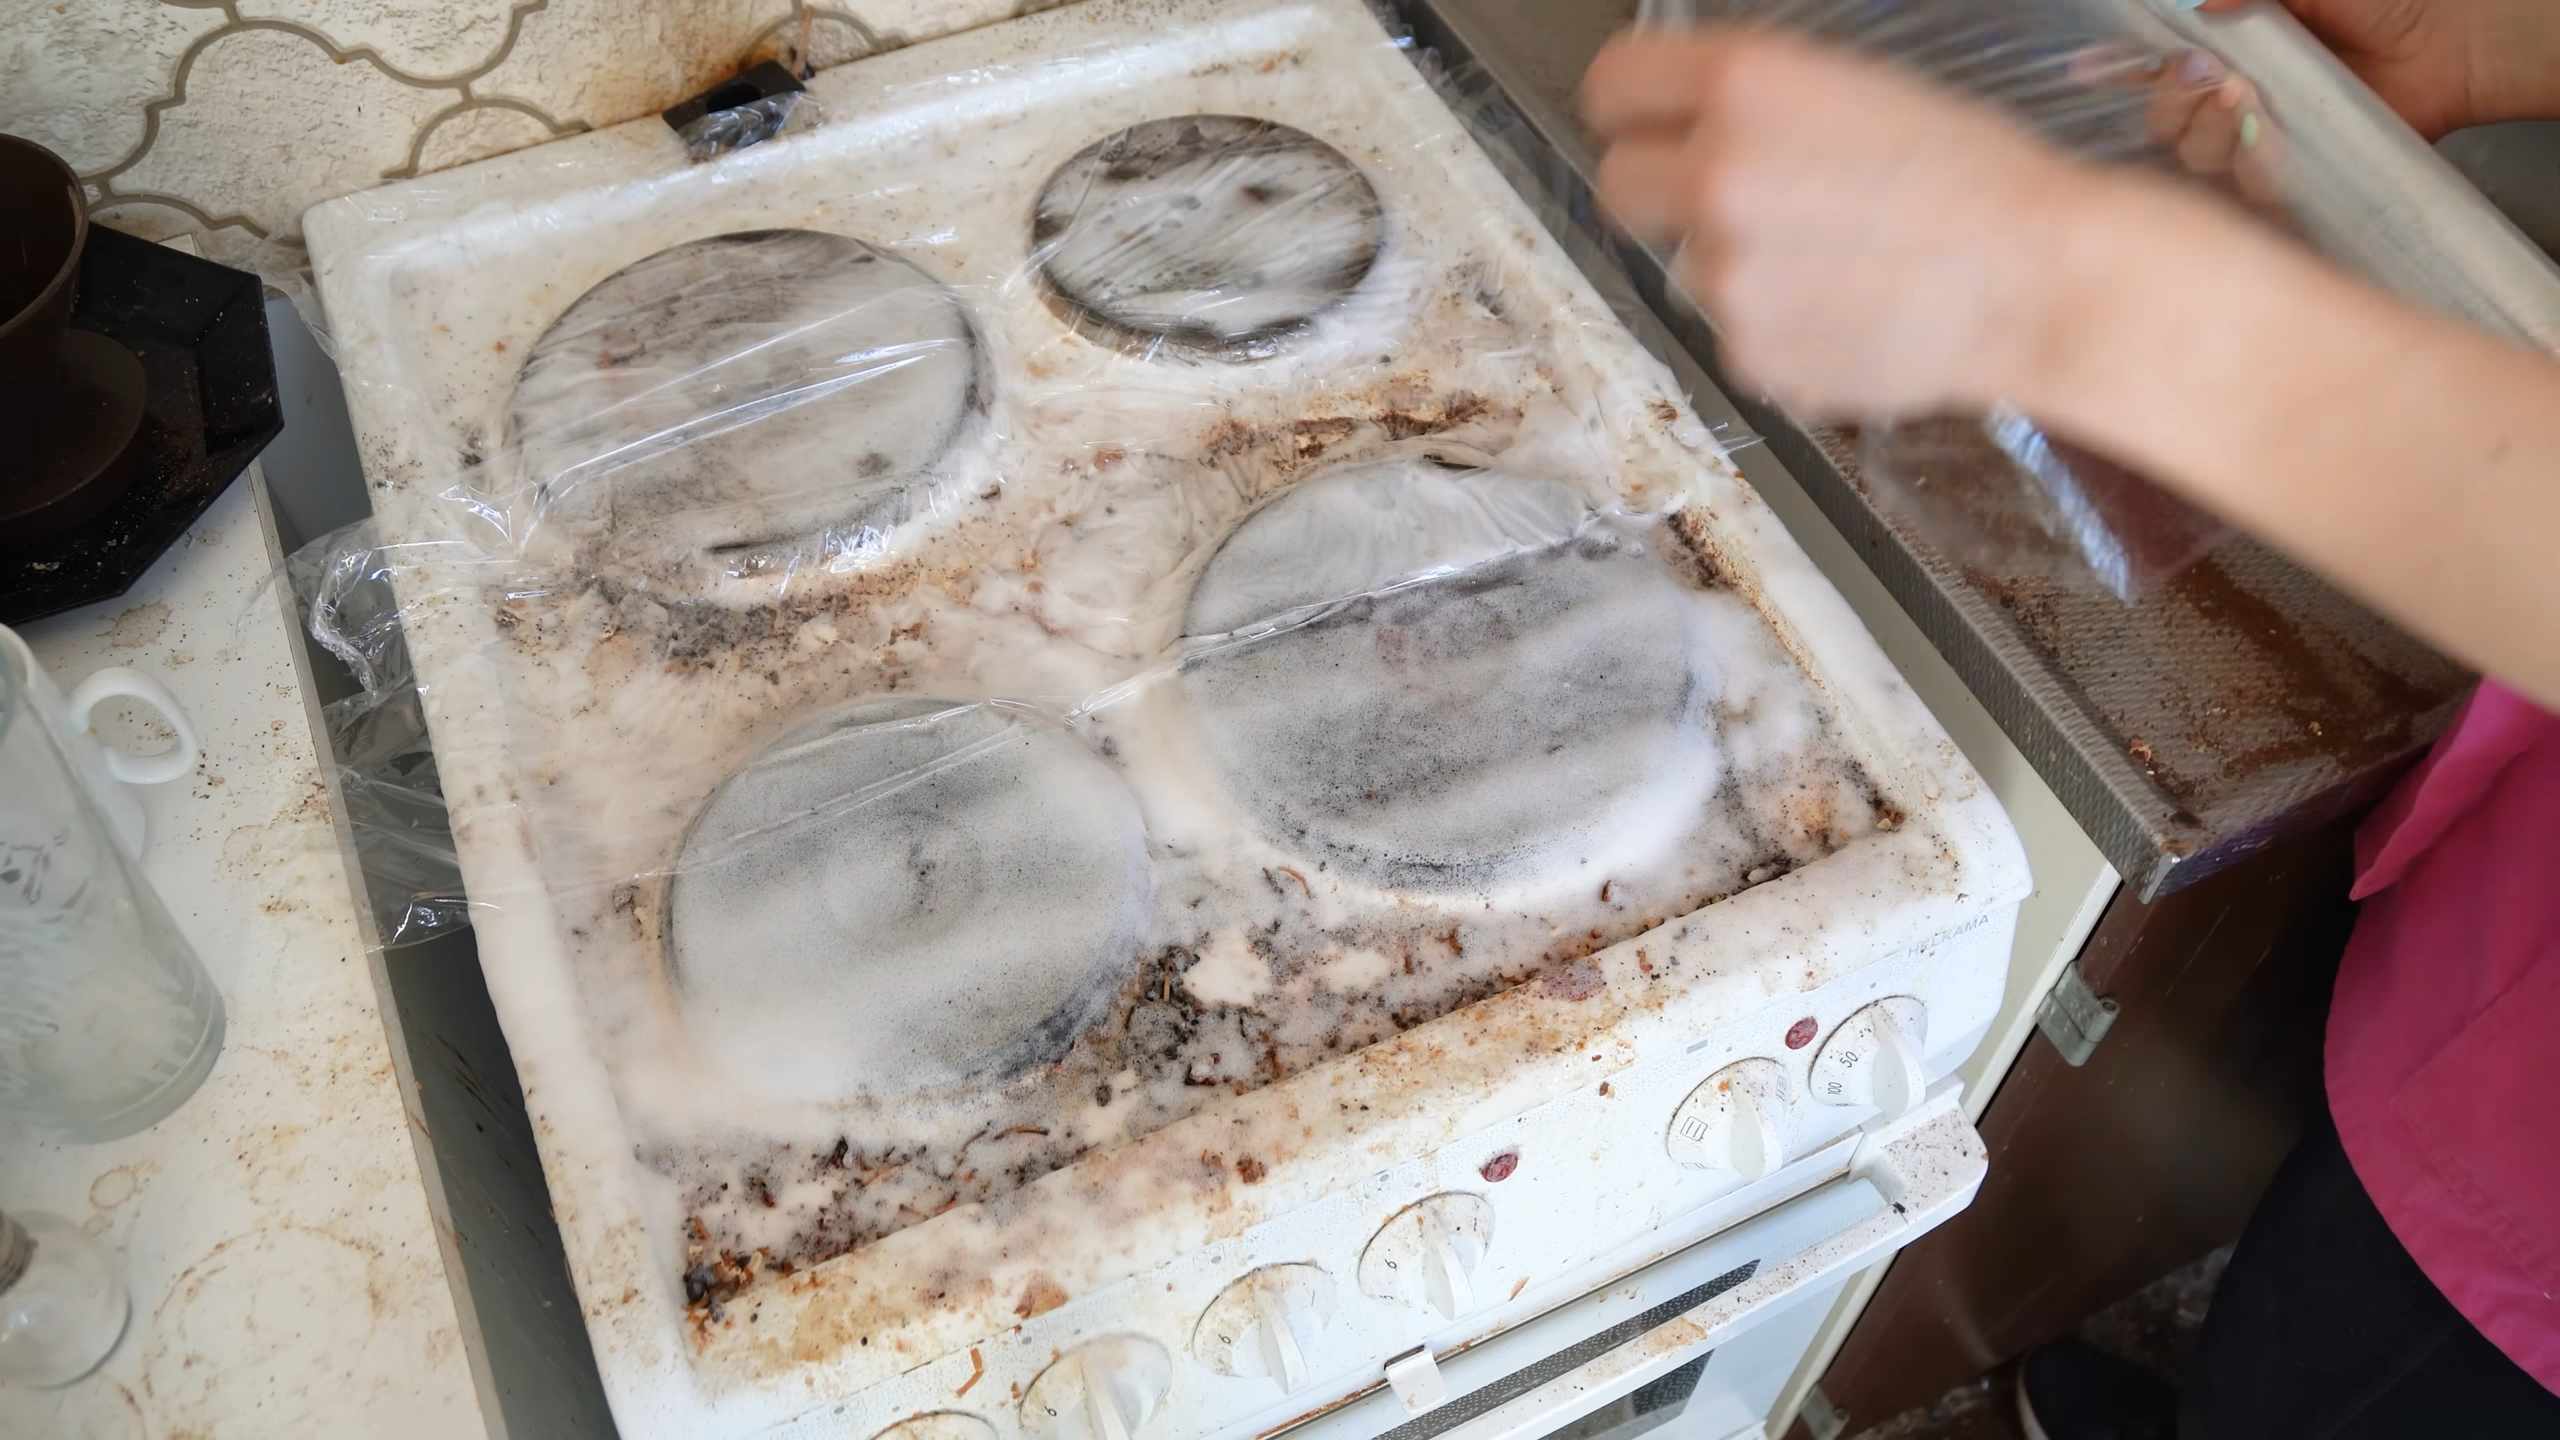
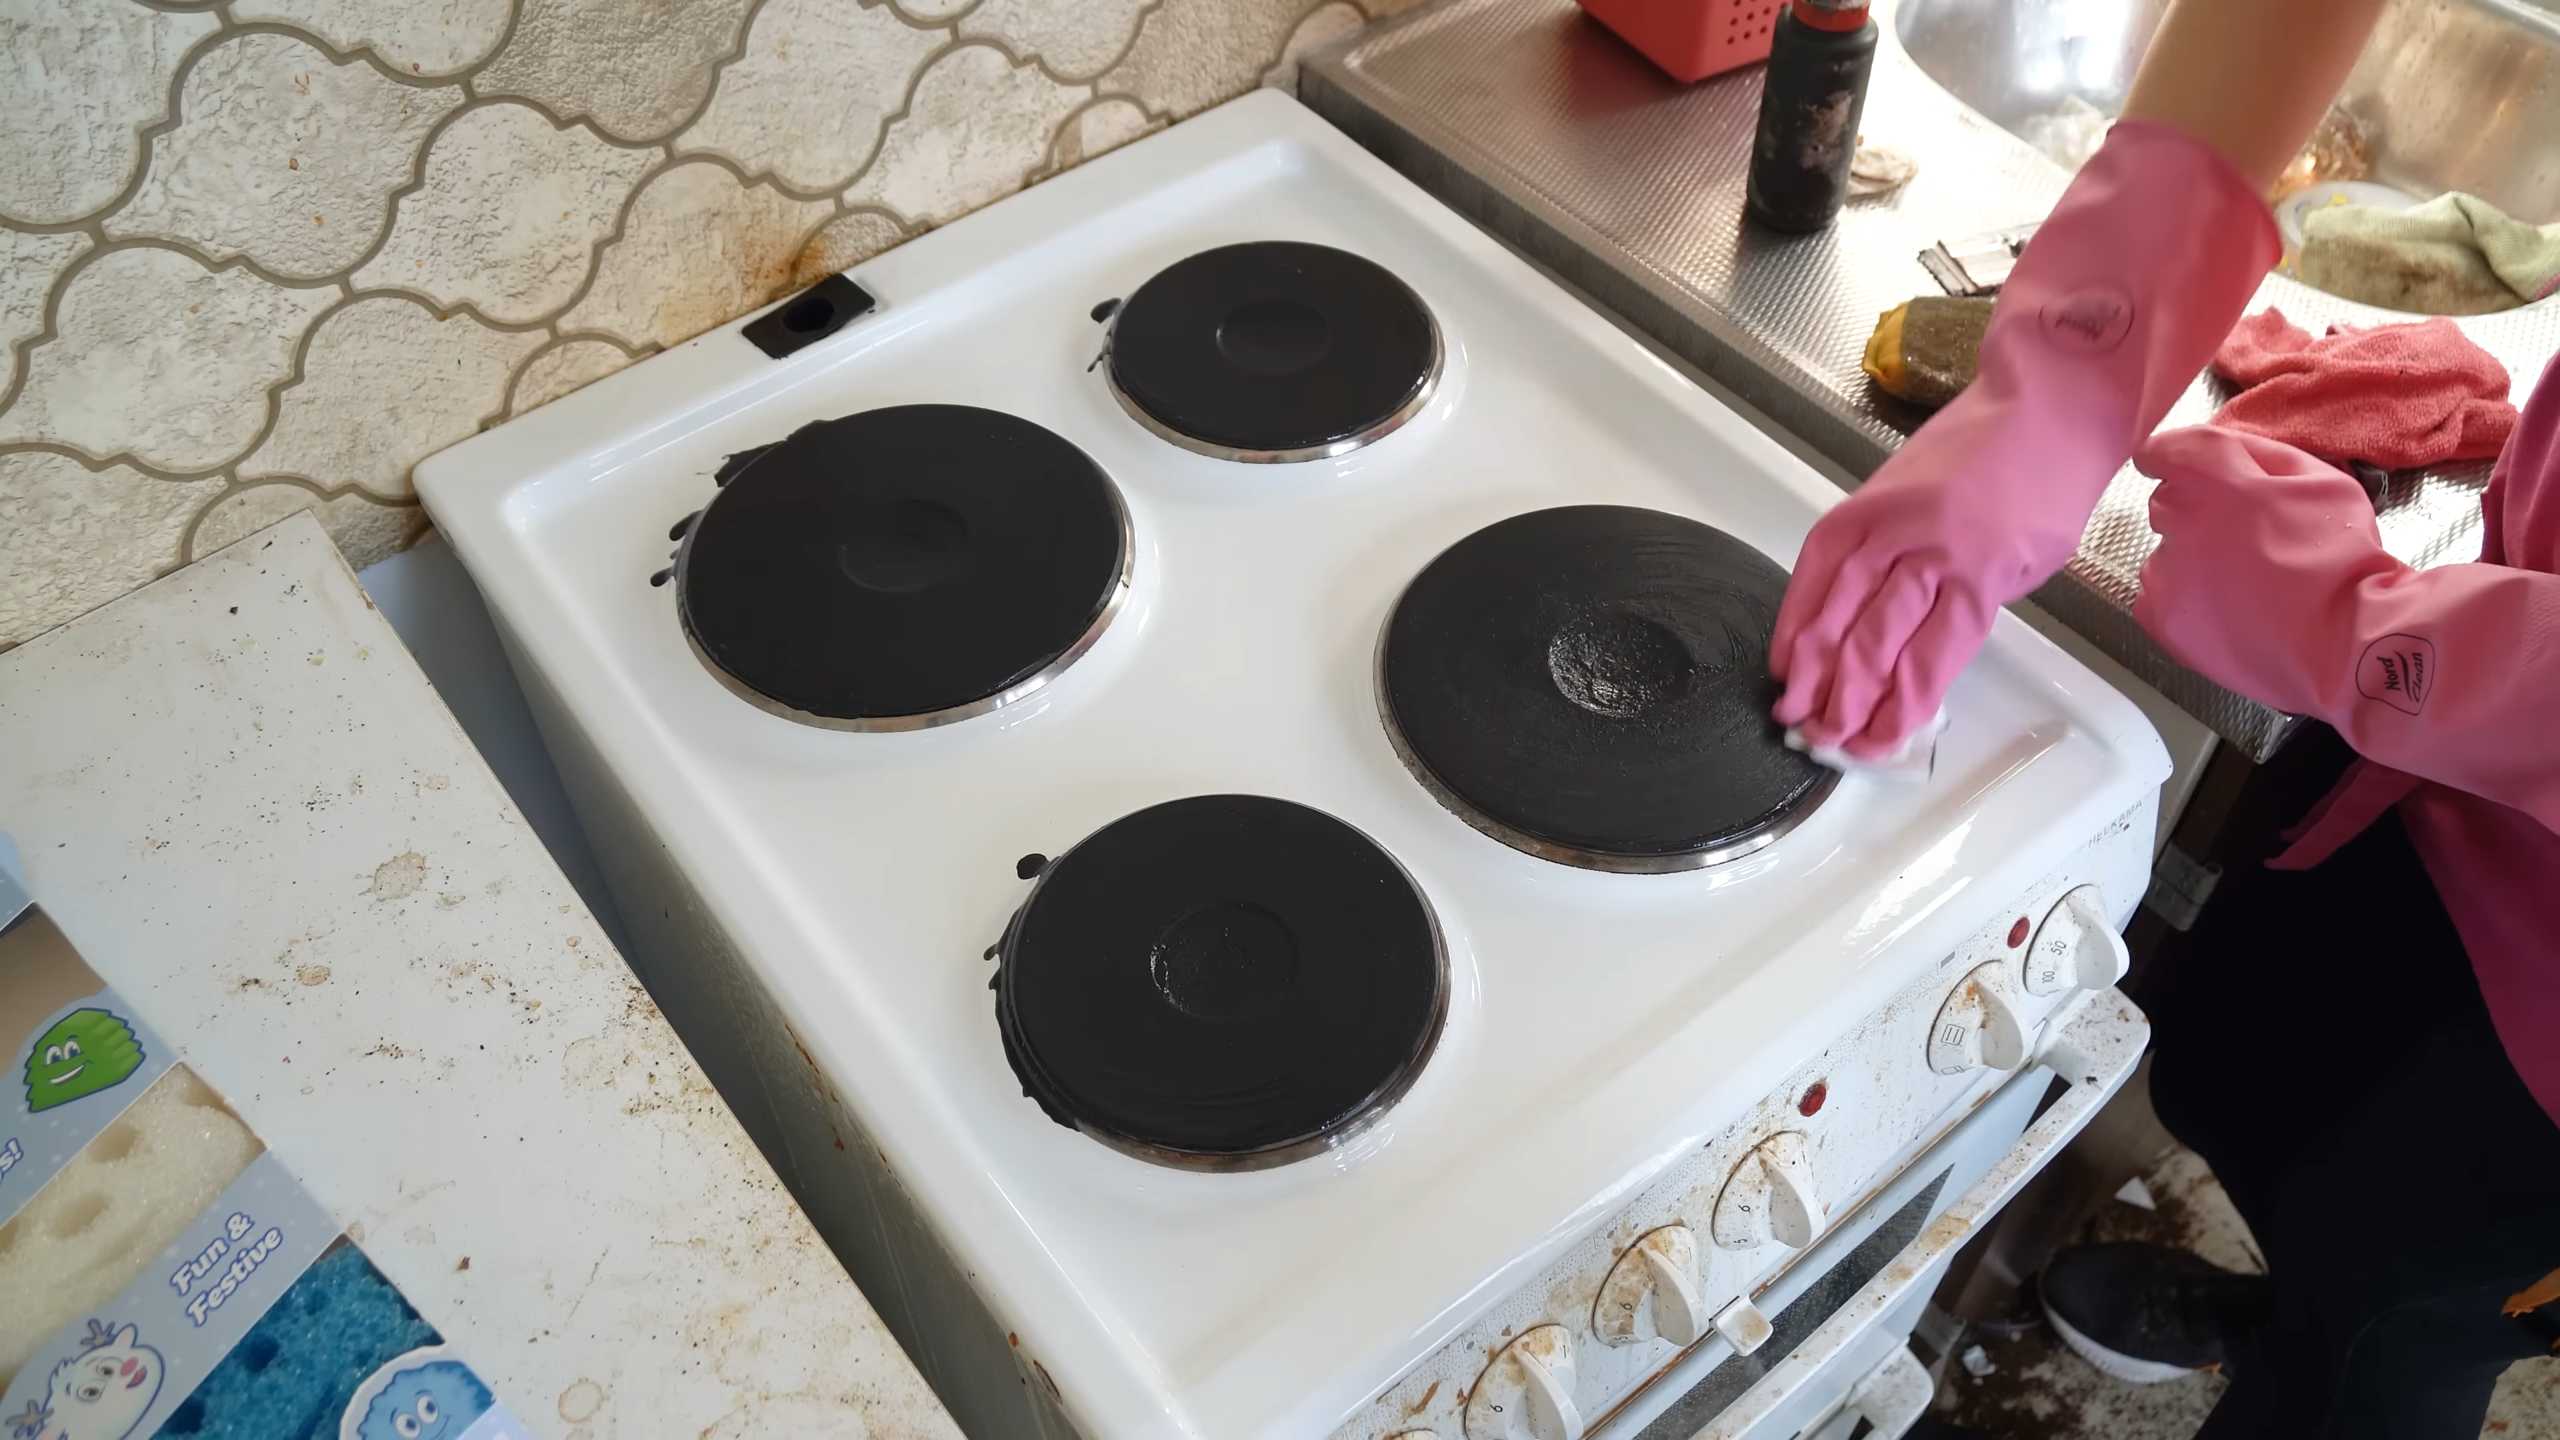
Hey there, fellow cleaning enthusiasts! I’m super excited to share some amazing DIY hacks that will take your CIF cream cleaner game to the next level. We all know and love CIF for its ability to tackle tough stains, but did you know you can use it in so many more ways than just cleaning your stovetop? Get ready to be amazed!
Hack #1: Revive Your Grout Like a Pro
Grout can be a real pain. It gets grimy and discolored so easily. But don’t worry, CIF is here to rescue your grout lines!
What you’ll need:
* CIF cream cleaner
* An old toothbrush or grout brush
* Water
* A sponge or cloth
* Optional: Baking soda (for extra stubborn stains)
Step-by-step instructions:
1. Prepare the area: Lightly dampen the grout lines with water. This helps the CIF adhere better and prevents it from drying out too quickly.
2. Apply the CIF: Squeeze a small amount of CIF directly onto the grout lines. Don’t overdo it – a little goes a long way!
3. Scrub, scrub, scrub!: Using your toothbrush or grout brush, scrub the grout lines in a back-and-forth motion. Apply some pressure, especially on those stubborn stains. If you’re dealing with really tough grime, you can mix a little baking soda with the CIF to create a more abrasive paste.
4. Let it sit (optional): For heavily soiled grout, let the CIF sit for about 5-10 minutes. This allows the cleaning agents to penetrate the grime and loosen it up.
5. Rinse thoroughly: Use a damp sponge or cloth to wipe away the CIF and loosened dirt. Rinse the sponge frequently to avoid spreading the grime around.
6. Dry and admire: Once you’ve rinsed away all the CIF, dry the grout lines with a clean cloth. Step back and admire your sparkling clean grout!
Hack #2: Sparkling Stainless Steel Sink Savior
Stainless steel sinks are beautiful, but they can easily get water spots, fingerprints, and general grime. CIF to the rescue! This hack will leave your sink looking brand new.
What you’ll need:
* CIF cream cleaner
* A soft sponge or microfiber cloth
* Water
* A clean, dry cloth
Step-by-step instructions:
1. Wet the sink: Lightly wet the entire surface of your stainless steel sink.
2. Apply the CIF: Squeeze a small amount of CIF onto your sponge or microfiber cloth.
3. Clean in the direction of the grain: Gently rub the CIF onto the sink surface, following the direction of the stainless steel grain. This helps prevent scratches.
4. Rinse thoroughly: Rinse the sink completely with water, making sure to remove all traces of CIF.
5. Dry and polish: Use a clean, dry cloth to dry the sink thoroughly. This will prevent water spots and leave your sink with a beautiful shine. For an extra polished look, you can use a stainless steel cleaner after drying.
Hack #3: Oven Door Glass Gleaming
Burnt-on food and grease on your oven door glass can be a nightmare to clean. But with CIF, it’s a breeze!
What you’ll need:
* CIF cream cleaner
* A non-abrasive scouring pad or sponge
* Water
* A clean cloth or paper towels
* Optional: Razor scraper (for extremely stubborn spots)
Step-by-step instructions:
1. Cool down the oven: Make sure your oven is completely cool before you start cleaning.
2. Apply the CIF: Apply a generous amount of CIF to the oven door glass, focusing on the areas with the most burnt-on food.
3. Let it sit: Allow the CIF to sit on the glass for at least 15-20 minutes. This will give it time to loosen the grime. For really tough spots, you can let it sit for up to an hour.
4. Scrub gently: Using a non-abrasive scouring pad or sponge, gently scrub the glass. Avoid using excessive pressure, as this could scratch the glass.
5. Razor scrape (optional): If you have extremely stubborn spots that won’t come off with scrubbing, you can carefully use a razor scraper to lift them. Hold the scraper at a shallow angle and gently scrape the surface. Be very careful not to scratch the glass.
6. Rinse thoroughly: Rinse the glass thoroughly with water, removing all traces of CIF and loosened grime.
7. Dry and admire: Dry the glass with a clean cloth or paper towels. Step back and admire your sparkling clean oven door!
Hack #4: Bathtub and Shower Bliss
Soap scum, hard water stains, and mildew can make your bathtub and shower look dingy. CIF can help you restore them to their former glory.
What you’ll need:
* CIF cream cleaner
* A sponge or scrub brush
* Water
* A clean cloth or squeegee
* Optional: Vinegar (for extra tough hard water stains)
Step-by-step instructions:
1. Wet the surfaces: Lightly wet the bathtub and shower surfaces with water.
2. Apply the CIF: Apply a generous amount of CIF to the surfaces, focusing on areas with soap scum, hard water stains, and mildew.
3. Scrub thoroughly: Using a sponge or scrub brush, scrub the surfaces thoroughly. Pay special attention to corners, grout lines, and areas around the drain. If you’re dealing with tough hard water stains, you can spray the area with vinegar before applying the CIF. The vinegar will help to dissolve the mineral deposits.
4. Let it sit (optional): For heavily soiled areas, let the CIF sit for about 5-10 minutes.
5. Rinse thoroughly: Rinse the surfaces completely with water, removing all traces of CIF and loosened grime.
6. Dry and prevent: Dry the surfaces with a clean cloth or squeegee. To help prevent future buildup of soap scum and hard water stains, you can spray the surfaces with a daily shower cleaner after each use.
Hack #5: Cleaning Burnt Pots and Pans
Accidentally burnt food in your pots and pans? Don’t throw them away! CIF can help you salvage them.
What you’ll need:
* CIF cream cleaner
* A non-abrasive scouring pad or sponge
* Water
* Optional: Baking soda, Vinegar
Step-by-step instructions:
1. Let the pot/pan cool: Make sure the pot or pan is completely cool before you start cleaning.
2. Add water and baking soda (optional): If the burnt food is really stuck on, fill the pot or pan with water and add a few tablespoons of baking soda. Bring the mixture to a boil and let it simmer for about 15-20 minutes. This will help to loosen the burnt food.
3. Drain the water: Drain the water from the pot or pan.
4. Apply the CIF: Apply a generous amount of CIF to the burnt areas.
5. Scrub gently: Using a non-abrasive scouring pad or sponge, gently scrub the burnt areas. Avoid using excessive pressure, as this could scratch the surface of the pot or pan. If the burnt food is still stubborn, you can add a little vinegar to the CIF to create a more powerful cleaning solution.
6. Rinse thoroughly: Rinse the pot or pan thoroughly with water, removing all traces of CIF and loosened burnt food.
7. Repeat if necessary: If there are still some burnt areas remaining, repeat steps 4-6.
8. Dry and admire: Dry the pot or pan thoroughly with a clean cloth.
Hack #6: Refreshing White Shoes
White shoes looking a little worse for wear? CIF can help bring them back to life!
What you’ll need:
* CIF cream cleaner
* An old toothbrush or small brush
* Water
* A clean cloth or paper towels
Step-by-step instructions:
1. Remove loose dirt: Use a brush or cloth to remove any loose dirt or debris from the shoes.
2. Apply the CIF: Apply a small amount of CIF to the dirty areas of the shoes.
3. Scrub gently: Using an old toothbrush or small brush, gently scrub the CIF into the shoes. Pay special attention to scuff marks and stains.
4. Rinse thoroughly: Rinse the shoes thoroughly with water, removing all traces of CIF.
5. Dry and admire: Stuff the shoes with paper towels to help them maintain their shape and allow them to air dry. Avoid
Conclusion
So, there you have it! This simple yet incredibly effective DIY CIF cleaning hack is a game-changer for anyone looking to achieve a sparkling clean home without breaking the bank or relying on harsh chemicals. We’ve shown you how to harness the power of readily available ingredients to create a cleaning solution that rivals the effectiveness of store-bought CIF, and in many cases, surpasses it.
Why is this a must-try? Because it’s economical, environmentally friendly, and customizable. You control exactly what goes into your cleaner, avoiding potentially harmful additives and tailoring the scent to your personal preferences. Think of the satisfaction of knowing you’re not only saving money but also contributing to a healthier home and planet.
Beyond the basic recipe, the possibilities are endless. For a boost in disinfecting power, consider adding a few drops of tea tree oil or eucalyptus oil. If you’re tackling particularly stubborn grime, a splash of white vinegar can work wonders. And for those who prefer a creamier consistency, a touch more baking soda can thicken the mixture to your liking. Experiment with different essential oils to create signature scents that uplift your mood while you clean. Lavender for relaxation, lemon for invigoration, or peppermint for a refreshing burst – the choice is yours!
This DIY CIF cleaning hack isn’t just about saving money; it’s about empowering you to take control of your cleaning routine and create a healthier, happier home. It’s about reducing your reliance on harsh chemicals and embracing a more sustainable approach to cleaning. It’s about the satisfaction of knowing you’ve created something effective and beneficial with your own two hands.
We are confident that once you try this DIY CIF cleaning solution, you’ll be amazed by the results. The streak-free shine, the fresh scent, and the peace of mind knowing you’re using a safe and effective cleaner will make it a staple in your cleaning arsenal.
Don’t just take our word for it – give it a try! We encourage you to experiment with the recipe, find the variations that work best for you, and most importantly, share your experiences with us. Let us know what surfaces you’ve cleaned, what scents you’ve created, and any tips or tricks you’ve discovered along the way. Your feedback is invaluable and helps us continue to refine and improve this DIY cleaning solution for everyone. Share your before-and-after photos, your favorite scent combinations, and your cleaning success stories on our social media channels using #DIYCIFClean. Let’s build a community of empowered cleaners who are passionate about creating sparkling clean homes in a sustainable and affordable way. We can’t wait to hear from you!
Frequently Asked Questions (FAQ)
What exactly *is* CIF, and why should I make my own?
CIF is a popular brand of cleaning products known for its effectiveness on various surfaces, particularly for removing tough stains and grime. However, store-bought CIF can be expensive and often contains harsh chemicals that some people prefer to avoid. Making your own DIY CIF cleaning solution allows you to control the ingredients, save money, and create a more environmentally friendly cleaning product. You know exactly what’s going into your cleaner, avoiding potential allergens or irritants.
What are the basic ingredients I need for this DIY CIF cleaning hack?
The basic ingredients typically include baking soda, liquid dish soap (preferably a natural or eco-friendly brand), water, and optionally, essential oils for fragrance and added cleaning power. Some variations may also include white vinegar or washing soda for extra cleaning power. The exact proportions will vary depending on the specific recipe you choose, but these are the core components.
Can I use this DIY CIF cleaning solution on all surfaces?
While this DIY cleaner is generally safe for most surfaces, it’s always a good idea to test it on a small, inconspicuous area first, especially on delicate or sensitive materials like marble, granite, or painted surfaces. Avoid using it on surfaces that are known to be damaged by acidic cleaners, such as unsealed stone. Always err on the side of caution and test before applying liberally.
How long does this DIY CIF cleaning solution last?
Since this cleaner doesn’t contain any preservatives, it’s best to use it within a week or two for optimal effectiveness. Store it in an airtight container in a cool, dark place to prevent spoilage. If you notice any changes in color, smell, or consistency, it’s best to discard it and make a fresh batch.
Can I add other ingredients to customize my DIY CIF cleaner?
Absolutely! That’s one of the best things about making your own cleaner. You can customize it to suit your specific needs and preferences. Some popular additions include:
* **Essential oils:** For fragrance and added cleaning power (tea tree, lavender, lemon, eucalyptus).
* **White vinegar:** For extra grime-fighting power (use with caution on certain surfaces).
* **Washing soda:** For tackling tough stains and grease (use with caution, as it can be more abrasive).
* **Borax:** Another option for boosting cleaning power (use with caution and research safety guidelines).
* **Lemon juice:** A natural disinfectant and deodorizer.
Remember to research the properties of any new ingredient before adding it to your cleaner to ensure it’s safe for the surfaces you intend to clean.
My DIY CIF cleaner is too thick/thin. How can I adjust the consistency?
If your cleaner is too thick, simply add a little more water until you reach the desired consistency. If it’s too thin, add a bit more baking soda, a teaspoon at a time, until it thickens up. Remember to mix well after each addition to ensure the ingredients are properly combined.
Is this DIY CIF cleaning hack safe for pets and children?
While this DIY cleaner is generally safer than store-bought options, it’s still important to keep it out of reach of children and pets. Avoid using essential oils that are known to be toxic to animals. Always store the cleaner in a clearly labeled container to prevent accidental ingestion. If you have any concerns, consult with your veterinarian or pediatrician.
How do I properly dispose of this DIY CIF cleaning solution?
Since the ingredients are generally biodegradable, you can usually dispose of the cleaner down the drain with plenty of water. However, if you’ve added any potentially harmful ingredients like borax, it’s best to check with your local waste management guidelines for proper disposal procedures.
What if I don’t have all the ingredients on hand? Can I substitute anything?
While the basic ingredients are essential for the effectiveness of the cleaner, you can sometimes make substitutions depending on what you have available. For example, if you don’t have liquid dish soap, you could try using a small amount of castile soap. However, keep in mind that substitutions may affect the overall performance of the cleaner.
How does this DIY CIF cleaning hack compare to store-bought CIF in terms of effectiveness?
Many users find that this DIY CIF cleaning hack is just as effective, if not more so, than store-bought CIF, especially for everyday cleaning tasks. The combination of baking soda, dish soap, and optional additives like vinegar and essential oils provides a powerful cleaning action that can tackle grease, grime, and stains. Plus, you have the added benefit of knowing exactly what’s in your cleaner and avoiding harsh chemicals. The key is to experiment with the recipe and find the variations that work best for your specific cleaning needs.

Leave a Comment