
Bottle Grown Peppers: Imagine plucking fresh, vibrant peppers right from your windowsill, even if you don’t have a sprawling garden! Sounds like a dream? Well, it’s a dream that can easily become a reality with this simple and rewarding DIY project. For centuries, resourceful gardeners have found innovative ways to cultivate food in limited spaces, from ancient rooftop gardens to modern-day urban farms. This tradition of ingenuity continues with our guide to growing peppers in bottles.
Why should you try bottle grown peppers? Because it’s incredibly space-saving, budget-friendly, and a fantastic way to recycle! Whether you live in an apartment, have a small balcony, or simply want to add a touch of green to your indoor space, this method is perfect. Plus, it’s a fun and educational project for the whole family. I’m going to show you how to transform ordinary plastic bottles into thriving mini-gardens, allowing you to enjoy the delicious taste of homegrown peppers all year round. Get ready to unleash your inner gardener and discover the joy of growing your own food, one bottle at a time!
DIY Bottle Grown Peppers: A Beginner’s Guide
Hey there, fellow gardening enthusiasts! Ever thought about growing peppers, but you’re short on space or just want a fun, quirky project? Well, you’re in the right place! I’m going to walk you through how to grow peppers in plastic bottles. It’s a super easy and rewarding way to get fresh peppers, even if you only have a balcony or a sunny windowsill. Let’s get started!
What You’ll Need
Before we dive in, let’s gather our supplies. This is a pretty low-cost project, which is always a bonus!
* **Plastic Bottles:** Think soda bottles, water bottles, juice bottles – anything that’s relatively sturdy and at least 2 liters in size. The bigger, the better, as it gives the pepper plant more room to grow.
* **Pepper Seeds or Seedlings:** You can start from seeds (which is more budget-friendly) or buy small pepper seedlings from a garden center. Choose your favorite pepper variety! I personally love jalapenos and bell peppers for this project.
* **Potting Mix:** Use a good quality potting mix. This is important because it provides the right nutrients and drainage for your peppers. Don’t use garden soil, as it can compact too much in a container.
* **Scissors or a Utility Knife:** For cutting the plastic bottles. Be careful!
* **Drill or Nail:** To create drainage holes.
* **Watering Can or Spray Bottle:** For watering your peppers.
* **Optional: Plant Food:** A balanced liquid fertilizer can help your peppers thrive.
* **Optional: Small Pebbles or Gravel:** For drainage at the bottom of the bottle.
Preparing the Bottles
Okay, now that we have everything, let’s get those bottles ready for their new purpose!
1. **Clean the Bottles:** Thoroughly wash the plastic bottles with soap and water to remove any residue. Rinse them well and let them dry completely. This is crucial to prevent any unwanted bacteria or mold from affecting your pepper plants.
2. **Cut the Bottles:** This is where the scissors or utility knife comes in. You have a couple of options here:
* **Option 1: Single Container:** Cut the bottle in half horizontally. You’ll be using the bottom half as your container. The top half can be discarded or used for another project.
* **Option 2: Self-Watering Container (My Favorite!):** Cut the bottle about two-thirds of the way up. Invert the top portion and nest it inside the bottom portion. This creates a self-watering system, which is fantastic for busy gardeners (like me!).
3. **Create Drainage Holes:** This is super important! Peppers don’t like sitting in soggy soil. Use a drill or a nail (heated with a lighter for easier piercing) to create several drainage holes in the bottom of the bottle (or the bottom of the bottom portion if you’re making a self-watering container). I usually make about 5-6 holes.
4. **Optional: Add Drainage Layer:** If you’re using the single container method, you can add a layer of small pebbles or gravel to the bottom of the bottle. This helps improve drainage and prevents the potting mix from clogging the drainage holes.
Planting Your Peppers
Alright, the bottles are prepped, now for the fun part – planting!
1. **Fill with Potting Mix:** Fill the bottle (or the bottom portion of your self-watering container) with potting mix, leaving about an inch or two of space at the top.
2. **Plant Your Seeds or Seedlings:**
* **From Seeds:** Make a small indentation in the potting mix (about ¼ inch deep). Place 2-3 pepper seeds in the indentation and gently cover them with potting mix. Water lightly.
* **From Seedlings:** Gently remove the pepper seedling from its original container. Loosen the roots slightly. Make a hole in the potting mix large enough to accommodate the seedling’s root ball. Place the seedling in the hole and gently fill in around it with potting mix. Water thoroughly.
3. **Water Thoroughly:** After planting, water the potting mix thoroughly until water drains out of the drainage holes. This helps settle the soil and ensures the roots have access to moisture.
4. **If using the self-watering method:** Fill the bottom reservoir with water. The potting mix will wick up the water as needed.
Caring for Your Bottle Grown Peppers
Now that your peppers are planted, it’s time to give them the TLC they need to thrive!
1. **Sunlight:** Peppers need plenty of sunlight – at least 6-8 hours per day. Place your bottle grown peppers in a sunny location, such as a windowsill, balcony, or patio. If you don’t have enough natural sunlight, you can supplement with a grow light.
2. **Watering:** Water your peppers regularly, but don’t overwater. The potting mix should be moist, but not soggy. Check the soil moisture by sticking your finger into the soil. If the top inch feels dry, it’s time to water. With the self-watering method, just keep the bottom reservoir filled.
3. **Fertilizing:** Peppers are heavy feeders, so they benefit from regular fertilization. Use a balanced liquid fertilizer (follow the instructions on the fertilizer package) every 2-3 weeks. I like to use a fertilizer that’s specifically formulated for vegetables.
4. **Support:** As your pepper plants grow, they may need some support, especially if they’re producing a lot of peppers. You can use small stakes or bamboo skewers to support the stems.
5. **Pest Control:** Keep an eye out for pests, such as aphids, spider mites, and whiteflies. If you spot any pests, you can try spraying them with insecticidal soap or neem oil. I prefer organic pest control methods whenever possible.
6. **Pollination:** Pepper plants are self-pollinating, but you can help them along by gently shaking the plants or using a small paintbrush to transfer pollen from one flower to another. This is especially important if you’re growing your peppers indoors.
Troubleshooting
Even with the best care, you might encounter a few challenges along the way. Here are some common problems and how to fix them:
* **Yellowing Leaves:** This could be a sign of overwatering, underwatering, or nutrient deficiency. Check the soil moisture and adjust your watering accordingly. If the soil is consistently moist, you might be overwatering. If the leaves are yellowing and the soil is dry, you might be underwatering. If you’re fertilizing regularly, the yellowing could be due to a nutrient deficiency. Try using a fertilizer that’s specifically formulated for vegetables.
* **Blossom Drop:** This is when the pepper flowers fall off before they produce fruit. This can be caused by a number of factors, including temperature stress, lack of pollination, or nutrient deficiency. Make sure your peppers are getting enough sunlight and water. You can also try hand-pollinating the flowers.
* **Small Peppers:** If your peppers are small, it could be due to a lack of nutrients or sunlight. Make sure you’re fertilizing regularly and that your peppers are getting enough sunlight.
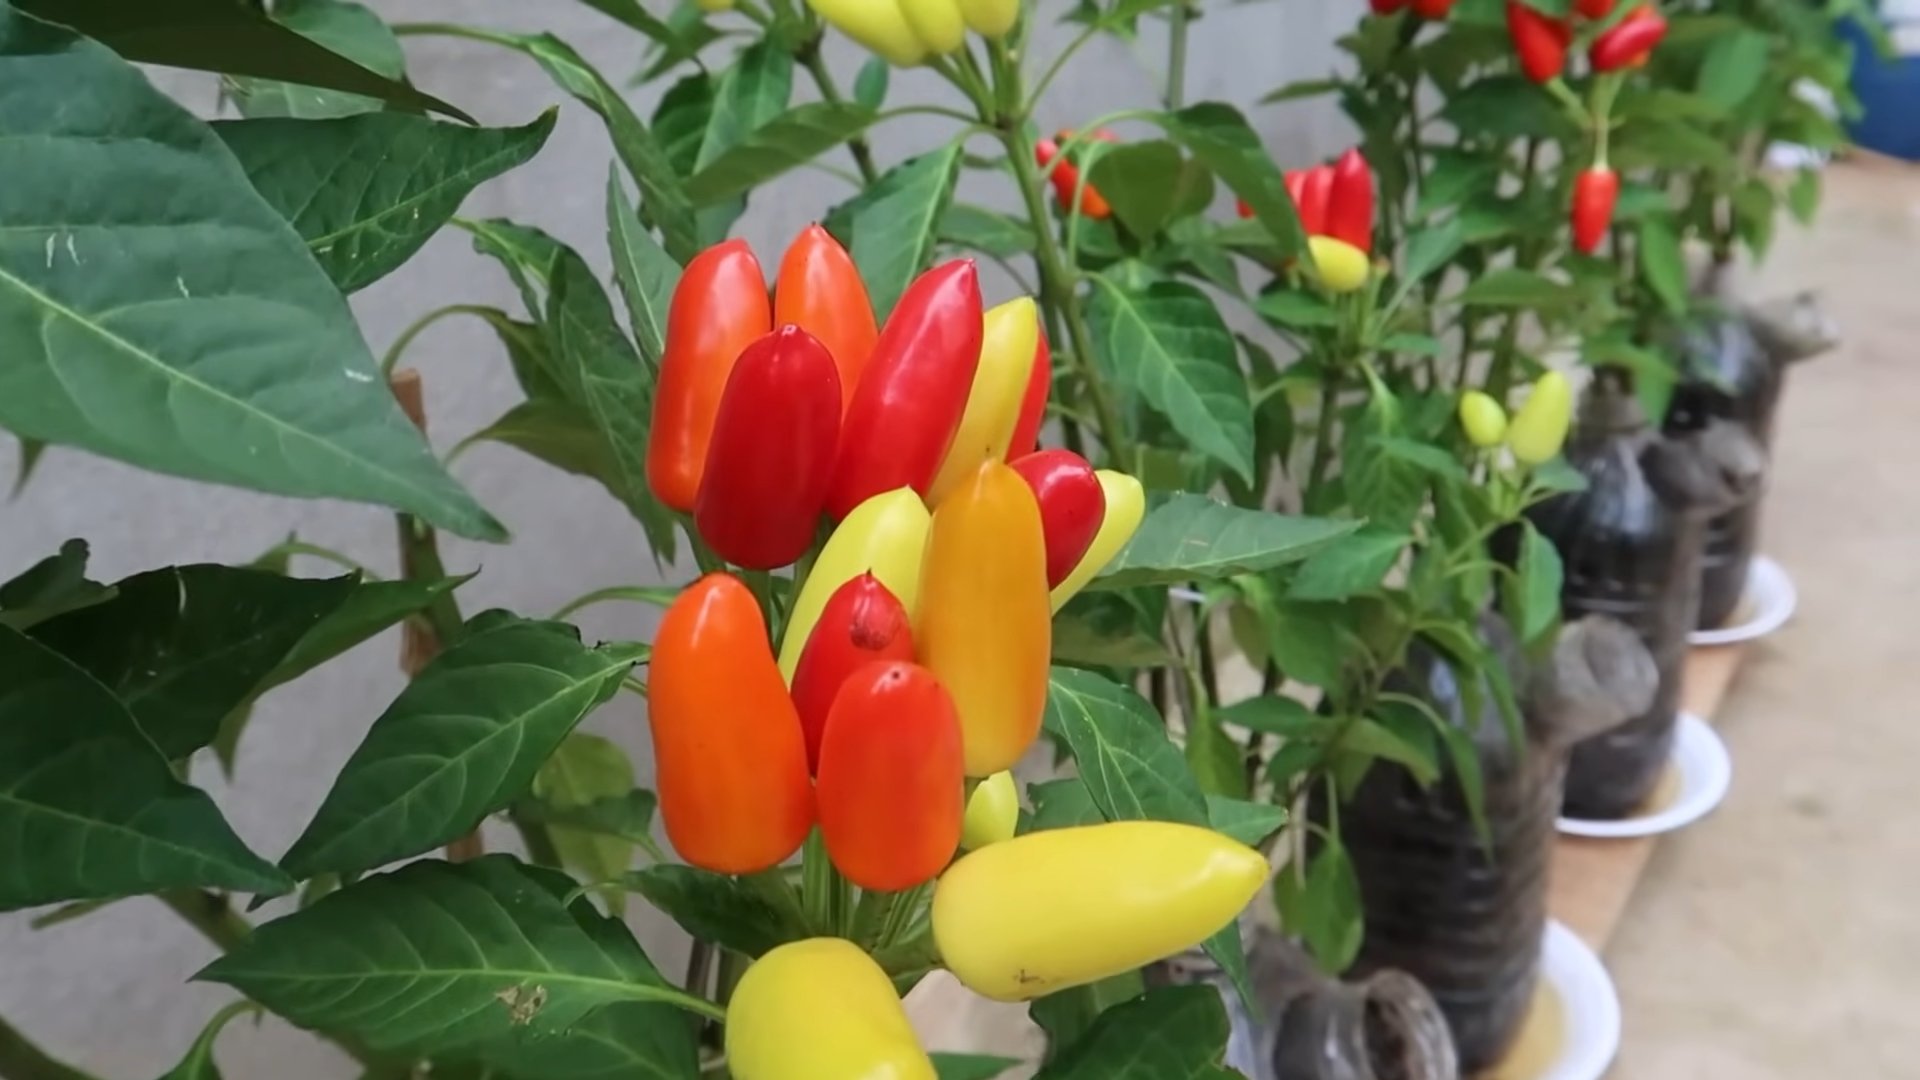
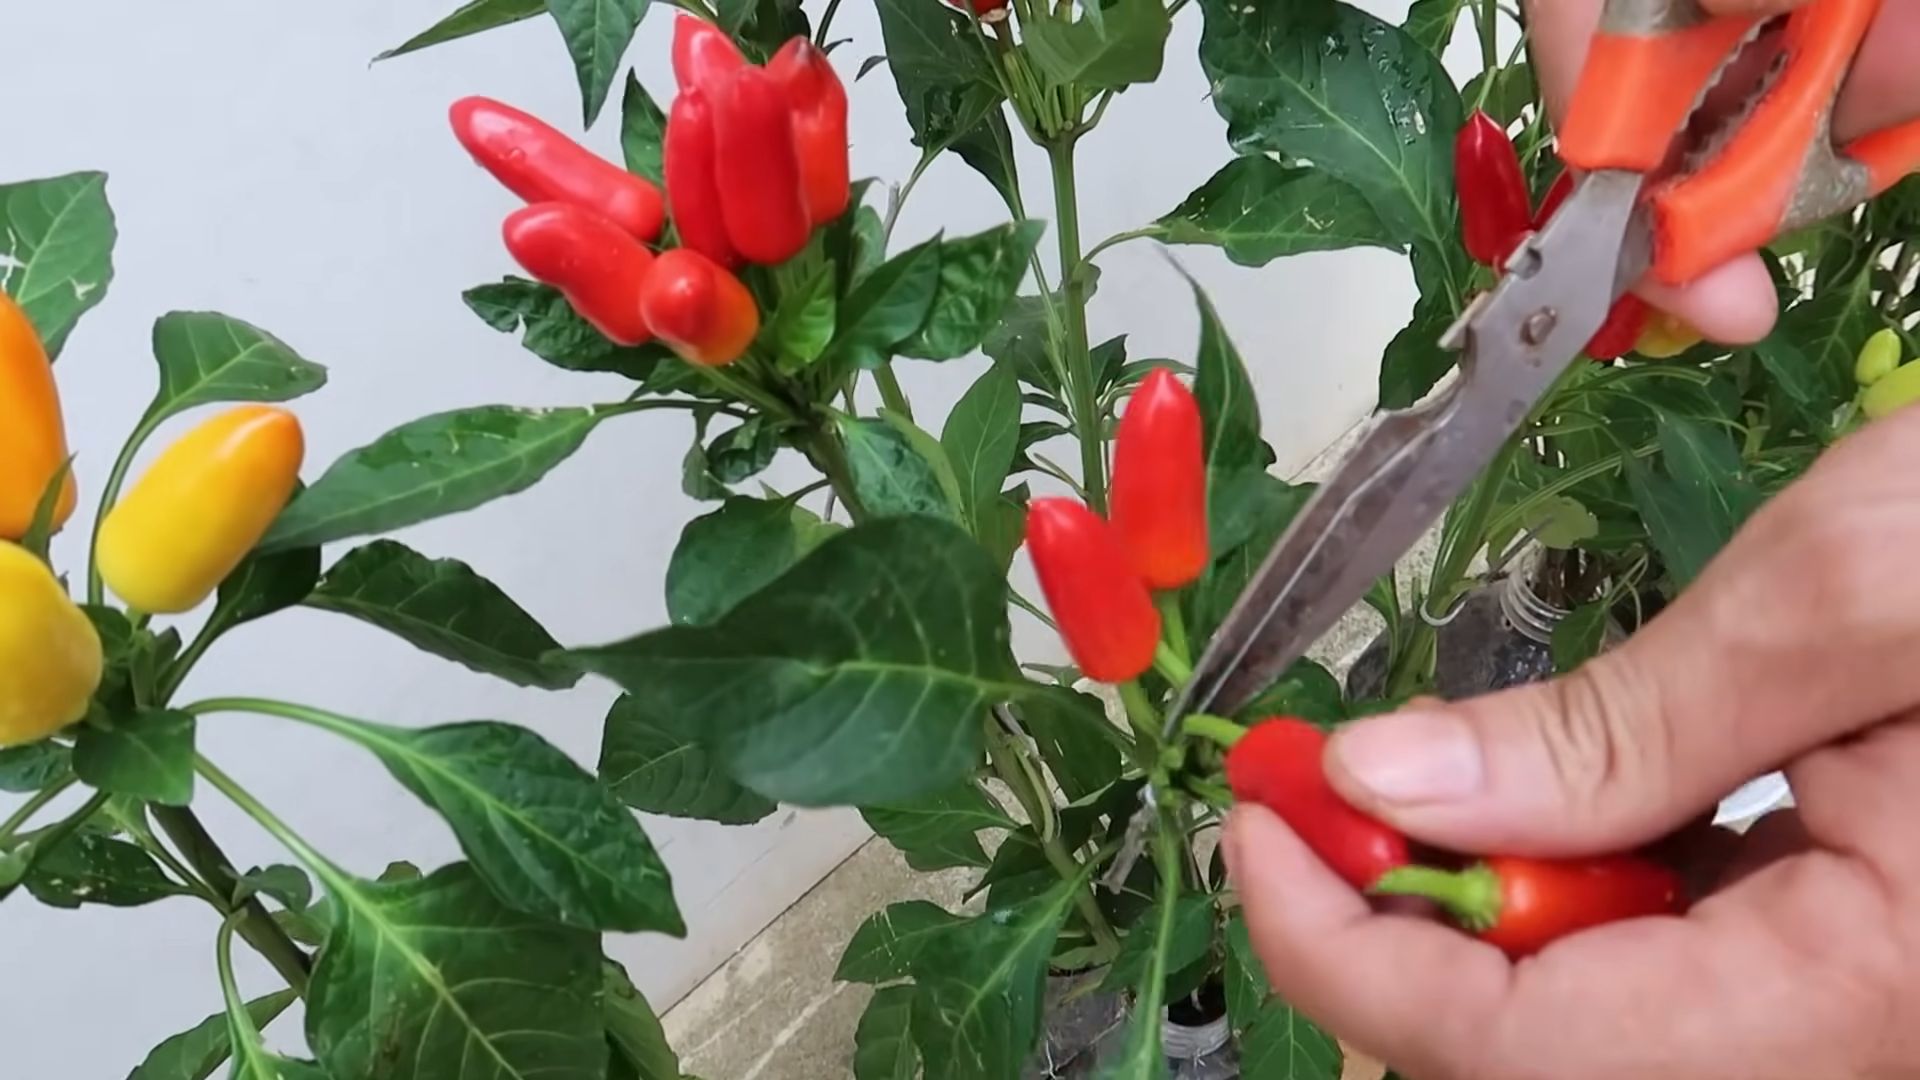
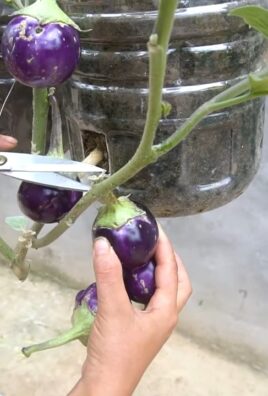
Harvesting Your Peppers
The best part of growing your own peppers is, of course, harvesting them! The time it takes for peppers to mature depends on the variety. Generally, bell peppers take about 60-90 days to mature, while jalapenos take about 70-80 days.
You’ll know your peppers are ready to harvest when they’ve reached their mature size and color. Use scissors or a knife to cut the peppers from the plant, leaving a small stem attached.
And that’s it! You’ve successfully grown peppers in plastic bottles. Enjoy your fresh, homegrown peppers in your favorite recipes! I love adding them to salsas, salads, and stir-fries.
Growing peppers in bottles is a fun and rewarding project that anyone can do. So, grab some bottles, seeds, and potting mix, and get growing! Happy gardening!
Conclusion
So, there you have it! Growing peppers in bottles isn’t just a quirky gardening experiment; it’s a genuinely effective and rewarding way to cultivate these vibrant vegetables, especially when space is at a premium. We’ve walked through the process, highlighting the simplicity and accessibility of this method. From choosing the right bottle to nurturing your pepper plant, every step is designed to be manageable and enjoyable, even for beginner gardeners.
Why is this DIY trick a must-try? Because it democratizes gardening. It removes the barriers of large plots of land and expensive equipment. It allows anyone, regardless of their living situation, to experience the joy of growing their own food. Imagine the satisfaction of harvesting fresh, flavorful peppers from a plant you nurtured in a recycled bottle! It’s a small act with a big impact, connecting you to the natural world and providing a tangible reward for your efforts.
But the benefits extend beyond mere convenience. Bottle-grown peppers often thrive because the controlled environment allows for better management of soil conditions, watering, and pest control. You can easily move your bottle garden to chase the sun or shelter it from harsh weather. Plus, the visual appeal of peppers growing in colorful bottles adds a unique charm to any balcony, patio, or windowsill.
Ready to take your bottle-grown peppers to the next level? Consider experimenting with different pepper varieties. Jalapeños, bell peppers, chili peppers – the possibilities are endless! You can also try adding companion plants like basil or marigolds to your bottle garden to deter pests and enhance the flavor of your peppers. Another variation is to use different types of bottles. While plastic bottles are readily available and work well, you could also explore using glass bottles for a more aesthetically pleasing look (just be mindful of the weight and potential for breakage).
We wholeheartedly encourage you to give this DIY trick a try. It’s a fun, educational, and ultimately delicious experience. Don’t be afraid to experiment, adapt the techniques to your specific environment, and most importantly, have fun!
Once you’ve harvested your first bottle-grown peppers, we’d love to hear about your experience. Share your photos, tips, and challenges in the comments below. Let’s build a community of bottle gardeners and inspire others to embrace this sustainable and rewarding practice. Your insights could help someone else discover the joy of growing their own food, one bottle at a time. So, grab a bottle, some soil, and a pepper seedling, and get ready to embark on a gardening adventure! Let’s grow together!
Frequently Asked Questions (FAQ)
What types of peppers grow best in bottles?
Almost any pepper variety can be grown in a bottle, but smaller varieties tend to thrive best due to the limited space. Consider growing chili peppers, jalapeños, bell peppers (smaller varieties), or even ornamental peppers. Experiment to see what works best in your climate and with your available resources. Remember to choose varieties that mature relatively quickly to maximize your harvest within the growing season.
What size bottle is best for growing peppers?
A 2-liter plastic bottle is a good starting point, but larger bottles (3-5 liters) will provide more room for the roots to grow and support larger pepper plants. The size of the bottle should be proportional to the expected size of the pepper variety you choose. Ensure the bottle is clean and has adequate drainage holes before planting.
How often should I water my bottle-grown peppers?
Watering frequency depends on the climate, the type of soil you’re using, and the size of the bottle. Generally, you should water when the top inch of soil feels dry to the touch. Avoid overwatering, as this can lead to root rot. Ensure the bottle has adequate drainage to prevent water from pooling at the bottom. During hot weather, you may need to water daily, while during cooler periods, watering every few days may suffice.
What kind of soil should I use for bottle-grown peppers?
Use a well-draining potting mix specifically formulated for vegetables. Avoid using garden soil, as it can be too heavy and compact, hindering root growth. A good potting mix will provide the necessary nutrients and aeration for healthy pepper plants. You can also amend the potting mix with compost or other organic matter to improve its fertility and drainage.
How much sunlight do bottle-grown peppers need?
Peppers need at least 6-8 hours of direct sunlight per day to thrive. Place your bottle garden in a sunny location, such as a south-facing balcony or windowsill. If you don’t have access to enough natural sunlight, you can supplement with grow lights. Rotate the bottles regularly to ensure all sides of the plant receive adequate sunlight.
Do I need to fertilize my bottle-grown peppers?
Yes, peppers are heavy feeders and will benefit from regular fertilization. Use a balanced fertilizer specifically formulated for vegetables, following the instructions on the label. Fertilize every 2-3 weeks during the growing season. You can also use organic fertilizers, such as compost tea or fish emulsion.
How do I protect my bottle-grown peppers from pests and diseases?
Regularly inspect your plants for signs of pests or diseases. Common pests that affect peppers include aphids, spider mites, and whiteflies. You can control these pests with insecticidal soap or neem oil. To prevent diseases, ensure good air circulation and avoid overwatering. Remove any infected leaves or plants promptly.
Can I grow peppers indoors in bottles?
Yes, you can grow peppers indoors in bottles, but you’ll need to provide adequate light and ventilation. Place the bottles near a sunny window or use grow lights. Ensure good air circulation to prevent fungal diseases. You may also need to hand-pollinate the flowers to ensure fruit production.
How long does it take for bottle-grown peppers to produce fruit?
The time it takes for peppers to produce fruit depends on the variety, the growing conditions, and the size of the plant. Generally, it takes 60-90 days from transplanting for peppers to mature and produce fruit. Be patient and provide the plants with the necessary care, and you’ll be rewarded with a bountiful harvest.
What do I do if my bottle-grown pepper plant gets too big for the bottle?
If your pepper plant outgrows its bottle, you can either prune it back to control its size or transplant it into a larger container. If you choose to transplant, carefully remove the plant from the bottle and replant it in a larger pot with fresh potting mix. Be gentle when handling the roots to avoid damaging them.
Leave a Comment