
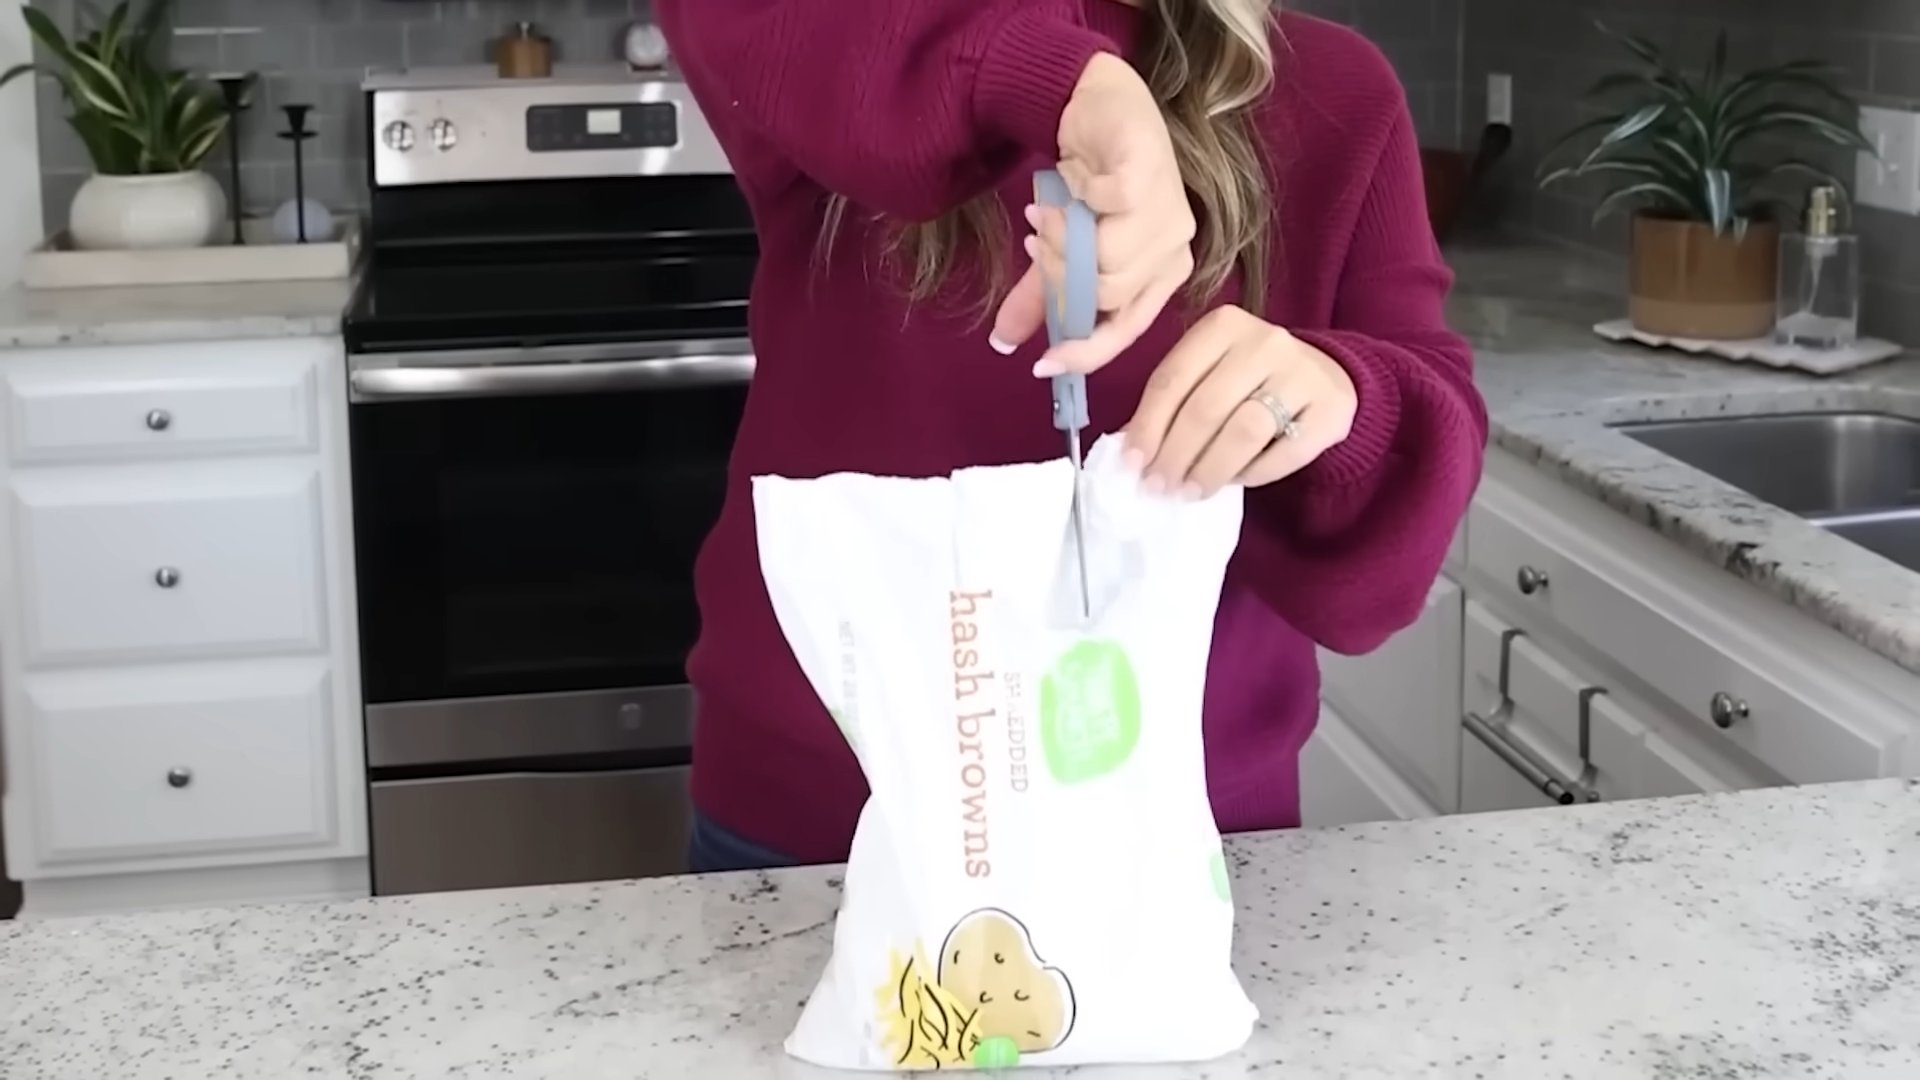
Bag tying trick: Ever wrestled with a stubborn garbage bag, struggling to get a knot tight enough to prevent spills and unwanted odors? I know I have! It’s a universal frustration, right up there with tangled headphones and finding only one sock after laundry day. But what if I told you there’s a simple, almost magical, way to tie bags that guarantees a secure closure every single time?
While the art of knot-tying dates back to prehistoric times, with evidence suggesting its use for tools and shelter, the humble garbage bag knot might not have the same historical gravitas. However, its impact on our daily lives is undeniable. Think about it: from containing household waste to securing garden debris, a well-tied bag is essential for cleanliness and organization.
In today’s world, where efficiency and minimizing mess are highly valued, mastering a reliable bag tying trick is more important than ever. No more rogue coffee grounds escaping onto your kitchen floor! This DIY hack isn’t just about convenience; it’s about saving time, reducing frustration, and maintaining a tidy environment. So, ditch those flimsy, unreliable knots and let’s dive into a game-changing technique that will transform the way you handle bags forever. Trust me, once you learn this, you’ll wonder how you ever lived without it!
Planting Bush Beans: A Beginner’s Guide to a Bountiful Harvest
Hey there, fellow gardening enthusiasts! Today, I’m going to walk you through the process of planting bush beans. These little guys are relatively easy to grow, making them perfect for beginner gardeners like myself (when I started!). Plus, the satisfaction of harvesting your own fresh beans is just unbeatable. So, grab your gardening gloves, and let’s get started!
Choosing the Right Bush Bean Variety
Before we even think about digging in the dirt, we need to decide which type of bush bean we want to grow. There are tons of varieties out there, each with its own unique characteristics. Here are a few popular options:
* Blue Lake Bush Beans: These are a classic choice, known for their excellent flavor and high yields. They’re also relatively disease-resistant.
* Contender Bush Beans: As the name suggests, these beans are tough and can handle cooler temperatures, making them a good option for areas with shorter growing seasons.
* Provider Bush Beans: These are another early-maturing variety, perfect if you want to harvest your beans quickly.
* Roma Bush Beans: If you prefer a flatter, wider bean, Roma beans are a great choice. They have a delicious, slightly nutty flavor.
* Golden Wax Bush Beans: These bright yellow beans add a pop of color to your garden and are known for their tender texture.
I usually go with Blue Lake or Contender, depending on the weather forecast for the season. Do some research and see which variety appeals most to you!
Preparing Your Planting Site
Bush beans need a sunny spot with well-drained soil. They’re not too picky, but good soil preparation will definitely give them a head start.
* Sunlight: Bush beans need at least 6-8 hours of direct sunlight per day. Choose a location in your garden that gets plenty of sunshine.
* Soil: The ideal soil for bush beans is loose, well-drained, and slightly acidic (pH 6.0-6.8). If your soil is heavy clay or sandy, you’ll need to amend it.
* Amendments: I like to add compost or well-rotted manure to my soil before planting. This improves drainage, adds nutrients, and helps retain moisture. You can also add some all-purpose fertilizer, following the instructions on the package.
Step-by-Step Planting Guide
Now for the fun part – getting those beans in the ground!
1. Clear the Area: Remove any weeds, rocks, or debris from the planting area. You want a nice, clean slate for your beans.
2. Loosen the Soil: Use a garden fork or tiller to loosen the soil to a depth of about 6-8 inches. This will make it easier for the bean roots to grow.
3. Amend the Soil (if needed): If your soil is poor, mix in compost, manure, or fertilizer as described above.
4. Create Rows: Bush beans are typically planted in rows. Space the rows about 18-24 inches apart. You can use a garden rake or hoe to create shallow furrows for the seeds.
5. Plant the Seeds: Sow the bean seeds about 1 inch deep and 2-4 inches apart within the row. Don’t overcrowd them!
6. Cover the Seeds: Gently cover the seeds with soil and pat it down lightly.
7. Water Thoroughly: Water the planting area thoroughly after planting. This will help the seeds germinate.
Caring for Your Bush Bean Plants
Once your beans are planted, it’s important to provide them with the care they need to thrive.
* Watering: Bush beans need consistent moisture, especially during flowering and pod development. Water deeply whenever the top inch of soil feels dry. Avoid overwatering, as this can lead to root rot. I usually water in the morning to allow the foliage to dry before nightfall, which helps prevent fungal diseases.
* Weeding: Keep the planting area free of weeds. Weeds compete with the bean plants for water and nutrients. Hand-pull weeds carefully to avoid disturbing the bean roots.
* Fertilizing: Bush beans don’t need a lot of fertilizer, but a side dressing of compost or a balanced fertilizer a few weeks after planting can give them a boost.
* Pest Control: Keep an eye out for common bean pests like aphids, bean beetles, and slugs. You can control these pests with insecticidal soap, neem oil, or by hand-picking them off the plants. I prefer using organic methods whenever possible.
* Supporting the Plants (Optional): Bush beans are generally self-supporting, but if you live in a windy area, you may want to provide them with some support. You can use stakes or a trellis to keep the plants from falling over.
Harvesting Your Bush Beans
The best part of growing bush beans is, of course, harvesting them!
* When to Harvest: Bush beans are typically ready to harvest about 50-60 days after planting. The pods should be firm, plump, and snap easily when bent. Don’t let the pods get too large and tough.
* How to Harvest: Gently snap the bean pods off the plant, being careful not to damage the stems. Harvest regularly to encourage the plant to produce more beans.
* Storage: Freshly harvested bush beans can be stored in the refrigerator for up to a week. You can also freeze them for longer storage. To freeze bush beans, blanch them in boiling water for 2-3 minutes, then cool them in ice water. Drain well and store in freezer bags.
Troubleshooting Common Problems
Even with the best care, you might encounter some problems when growing bush beans. Here are a few common issues and how to deal with them:
* Poor Germination: If your bean seeds don’t germinate, it could be due to several factors, such as cold soil, overwatering, or poor-quality seeds. Make sure the soil temperature is at least 60°F (16°C) before planting. Use fresh, high-quality seeds. Avoid overwatering the soil.
* Yellowing Leaves: Yellowing leaves can be a sign of nutrient deficiency, overwatering, or disease. Check the soil drainage and adjust your watering accordingly. Fertilize with a balanced fertilizer if necessary.
* Bean Beetles: Bean beetles are small, orange beetles that can skeletonize the leaves of bean plants. Control them with insecticidal soap, neem oil, or by hand-picking them off the plants.
* Aphids: Aphids are small, sap-sucking insects that can weaken bean plants. Control them with insecticidal soap or by spraying the plants with a strong stream of water.
* Powdery Mildew: Powdery mildew is a fungal disease that can cause a white, powdery coating on the leaves of bean plants. Prevent powdery mildew by providing good air circulation and avoiding overhead watering. Treat with a fungicide if necessary.
Extending Your Bean Harvest
Want to enjoy fresh bush beans for as long as possible? Here are a few tips for extending your harvest:
* Succession Planting: Plant a new batch of bush beans every 2-3 weeks to ensure a continuous harvest throughout the growing season.
* Choose Early-Maturing Varieties: Select varieties that mature quickly, such as Provider or Contender, to get an early start on your harvest.
* Protect Plants from Frost: If you live in an area with early frosts, protect your bean plants with row covers or blankets to extend the growing season.
Saving Bean Seeds for Next Year
If you want to save money and grow your own seeds, you can easily save bean seeds from your harvest.
1. Allow Some Pods to Mature: Let some of the bean pods on your plants dry out completely on the vine. The pods should turn brown and brittle.
2. Harvest the Dry Pods: Once the pods are dry, harvest them and remove the seeds.
3. Dry the Seeds: Spread the seeds out on a screen or tray and let them dry for a few more days.
4. Store the Seeds: Store the dried seeds in an airtight container in a cool, dry place. They should be viable for several years.
Enjoying Your Homegrown Bush Beans
Now that you’ve successfully grown and harvested your own bush beans, it’s time to enjoy them! There are endless ways to prepare and eat fresh bush beans. Here are a few ideas:
* Steamed or Boiled: Simply steam or boil the beans until they’re tender-crisp. Season with salt, pepper, and a little butter or olive oil.
* Sautéed: Sauté the beans in a pan with garlic, onions, and other vegetables.
* Roasted: Roast the beans in the oven with olive oil, salt, and pepper.
* In Salads: Add cooked bush beans to salads for a boost
Conclusion
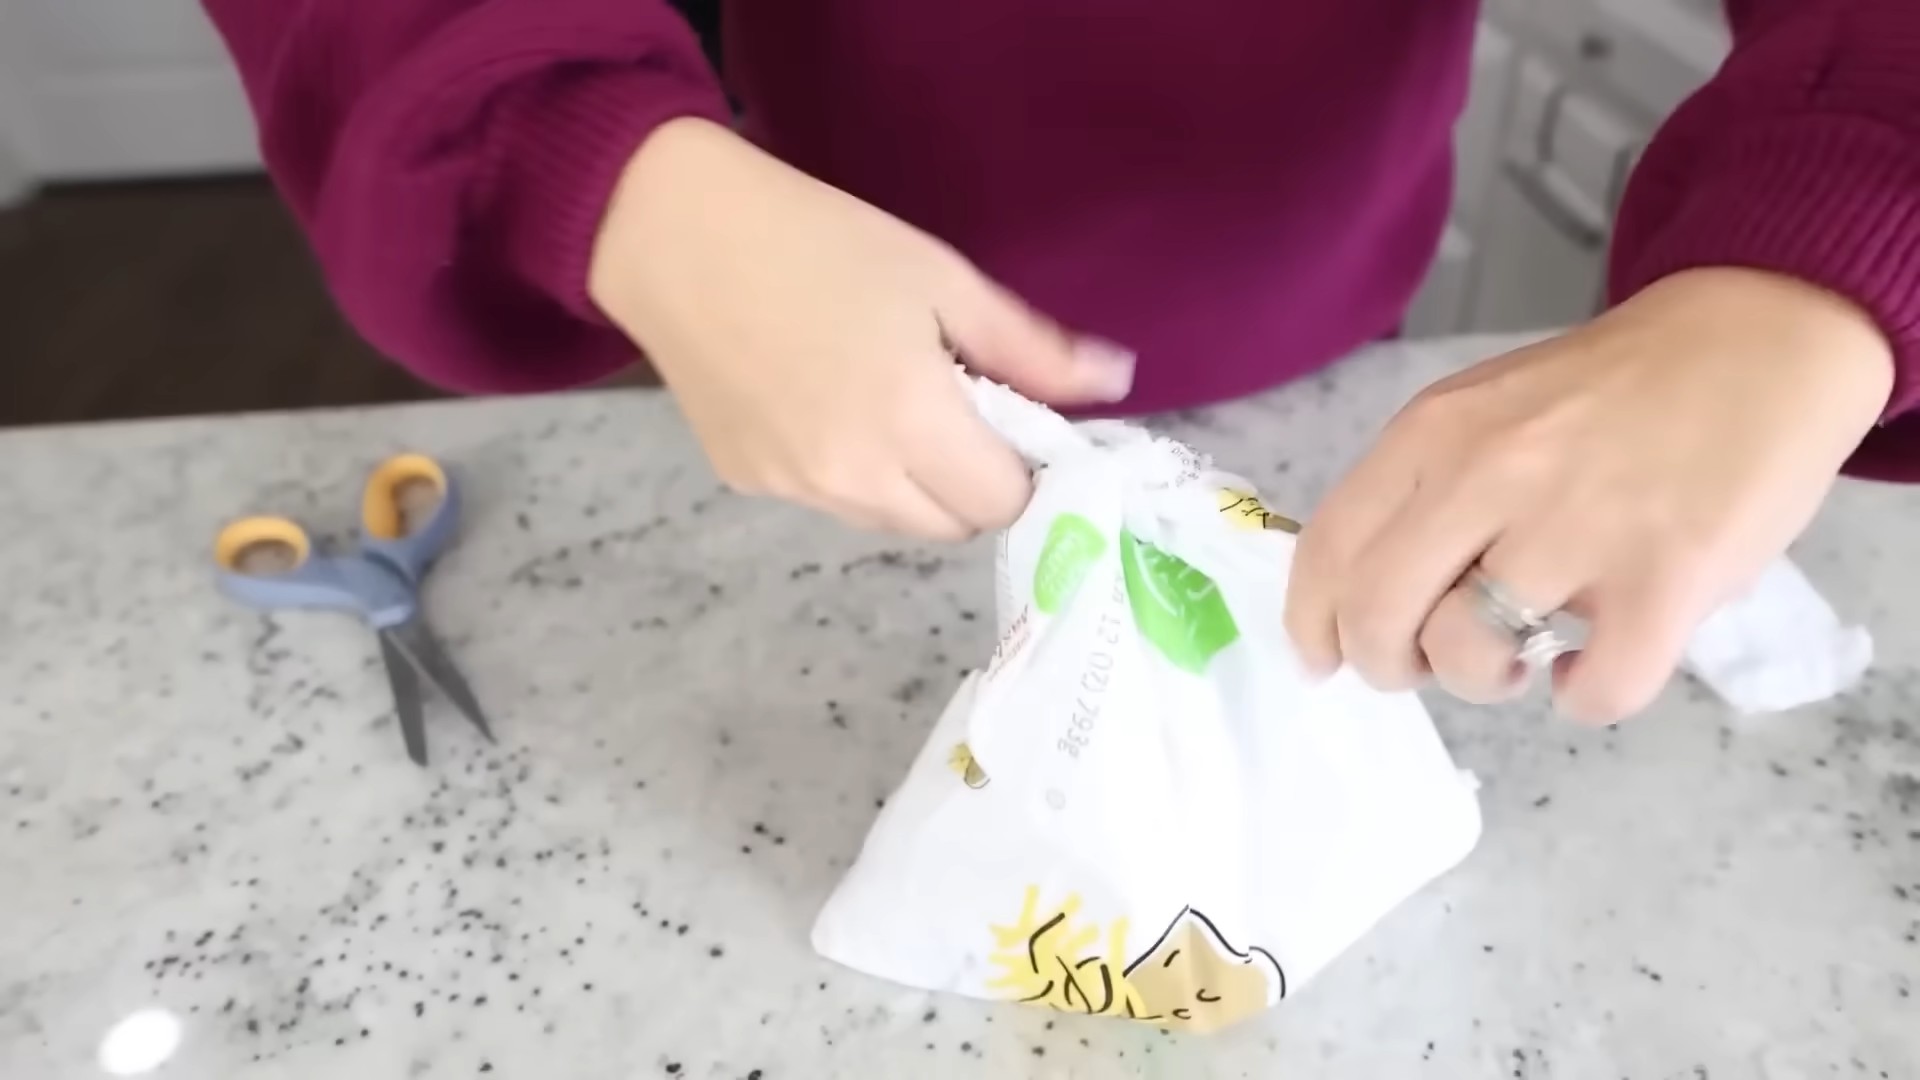
So, there you have it! This simple bag tying trick isn’t just a neat little life hack; it’s a game-changer for anyone who deals with overflowing trash cans, leaky freezer bags, or unruly garden waste. It’s a testament to the fact that sometimes, the most effective solutions are also the simplest. Forget struggling with flimsy knots that come undone at the worst possible moment. Forget wrestling with twist ties that inevitably break or disappear. This method offers a secure, reliable, and surprisingly elegant way to seal your bags, keeping messes contained and your sanity intact.
Why is this bag tying trick a must-try? Because it saves you time, reduces frustration, and minimizes waste. Think about it: no more double-bagging to prevent leaks, no more frantic searches for a working twist tie, and no more garbage explosions in your car on the way to the dump. It’s a small change that makes a big difference in your daily routine.
But the beauty of this trick lies not only in its simplicity but also in its adaptability. Feel free to experiment with different bag materials and thicknesses. While this method works wonders with standard kitchen trash bags, it’s equally effective with heavy-duty contractor bags, produce bags, and even freezer bags. For freezer bags, consider leaving a little extra air inside before tying to prevent freezer burn. You can also use different variations of the knot itself. For example, instead of a simple overhand knot, try a figure-eight knot for added security, especially when dealing with heavy or bulky items. Or, if you’re using thinner bags, reinforce the knot by wrapping the excess bag material around it several times before tightening.
Another variation to consider is the “handle tie.” If your bag has handles, you can use them to create an even more secure closure. Simply cross the handles over each other and tie them in a knot, then use the standard bag tying trick on the remaining bag material. This is particularly useful for grocery bags or shopping bags that you want to reuse.
Beyond the practical benefits, mastering this bag tying trick also offers a sense of satisfaction. There’s something inherently pleasing about executing a simple task perfectly, and this is one of those tasks. It’s a skill you can use every day, and it’s one that you can easily teach to others.
We wholeheartedly encourage you to give this bag tying trick a try. Once you’ve mastered it, you’ll wonder how you ever lived without it. And we’d love to hear about your experience! Share your tips, variations, and success stories in the comments below. Let us know how this trick has helped you simplify your life and tackle those everyday messes with ease. Your feedback will not only help us improve this guide but also inspire others to embrace the power of simple solutions. So go ahead, grab a bag, and give it a whirl. You might just be surprised at how much you enjoy it!
Frequently Asked Questions
Q: What kind of bags does this trick work best with?
A: This bag tying trick is incredibly versatile and works well with a wide variety of bags. It’s effective on standard kitchen trash bags, heavy-duty contractor bags, produce bags, freezer bags, and even shopping bags. The key is to adjust the tightness of the knot based on the bag’s thickness and the weight of the contents. Thicker bags may require a slightly looser knot to prevent tearing, while thinner bags may benefit from a tighter knot or a reinforced knot. Experiment with different bag types to find what works best for you.
Q: Is this knot really secure enough for heavy trash bags?
A: Yes, when executed correctly, this knot is surprisingly secure, even for heavy trash bags. The key is to ensure that you’re pulling the knot tight enough to create a firm seal. For particularly heavy bags, consider using a figure-eight knot instead of a simple overhand knot for added security. You can also reinforce the knot by wrapping the excess bag material around it several times before tightening. If you’re still concerned about leaks, you can always double-bag your trash, but with this trick, you’ll likely find that it’s unnecessary.
Q: I’m having trouble getting the knot tight enough. Any tips?
A: Getting the knot tight enough is crucial for a secure seal. Here are a few tips to help:
* Use your body weight: When pulling the knot tight, use your body weight to your advantage. Lean into the knot and use your legs to generate more force.
* Grip the bag firmly: Make sure you have a firm grip on the bag material as you’re pulling the knot tight. This will prevent the bag from slipping and ensure that the knot is properly tightened.
* Practice makes perfect: Like any skill, mastering this trick takes practice. Don’t get discouraged if you don’t get it right away. Keep practicing, and you’ll eventually develop the technique.
* Consider gloves: If you’re having trouble gripping the bag, try wearing gloves. The added grip will make it easier to pull the knot tight.
Q: Can I use this trick on freezer bags to prevent freezer burn?
A: Yes, this trick is excellent for sealing freezer bags and helping to prevent freezer burn. Before tying the bag, try to remove as much air as possible. However, don’t remove all the air, as a small amount of air can help prevent the bag from sticking to the food. When tying the knot, leave a little extra slack to allow for expansion as the contents freeze. You can also wrap the bag tightly in plastic wrap or aluminum foil for added protection against freezer burn.
Q: What if the bag material is too thin and tears easily?
A: If you’re working with thin bag material that tears easily, there are a few things you can try:
* Use a gentler touch: Avoid pulling the knot too tight, as this can cause the bag to tear.
* Reinforce the knot: Wrap the excess bag material around the knot several times before tightening to reinforce it.
* Double-bag: If you’re concerned about the bag tearing, double-bag your items for added protection.
* Use a different bag: If the bag material is consistently tearing, consider switching to a thicker, more durable bag.
Q: Is this trick environmentally friendly?
A: While this trick itself doesn’t directly impact the environment, it can contribute to more sustainable practices. By creating a secure seal, you can reduce the need for double-bagging, which saves plastic. Additionally, by preventing leaks and spills, you can minimize waste and prevent contamination. To further enhance the environmental friendliness of this trick, consider using biodegradable or compostable bags whenever possible.
Q: Can I use this trick to tie bags for composting?
A: Yes, this trick is perfectly suitable for tying bags used for composting. However, it’s essential to use bags that are specifically designed for composting. These bags are typically made from biodegradable materials that will break down in a compost pile. Avoid using regular plastic bags, as they will not decompose and can contaminate your compost. When tying the bag, ensure that the knot is secure to prevent leaks and spills.
Q: I tried it, and the bag still came untied. What did I do wrong?
A: If the bag came untied, it’s likely that the knot wasn’t tight enough or that the bag material was too slippery. Here are a few things to check:
* Knot tightness: Make sure you’re pulling the knot as tight as possible. Use your body weight to your advantage and ensure that you have a firm grip on the bag material.
* Bag material: If the bag material is slippery, it may be difficult to get a secure knot. Try using a different bag or roughening up the bag material slightly before tying the knot.
* Knot type: Consider using a figure-eight knot instead of a simple overhand knot for added security.
* Practice: As with any skill, mastering this trick takes practice. Keep practicing, and you’ll eventually develop the technique.
Q: Can I use this trick to tie bags with liquids inside?
A: Yes, you can use this trick to tie bags with liquids inside, but it’s crucial to take extra precautions to prevent leaks. Ensure that the knot is extremely tight and consider reinforcing it by wrapping the excess bag material around it several times. You can also place the bag inside another bag for added protection. When handling bags with liquids, be careful not to puncture or tear the bag.


Leave a Comment