
Angled Luffa Growing Tips: Ever dreamt of strolling through your backyard, plucking a fresh, homegrown luffa sponge, ready to exfoliate your skin or scrub your dishes? It sounds like a dream, right? Well, it doesn’t have to be! Growing your own angled luffa is not only incredibly rewarding but also surprisingly achievable, even if you don’t have a sprawling garden. This DIY guide is packed with insider secrets and simple hacks to help you cultivate these fascinating gourds right at home.
The luffa, also known as the sponge gourd, has a rich history, dating back centuries in Asian and African cultures. Traditionally, it wasn’t just a bath accessory; it was a versatile tool used for everything from filtering water to crafting sandals! Today, with growing concerns about sustainability and reducing plastic waste, the angled luffa is making a serious comeback.
Why should you try these Angled Luffa Growing Tips? Because store-bought sponges are often made of synthetic materials that contribute to pollution. Growing your own is an eco-friendly alternative that’s gentle on the environment and your wallet. Plus, there’s nothing quite like the satisfaction of nurturing a plant from seed to sponge. So, let’s dive in and unlock the secrets to a bountiful luffa harvest!
Growing Angled Luffa: A DIY Guide to Bountiful Harvests
Hey there, fellow gardening enthusiasts! I’m so excited to share my experience and tips on growing angled luffa (also known as Chinese okra or ridged gourd). It’s a rewarding plant to cultivate, providing you with delicious vegetables and, later, natural sponges! This guide will walk you through every step, from seed to sponge.
Choosing the Right Variety and Starting Seeds
Before we dive into the nitty-gritty, let’s talk about choosing the right angled luffa variety. There are a few different types, varying in size and ridge prominence. I personally prefer the varieties that produce longer, more pronounced ridges, as they tend to be more flavorful when young and make better sponges when mature.
Here’s how I start my angled luffa seeds:
1. Soaking the Seeds: Angled luffa seeds have a tough outer shell, so soaking them helps speed up germination. I usually soak them in warm water for 24-48 hours. You’ll notice they swell up a bit – that’s a good sign!
2. Preparing the Seed Starting Mix: I use a well-draining seed starting mix. You can buy a pre-made mix or create your own by combining equal parts peat moss, perlite, and vermiculite.
3. Planting the Seeds: Fill your seed starting trays or small pots with the mix. Make a small hole, about ½ inch deep, in the center of each pot. Place one seed in each hole and gently cover it with the mix.
4. Watering and Providing Warmth: Water the soil gently until it’s moist but not soggy. Angled luffa seeds need warmth to germinate, ideally between 70-85°F (21-29°C). I use a heat mat under my seed starting trays to maintain a consistent temperature.
5. Patience is Key: Germination can take anywhere from 7-21 days, depending on the temperature and seed quality. Keep the soil consistently moist and be patient! Once the seedlings emerge, provide them with plenty of light.
Preparing the Garden Bed and Transplanting Seedlings
Angled luffa vines are vigorous growers, so they need plenty of space and support. Here’s how I prepare my garden bed:
1. Choosing the Right Location: Select a sunny location with well-draining soil. Angled luffa needs at least 6-8 hours of direct sunlight per day.
2. Soil Preparation: Amend the soil with plenty of compost or well-rotted manure. Angled luffa is a heavy feeder, so rich soil is essential. I also like to add a slow-release fertilizer to the soil at planting time.
3. Building a Strong Trellis: Angled luffa vines can grow up to 30 feet long, so they need a sturdy trellis to climb on. I’ve used various trellises, including cattle panels, wooden structures, and even sturdy fences. Make sure your trellis is strong enough to support the weight of the mature vines and fruits.
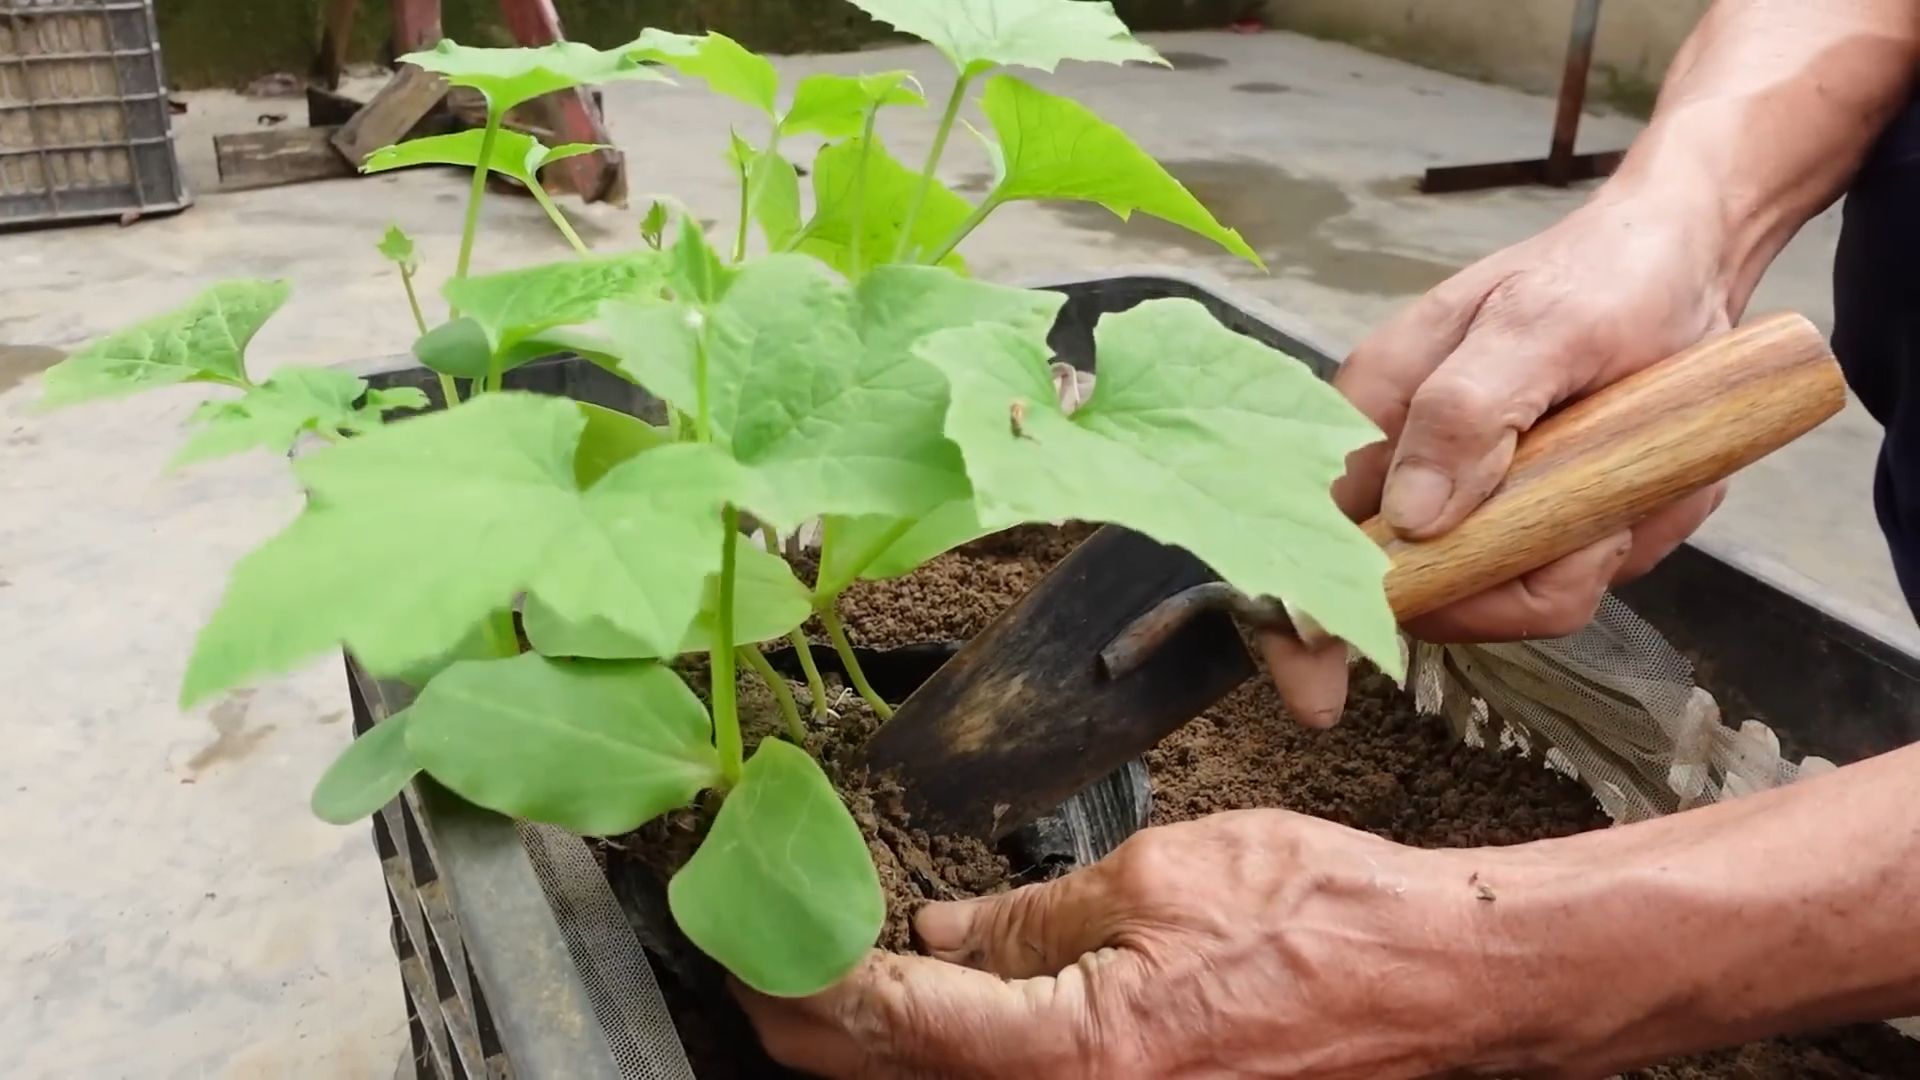
4. Hardening Off the Seedlings: Before transplanting your seedlings outdoors, you need to harden them off. This process gradually acclimates them to outdoor conditions. Start by placing the seedlings outdoors in a sheltered location for a few hours each day, gradually increasing the amount of time they spend outside over a week or two.
5. Transplanting: Once the seedlings are hardened off and the weather is warm (soil temperature above 60°F or 15°C), it’s time to transplant them into the garden. Space the seedlings about 2-3 feet apart along the trellis. Dig a hole slightly larger than the root ball, gently remove the seedling from its pot, and place it in the hole. Backfill with soil and water thoroughly.
Caring for Your Angled Luffa Vines
Now that your angled luffa vines are in the ground, it’s time to provide them with the care they need to thrive.
1. Watering: Angled luffa needs consistent watering, especially during hot, dry weather. Water deeply and regularly, ensuring the soil stays moist but not waterlogged. I use a soaker hose to deliver water directly to the roots.
2. Fertilizing: As mentioned earlier, angled luffa is a heavy feeder. I fertilize my vines every 2-3 weeks with a balanced liquid fertilizer. You can also side-dress the plants with compost or manure.
3. Pruning: Pruning can help improve air circulation and encourage fruit production. I usually prune away any yellowing or diseased leaves. You can also prune the tips of the vines to encourage branching.
4. Pollination: Angled luffa produces separate male and female flowers. The female flowers have a small luffa fruit behind them. If you’re not seeing many fruits developing, you may need to hand-pollinate the flowers. To do this, use a small paintbrush to transfer pollen from the male flowers to the female flowers. The best time to hand-pollinate is in the morning.
5. Pest and Disease Control: Angled luffa is generally pest-resistant, but it can be susceptible to certain pests and diseases, such as squash bugs, aphids, and powdery mildew. I regularly inspect my vines for any signs of problems and take action promptly. For squash bugs, I hand-pick them off the plants. For aphids, I use a strong stream of water or insecticidal soap. For powdery mildew, I use a fungicide.
Harvesting and Using Angled Luffa
The best part of growing angled luffa is harvesting and using the fruits!
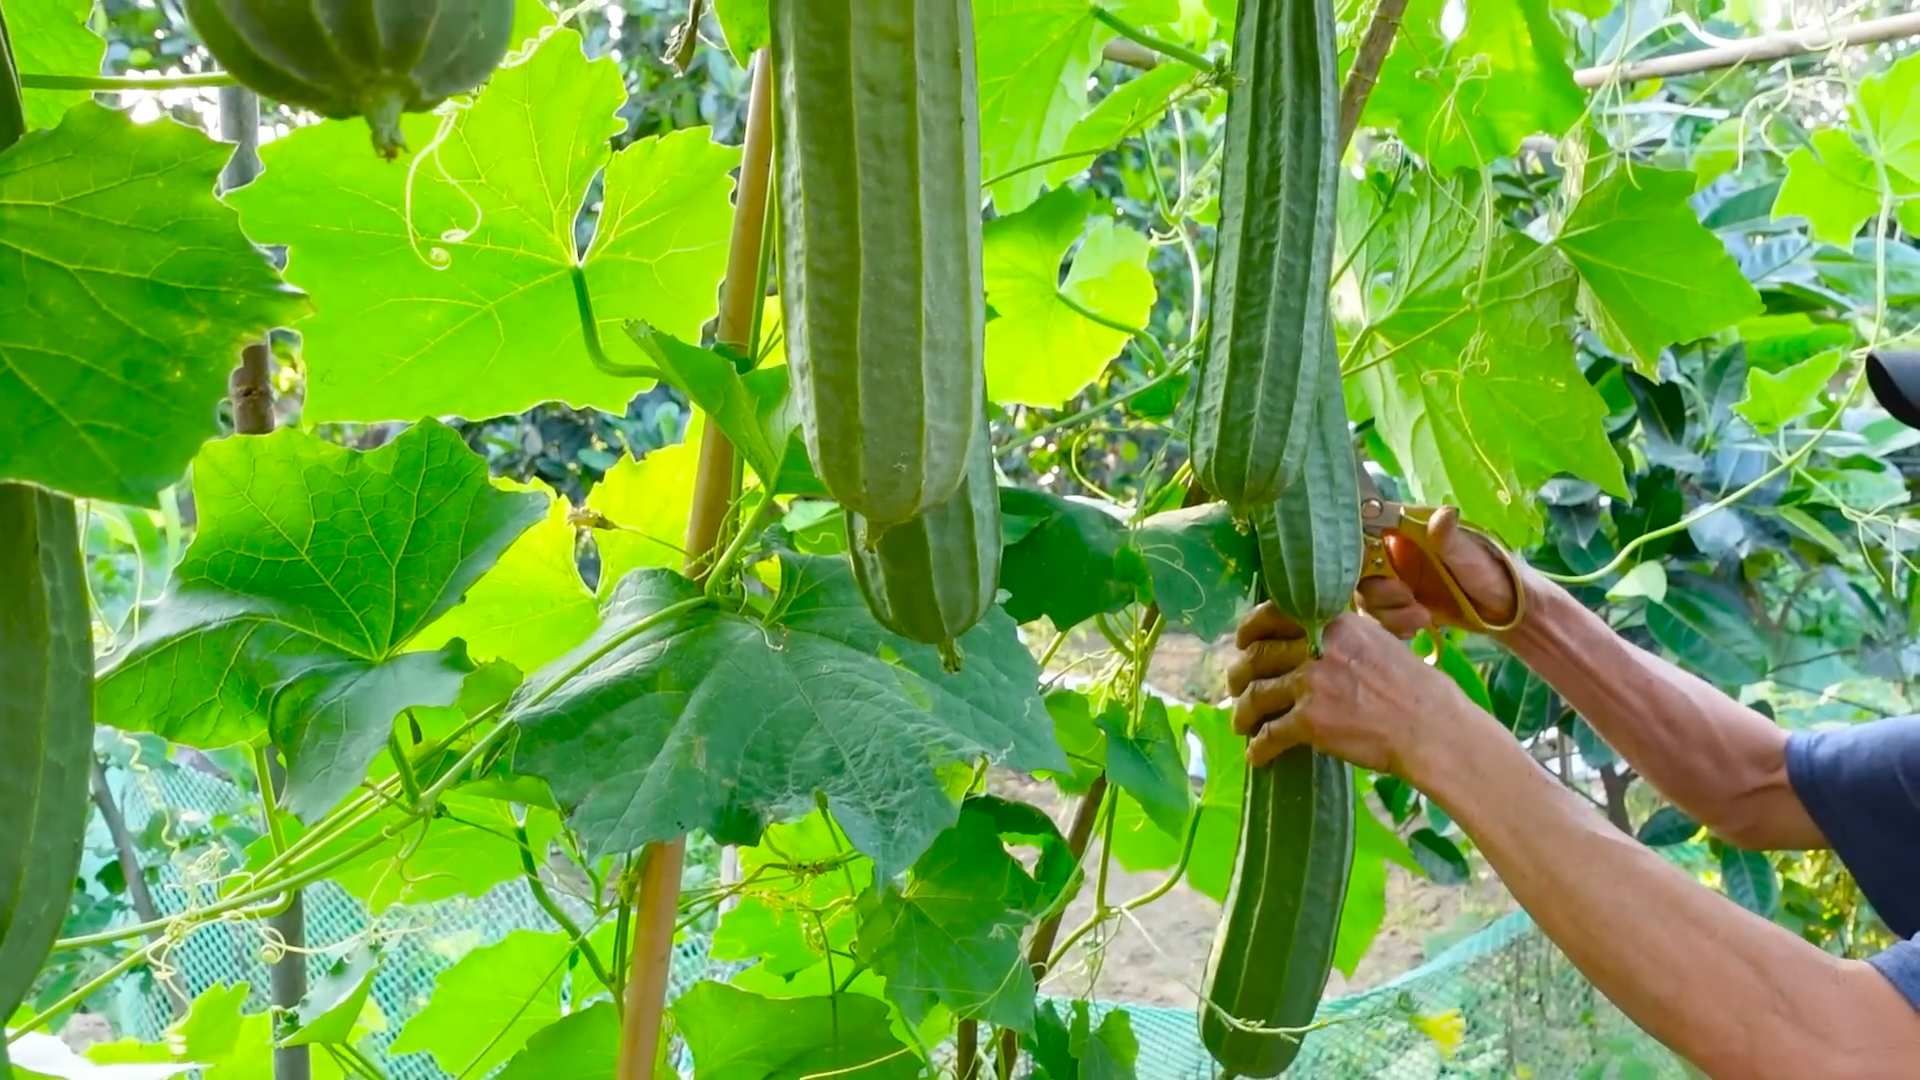
1. Harvesting for Eating: Angled luffa is best eaten when it’s young and tender, about 6-8 inches long. The skin should be smooth and the flesh firm. You can harvest the fruits by cutting them from the vine with a sharp knife.
2. Cooking with Angled Luffa: Angled luffa has a mild, slightly sweet flavor. It can be used in a variety of dishes, such as stir-fries, soups, and stews. I love to sauté it with garlic and ginger.
3. Harvesting for Sponges: To harvest angled luffa for sponges, you need to let the fruits mature on the vine until they turn yellow or brown and the skin becomes dry and brittle. This can take several months.
4. Processing Luffa into Sponges: Once the luffa is mature, cut it from the vine. Here’s how I process them into sponges:
* Peeling the Skin: Crack the dry skin and peel it away from the fibrous interior. This can be a bit messy, so I usually do it outdoors.
* Removing the Seeds: Shake out the seeds. You can save them for planting next year!
* Washing the Luffa: Rinse the luffa thoroughly with water to remove any remaining pulp or debris.
* Bleaching (Optional): If you want a whiter sponge, you can soak it in a diluted bleach solution for a few minutes. Be sure to rinse it thoroughly afterward. I personally prefer to skip this step for a more natural sponge.
* Drying the Luffa: Hang the luffa in a well-ventilated area to dry completely. This can take several days.
* Cutting and Shaping: Once the luffa is dry, you can cut it into smaller pieces and shape it as desired. I like to cut mine into rectangular sponges for use in the kitchen and bathroom.
Troubleshooting Common Problems
Even with the best care, you may encounter some problems while growing angled luffa. Here are a few common issues and how to address them:
* Poor Germination: If your seeds aren’t germinating, make sure they’re getting enough warmth and moisture. You can also try scarifying the seeds by gently rubbing them with sandpaper before soaking them.
* Lack of Fruit Production: If your vines are growing well but not producing fruit, it could be due to poor pollination. Try hand-pollinating the flowers.
* Yellowing Leaves: Yellowing leaves can be a sign of nutrient deficiency or overwatering. Check the soil moisture and fertilize the plants if necessary.
* Pest Infestations: Regularly inspect your vines for pests and take action promptly.
* Disease Problems: Provide good air circulation and avoid overhead watering to prevent disease problems.
Final Thoughts
Growing angled luffa is a rewarding experience that provides you with delicious vegetables and natural sponges. With a little care and attention, you can enjoy a bountiful harvest. Don’t be afraid to experiment and try different techniques to find what works best for you. Happy gardening!
Conclusion
So, there you have it! Mastering the art of growing angled luffa isn’t just about planting a seed and hoping for the best. It’s about understanding the plant’s needs, providing the right support, and employing a few clever DIY tricks to maximize your harvest. This guide has armed you with the knowledge to transform your garden into a luffa haven, yielding an abundance of these versatile gourds.
Why is this DIY approach a must-try? Because it empowers you to take control of your angled luffa cultivation. Forget relying solely on commercial fertilizers or generic growing advice. By understanding the specific needs of your plants and tailoring your approach accordingly, you’ll see a significant difference in the size, quality, and overall yield of your luffas. Plus, there’s immense satisfaction in knowing you nurtured these amazing sponges from seed to shower!
But don’t stop there! Experiment with variations to find what works best for your specific climate and soil conditions. Consider these ideas:
* Vertical Growing Structures: While we’ve emphasized sturdy trellises, explore other vertical options like arches or even repurposing old ladders. The key is to provide ample support for the heavy gourds.
* Companion Planting: Research companion plants that can deter pests or improve soil health around your angled luffa vines. Marigolds, basil, and nasturtiums are often beneficial companions in the garden.
* Seed Saving: Once you’ve grown a successful crop, save seeds from your best luffas for future planting. This allows you to develop a strain that’s perfectly adapted to your local environment.
* Different Varieties: Explore different varieties of angled luffa. Some may be more disease-resistant or have a different texture that you prefer.
Ultimately, growing angled luffa is a journey of discovery. Embrace the process, learn from your mistakes, and celebrate your successes. We’re confident that with these DIY growing tips, you’ll be well on your way to harvesting a bountiful crop of these amazing natural sponges.
Now, it’s your turn! We encourage you to put these tips into practice and share your experiences with us. Did you try a particular variation that worked wonders? Did you encounter any challenges along the way? Your insights can help other gardeners succeed in their angled luffa growing endeavors. Share your photos, stories, and questions in the comments below. Let’s build a community of passionate luffa growers! Happy gardening!
Frequently Asked Questions (FAQ)
What is the best time to plant angled luffa seeds?
The ideal time to plant angled luffa seeds is in late spring or early summer, after the last frost has passed and the soil has warmed up to at least 70°F (21°C). Angled luffa requires a long growing season, typically 150-200 days, so starting them indoors 4-6 weeks before the last frost can give them a head start. If you live in a region with a shorter growing season, starting them indoors is highly recommended. Ensure the seedlings receive plenty of sunlight or use grow lights to prevent them from becoming leggy.
How much sunlight does angled luffa need?
Angled luffa thrives in full sunlight, requiring at least 6-8 hours of direct sunlight per day. Insufficient sunlight can lead to stunted growth, reduced flowering, and smaller, less developed luffas. Choose a planting location that receives ample sunlight throughout the day. If you’re growing them indoors initially, ensure they are placed near a sunny window or under grow lights.
What type of soil is best for growing angled luffa?
Angled luffa prefers well-drained, fertile soil that is rich in organic matter. The soil pH should be slightly acidic to neutral, ideally between 6.0 and 7.0. Before planting, amend the soil with compost, well-rotted manure, or other organic materials to improve drainage, fertility, and water retention. Avoid heavy clay soils, as they can become waterlogged and hinder root growth. If you have clay soil, consider growing angled luffa in raised beds or containers with a well-draining potting mix.
How often should I water angled luffa plants?
Angled luffa plants require consistent moisture,
So, there you have it! Mastering the art of growing angled luffa isn’t just about planting a seed and hoping for the best. It’s about understanding the plant’s needs, providing the right support, and employing a few clever DIY tricks to maximize your harvest. This guide has armed you with the knowledge to transform your garden into a luffa haven, yielding an abundance of these versatile gourds.
Why is this DIY approach a must-try? Because it empowers you to take control of your angled luffa cultivation. Forget relying solely on commercial fertilizers or generic growing advice. By understanding the specific needs of your plants and tailoring your approach accordingly, you’ll see a significant difference in the size, quality, and overall yield of your luffas. Plus, there’s immense satisfaction in knowing you nurtured these amazing sponges from seed to shower!
But don’t stop there! Experiment with variations to find what works best for your specific climate and soil conditions. Consider these ideas:
* Vertical Growing Structures: While we’ve emphasized sturdy trellises, explore other vertical options like arches or even repurposing old ladders. The key is to provide ample support for the heavy gourds.
* Companion Planting: Research companion plants that can deter pests or improve soil health around your angled luffa vines. Marigolds, basil, and nasturtiums are often beneficial companions in the garden.
* Seed Saving: Once you’ve grown a successful crop, save seeds from your best luffas for future planting. This allows you to develop a strain that’s perfectly adapted to your local environment.
* Different Varieties: Explore different varieties of angled luffa. Some may be more disease-resistant or have a different texture that you prefer.
Ultimately, growing angled luffa is a journey of discovery. Embrace the process, learn from your mistakes, and celebrate your successes. We’re confident that with these DIY growing tips, you’ll be well on your way to harvesting a bountiful crop of these amazing natural sponges.
Now, it’s your turn! We encourage you to put these tips into practice and share your experiences with us. Did you try a particular variation that worked wonders? Did you encounter any challenges along the way? Your insights can help other gardeners succeed in their angled luffa growing endeavors. Share your photos, stories, and questions in the comments below. Let’s build a community of passionate luffa growers! Happy gardening!
Frequently Asked Questions (FAQ)
What is the best time to plant angled luffa seeds?
The ideal time to plant angled luffa seeds is in late spring or early summer, after the last frost has passed and the soil has warmed up to at least 70°F (21°C). Angled luffa requires a long growing season, typically 150-200 days, so starting them indoors 4-6 weeks before the last frost can give them a head start. If you live in a region with a shorter growing season, starting them indoors is highly recommended. Ensure the seedlings receive plenty of sunlight or use grow lights to prevent them from becoming leggy.
How much sunlight does angled luffa need?
Angled luffa thrives in full sunlight, requiring at least 6-8 hours of direct sunlight per day. Insufficient sunlight can lead to stunted growth, reduced flowering, and smaller, less developed luffas. Choose a planting location that receives ample sunlight throughout the day. If you’re growing them indoors initially, ensure they are placed near a sunny window or under grow lights.
What type of soil is best for growing angled luffa?
Angled luffa prefers well-drained, fertile soil that is rich in organic matter. The soil pH should be slightly acidic to neutral, ideally between 6.0 and 7.0. Before planting, amend the soil with compost, well-rotted manure, or other organic materials to improve drainage, fertility, and water retention. Avoid heavy clay soils, as they can become waterlogged and hinder root growth. If you have clay soil, consider growing angled luffa in raised beds or containers with a well-draining potting mix.
How often should I water angled luffa plants?
Angled luffa plants require consistent moisture, especially during hot, dry weather. Water deeply and regularly, ensuring the soil remains consistently moist but not waterlogged. The frequency of watering will depend on the weather conditions, soil type, and the size of the plants. As a general rule, water when the top inch of soil feels dry to the touch. Avoid overhead watering, as it can increase the risk of fungal diseases. Instead, water at the base of the plants or use a soaker hose.
What kind of fertilizer should I use for angled luffa?
Angled luffa plants are heavy feeders and benefit from regular fertilization. Use a balanced fertilizer with equal amounts of nitrogen, phosphorus, and potassium (e.g., 10-10-10) during the early stages of growth to promote healthy foliage and root development. Once the plants start flowering and fruiting, switch to a fertilizer that is higher in phosphorus and potassium (e.g., 5-10-10) to encourage fruit production. Apply fertilizer according to the manufacturer’s instructions, and avoid over-fertilizing, as it can lead to excessive foliage growth at the expense of fruit production. Organic fertilizers, such as compost tea or fish emulsion, can also be used to provide essential nutrients.
How do I prevent pests and diseases from affecting my angled luffa plants?
Angled luffa plants can be susceptible to various pests and diseases, including aphids, squash bugs, vine borers, powdery mildew, and fungal leaf spots. To prevent these problems, practice good garden hygiene, such as removing weeds and debris around the plants. Inspect your plants regularly for signs of pests or diseases, and take action promptly if you notice any problems. Use organic pest control methods, such as insecticidal soap or neem oil, to control aphids and other pests. To prevent fungal diseases, ensure good air circulation around the plants, avoid overhead watering, and apply a fungicide if necessary. Crop rotation can also help to prevent soilborne diseases.
How do I know when angled luffa is ready to harvest?
The timing of harvest depends on how you intend to use the angled luffa. For edible luffa, harvest the gourds when they are young and tender, typically when they are about 6-8 inches long. The skin should be smooth and easily pierced with a fingernail. For luffa sponges, allow the gourds to mature fully on the vine until the skin turns brown and dry. The gourd should feel lightweight and the seeds should rattle inside.
How do I process angled luffa into a sponge?
To process angled luffa into a sponge, first harvest the mature gourds. Soak the gourds in water for several days to soften the skin. Once the skin is soft, peel it off to reveal the fibrous interior. Remove the seeds and rinse the sponge thoroughly to remove any remaining pulp. Allow the sponge to dry completely in the sun. Once dry, you can cut the sponge into smaller pieces or use it whole.
Can I eat angled luffa?
Yes, young angled luffa gourds are edible and can be used in a variety of dishes. They have a mild, slightly sweet flavor and a tender texture. They can be stir-fried, steamed, added to soups and stews, or even eaten raw in salads. Choose young, tender gourds with smooth skin for the best flavor and texture.
What are some creative uses for angled luffa sponges?
Angled luffa sponges are incredibly versatile and can be used for a variety of purposes beyond bathing. They can be used for exfoliating skin, scrubbing dishes, cleaning surfaces, and even as a natural filter in aquariums. They can also be used in craft projects, such as making soaps, bath bombs, and decorative items. The possibilities are endless!
Leave a Comment