
Bottle Cabbage Planting: Ever dreamt of harvesting your own crisp, delicious cabbage right from your backyard, but thought you didn’t have the space? Or maybe you’re tired of battling pests and diseases that seem to plague traditional cabbage patches? Well, get ready to ditch those gardening woes because I’m about to share a game-changing DIY trick that will revolutionize your cabbage growing experience!
For centuries, cabbage has been a staple in diets around the world, from the hearty stews of Eastern Europe to the vibrant slaws of North America. Its versatility and nutritional value have made it a beloved vegetable across cultures. But let’s face it, growing cabbage can sometimes feel like a Herculean task. That’s where bottle cabbage planting comes in – a clever and surprisingly effective method that’s gaining popularity among urban gardeners and seasoned pros alike.
This isn’t just another gardening fad; it’s a practical solution to common cabbage-growing challenges. By utilizing recycled plastic bottles, we can create mini-greenhouses that protect our precious seedlings from harsh weather, hungry critters, and soil-borne diseases. Plus, it’s a fantastic way to upcycle and reduce waste! In this article, I’ll guide you step-by-step through the process of bottle cabbage planting, sharing all the tips and tricks I’ve learned along the way. Get ready to unlock a bountiful harvest, even in the smallest of spaces!
DIY Bottle Gardening: Grow Cabbage in Recycled Plastic
Hey there, fellow gardening enthusiasts! Ever thought about turning those empty plastic bottles into mini cabbage patches? It’s a fantastic way to recycle, save space, and enjoy fresh, homegrown cabbage right from your balcony or windowsill. I’m going to walk you through the whole process, step-by-step, so you can create your own bottle garden and cultivate some delicious cabbage. Let’s get started!
What You’ll Need
Before we dive in, let’s gather all the necessary materials. This will make the process smoother and more enjoyable.
* Plastic Bottles: The size depends on the variety of cabbage you want to grow. Larger bottles (2-liter soda bottles or even gallon-sized water jugs) are ideal for larger cabbage varieties, while smaller bottles can work for dwarf or ornamental cabbages. Make sure they are clean and free of any residue.
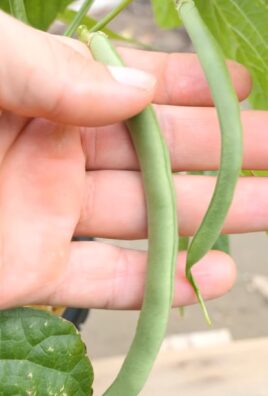
* Cabbage Seeds or Seedlings: Choose a variety that suits your climate and space. Consider factors like size, maturity time, and disease resistance. I personally love growing ‘Golden Acre’ for its compact size and quick harvest.
* Potting Mix: A good quality potting mix is crucial for healthy cabbage growth. It should be well-draining and rich in nutrients. You can also amend it with compost or other organic matter.
* Scissors or Utility Knife: For cutting the plastic bottles. Be careful!
* Drill or Nail: To create drainage holes in the bottom of the bottles.
* Watering Can or Spray Bottle: For watering your cabbage plants.
* Optional:
* Gloves: To protect your hands.
* Labels: To identify the cabbage variety and planting date.
* Fertilizer: A balanced liquid fertilizer to supplement nutrients.
* Small Rocks or Gravel: To improve drainage at the bottom of the bottles.
Preparing the Bottles
This is where we transform those discarded bottles into potential cabbage homes.
1. Clean the Bottles: Thoroughly wash the plastic bottles with soap and water to remove any dirt, debris, or sugary residue. Rinse them well and let them dry completely. This is important to prevent mold or other issues later on.
2. Cut the Bottles: There are a couple of ways you can cut the bottles, depending on the size and shape you want for your container.
* Option 1 (Horizontal Cut): For a wider, shallower container, cut the bottle horizontally about one-third of the way down from the top. This is great for smaller cabbage varieties or if you want to create a hanging planter.
* Option 2 (Vertical Cut): For a taller, deeper container, cut the bottle vertically down the middle. This is better suited for larger cabbage varieties that need more root space. You can then use both halves of the bottle as separate containers.
Safety First! Be extremely careful when using scissors or a utility knife. Always cut away from yourself and use a stable surface.
3. Create Drainage Holes: Drainage is essential to prevent waterlogging and root rot. Use a drill or a nail to create several drainage holes in the bottom of each bottle. I usually make about 4-5 holes, depending on the size of the bottle.
4. Optional: Add Gravel: To further improve drainage, you can add a layer of small rocks or gravel to the bottom of each bottle before adding the potting mix. This will help prevent the soil from becoming waterlogged.
Planting the Cabbage
Now for the fun part – planting your cabbage!
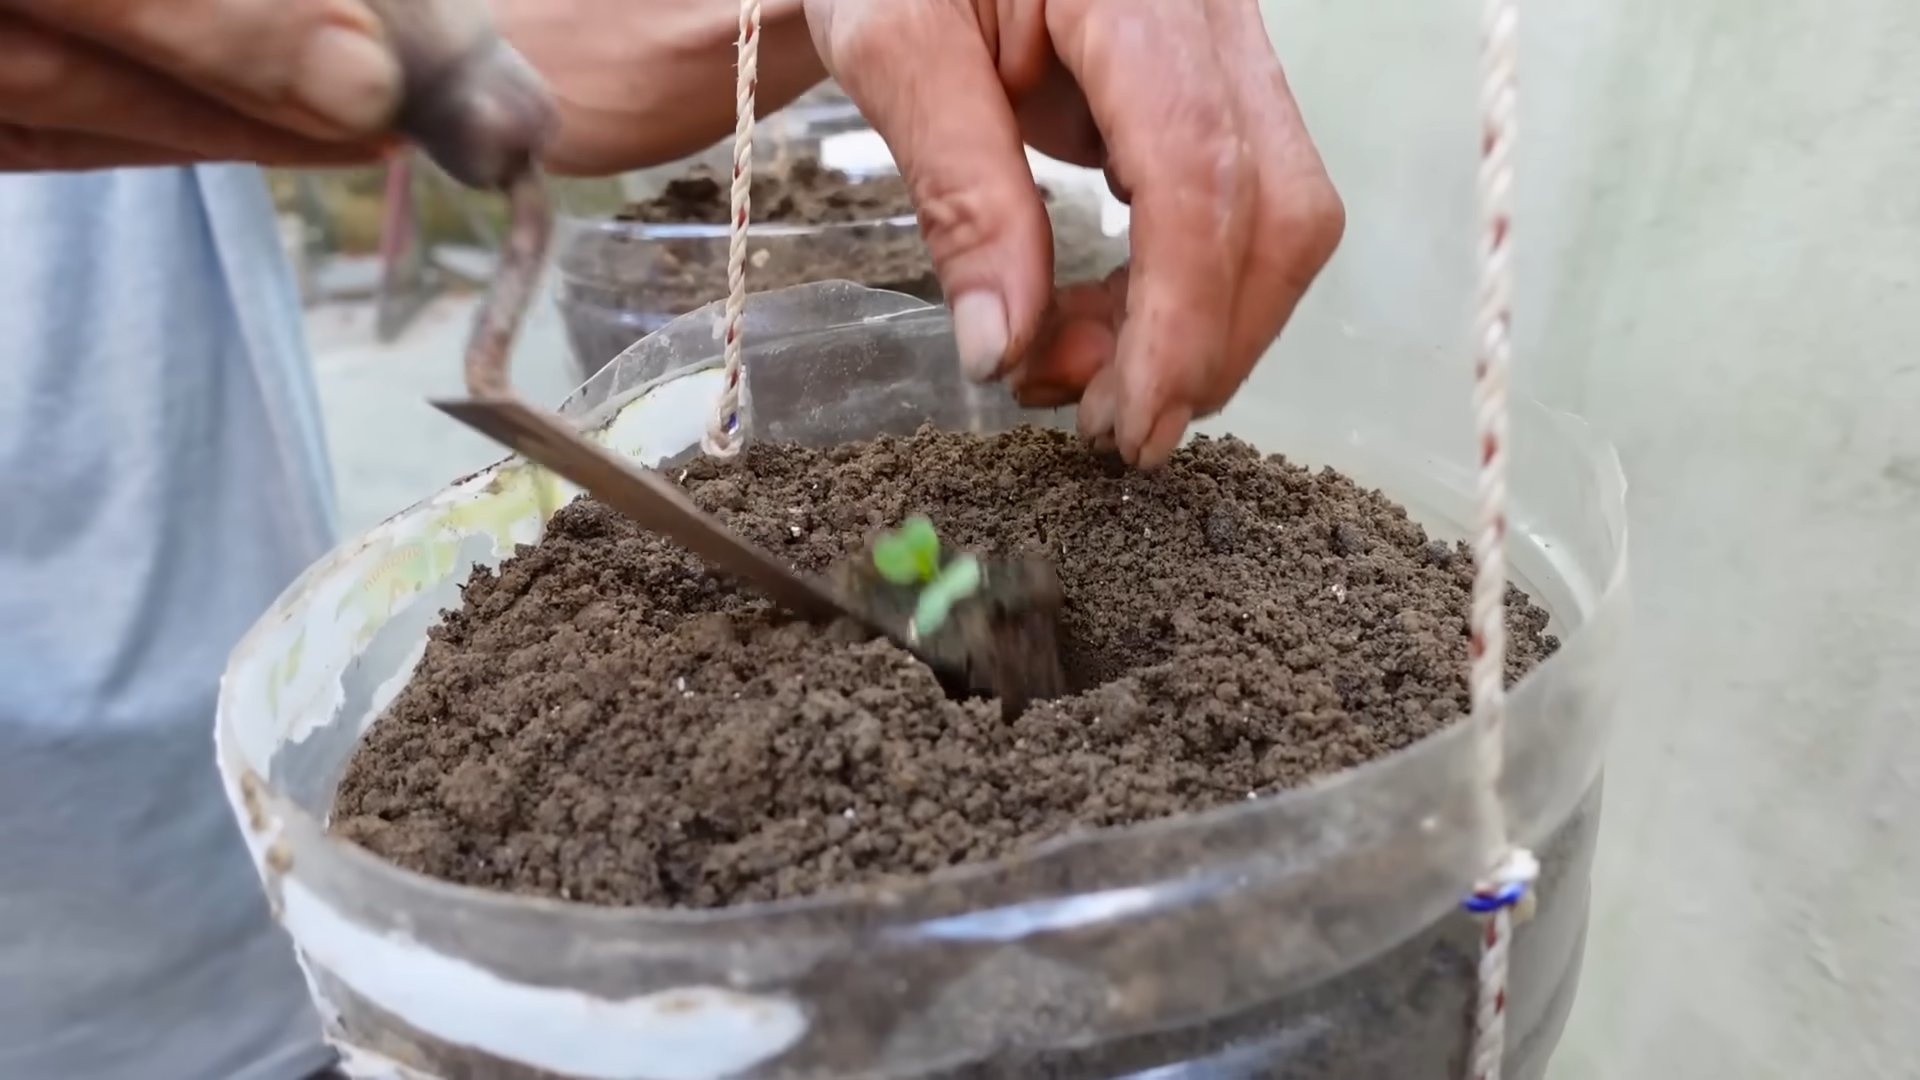
1. Fill the Bottles with Potting Mix: Fill each bottle with a good quality potting mix, leaving about an inch of space at the top. Gently tap the bottle to settle the soil and remove any air pockets.
2. Sowing Seeds (If Starting from Seed): If you’re starting from seed, sow 2-3 seeds per bottle, about half an inch deep. Cover the seeds with soil and gently water them. Keep the soil moist but not soggy until the seeds germinate.
3. Transplanting Seedlings (If Using Seedlings): If you’re using seedlings, carefully remove them from their containers and gently loosen the roots. Dig a small hole in the potting mix and place the seedling in the hole, making sure the top of the root ball is level with the soil surface. Gently backfill the hole with soil and water thoroughly.
4. Label Your Plants: Use labels to identify the cabbage variety and planting date. This will help you keep track of your plants and monitor their growth.
Caring for Your Cabbage Plants
Proper care is essential for healthy cabbage growth and a bountiful harvest.
1. Watering: Water your cabbage plants regularly, keeping the soil consistently moist but not soggy. Water deeply whenever the top inch of soil feels dry to the touch. Avoid overwatering, as this can lead to root rot. I usually water every 2-3 days, depending on the weather.
2. Sunlight: Cabbage plants need at least 6 hours of sunlight per day. Place your bottle garden in a sunny location, such as a balcony, windowsill, or patio. If you don’t have enough natural sunlight, you can supplement with grow lights.
3. Fertilizing: Cabbage plants are heavy feeders and benefit from regular fertilization. Use a balanced liquid fertilizer every 2-3 weeks, following the instructions on the label. You can also amend the soil with compost or other organic matter to provide additional nutrients.
4. Pest and Disease Control: Keep an eye out for pests and diseases, such as aphids, cabbage worms, and clubroot. Inspect your plants regularly and take action promptly if you notice any problems. You can use organic pest control methods, such as insecticidal soap or neem oil, to control pests. Ensure good air circulation to prevent fungal diseases.
5. Support (If Needed): As your cabbage plants grow, they may need support to prevent them from falling over. You can use stakes or trellises to provide support. This is especially important for larger cabbage varieties.
Harvesting Your Cabbage
The moment you’ve been waiting for – harvesting your homegrown cabbage!
1. Harvest Time: Cabbage is typically ready to harvest when the head is firm and compact. The maturity time varies depending on the variety, but it’s usually around 60-100 days from planting.
2. Harvesting Technique: To harvest your cabbage, use a sharp knife to cut the head from the stem, leaving a few outer leaves intact. You can also harvest the outer leaves as needed for salads or cooking.
3. Succession Planting: To extend your harvest, you can plant cabbage seeds or seedlings every few weeks. This is called succession planting and will ensure a continuous supply of fresh cabbage throughout the growing season.
Troubleshooting
Even with the best care, you might encounter some challenges along the way. Here are a few common issues and how to address them:
* Yellowing Leaves: This could be a sign of overwatering, underwatering, or nutrient deficiency. Check the soil moisture and adjust your watering accordingly. Fertilize your plants with a balanced liquid fertilizer.
* Stunted Growth: This could be due to poor soil, lack of sunlight, or pest infestation. Make sure your plants are getting enough sunlight and nutrients. Inspect them for pests and take action if necessary.
* Root Rot: This is caused by overwatering and poor drainage. Make sure your bottles have adequate drainage holes and avoid overwatering.
* Pest Infestation: Common cabbage pests include aphids, cabbage worms, and slugs. Use organic pest control methods to control pests.
Choosing the Right Cabbage Variety
Selecting the right cabbage variety is crucial for success in bottle gardening. Consider these factors:
* Size: Choose a variety that is suitable for the size of your bottles. Dwarf or compact varieties are ideal for smaller bottles, while larger bottles can accommodate larger varieties.
* Maturity Time: Choose a variety that has a maturity time that fits your growing season. Early-maturing varieties are a good choice for short growing seasons.
* Disease Resistance: Choose a variety that is resistant to common cabbage diseases, such as clubroot and black rot.
* Climate: Choose a variety that is well-suited to your climate. Some varieties are more tolerant of heat or cold than others.
Here are a few popular cabbage varieties for bottle gardening:
* Golden Acre: A compact, early-maturing variety that is well-suited for small spaces.
* Dwarf Blue Vates: A dwarf variety with blue-green leaves that is resistant to cold.
* Red Acre: A red cabbage variety that is both ornamental and edible.
* Savoy Cabbage: A variety with crinkled leaves that is known for its mild flavor.
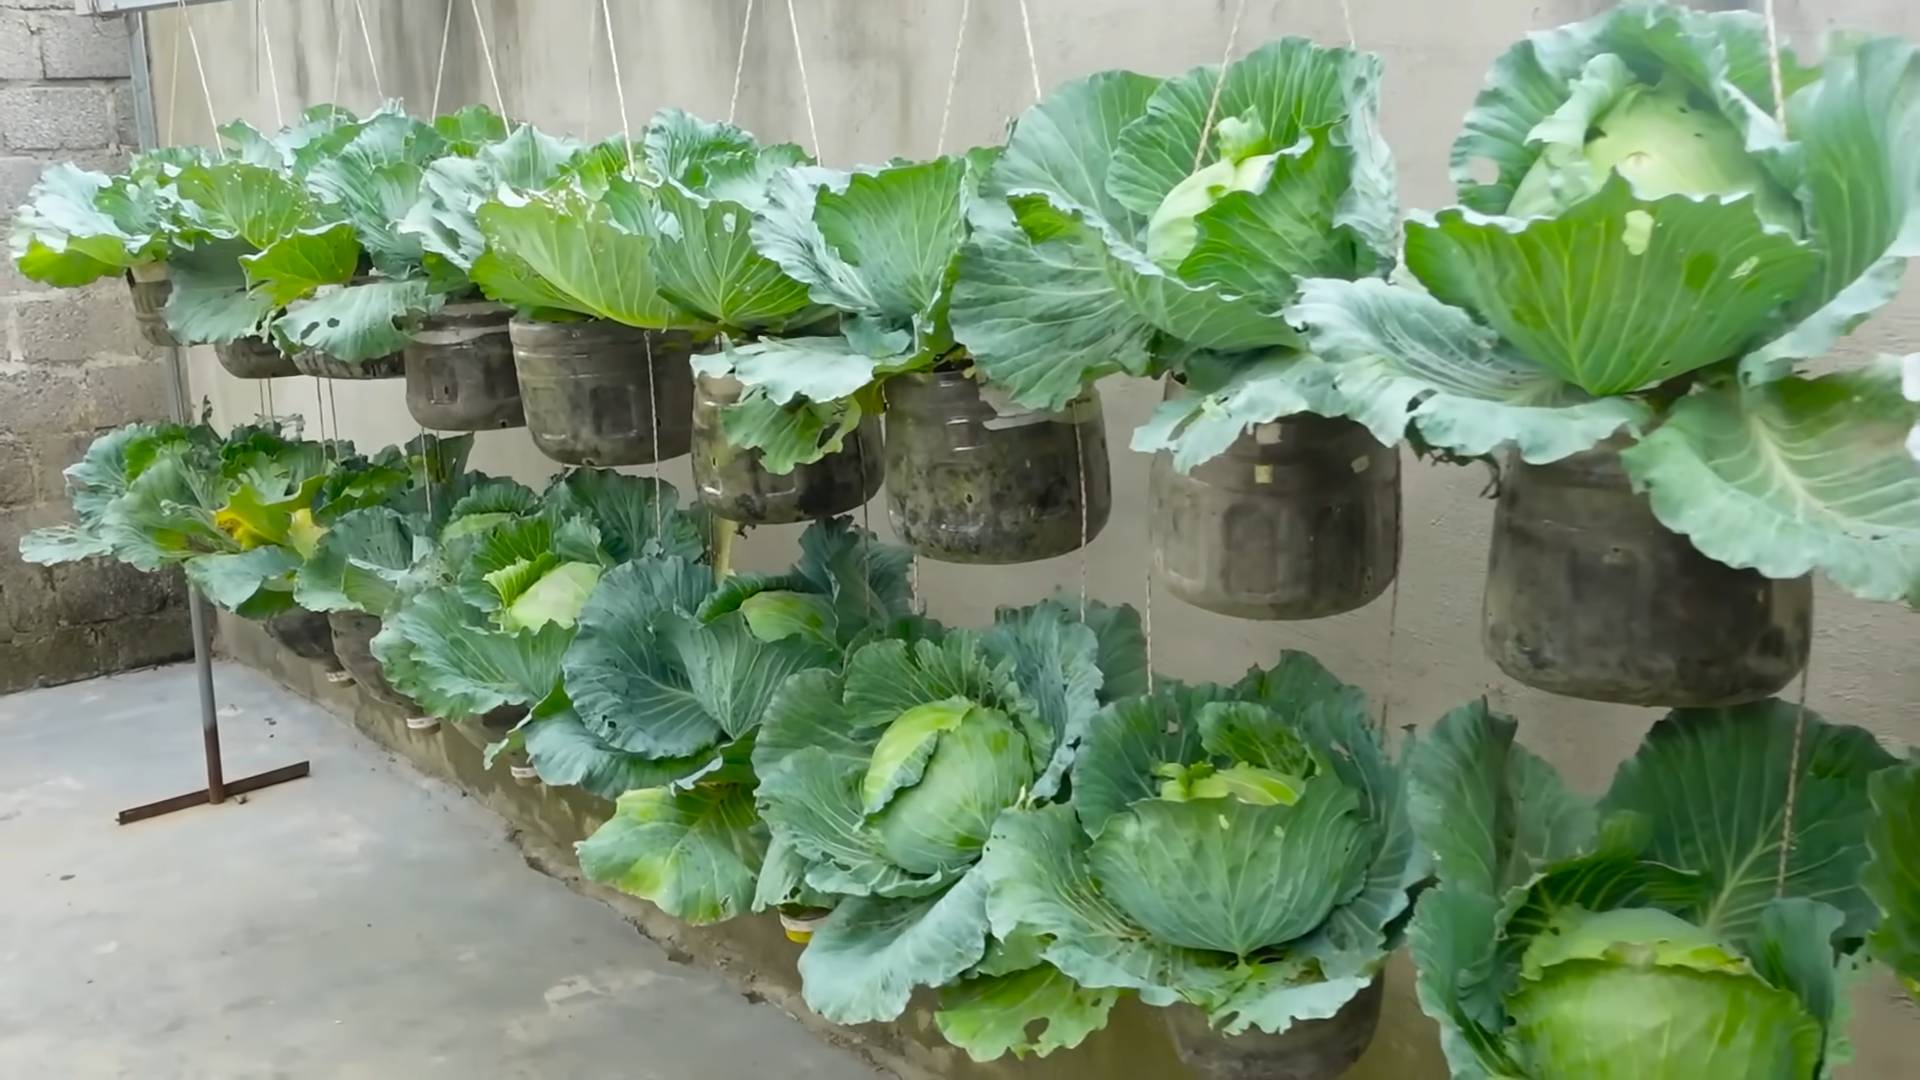
Creative Ideas for Your Bottle Garden
* Hanging Bottle Garden: Create a hanging bottle garden by attaching ropes or wires to the bottles and
Conclusion
So, there you have it! Transforming discarded plastic bottles into miniature cabbage cradles is not just a clever upcycling project; it’s a game-changer for gardeners of all levels. This simple yet effective bottle cabbage planting method offers a multitude of benefits, from protecting delicate seedlings from pests and harsh weather to maximizing space in your garden or balcony. It’s a sustainable solution that reduces waste, saves money, and allows you to enjoy fresh, homegrown cabbage even with limited resources.
Why is this a must-try? Because it’s incredibly accessible. You likely already have the primary ingredient – plastic bottles – readily available. The setup is quick and easy, requiring minimal tools and effort. And the results? Healthier, stronger cabbage seedlings that are better equipped to thrive. Imagine the satisfaction of nurturing your own cabbage patch, knowing that you’ve contributed to a more sustainable lifestyle while enjoying the delicious rewards of your labor.
But don’t stop there! This method is ripe for experimentation. Try using different sizes of bottles to accommodate various cabbage varieties. Consider painting the bottles white to reflect sunlight and prevent overheating, especially in warmer climates. You can also explore different soil mixtures to optimize drainage and nutrient availability. For those with limited space, vertical bottle gardens are an excellent option, creating a stunning and productive green wall. You could even integrate a simple drip irrigation system using smaller bottles to ensure consistent watering.
The beauty of this DIY project lies in its adaptability. It’s a blank canvas for your gardening creativity. Whether you’re a seasoned gardener or just starting out, this bottle cabbage planting technique is a fantastic way to enhance your gardening experience and connect with nature.
We wholeheartedly encourage you to give this method a try. It’s a rewarding project that’s both environmentally friendly and economically sound. And most importantly, it’s fun! Once you’ve experienced the joy of growing your own cabbage in repurposed bottles, we’re confident you’ll be hooked.
Don’t forget to share your experiences with us! We’d love to see your bottle cabbage gardens and hear about any variations or improvements you’ve made. Post pictures and stories on social media using relevant hashtags, or leave a comment below. Let’s build a community of bottle cabbage enthusiasts and inspire others to embrace sustainable gardening practices. Together, we can transform waste into wonder and cultivate a greener future, one bottle cabbage at a time. So, grab those bottles, get your hands dirty, and let the cabbage growing adventure begin!
Frequently Asked Questions (FAQ)
What type of plastic bottles are best for bottle cabbage planting?
Ideally, you should use sturdy, food-grade plastic bottles. Two-liter soda bottles or larger water bottles work well for most cabbage varieties. Avoid using bottles that have contained harsh chemicals or pesticides, as these could contaminate the soil and affect the growth of your cabbage. Thoroughly clean the bottles with soap and water before using them for planting. Clear or translucent bottles are preferable as they allow you to monitor the soil moisture levels.
How do I prepare the plastic bottles for planting?
First, thoroughly clean the bottles inside and out. Then, cut off the top portion of the bottle, leaving enough space for the cabbage seedling and its root system to grow. Make sure to create drainage holes at the bottom of the bottle to prevent waterlogging. You can use a drill, a nail, or even a hot skewer to create these holes. The number of drainage holes will depend on the size of the bottle and the type of soil you’re using. A general rule of thumb is to have at least four to five holes.
What type of soil should I use for bottle cabbage planting?
A well-draining, nutrient-rich soil is essential for healthy cabbage growth. A good potting mix specifically formulated for vegetables is an excellent choice. You can also create your own soil mix by combining equal parts of garden soil, compost, and perlite or vermiculite. The compost will provide essential nutrients, while the perlite or vermiculite will improve drainage and aeration. Avoid using heavy clay soil, as it can become waterlogged and hinder root development.
How often should I water my bottle cabbage plants?
Water your bottle cabbage plants regularly, keeping the soil consistently moist but not waterlogged. The frequency of watering will depend on the weather conditions, the type of soil you’re using, and the size of the bottle. Check the soil moisture level daily by inserting your finger into the soil. If the top inch of soil feels dry, it’s time to water. Water deeply, allowing the water to drain out of the drainage holes. Avoid overhead watering, as this can promote fungal diseases.
How much sunlight do bottle cabbage plants need?
Cabbage plants need at least six hours of direct sunlight per day to thrive. Choose a location that receives ample sunlight throughout the day. If you’re growing your bottle cabbage plants indoors, you may need to supplement with artificial lighting, such as grow lights. Rotate the bottles regularly to ensure that all sides of the plant receive adequate sunlight.
How do I fertilize my bottle cabbage plants?
Cabbage plants are heavy feeders and require regular fertilization to produce healthy heads. Use a balanced fertilizer specifically formulated for vegetables. Follow the instructions on the fertilizer packaging for application rates. You can also use organic fertilizers, such as compost tea or fish emulsion. Fertilize your bottle cabbage plants every two to three weeks during the growing season.
How do I protect my bottle cabbage plants from pests?
Bottle cabbage plants can be susceptible to various pests, such as cabbage worms, aphids, and slugs. Regularly inspect your plants for signs of infestation. You can handpick pests off the plants or use organic pest control methods, such as insecticidal soap or neem oil. Covering the bottles with netting can also help to protect the plants from pests.
Can I grow different varieties of cabbage in bottles?
Yes, you can grow different varieties of cabbage in bottles. Choose varieties that are well-suited to your climate and growing conditions. Smaller cabbage varieties, such as bok choy or napa cabbage, are particularly well-suited for bottle planting. Be sure to provide adequate space for each plant to grow.
How do I transplant my bottle cabbage seedlings into the garden?
When your bottle cabbage seedlings have developed several sets of true leaves and are large enough to handle, you can transplant them into the garden. Choose a cloudy day to minimize transplant shock. Dig a hole that is slightly larger than the bottle, and gently remove the seedling from the bottle, being careful not to damage the roots. Place the seedling in the hole and backfill with soil. Water thoroughly and mulch around the base of the plant to help retain moisture.
What are some creative variations for bottle cabbage planting?
There are many creative ways to adapt the bottle cabbage planting method. You can create vertical bottle gardens by hanging the bottles from a fence or wall. You can also paint the bottles with colorful designs to add visual appeal to your garden. Consider using different types of bottles, such as wine bottles or glass jars, for a unique look. You can even create a self-watering system by connecting multiple bottles together with tubing. The possibilities are endless!
Leave a Comment