
Growing radishes might seem intimidating to new gardeners, but trust me, it’s one of the most rewarding and quickest wins you can achieve! Imagine plucking vibrant, peppery radishes from your own backyard just weeks after planting – that’s the magic we’re unlocking today. For centuries, radishes have been a staple in diets across the globe, from ancient Egypt where they were a common offering to the gods, to modern-day salads and snacks. Their crisp texture and zesty flavor add a delightful kick to any meal.
But why should you bother growing radishes yourself? Well, store-bought radishes often lack the freshness and intense flavor of homegrown ones. Plus, gardening is a fantastic way to connect with nature, relieve stress, and enjoy the satisfaction of nurturing something from seed to harvest. In this beginner’s guide, I’ll share my tried-and-true tips and tricks to ensure you have a bountiful radish harvest, even if you’ve never touched a trowel before. Get ready to discover the joy of fresh, homegrown radishes – it’s easier than you think!
Growing Radishes: A Beginner’s Guide to Crunchy Success
Hey there, fellow gardening enthusiasts! I’m so excited you’re thinking about growing radishes. They’re one of the easiest and fastest vegetables to cultivate, making them perfect for beginners and impatient gardeners like myself. Seriously, you can go from seed to salad in just a few weeks! This guide will walk you through everything you need to know to grow delicious, crisp radishes right in your own backyard (or even in a container!).
Choosing Your Radish Variety
First things first, let’s talk about radish varieties. There’s more to radishes than just the classic red globe! Here are a few popular options:
* **Cherry Belle:** This is your classic, round, bright red radish. It’s quick to mature and has a mild flavor. A great starting point!
* **French Breakfast:** These are elongated, red radishes with a white tip. They have a slightly milder flavor than Cherry Belle and are delicious sliced on buttered bread (trust me!).
* **Icicle:** As the name suggests, these radishes are long, white, and have a slightly spicier flavor.
* **Black Spanish:** For the adventurous gardener! These radishes are large, round, black on the outside, and white on the inside. They have a very strong, pungent flavor and are best used cooked.
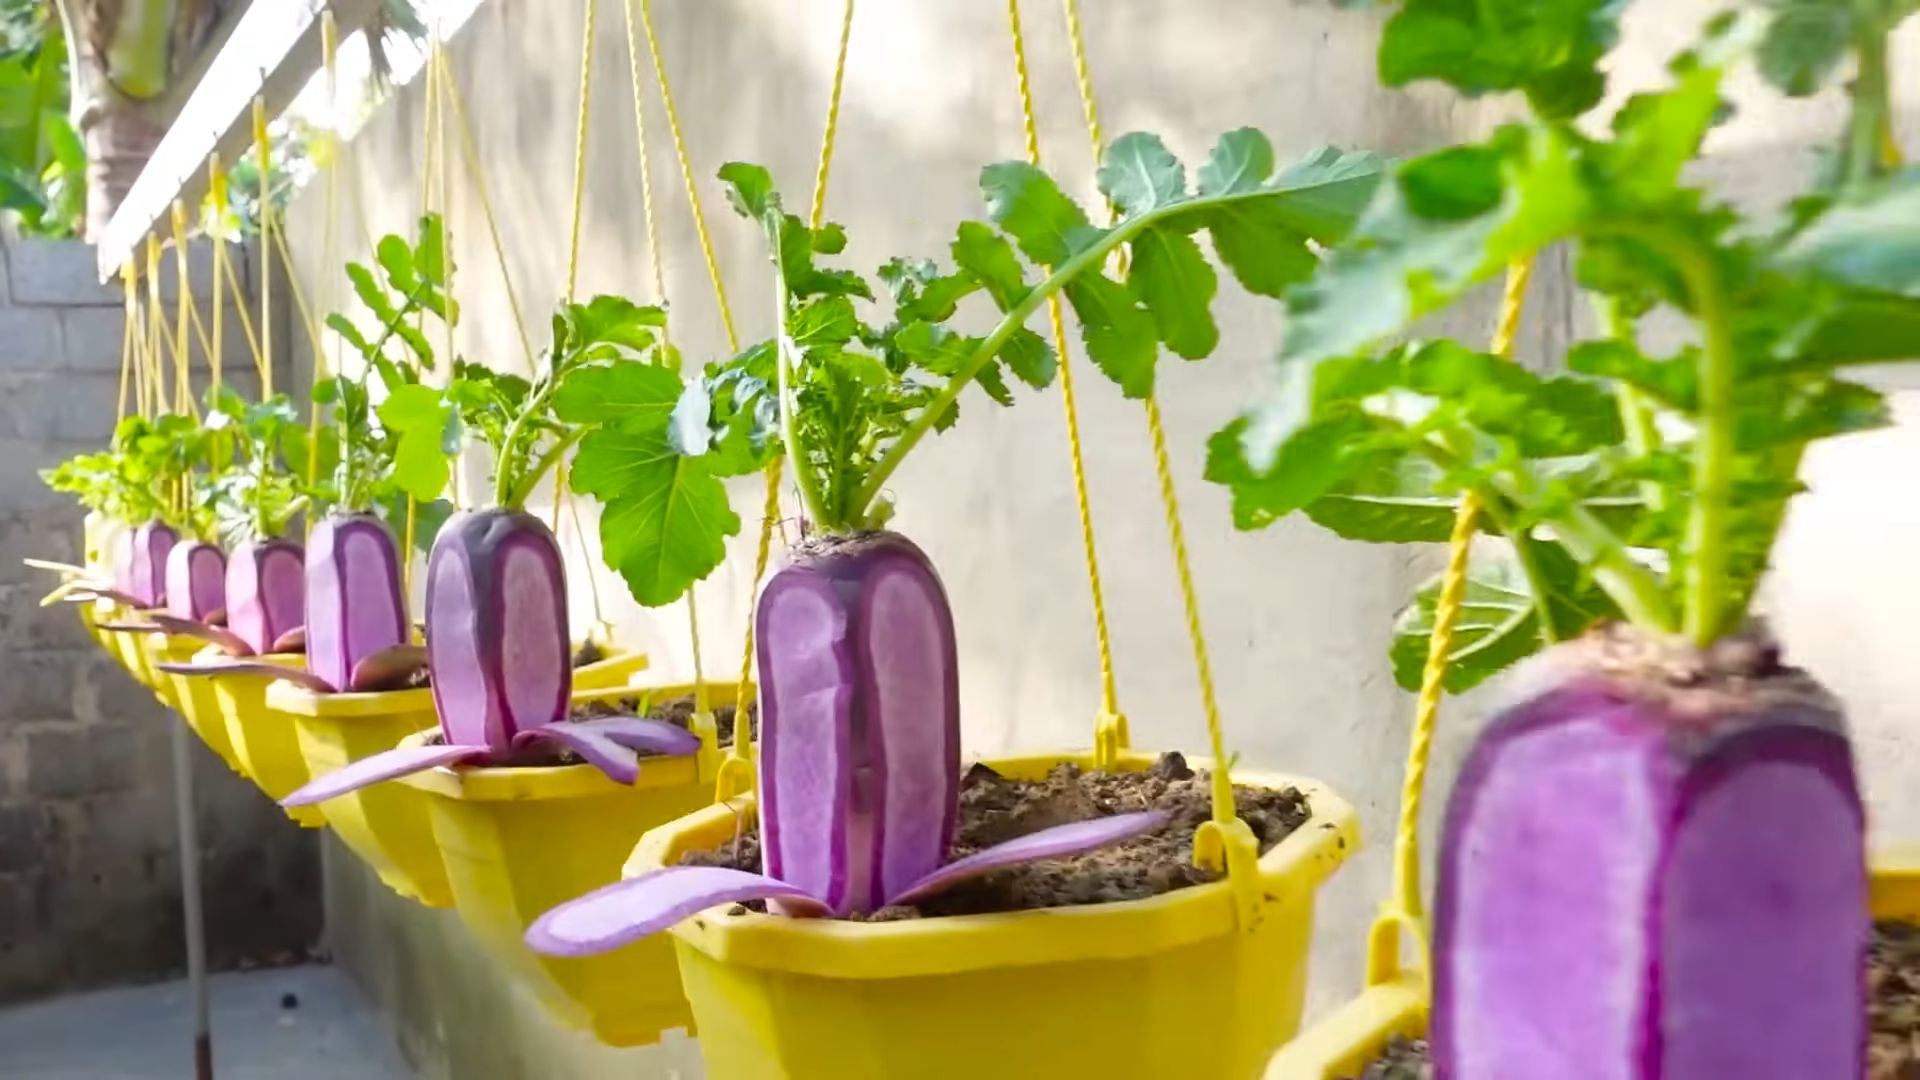
* **Watermelon Radish:** These are stunning! They’re large, round, and have a pale green exterior with a vibrant pink interior, resembling a watermelon. They have a mild, slightly sweet flavor.
I recommend starting with Cherry Belle or French Breakfast if you’re a beginner. They’re reliable and easy to grow.
Preparing Your Planting Area
Radishes are pretty adaptable, but they do have some preferences. Here’s how to get your planting area ready:
* **Sunlight:** Radishes need at least 6 hours of sunlight per day. More is better!
* **Soil:** Well-drained, loose soil is crucial. Radishes need room to expand, and compacted soil will result in small, misshapen roots. Amend your soil with compost or well-rotted manure to improve drainage and fertility. I like to add a little bit of sand if my soil is particularly heavy.
* **pH:** Radishes prefer a soil pH between 6.0 and 7.0. You can test your soil pH with a kit from your local garden center.
Planting Your Radish Seeds
Now for the fun part! Planting those tiny seeds and watching them sprout.
1. **Timing is Key:** Radishes are a cool-season crop, meaning they thrive in cooler temperatures. The best time to plant them is in early spring or late summer/early fall. In the spring, plant as soon as the soil is workable. In the fall, plant about 4-6 weeks before the first expected frost. I usually aim for soil temperatures between 50°F and 65°F.
2. **Direct Sowing:** Radishes are best direct-sown, meaning you plant the seeds directly into the ground. They don’t transplant well.
3. **Spacing:** Sow seeds about ½ inch deep and 1 inch apart in rows that are 6-12 inches apart. I like to use a dibber (a small tool for making holes in the soil) to create evenly spaced holes.
4. **Cover and Water:** Gently cover the seeds with soil and water thoroughly. Keep the soil consistently moist until the seeds germinate.
5. **Succession Planting:** To enjoy a continuous harvest of radishes, plant a new batch of seeds every 1-2 weeks. This is called succession planting.
Caring for Your Radishes
Radishes are relatively low-maintenance, but here are a few things to keep in mind:
* **Watering:** Consistent watering is essential for plump, juicy radishes. Dry soil can cause them to become woody and bitter. Aim for about 1 inch of water per week, especially during dry spells.
* **Thinning:** Once your seedlings emerge, thin them to about 2 inches apart. This will give them enough room to grow. Don’t be afraid to pull out the extra seedlings – you can even eat the tiny radish greens!
* **Weeding:** Keep your radish patch free of weeds. Weeds compete with radishes for nutrients and water. Hand-pulling weeds is usually the best option, as radishes have shallow roots and can be easily disturbed.
* **Fertilizing:** Radishes don’t need a lot of fertilizer, but a light feeding of a balanced fertilizer (like 10-10-10) a few weeks after planting can help boost growth. I prefer to use a liquid seaweed fertilizer, which is gentle and provides essential micronutrients.
Dealing with Pests and Diseases
Radishes are generally pest-resistant, but here are a few potential problems to watch out for:
* **Flea Beetles:** These tiny beetles can chew small holes in the leaves of your radishes. Cover your plants with row covers to prevent flea beetles from reaching them. You can also try spraying with insecticidal soap.
* **Root Maggots:** These are small, white larvae that feed on the roots of radishes, causing them to become tunneled and damaged. Rotate your crops each year to prevent root maggots from building up in the soil. You can also use diatomaceous earth around the base of your plants.
* **Clubroot:** This is a fungal disease that causes the roots of radishes to become swollen and distorted. Plant resistant varieties and avoid planting radishes in the same spot year after year.
Harvesting Your Radishes
This is the moment you’ve been waiting for! Radishes are typically ready to harvest in 3-4 weeks, depending on the variety.
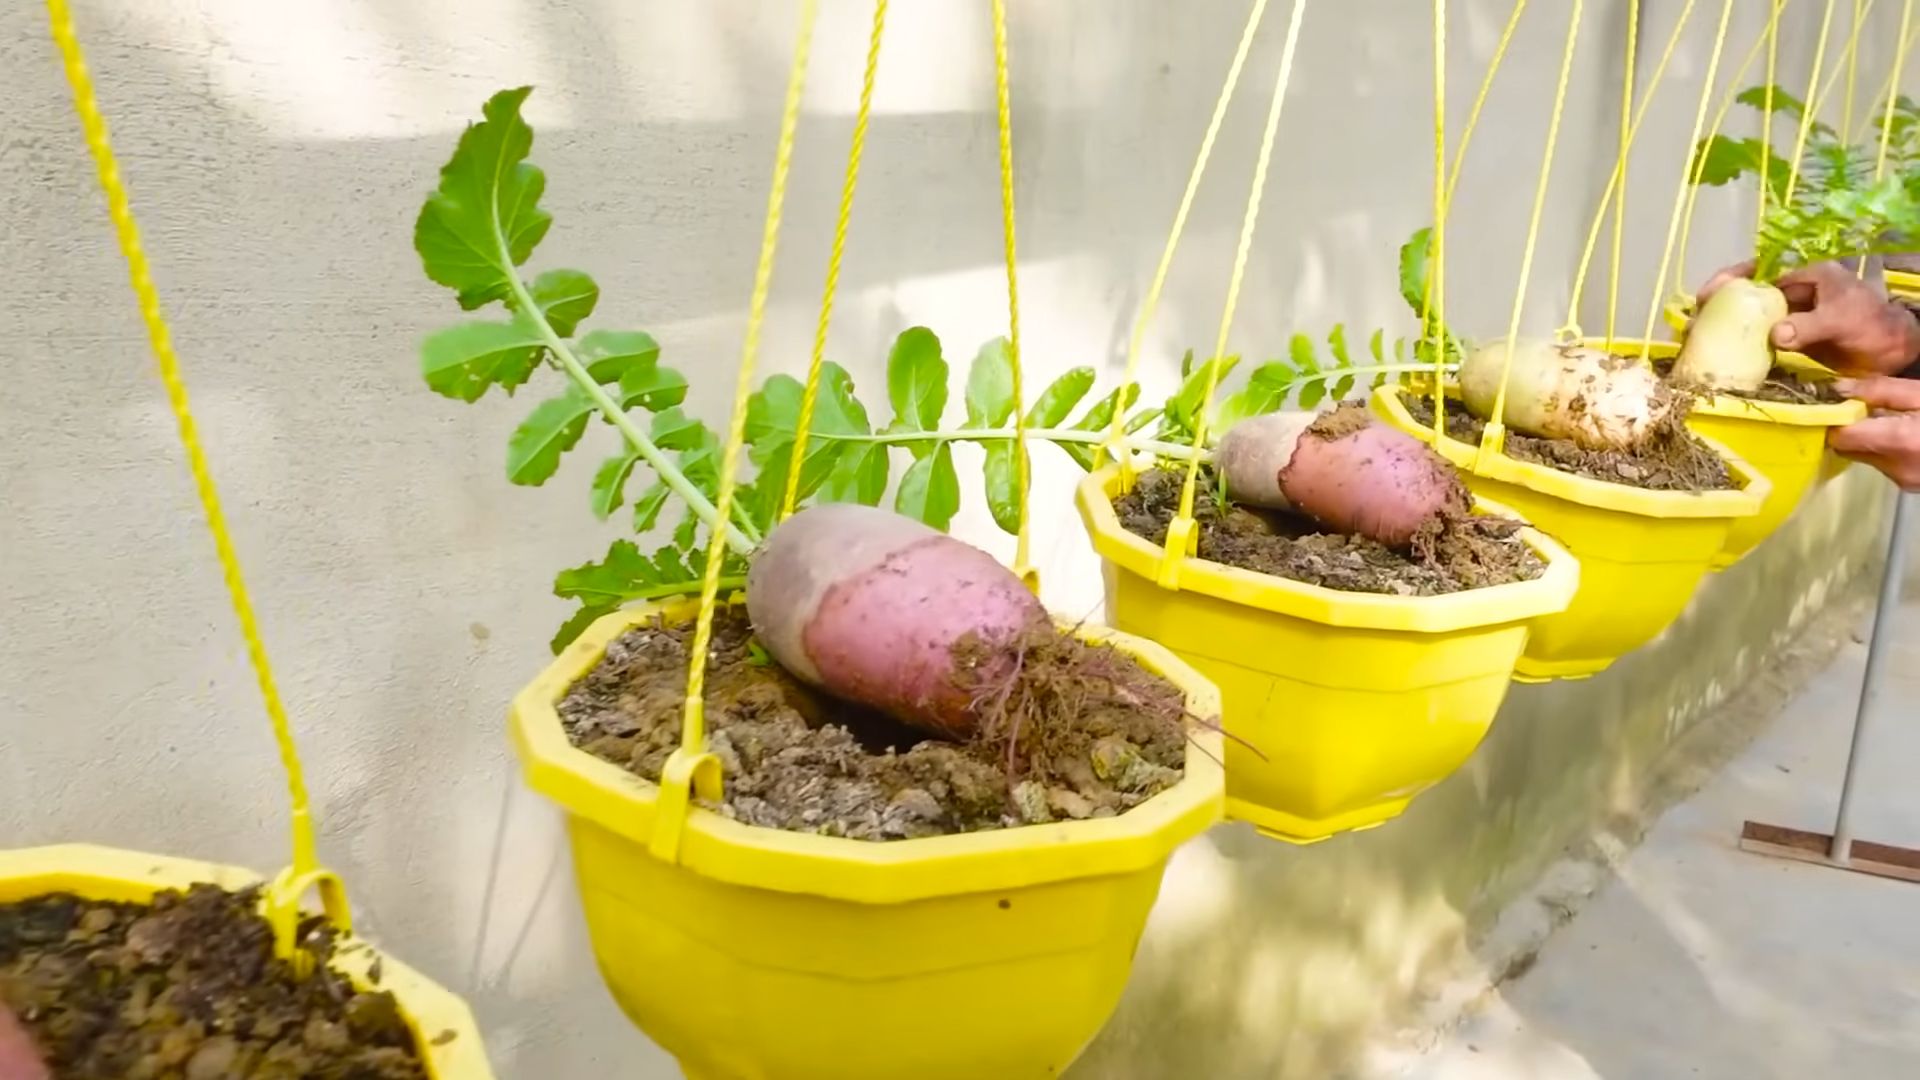
1. **Check for Size:** Gently brush away the soil around the base of a radish to check its size. They’re usually ready to harvest when they’re about 1 inch in diameter.
2. **Pull Gently:** Grasp the radish leaves near the base and gently pull the radish out of the ground. If it’s difficult to pull, loosen the soil around the radish with a trowel.
3. **Wash and Store:** Wash your radishes thoroughly and trim off the leaves. Store them in a plastic bag in the refrigerator for up to a week. You can also store the radish greens separately in a plastic bag in the refrigerator.
Enjoying Your Radishes
Now that you’ve harvested your beautiful radishes, it’s time to enjoy them! Here are a few ideas:
* **Raw:** Radishes are delicious eaten raw in salads, as a snack with hummus, or sliced on buttered bread with a sprinkle of salt.
* **Roasted:** Roasting radishes mellows out their flavor and makes them surprisingly sweet. Toss them with olive oil, salt, and pepper and roast them at 400°F for 20-25 minutes.
* **Pickled:** Pickled radishes are a tangy and flavorful addition to sandwiches, tacos, and salads.
* **Radish Greens:** Don’t throw away the radish greens! They’re packed with nutrients and can be eaten raw in salads, sautéed with garlic, or added to soups and stews.
Growing Radishes in Containers
Don’t have a garden? No problem! Radishes grow beautifully in containers.
* **Choose the Right Container:** Select a container that is at least 6 inches deep and has drainage holes.
* **Use a Good Potting Mix:** Fill the container with a high-quality potting mix.
* **Planting and Care:** Follow the same planting and care instructions as for growing radishes in the ground.
* **Watering:** Container-grown radishes will need to be watered more frequently than those grown in the ground, as the soil in containers dries out more quickly.
Troubleshooting Common Radish Problems
Even with the best care, you might encounter a few problems along the way. Here’s how to troubleshoot some common radish issues:
* **Radishes are small and stunted:** This is usually caused by compacted soil, lack of water, or overcrowding. Make sure your soil is loose and well-drained, water regularly, and thin your seedlings properly.
* **Radishes are woody and bitter:** This is usually caused by dry soil or hot weather. Keep the soil consistently moist and harvest your radishes promptly when they’re ready.
* **Radishes are cracked:** This is usually caused by inconsistent watering. Water regularly and avoid letting the soil dry out completely.
* **Radish leaves are yellowing:** This could be a sign of nutrient deficiency. Fertilize your radishes with a balanced fertilizer or liquid seaweed fertilizer.
Extra Tips for Radish Success
Here are a few extra tips to help you grow the best radishes ever:
* Choose the right variety for your climate. Some varieties are better suited to warmer climates than others.
* Plant radishes in a different spot each year. This will help prevent soilborne diseases.
* Don’t over-fertilize. Too much nitrogen can cause rad
Conclusion
So, there you have it! Growing radishes at home is not only incredibly simple, but it’s also a remarkably rewarding experience. From seed to table in just a few short weeks, you’ll be enjoying crisp, peppery radishes that are far superior in flavor and freshness to anything you can find at the grocery store. This isn’t just about saving a few dollars; it’s about connecting with your food, understanding the growing process, and enjoying the unparalleled taste of homegrown produce.
Why is this DIY trick a must-try? Because it empowers you to take control of your food source, even in a small space. Radishes are incredibly forgiving, making them perfect for beginner gardeners. They’re also a fantastic way to introduce children to the joys of gardening, teaching them about responsibility and the magic of watching something grow. Plus, the rapid growth cycle provides almost instant gratification, keeping enthusiasm high.
But the benefits don’t stop there. Growing your own radishes allows you to experiment with different varieties. Forget the standard red globe radishes; explore the world of French Breakfast radishes with their mild, elongated shape, or the vibrant Watermelon radishes with their stunning pink interior. You can even try growing black Spanish radishes for a more pungent, wintery flavor.
And speaking of variations, consider companion planting your radishes. They thrive alongside carrots, lettuce, and spinach, helping to deter pests and improve soil health. You can also use radish leaves in salads or stir-fries, adding a peppery kick to your meals. Don’t let any part of the plant go to waste!
Furthermore, think about succession planting. By sowing a small batch of radish seeds every week or two, you can ensure a continuous harvest throughout the growing season. This prevents you from being overwhelmed with too many radishes at once and allows you to enjoy fresh radishes for months on end.
Growing radishes is more than just a gardening project; it’s a gateway to a healthier, more sustainable lifestyle. It’s a chance to reconnect with nature, learn new skills, and enjoy the delicious rewards of your labor.
We wholeheartedly encourage you to give this DIY trick a try. Start small, experiment with different varieties, and don’t be afraid to make mistakes. Gardening is a learning process, and every failure is an opportunity to grow (pun intended!).
Once you’ve harvested your first batch of homegrown radishes, we’d love to hear about your experience. Share your photos, tips, and tricks in the comments below. Let’s build a community of radish enthusiasts and inspire others to embrace the joys of homegrown produce. What varieties did you try? What challenges did you face? What did you learn? Your insights can help others succeed and make their radish-growing journey even more rewarding. So, get your hands dirty, plant some seeds, and prepare to be amazed by the simple pleasure of growing your own radishes!
Frequently Asked Questions (FAQ)
What is the best time of year to plant radishes?
Radishes are cool-season crops, meaning they thrive in cooler temperatures. The best time to plant them is in early spring or late summer/early fall. In spring, plant as soon as the soil can be worked, typically a few weeks before the last expected frost. For a fall harvest, plant about 4-6 weeks before the first expected frost. Avoid planting during the heat of summer, as high temperatures can cause radishes to bolt (go to seed) and develop a strong, unpleasant flavor.
How much sunlight do radishes need?
Radishes need at least 6 hours of sunlight per day to grow properly. While they can tolerate some shade, especially in hotter climates, insufficient sunlight can result in leggy growth and smaller radish roots. Choose a planting location that receives full sun for the majority of the day. If you’re growing radishes indoors, consider using grow lights to supplement natural sunlight.
What kind of soil is best for growing radishes?
Radishes prefer loose, well-drained soil that is rich in organic matter. Heavy clay soil can hinder root development and result in misshapen or stunted radishes. Before planting, amend the soil with compost or other organic matter to improve drainage and fertility. A soil pH of 6.0 to 7.0 is ideal for radish growth. You can test your soil pH using a home testing kit or by sending a sample to a local agricultural extension office.
How often should I water radishes?
Radishes need consistent moisture to grow quickly and develop crisp, flavorful roots. Water deeply and regularly, especially during dry periods. Aim to keep the soil consistently moist but not waterlogged. Overwatering can lead to root rot, while underwatering can cause radishes to become tough and bitter. A good rule of thumb is to water when the top inch of soil feels dry to the touch. Mulching around the plants can help retain moisture and suppress weeds.
How long does it take for radishes to mature?
One of the great things about radishes is their rapid growth rate. Most varieties mature in just 3-4 weeks from planting. However, the exact time to maturity can vary depending on the variety, growing conditions, and weather. Check the seed packet for specific information on the maturity date of the radish variety you are growing.
How do I know when radishes are ready to harvest?
Radishes are ready to harvest when the roots have reached the desired size. Gently brush away the soil around the base of the plant to check the size of the radish. Most varieties are ready to harvest when the roots are about 1 inch in diameter. Don’t let radishes get too large, as they can become tough and bitter. Harvest radishes by gently pulling them from the soil.
Why are my radishes cracking?
Radish roots can crack due to inconsistent watering. If the soil dries out and then is suddenly saturated with water, the radishes can grow too quickly and the skin can split. To prevent cracking, water radishes regularly and consistently, especially during dry periods. Mulching around the plants can also help maintain consistent soil moisture.
Why are my radishes all tops and no bottoms?
Several factors can contribute to radishes producing abundant foliage but small or nonexistent roots. Insufficient sunlight, overcrowding, and poor soil fertility are common culprits. Make sure your radishes are getting at least 6 hours of sunlight per day, thin the seedlings to provide adequate spacing, and amend the soil with compost or other organic matter before planting.
Can I eat radish leaves?
Yes, radish leaves are edible and can be used in salads, stir-fries, or soups. They have a peppery flavor similar to the radish root, but milder. Choose young, tender leaves for the best flavor and texture. Avoid eating leaves that are yellowed, wilted, or damaged.
How do I store radishes after harvesting?
To store radishes, remove the leaves and wash the roots thoroughly. Place the radishes in a plastic bag or container lined with a damp paper towel. Store them in the refrigerator for up to 1-2 weeks. Radish leaves can also be stored in the refrigerator, but they will wilt more quickly than the roots.

Leave a Comment