
DIY Grape Growing: Imagine plucking juicy, sun-ripened grapes straight from your own backyard! Sounds like a dream, right? Well, it doesn’t have to be! For centuries, cultivating grapes has been a cherished tradition, dating back to ancient civilizations who revered the fruit for its deliciousness and the wine it produced. From the vineyards of the Roman Empire to the family gardens of today, the allure of growing your own grapes has endured.
But let’s be honest, the thought of growing grapes can seem a little intimidating. Visions of sprawling vineyards and complicated pruning techniques might flash before your eyes. That’s where this DIY guide comes in! I’m here to show you that DIY Grape Growing is totally achievable, even if you have limited space or gardening experience.
In today’s world, where we’re all striving for a more sustainable and self-sufficient lifestyle, knowing how to grow your own food is more important than ever. Plus, store-bought grapes simply can’t compare to the flavor of homegrown ones. This article will provide you with simple, step-by-step instructions and clever hacks to successfully cultivate your own grape vines, transforming your garden into a personal vineyard. Get ready to impress your friends and family with your green thumb and enjoy the sweet rewards of your labor!
DIY Grape Growing: From Seed to Sweetness in Your Own Backyard
Growing your own grapes might seem like something only vineyards can achieve, but trust me, with a little patience and some know-how, you can absolutely cultivate your own delicious grapes right in your backyard! I’m going to walk you through the entire process, from choosing the right variety to harvesting your first juicy bunch.
Choosing Your Grape Variety
Before you even think about digging a hole, you need to decide what kind of grapes you want to grow. This isn’t just about taste; it’s about your climate, your soil, and what you plan to do with your grapes.
* **Climate Considerations:** This is HUGE. Some grape varieties are hardy and can withstand cold winters, while others thrive in warm, sunny climates. Research which varieties are best suited for your USDA hardiness zone. For example, if you live in a colder region, look for varieties like ‘Marquette’ or ‘Frontenac’. If you’re in a warmer area, ‘Thompson Seedless’ or ‘Zinfandel’ might be better choices.
* **Purpose of the Grapes:** Are you dreaming of making your own wine? Or are you more interested in fresh eating or making jams and jellies? Wine grapes tend to be smaller and have a higher sugar content, while table grapes are larger and juicier.
* **Disease Resistance:** Some grape varieties are more resistant to common grape diseases like powdery mildew and black rot. Choosing a disease-resistant variety can save you a lot of headaches (and fungicide!).
* **Seedless vs. Seeded:** This is a personal preference. Seedless grapes are obviously easier to eat, but some people find that seeded grapes have a richer flavor.
I personally recommend starting with a disease-resistant variety that’s known to do well in your area. It’ll make the whole process a lot less stressful!
Preparing Your Planting Site
Grapes need a sunny spot with well-drained soil. Seriously, well-drained soil is non-negotiable. They hate having wet feet!
* **Sunlight:** Grapes need at least 6-8 hours of direct sunlight per day. The more sun, the better!
* **Soil Drainage:** Perform a drainage test. Dig a hole about a foot deep and fill it with water. If the water doesn’t drain within 24 hours, you have drainage issues. You might need to amend the soil with organic matter or even consider planting in raised beds.
* **Soil pH:** Grapes prefer a slightly acidic soil pH, ideally between 6.0 and 7.0. You can test your soil pH with a home testing kit or send a sample to your local agricultural extension office.
* **Soil Preparation:** Clear the area of any weeds, grass, or rocks. Dig a hole that’s twice as wide and just as deep as the root ball of your grape vine. Amend the soil with compost or well-rotted manure to improve drainage and fertility.
Planting Your Grape Vine
Now for the exciting part! Getting your grape vine in the ground.
1. **Soak the Roots:** Before planting, soak the roots of your grape vine in water for about an hour. This will help rehydrate them and give them a good start.
2. **Position the Vine:** Carefully remove the grape vine from its container and gently loosen the roots. Place the vine in the hole, making sure that the top of the root ball is level with the ground.
3. **Backfill the Hole:** Backfill the hole with the amended soil, gently tamping it down as you go.
4. **Water Thoroughly:** Water the newly planted vine thoroughly. This will help settle the soil and get rid of any air pockets.
5. **Mulch:** Apply a layer of mulch around the base of the vine to help retain moisture and suppress weeds. I like to use wood chips or straw.
6. **Staking (Optional):** If your grape vine is very young and spindly, you might want to stake it to provide some support.
Training and Pruning Your Grape Vine
This is where things get a little more complicated, but don’t worry, I’ll break it down for you. Training and pruning are essential for shaping your grape vine and maximizing fruit production.
* **The Importance of Training:** Training involves guiding the growth of your grape vine along a trellis or other support system. This helps to improve air circulation, sunlight exposure, and fruit quality.
* **The Importance of Pruning:** Pruning involves removing unwanted growth to encourage the development of fruiting wood. Grapes produce fruit on one-year-old wood, so you need to prune to encourage the growth of new wood each year.
Year 1: Establishing the Trunk
The first year is all about establishing a strong trunk.
1. **Choose the Strongest Shoot:** Select the strongest, most upright shoot on your grape vine. This will become the main trunk.
2. **Remove Other Shoots:** Remove all other shoots that are growing from the base of the vine.
3. **Tie the Shoot to a Stake:** Tie the chosen shoot to a stake or trellis wire to encourage it to grow vertically.
4. **Pinch Off Side Shoots:** As the shoot grows, pinch off any side shoots that develop along the trunk. You want to focus all the energy on growing the main trunk.
5. **Cut Back in Late Winter:** In late winter, before the buds begin to swell, cut back the trunk to about 2-3 feet in height. This will encourage the development of lateral shoots in the second year.
Year 2: Developing the Arms
In the second year, you’ll start to develop the arms of your grape vine.
1. **Select Two Strong Shoots:** In the spring, select two strong shoots that are growing from the top of the trunk. These will become the arms.
2. **Train the Arms Horizontally:** Train the arms horizontally along the trellis wire.
3. **Remove Other Shoots:** Remove any other shoots that are growing from the trunk or the arms.
4. **Pinch Off Side Shoots:** Pinch off any side shoots that develop along the arms.
5. **Cut Back in Late Winter:** In late winter, cut back the arms to about 3-4 feet in length.
Year 3 and Beyond: Fruiting and Maintenance
From the third year onwards, your grape vine should start to produce fruit.
1. **Identify Fruiting Wood:** Grapes produce fruit on one-year-old wood. This is the wood that grew last year.
2. **Prune in Late Winter:** In late winter, prune away about 90% of the previous year’s growth, leaving only a few buds on each arm. These buds will produce the new shoots that will bear fruit.
3. **Remove Suckers:** Regularly remove any suckers that grow from the base of the vine.
4. **Remove Water Sprouts:** Remove any water sprouts that grow from the trunk or arms. These are non-fruiting shoots that steal energy from the vine.
Pruning can seem intimidating, but it’s really just about understanding how grapes produce fruit and encouraging the growth of new fruiting wood. There are tons of great resources online and at your local library that can help you learn more about grape pruning techniques.
Watering and Fertilizing
Grapes need consistent watering, especially during dry periods.
* **Watering:** Water deeply and regularly, especially during the first year. Once established, grapes are relatively drought-tolerant, but they still need water during dry spells.
* **Fertilizing:** Fertilize your grape vine in the spring with a balanced fertilizer. Avoid over-fertilizing, as this can lead to excessive vegetative growth and reduced fruit production. I like to use a fertilizer specifically formulated for grapes.
Pest and Disease Control
Grapes can be susceptible to a variety of pests and diseases.
* **Common Pests:** Japanese beetles, grape phylloxera, and spider mites are common grape pests.
* **Common Diseases:** Powdery mildew, black rot, and downy mildew are common grape diseases.
* **Prevention is Key:** The best way to control pests and diseases is to prevent them in the first place. Choose disease-resistant varieties, provide good air circulation, and keep your grape vine healthy and vigorous.
* **Organic Control Methods:** If you do encounter pests or diseases, try using organic control methods first. Insecticidal soap, neem oil, and copper fungicides can be effective against many common grape pests and diseases.
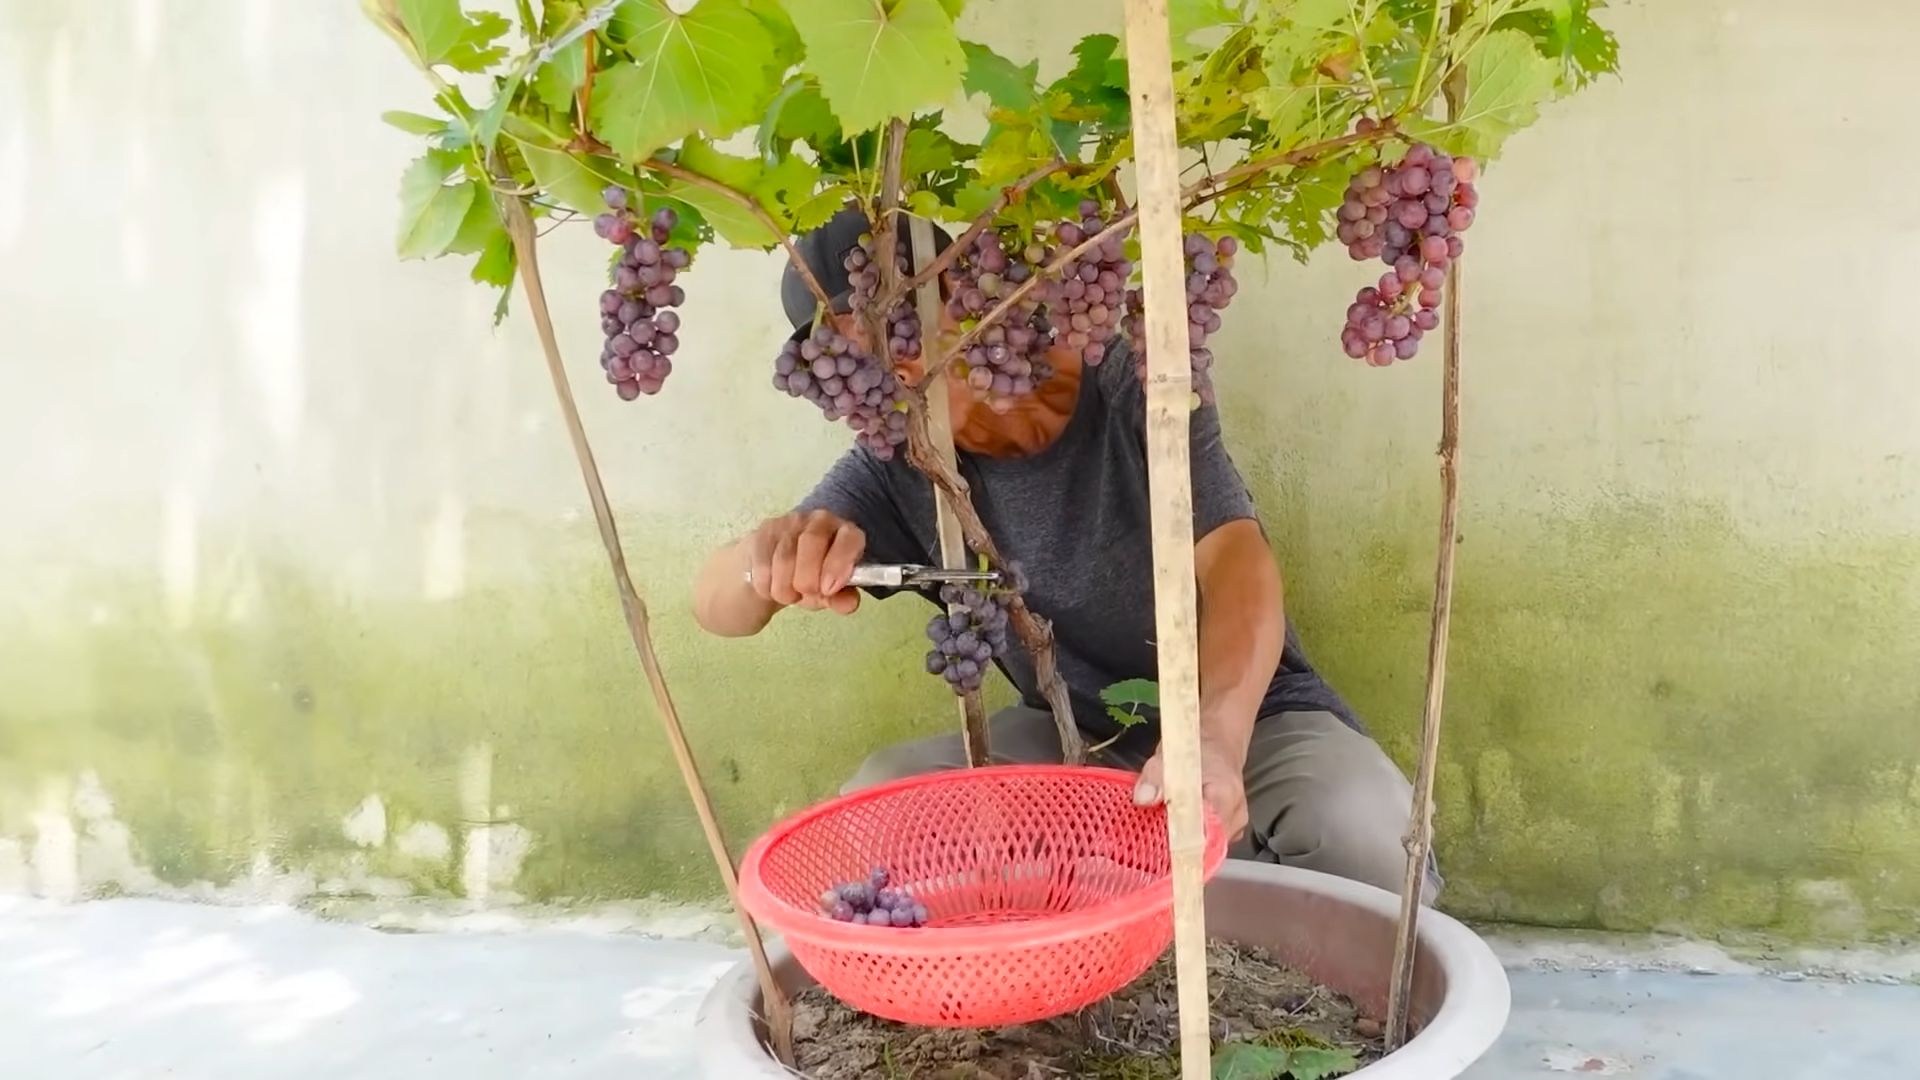
Harvesting Your Grapes
The moment you’ve been waiting for! Harvesting your own grapes is incredibly rewarding.
* **Timing is Everything:** The timing of the harvest is crucial for getting the best flavor and sugar content. Grapes are typically ready to harvest in late summer or early fall.
* **Signs of Ripeness:** Look for these signs of ripeness:
* The grapes should be plump and juicy.
* The grapes should be easy to pull from the vine.
* The grapes should have a rich, sweet flavor.
* The seeds should be brown.
* **Taste Test:**
Conclusion
So, there you have it! Embarking on your own DIY grape growing adventure is not just a fun project; it’s a gateway to enjoying the freshest, most flavorful grapes imaginable, right from your backyard. Forget the supermarket varieties that often lack the vibrant taste and satisfying crunch of homegrown fruit. With a little patience, planning, and the techniques outlined, you can cultivate your own thriving grapevine and reap the rewards for years to come.
Why is this DIY grape growing trick a must-try? Because it empowers you to control every aspect of the process, from selecting the perfect grape variety suited to your climate and taste preferences to ensuring the use of organic and sustainable growing practices. You’ll know exactly what goes into your grapes, guaranteeing a healthier and more delicious harvest. Plus, there’s an undeniable satisfaction in nurturing a plant from its humble beginnings to a bountiful producer. Imagine the pride you’ll feel when you serve your own homegrown grapes to friends and family, or use them to create homemade jams, jellies, or even your own small batch wine!
But the beauty of DIY grape growing lies in its adaptability. Feel free to experiment with different training methods, such as the cordon or cane pruning systems, to find what works best for your space and the specific variety you’re growing. Consider adding companion plants like basil or marigolds to deter pests naturally and enhance the overall health of your vineyard. You can also explore different soil amendments and fertilizers to optimize the nutrient content and improve the flavor of your grapes.
Don’t be afraid to get creative and personalize your grape growing journey!
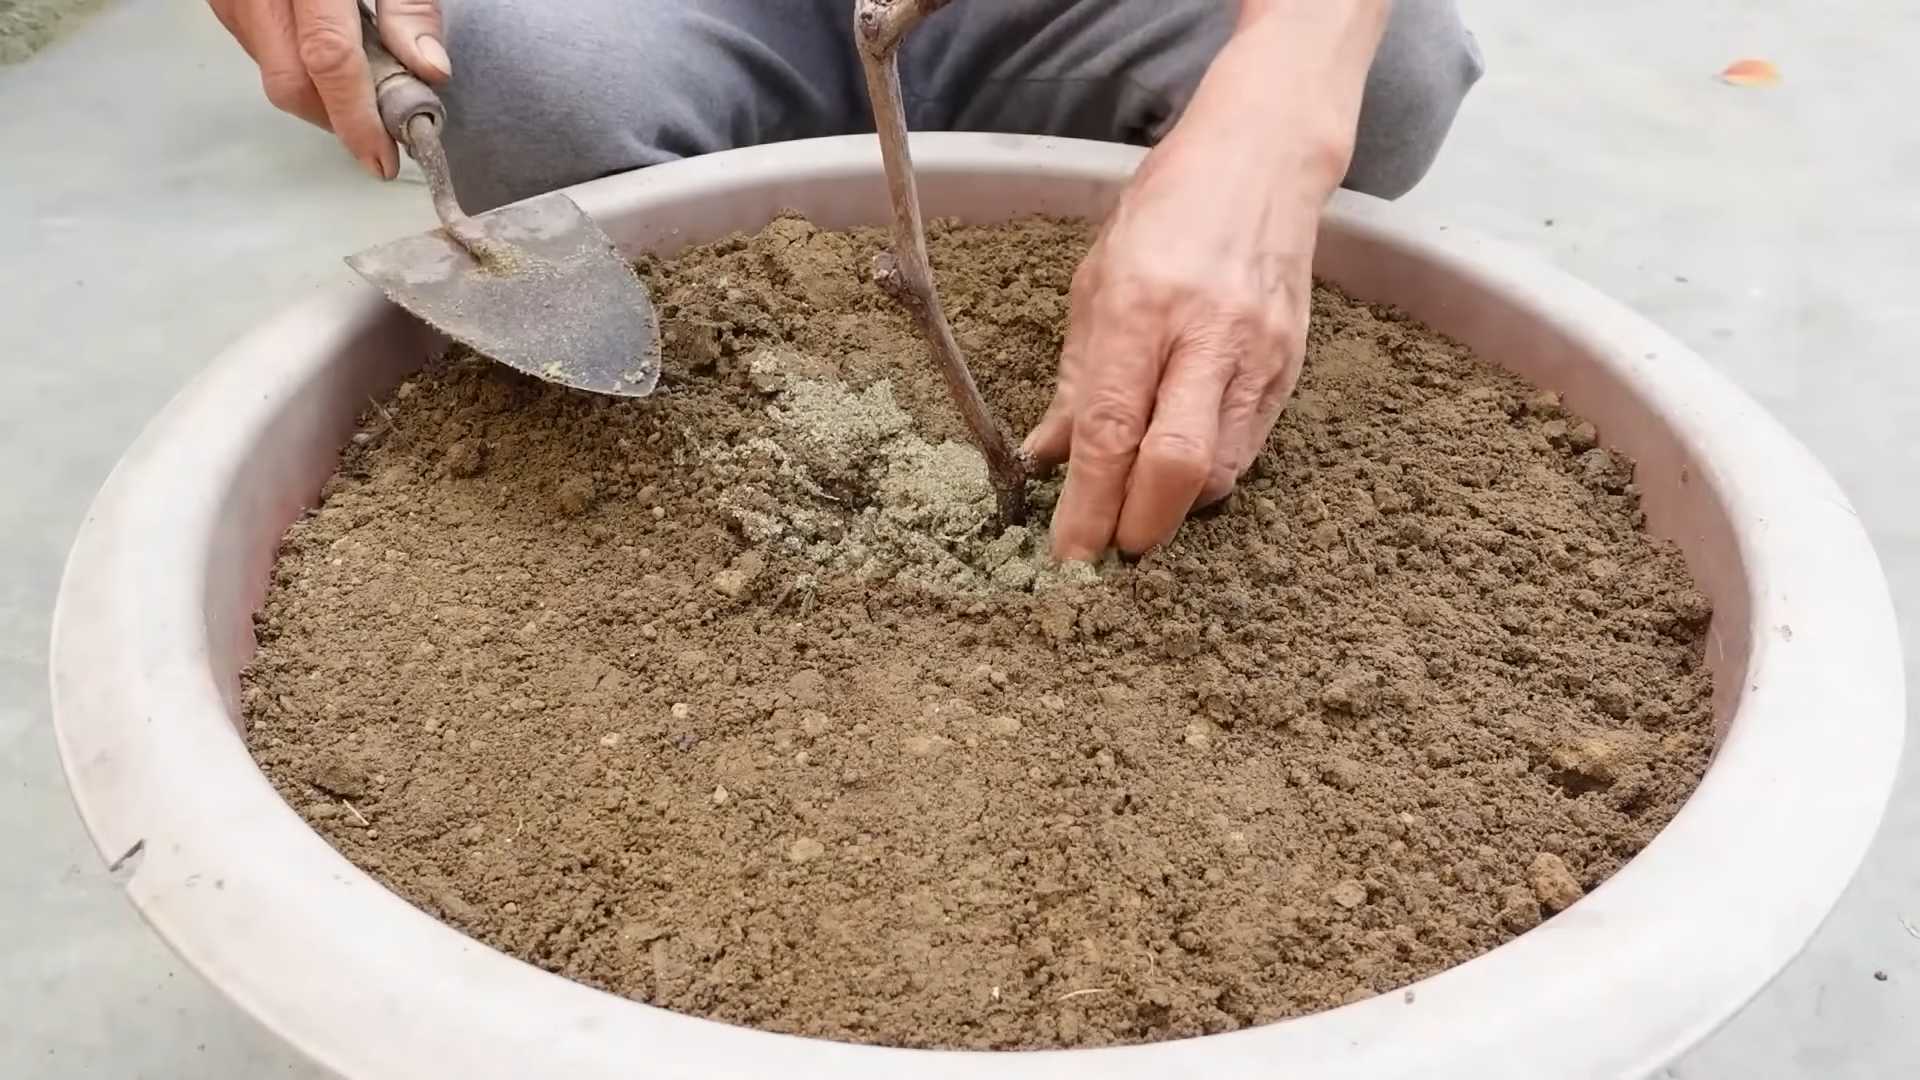
For those with limited space, consider growing grapes in containers. This allows you to enjoy the benefits of homegrown grapes even if you don’t have a traditional garden. Just be sure to choose a large container with good drainage and select a grape variety that is well-suited for container growing, such as ‘Himrod’ or ‘Reliance’.
And for those looking to take their grape growing to the next level, consider learning about grafting techniques. Grafting allows you to combine the desirable traits of two different grape varieties, such as disease resistance and superior fruit quality. It’s a more advanced technique, but it can significantly enhance your grape growing success.
We wholeheartedly encourage you to give this DIY grape growing trick a try. It’s an investment in your health, your taste buds, and your connection to nature. And most importantly, don’t forget to share your experiences with us! We’d love to hear about your successes, challenges, and any unique tips or tricks you discover along the way. Share your photos and stories on social media using #DIYGrapeGrowing, and let’s build a community of passionate home grape growers!
Frequently Asked Questions (FAQ)
What is the best time of year to plant grapevines?
The ideal time to plant grapevines is in early spring, after the last frost has passed, or in late fall, before the ground freezes. Planting during these times allows the grapevine to establish its roots before the stresses of summer heat or winter cold. If you live in a region with mild winters, fall planting is often preferred as it gives the roots more time to develop before the growing season begins. When planting, ensure the soil is well-draining and amended with compost or other organic matter to provide essential nutrients.
How much sunlight do grapevines need?
Grapevines require at least 6-8 hours of direct sunlight per day to thrive and produce a good crop of grapes. Sunlight is essential for photosynthesis, the process by which plants convert light energy into chemical energy in the form of sugars. Without sufficient sunlight, grapevines will produce fewer grapes, and the grapes that are produced may be smaller and less flavorful. Choose a planting location that receives full sun throughout the day, and avoid areas that are shaded by trees or buildings.
What type of soil is best for growing grapes?
Grapevines prefer well-drained soil that is slightly acidic to neutral in pH (between 6.0 and 7.0). Good drainage is crucial to prevent root rot, a common problem in grapevines. If your soil is heavy clay, amend it with compost, sand, or other organic matter to improve drainage. If your soil is sandy, amend it with compost or peat moss to help retain moisture. Before planting, it’s a good idea to have your soil tested to determine its pH and nutrient levels. This will allow you to make any necessary amendments to ensure optimal growing conditions for your grapevines.
How often should I water my grapevines?
Watering frequency depends on several factors, including the climate, soil type, and age of the grapevine. Newly planted grapevines need to be watered more frequently than established vines. In general, water deeply but infrequently, allowing the soil to dry out slightly between waterings. During hot, dry weather, you may need to water more often. Avoid overwatering, as this can lead to root rot. A good rule of thumb is to water when the top inch of soil feels dry to the touch. Consider using a soaker hose or drip irrigation system to deliver water directly to the roots, minimizing water loss through evaporation.
How do I prune my grapevines?
Pruning is essential for maintaining the health and productivity of grapevines. The best time to prune is in late winter or early spring, before the buds begin to swell. The goal of pruning is to remove dead, damaged, or diseased wood, as well as to shape the vine and promote fruit production. There are several different pruning methods, including cane pruning and spur pruning. The best method for you will depend on the variety of grape you are growing and your personal preferences. It’s important to research the specific pruning requirements of your grape variety before you begin. There are many excellent resources available online and in libraries that can guide you through the pruning process.
What are some common pests and diseases that affect grapevines?
Grapevines are susceptible to a variety of pests and diseases, including aphids, Japanese beetles, powdery mildew, and black rot. Regular monitoring of your grapevines is essential for early detection and treatment of these problems. If you notice any signs of pests or diseases, take action immediately to prevent them from spreading. There are many organic and conventional treatments available for controlling pests and diseases in grapevines. Choose the treatment that is best suited for your situation and follow the instructions carefully. Consider using preventative measures, such as planting disease-resistant varieties and maintaining good air circulation around your vines, to minimize the risk of pest and disease problems.
Can I grow grapes in containers?
Yes, you can absolutely grow grapes in containers! This is a great option for those with limited space or who live in areas with poor soil. Choose a large container with good drainage and select a grape variety that is well-suited for container growing, such as ‘Himrod’ or ‘Reliance’. Use a high-quality potting mix and fertilize regularly. Container-grown grapevines will need to be watered more frequently than those grown in the ground, especially during hot weather. You may also need to provide support for the vines, such as a trellis or stake. With proper care, you can enjoy a bountiful harvest of grapes from your container garden.
How long does it take for a grapevine to produce fruit?
Most grapevines will begin to produce fruit within 2-3 years of planting. However, it may take 3-5 years for the vine to reach its full production potential. The exact time frame will depend on the variety of grape, the growing conditions, and the care you provide. Be patient and continue to provide your grapevines with the necessary care, and you will eventually be rewarded with a delicious harvest of homegrown grapes. Remember that proper pruning and training are crucial for maximizing fruit production.
Leave a Comment