
Grow Bell Peppers at Home and unlock a world of fresh, vibrant flavor right outside your door! Imagine biting into a crisp, juicy bell pepper, bursting with sunshine and knowing you nurtured it from seed to table. Forget those bland, store-bought peppers – this year, we’re taking control and cultivating our own delicious bounty.
For centuries, bell peppers have been a staple in cuisines around the globe, adding color and zest to dishes from Spain’s paella to Mexico’s vibrant salsas. Their journey from South America to our gardens is a testament to their adaptability and enduring appeal. But let’s be honest, sometimes growing them can feel a little tricky, right? That’s where these DIY tricks and hacks come in!
I’ve compiled a collection of simple, yet effective techniques that will help you grow bell peppers at home, even if you’re a complete beginner. We’ll cover everything from choosing the right varieties for your climate to maximizing your yield with clever watering and fertilizing strategies. Why rely on expensive grocery store produce when you can have a thriving bell pepper patch just steps away? Not only will you save money, but you’ll also enjoy the satisfaction of knowing exactly where your food comes from. So, grab your gardening gloves, and let’s get started on this exciting journey to homegrown bell pepper perfection!
Growing Bell Peppers at Home: A DIY Guide for a Bountiful Harvest
Hey there, fellow gardening enthusiasts! I’m so excited to share my tried-and-true method for growing bell peppers right in your own backyard (or even on your balcony!). Forget those expensive grocery store peppers – with a little patience and these simple steps, you’ll be enjoying fresh, crisp bell peppers all season long.
Choosing the Right Bell Pepper Variety
Before we dive into the nitty-gritty, let’s talk about choosing the right bell pepper variety. There are so many options out there, from classic green bell peppers to vibrant reds, yellows, oranges, and even purples! Consider these factors when making your selection:
* Climate: Some varieties are better suited for cooler climates, while others thrive in warmer temperatures. Check the seed packet or plant label for information on the ideal growing conditions for each variety.
* Size: Bell peppers come in different sizes, from small snack-sized peppers to large, blocky peppers perfect for stuffing. Think about how you plan to use your peppers and choose a variety that fits your needs.
* Color: While color doesn’t affect the taste significantly, it can add visual appeal to your garden and your meals! Experiment with different colors to find your favorites.
* Disease Resistance: Look for varieties that are resistant to common bell pepper diseases, such as blossom end rot and tobacco mosaic virus. This can save you a lot of headaches down the road.
Some popular bell pepper varieties include:
* California Wonder (classic green)
* Yolo Wonder (disease-resistant green)
* Golden Bell (yellow)
* Red Knight (red)
* Orange Bell (orange)
* Purple Beauty (purple)
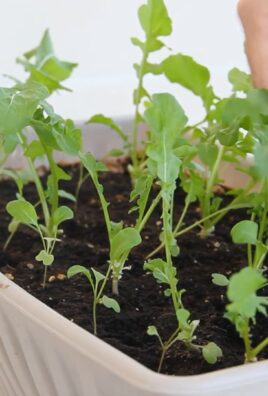
Starting Your Bell Pepper Seeds (or Buying Seedlings)
You have two main options for starting your bell peppers: starting from seed or buying seedlings from a nursery. Starting from seed gives you more control over the process and allows you to choose from a wider variety of options. However, it requires a bit more time and effort. Buying seedlings is a quicker and easier option, but you’ll be limited to the varieties that are available at your local nursery.
Starting from Seed:
I personally love starting my bell peppers from seed. It’s so rewarding to watch those tiny seeds sprout and grow into healthy plants! Here’s how I do it:
1. Gather your supplies: You’ll need bell pepper seeds, seed starting trays or small pots, seed starting mix, a spray bottle, and a heat mat (optional, but recommended).
2. Sow the seeds: Fill your seed starting trays or pots with seed starting mix. Moisten the mix with a spray bottle. Sow the seeds about ¼ inch deep, placing 2-3 seeds per cell or pot.
3. Provide warmth and moisture: Bell peppers need warmth to germinate. Place your seed starting trays or pots on a heat mat, if using. Cover the trays or pots with a clear plastic dome or plastic wrap to create a humid environment. Mist the soil regularly to keep it moist.
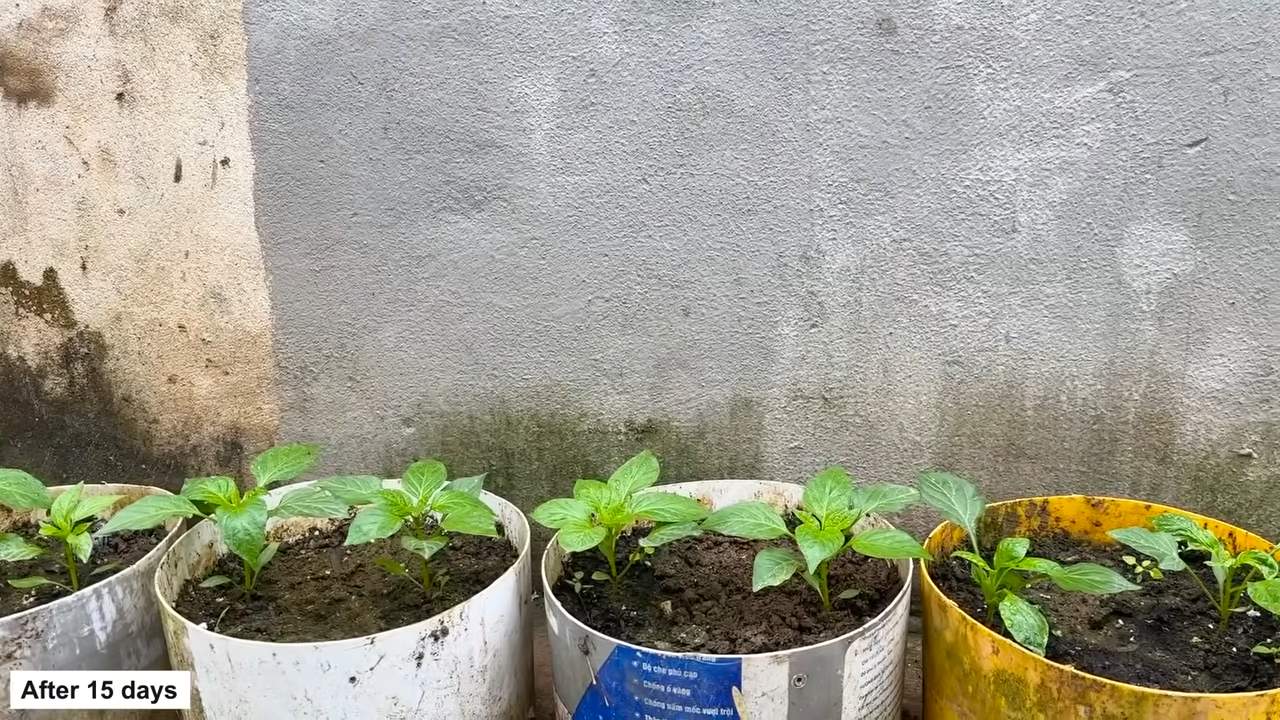
4. Wait for germination: Bell pepper seeds typically germinate in 7-14 days. Once the seedlings emerge, remove the plastic dome or plastic wrap and place the trays or pots under a grow light or in a sunny window.
5. Thin the seedlings: Once the seedlings have developed their first true leaves (the leaves that appear after the initial seed leaves), thin them to one seedling per cell or pot. Snip off the weaker seedlings at the soil line with scissors.
6. Harden off the seedlings: Before transplanting your bell pepper seedlings outdoors, you’ll need to harden them off. This process gradually acclimates the seedlings to outdoor conditions. Start by placing the seedlings outdoors in a sheltered location for a few hours each day, gradually increasing the amount of time they spend outdoors over the course of a week or two.
Buying Seedlings:
If you’re short on time or don’t want to deal with starting seeds, buying seedlings is a great option. Look for healthy seedlings with sturdy stems and vibrant green leaves. Avoid seedlings that are leggy, yellowed, or have signs of disease or pests.
Preparing Your Garden Bed or Containers
Bell peppers need well-drained soil that is rich in organic matter. Choose a location that receives at least 6-8 hours of sunlight per day.
Preparing the Garden Bed:
1. Clear the area: Remove any weeds, rocks, or debris from the area where you plan to plant your bell peppers.
2. Amend the soil: Amend the soil with compost, aged manure, or other organic matter to improve drainage and fertility. Work the amendments into the soil to a depth of at least 12 inches.
3. Test the soil pH: Bell peppers prefer a soil pH of 6.0-6.8. Test your soil pH using a soil testing kit and amend the soil as needed to achieve the desired pH.
4. Create raised beds (optional): Raised beds can improve drainage and warm up the soil more quickly in the spring.
Preparing Containers:
1. Choose the right container: Bell peppers need a container that is at least 12 inches in diameter and 12 inches deep. Make sure the container has drainage holes.
2. Use a good quality potting mix: Don’t use garden soil in containers, as it can become compacted and poorly drained. Use a good quality potting mix that is specifically formulated for containers.
3. Add slow-release fertilizer: Incorporate a slow-release fertilizer into the potting mix to provide your bell peppers with a steady supply of nutrients.
Transplanting Your Bell Pepper Seedlings
Once your bell pepper seedlings are hardened off (if you started from seed) and the danger of frost has passed, it’s time to transplant them into your garden bed or containers.
1. Choose a cloudy day: Transplanting on a cloudy day will help prevent the seedlings from getting stressed by the sun.
2. Dig a hole: Dig a hole that is slightly larger than the root ball of the seedling.
3. Remove the seedling from the container: Gently remove the seedling from its container, being careful not to damage the roots.
4. Place the seedling in the hole: Place the seedling in the hole and backfill with soil. Gently firm the soil around the base of the plant.
5. Water thoroughly: Water the seedlings thoroughly after transplanting.
6. Space the plants properly: Space bell pepper plants 18-24 inches apart in the garden bed or one plant per container.
Caring for Your Bell Pepper Plants
Once your bell pepper plants are in the ground, it’s important to provide them with the care they need to thrive.
* Watering: Water your bell pepper plants regularly, especially during hot, dry weather. Aim to keep the soil consistently moist, but not waterlogged. Water deeply and less frequently, rather than shallowly and more often.
* Fertilizing: Fertilize your bell pepper plants every 2-3 weeks with a balanced fertilizer. You can also use a liquid fertilizer or compost tea.
* Mulching: Mulch around your bell pepper plants with straw, wood chips, or other organic mulch to help retain moisture, suppress weeds, and regulate soil temperature.
* Staking or caging: Bell pepper plants can become top-heavy as they produce fruit. Staking or caging the plants will help prevent them from falling over.
* Pruning: Pruning bell pepper plants is not essential, but it can help improve air circulation and sunlight penetration. Remove any suckers (shoots that grow from the base of the plant) and any yellowed or diseased leaves.
* Pest and disease control: Keep an eye out for pests and diseases. Common bell pepper pests include aphids, flea beetles, and pepper weevils. Common diseases include blossom end rot, powdery mildew, and bacterial leaf spot. Treat any problems promptly with appropriate organic pest control methods or fungicides.
Dealing with Blossom End Rot
Blossom end rot is a common problem in bell peppers, especially during hot, dry weather. It is caused by a calcium deficiency in the developing fruit. The bottom of the pepper will develop a dark, leathery spot.
To prevent blossom end rot:
* Maintain consistent soil moisture: Water your bell pepper plants regularly and deeply.
* Add calcium to the soil: Amend the soil with lime or bone meal before planting. You can also use a calcium-containing fertilizer.
* Avoid over-fertilizing with nitrogen: Too much nitrogen can interfere with calcium uptake.
If you see blossom end rot on your peppers, remove the affected fruit and adjust your watering and fertilizing practices.
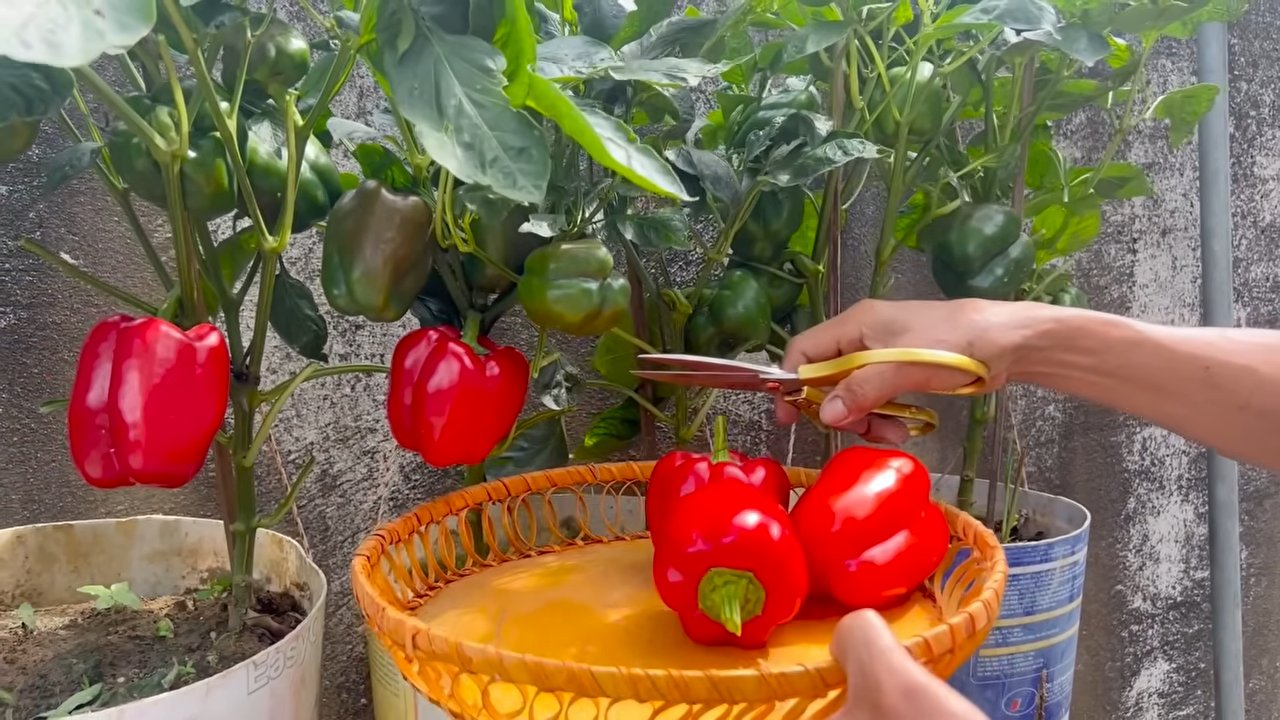
Harvesting Your Bell Peppers
Bell peppers are typically ready to harvest 60-90 days after transplanting, depending on the variety. The peppers will be firm and brightly colored.
To harvest bell peppers:
1. Use pruning shears or a sharp knife: Cut
Conclusion
So, there you have it! Growing bell peppers at home, while it might seem daunting at first, is absolutely achievable and incredibly rewarding. We’ve walked you through the essential steps, from selecting the right seeds and nurturing seedlings to transplanting and providing ongoing care. But why should you bother with all this effort when you can simply buy bell peppers at the store?
The answer lies in the unparalleled flavor and freshness you simply can’t replicate with store-bought produce. Imagine biting into a crisp, juicy bell pepper, still warm from the sun, knowing you nurtured it from a tiny seed. The taste is brighter, the texture is firmer, and the satisfaction is immense. Plus, you have complete control over the growing process, ensuring your peppers are free from harmful pesticides and chemicals.
Beyond the superior taste and health benefits, growing your own bell peppers is a fantastic way to connect with nature, learn new skills, and add a touch of vibrant color to your garden or balcony. It’s a project that can be enjoyed by the whole family, teaching children about the wonders of plant life and the importance of sustainable living.
And don’t feel limited to just the standard green bell pepper! Experiment with different varieties to add a rainbow of colors and flavors to your meals. Try growing sweet yellow bell peppers, fiery red bell peppers, or even the unique purple bell peppers for a truly eye-catching harvest. You can also explore different growing methods. If you’re short on space, consider growing bell peppers in containers on your patio or balcony. Vertical gardening techniques can also maximize your yield in limited areas.
For those looking for an extra challenge, try saving seeds from your best-performing bell peppers to perpetuate your favorite varieties year after year. This is a great way to develop your own unique strains of bell peppers that are perfectly adapted to your local climate.
Growing bell peppers at home is more than just a gardening project; it’s an investment in your health, your taste buds, and your connection to the natural world. It’s a chance to experience the joy of nurturing life from seed to table and to savor the unparalleled flavor of homegrown produce.
We encourage you to take the plunge and give it a try. Don’t be afraid to experiment, learn from your mistakes, and most importantly, have fun! Once you’ve harvested your first batch of homegrown bell peppers, we’d love to hear about your experience. Share your tips, successes, and challenges in the comments below. Let’s build a community of bell pepper enthusiasts and inspire others to discover the joys of growing their own food. Happy gardening!
Frequently Asked Questions (FAQ)
What is the best time of year to start growing bell peppers?
The best time to start growing bell peppers depends on your climate. Bell peppers are warm-season crops and require a long growing season of 60-90 days. In colder climates, it’s best to start seeds indoors 6-8 weeks before the last expected frost. This gives the seedlings a head start before transplanting them outdoors when the weather warms up. In warmer climates with mild winters, you can start seeds directly in the ground after the last frost. However, starting indoors is still recommended for a faster and more reliable harvest. Check your local frost dates to determine the optimal time to start your seeds.
How much sunlight do bell peppers need?
Bell peppers need at least 6-8 hours of direct sunlight per day to thrive. Sunlight is essential for photosynthesis, the process by which plants convert light energy into chemical energy for growth. Insufficient sunlight can lead to stunted growth, reduced fruit production, and pale, weak plants. Choose a sunny location in your garden or on your balcony that receives ample sunlight throughout the day. If you’re growing bell peppers indoors, use grow lights to supplement natural sunlight, especially during the winter months. Rotate your plants regularly to ensure even exposure to light.
What kind of soil is best for growing bell peppers?
Bell peppers prefer well-drained, fertile soil that is rich in organic matter. The ideal soil pH is between 6.0 and 7.0. Before planting, amend your soil with compost, aged manure, or other organic materials to improve drainage, fertility, and water retention. Avoid heavy clay soils, as they can become waterlogged and suffocate the roots. If you have clay soil, consider growing bell peppers in raised beds or containers with a well-draining potting mix. You can also add perlite or vermiculite to your soil to improve drainage.
How often should I water my bell pepper plants?
Bell pepper plants need consistent moisture, especially during hot weather. Water deeply and regularly, aiming to keep the soil consistently moist but not waterlogged. The frequency of watering will depend on the weather, soil type, and plant size. Check the soil moisture regularly by sticking your finger about an inch into the soil. If the soil feels dry, it’s time to water. Avoid overhead watering, as this can promote fungal diseases. Instead, water at the base of the plant, using a soaker hose or drip irrigation system. Mulching around the plants can also help to retain moisture and suppress weeds.
What are some common pests and diseases that affect bell peppers?
Bell peppers are susceptible to a variety of pests and diseases, including aphids, whiteflies, spider mites, blossom-end rot, and fungal diseases. Regularly inspect your plants for signs of pests or diseases. Aphids, whiteflies, and spider mites can be controlled with insecticidal soap or neem oil. Blossom-end rot, a calcium deficiency, can be prevented by ensuring consistent watering and adding calcium to the soil. Fungal diseases can be prevented by providing good air circulation, avoiding overhead watering, and using a fungicide if necessary. Crop rotation can also help to prevent soilborne diseases.
How do I know when my bell peppers are ready to harvest?
Bell peppers are typically ready to harvest when they reach their mature size and color. The exact size and color will depend on the variety. Green bell peppers are usually harvested when they are firm and fully sized, but before they start to turn color. Colored bell peppers (red, yellow, orange) are harvested when they have reached their full color and are slightly soft to the touch. Use a sharp knife or pruning shears to cut the peppers from the plant, leaving a short stem attached. Regular harvesting encourages the plant to produce more peppers.
Can I grow bell peppers in containers?
Yes, bell peppers can be successfully grown in containers. Choose a container that is at least 12 inches in diameter and depth to provide enough room for the roots to grow. Use a well-draining potting mix and ensure the container has drainage holes. Place the container in a sunny location that receives at least 6-8 hours of direct sunlight per day. Water regularly and fertilize every 2-3 weeks with a balanced fertilizer. Container-grown bell peppers may require more frequent watering and fertilization than those grown in the ground.
How can I encourage my bell pepper plants to produce more fruit?
To encourage your bell pepper plants to produce more fruit, ensure they receive adequate sunlight, water, and nutrients. Regular fertilization with a balanced fertilizer can help to promote fruit production. Pruning the plants can also help to improve air circulation and encourage branching, which can lead to more fruit. Remove any suckers (small shoots that grow from the base of the plant) to direct the plant’s energy towards fruit production. Harvesting the peppers regularly will also encourage the plant to produce more fruit.
What are some companion plants for bell peppers?
Companion planting can help to improve the growth and health of your bell pepper plants. Some good companion plants for bell peppers include basil, marigolds, carrots, onions, and garlic. Basil helps to repel pests and improve the flavor of the peppers. Marigolds also repel pests and attract beneficial insects. Carrots and onions help to loosen the soil and improve drainage. Garlic helps to deter pests and prevent fungal diseases. Avoid planting bell peppers near fennel, as it can inhibit their growth.
How do I save seeds from my bell peppers?
Saving seeds from your bell peppers is a great way to perpetuate your favorite varieties. Choose healthy, fully ripe peppers from your best-performing plants. Cut the peppers open and remove the seeds. Rinse the seeds thoroughly to remove any pulp. Spread the seeds out on a paper towel to dry completely. Once the seeds are dry, store them in an airtight container in a cool, dark, and dry place. Properly stored bell pepper seeds can remain viable for several years. Remember that hybrid varieties may not produce true-to-type seeds, so you may not get the same results when you grow them.
Leave a Comment