
Growing Watermelons in Pots might sound like a summer dream reserved for sprawling farms, but guess what? I’m here to tell you that juicy, homegrown watermelons are totally achievable, even if you’re working with a small balcony or patio! Forget the image of endless fields – we’re bringing the watermelon patch to you, one pot at a time.
For centuries, watermelons have been a symbol of summer abundance and refreshing sweetness, enjoyed in cultures around the globe. From ancient Egypt, where they were buried with pharaohs, to modern-day picnics, this fruit has always held a special place in our hearts (and stomachs!). But what if you thought you couldn’t partake in the joy of growing your own because of limited space? That’s where this DIY guide comes in!
Let’s face it, store-bought watermelons can sometimes be a gamble. Are they truly ripe? Have they traveled halfway across the world? By growing watermelons in pots yourself, you control the entire process, ensuring the sweetest, most flavorful fruit imaginable. Plus, there’s nothing quite like the satisfaction of nurturing a tiny seedling into a thriving vine laden with delicious watermelons. So, ditch the grocery store guesswork and get ready to embark on a fun and rewarding gardening adventure! I’m excited to share my best tips and tricks to help you succeed, even in the smallest of spaces.
Growing Watermelons in Pots: A Sweet Summer Project!
Hey there, fellow gardening enthusiasts! Ever dreamt of biting into a juicy, homegrown watermelon but thought you didn’t have the space? Well, I’m here to tell you that you absolutely can grow watermelons, even if you only have a balcony or a small patio! It’s all about choosing the right variety and providing the right conditions. I’ve successfully grown watermelons in pots for years, and I’m excited to share my secrets with you. Let’s dive in!
Choosing the Right Watermelon Variety
The key to successful container watermelon gardening is selecting a compact or bush variety. Forget those giant, sprawling melons you see in the fields! We need something that’s happy to stay relatively contained. Here are a few of my favorite varieties that thrive in pots:
* Sugar Baby: This is a classic choice for container gardening. It produces small, round melons (around 8-10 pounds) that are incredibly sweet. They mature quickly, which is a bonus!
* Bush Sugar Baby: As the name suggests, this is a bush-type watermelon, meaning it has a more compact growth habit than the regular Sugar Baby. Perfect for smaller spaces!
* Golden Midget: This variety is a real showstopper! It produces small, yellow-skinned watermelons with pink flesh. They’re super sweet and mature very early.
* Tiger Baby: This is another small-fruited variety with a unique striped rind. It’s known for its excellent flavor and disease resistance.
* Yellow Doll: If you’re looking for something different, try Yellow Doll. It has bright yellow flesh and a crisp, refreshing taste.
Gathering Your Supplies
Before we get started, let’s make sure we have everything we need. Here’s a checklist:
* Large Container: This is crucial! You’ll need a pot that’s at least 24 inches in diameter and 24 inches deep. The bigger, the better, as watermelons have extensive root systems. I prefer using plastic or resin pots because they’re lightweight and retain moisture well.
* High-Quality Potting Mix: Don’t skimp on the potting mix! Use a well-draining mix that’s rich in organic matter. Avoid using garden soil, as it can become compacted in containers. I like to use a mix of peat moss, perlite, and compost.
* Watermelon Seeds: Choose your favorite variety from the list above! Make sure to buy seeds from a reputable source to ensure good germination rates.
* Water-Soluble Fertilizer: Watermelons are heavy feeders, so you’ll need to fertilize them regularly. Choose a fertilizer that’s high in phosphorus and potassium, which are essential for fruit development.
* Trellis or Support: While bush varieties are more compact, they still benefit from some support, especially when the melons start to develop. A small trellis or tomato cage will do the trick.
* Watering Can or Hose: Watermelons need consistent moisture, so make sure you have a reliable way to water them.
* Gardening Gloves: Protect your hands from dirt and thorns!
* Optional:
* Seed Starting Tray: If you want to get a head start, you can start your seeds indoors.
* Heat Mat: This can help speed up germination, especially in cooler climates.
* Mulch: Mulch helps retain moisture and suppress weeds.
Step-by-Step Planting Guide
Now for the fun part! Let’s get those watermelon seeds in the ground (or pot, in this case!).
1. Starting Seeds (Optional)
If you live in a cooler climate with a shorter growing season, starting your seeds indoors is a great way to get a head start.
1. Fill your seed starting tray with potting mix. Moisten the mix thoroughly.
2. Plant the seeds about 1 inch deep. I usually plant 2-3 seeds per cell to increase my chances of germination.
3. Cover the tray with a clear plastic dome or plastic wrap. This will help create a humid environment.
4. Place the tray on a heat mat or in a warm location. Watermelon seeds germinate best at temperatures between 70-85°F (21-29°C).
5. Keep the soil moist but not soggy. Check the tray daily and water as needed.
6. Once the seedlings emerge (usually within 7-10 days), remove the plastic cover and place the tray under a grow light or in a sunny window.
7. Thin the seedlings to one per cell. Choose the strongest, healthiest seedling and snip off the others at the soil line.
8. Harden off the seedlings before transplanting them outdoors. This means gradually exposing them to outdoor conditions over a period of 7-10 days. Start by placing them in a sheltered location for a few hours each day, gradually increasing the amount of time they spend outdoors.
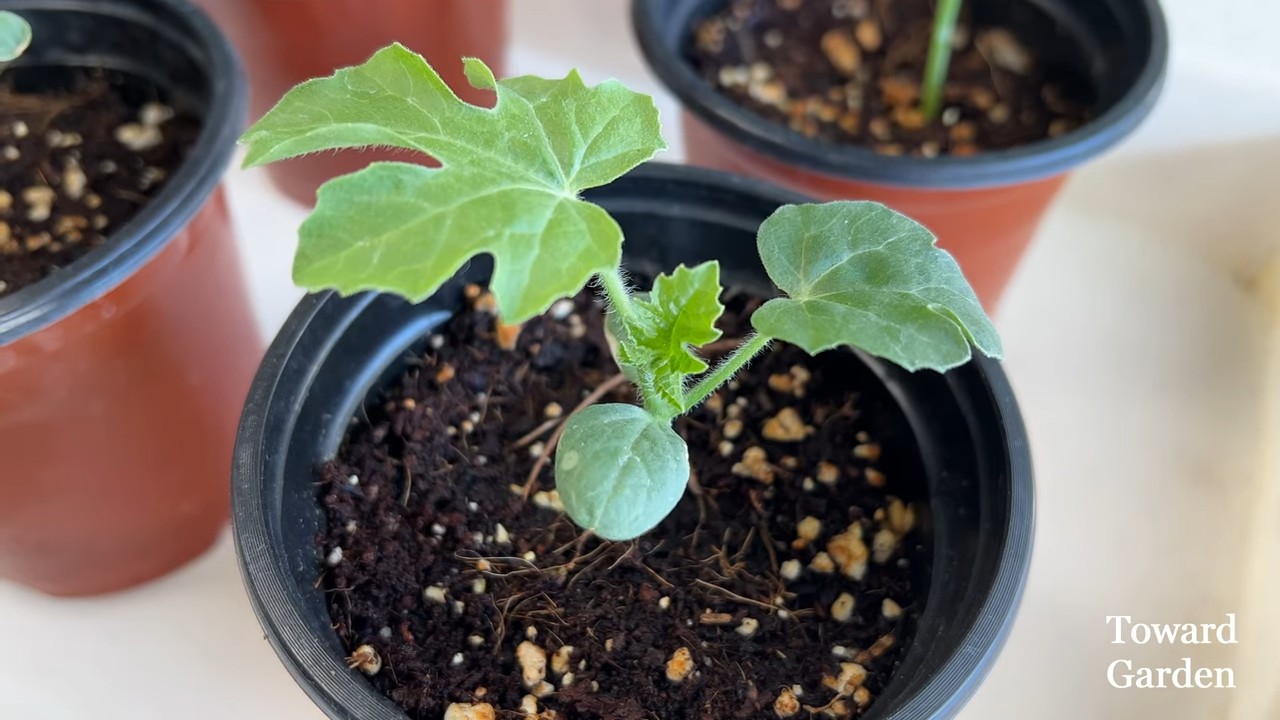
2. Planting Directly in the Container
If you live in a warmer climate with a longer growing season, you can plant your watermelon seeds directly in the container.
1. Fill your container with potting mix, leaving about 2-3 inches of space at the top.
2. Moisten the potting mix thoroughly.
3. Plant 3-4 seeds in the center of the container, about 1 inch deep.
4. Cover the seeds with soil and gently pat down.
5. Water the container gently.
6. Keep the soil moist but not soggy.
7. Once the seedlings emerge, thin them to one or two of the strongest plants.
3. Transplanting Seedlings (If Started Indoors)
Once your seedlings have developed a few sets of true leaves and the weather is warm enough (soil temperature above 65°F or 18°C), it’s time to transplant them into your container.
1. Choose a sunny day for transplanting.
2. Dig a hole in the center of the container that’s large enough to accommodate the root ball of the seedling.
3. Gently remove the seedling from its cell, being careful not to damage the roots.
4. Place the seedling in the hole and backfill with potting mix.
5. Water the seedling thoroughly.
6. Add a layer of mulch around the base of the plant to help retain moisture and suppress weeds.
Caring for Your Watermelon Plants
Now that your watermelon plants are in their container, it’s time to provide them with the care they need to thrive.
1. Watering
Watermelons need consistent moisture, especially during hot weather. Water deeply whenever the top inch of soil feels dry to the touch. Avoid overhead watering, as this can lead to fungal diseases. I prefer to water at the base of the plant.
2. Fertilizing
Watermelons are heavy feeders, so you’ll need to fertilize them regularly. Start fertilizing about two weeks after transplanting or when the seedlings have developed a few sets of true leaves. Use a water-soluble fertilizer that’s high in phosphorus and potassium. Follow the instructions on the fertilizer label. I usually fertilize every 2-3 weeks.
3. Pruning
While you don’t need to prune bush-type watermelons extensively, you can remove any dead or yellowing leaves to improve air circulation. You can also pinch off any side shoots that are growing too vigorously.
4. Pollination
Watermelons need to be pollinated in order to produce fruit. If you’re growing your watermelons outdoors, bees and other pollinators will usually take care of this for you. However, if you’re growing them indoors or in a greenhouse, you may need to hand-pollinate them.
To hand-pollinate watermelons:
1. Identify the male and female flowers. Male flowers have a long, thin stem, while female flowers have a small, immature fruit at the base of the flower.
2. Use a small paintbrush or cotton swab to collect pollen from the male flower.
3. Transfer the pollen to the stigma of the female flower.
4. Repeat this process for several female flowers.
5. Hand-pollinate in the morning, when the flowers are open.
5. Supporting the Fruit
As your watermelons grow, they may need some support to prevent them from breaking off the vine. You can use a sling made from pantyhose or netting to support the fruit. Tie the sling to the trellis or support structure.
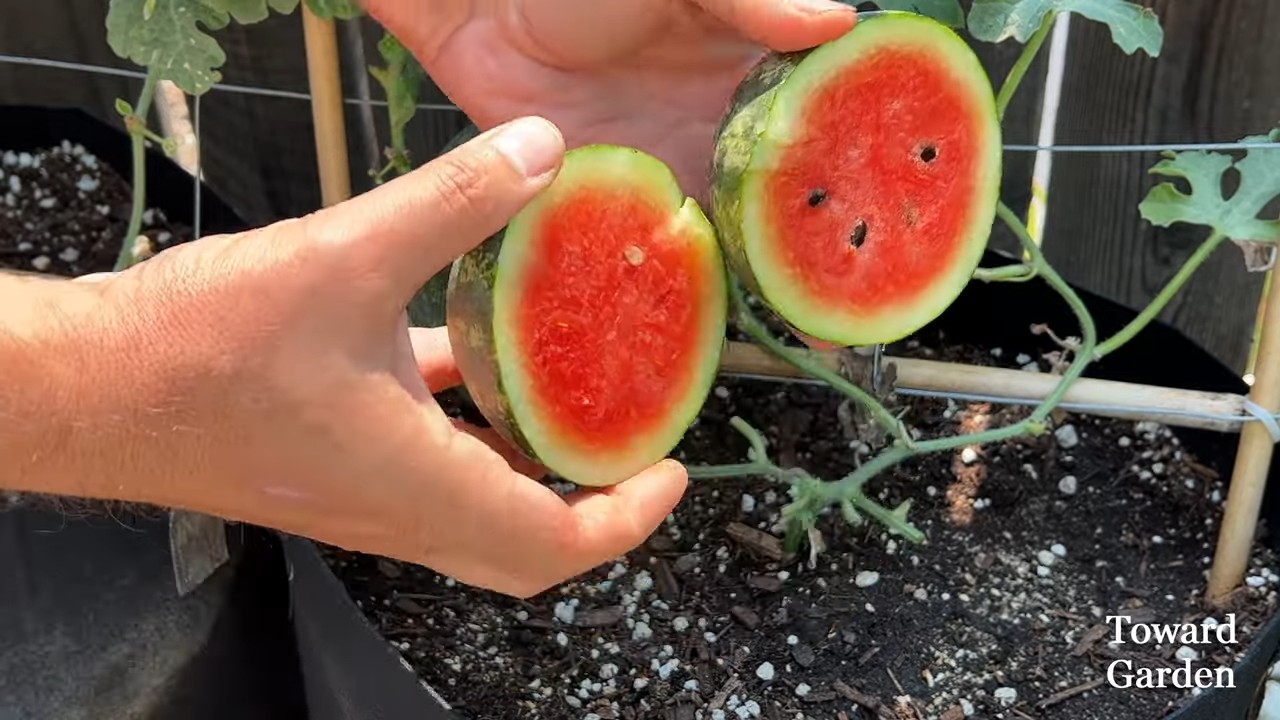
Harvesting Your Watermelons
The moment we’ve all been waiting for! Harvesting your homegrown watermelons is incredibly rewarding. Here’s how to know when they’re ready:
* Check the tendril closest to
Conclusion
So, there you have it! Growing watermelons in pots might seem like a daunting task, reserved for those with sprawling gardens and endless sunshine. But as we’ve shown, with a little planning, the right techniques, and a whole lot of love, you can absolutely cultivate these juicy delights right on your patio, balcony, or even a sunny windowsill. This DIY trick opens up the world of homegrown watermelons to apartment dwellers, urban gardeners, and anyone looking to maximize their limited space.
Why is this a must-try? Because the satisfaction of biting into a watermelon you nurtured from a tiny seed is unparalleled. It’s a testament to your gardening skills, a delicious reward for your efforts, and a conversation starter that will impress your friends and family. Plus, you have complete control over the growing process, ensuring your watermelon is free from harmful pesticides and bursting with natural flavor.
But the fun doesn’t stop there! Feel free to experiment with different watermelon varieties. Bush varieties like ‘Sugar Baby’ are particularly well-suited for container gardening, but don’t be afraid to try smaller, personal-sized watermelons like ‘Golden Midget’ or ‘Tiger Baby’ for a unique twist. You can also explore different soil amendments to boost growth and sweetness. Consider adding bone meal for phosphorus, which promotes strong root development, or Epsom salts for magnesium, which aids in chlorophyll production and overall plant health.
Another variation to consider is vertical gardening. If you’re truly short on space, train your watermelon vine to climb a trellis or support structure. This not only saves space but also improves air circulation around the plant, reducing the risk of fungal diseases. Just be sure to provide adequate support for the developing watermelons, as they can become quite heavy. You can use slings made from old t-shirts or pantyhose to cradle the fruits and prevent them from breaking off the vine.
And remember, consistent watering and fertilization are key to success. Watermelons are thirsty plants, especially when they’re fruiting. Check the soil moisture regularly and water deeply whenever the top inch feels dry. Use a balanced fertilizer specifically formulated for fruiting plants, following the instructions on the label.
Ultimately, the best way to learn is by doing. Don’t be afraid to dive in and give this DIY trick a try. The worst that can happen is you learn something new. And the best that can happen? You’ll be enjoying the sweetest, most delicious watermelons you’ve ever tasted, grown right in your own backyard (or balcony!).
We’re eager to hear about your experiences! Share your photos, tips, and challenges in the comments below. Let’s create a community of pot-grown watermelon enthusiasts and learn from each other. Happy gardening! Let us know how your **growing watermelons in pots** journey goes!
Frequently Asked Questions (FAQ)
1. What size pot do I need to grow watermelons?
A large pot is crucial for successful watermelon cultivation. Aim for a pot that is at least 24 inches in diameter and 18 inches deep. The bigger, the better, as watermelons have extensive root systems. A 20-gallon container is a good starting point, but larger sizes will provide more room for root growth and nutrient uptake, leading to healthier plants and larger fruits. Consider using a fabric pot, as these allow for better drainage and aeration, preventing root rot.
2. What type of soil is best for growing watermelons in pots?
Watermelons thrive in well-draining, nutrient-rich soil. A good potting mix should be light and airy, allowing for proper root development. Avoid using garden soil, as it can become compacted in pots and hinder drainage. A mix of equal parts potting soil, compost, and perlite or vermiculite is ideal. The compost provides essential nutrients, while the perlite or vermiculite improves drainage and aeration. You can also add a slow-release fertilizer to the soil mix to provide a steady supply of nutrients throughout the growing season.
3. How often should I water my watermelon plants in pots?
Watermelons are heavy drinkers, especially during hot weather and when they are fruiting. Check the soil moisture regularly, ideally every day, and water deeply whenever the top inch feels dry. Water until the water drains out of the bottom of the pot. Avoid overhead watering, as this can lead to fungal diseases. Instead, water at the base of the plant, directing the water towards the roots. In extremely hot weather, you may need to water your watermelon plants twice a day.
4. How much sunlight do watermelons need?
Watermelons require at least 6-8 hours of direct sunlight per day to thrive. Choose a sunny location for your potted watermelons, preferably one that receives morning sun. If you live in a particularly hot climate, providing some afternoon shade can help prevent the plants from overheating. If you don’t have a sunny spot, you can supplement with grow lights.
5. How do I pollinate my watermelon flowers?
Watermelons have separate male and female flowers. The female flowers have a small, immature watermelon at the base, while the male flowers do not. Pollination is necessary for the female flowers to develop into watermelons. If you don’t see bees or other pollinators visiting your plants, you may need to hand-pollinate them. To hand-pollinate, use a small paintbrush to collect pollen from the male flowers and transfer it to the female flowers. Do this in the morning, when the flowers are open.
6. How do I know when my watermelon is ripe?
Determining when a watermelon is ripe can be tricky, but there are a few telltale signs. First, look at the tendril closest to the fruit. When this tendril turns brown and dries out, the watermelon is likely ripe. Second, check the underside of the watermelon where it rests on the soil. This spot, known as the ground spot, should turn from white to a creamy yellow color. Finally, give the watermelon a gentle thump. A ripe watermelon will sound hollow.
7. My watermelon plant is producing flowers, but no fruit. What could be the problem?
There are several reasons why your watermelon plant might not be producing fruit. One common reason is lack of pollination. Make sure there are plenty of bees or other pollinators visiting your plants. If not, hand-pollinate the flowers. Another reason could be insufficient nutrients. Watermelons are heavy feeders and need plenty of nutrients to produce fruit. Fertilize your plants regularly with a balanced fertilizer. Finally, stress can also prevent fruit production. Make sure your plants are getting enough water, sunlight, and protection from pests and diseases.
8. How do I deal with pests and diseases on my watermelon plants?
Watermelons can be susceptible to various pests and diseases, including aphids, squash bugs, vine borers, and fungal diseases like powdery mildew. Regularly inspect your plants for signs of pests or diseases. If you find any, take action immediately. For aphids, you can spray the plants with a strong stream of water or use insecticidal soap. For squash bugs and vine borers, hand-picking them off the plants is often the most effective method. To prevent fungal diseases, ensure good air circulation around the plants and avoid overhead watering. You can also use a fungicide if necessary.
9. Can I grow watermelons indoors?
While it’s possible to grow watermelons indoors, it can be challenging. Watermelons require a lot of sunlight, so you’ll need to provide supplemental lighting with grow lights. You’ll also need to hand-pollinate the flowers. Additionally, indoor watermelons may not grow as large or produce as many fruits as those grown outdoors. However, with the right conditions and care, you can successfully grow watermelons indoors.
10. What are some good watermelon varieties for container gardening?
Several watermelon varieties are well-suited for container gardening. Bush varieties like ‘Sugar Baby’ are compact and produce smaller fruits, making them ideal for pots. Other good choices include ‘Golden Midget,’ ‘Tiger Baby,’ and ‘Bush Sugar Baby.’ These varieties are all relatively small and easy to manage in containers. When choosing a variety, consider the size of your pot and the amount of space you have available.

Leave a Comment