
Grow Chili Peppers like a pro, even if you think you have a “brown thumb”! Have you ever dreamed of adding a fiery kick to your meals with homegrown chilies, but felt intimidated by the process? Well, get ready to ditch those doubts! This isn’t just another gardening guide; it’s your personal roadmap to a bountiful chili pepper harvest, packed with easy DIY tricks and hacks that will transform your backyard (or balcony!) into a spicy paradise.
The history of chili peppers is as vibrant as their colors, dating back over 6,000 years in South America. They weren’t just a food source; they held cultural and medicinal significance for ancient civilizations. Today, the love for chilies has spread globally, and growing your own allows you to connect with this rich history while enjoying fresh, flavorful peppers.
But why should you bother with these DIY tricks? Because let’s face it, gardening can sometimes feel like a guessing game. Maybe you’ve struggled with pests, poor soil, or simply not knowing when to harvest. These simple, yet effective hacks will help you overcome those challenges, ensuring a thriving chili pepper garden and a constant supply of delicious heat. I’m excited to share these secrets with you, so you can grow chili peppers that are bursting with flavor and ready to spice up your life!
Growing Chili Peppers: From Seed to Spice Rack (DIY Guide)
Hey there, fellow spice enthusiasts! Ever dreamt of having a constant supply of fiery chili peppers right at your fingertips? Well, you’ve come to the right place! I’m going to walk you through the entire process of growing chili peppers, from sprouting those tiny seeds to harvesting a bounty of flavorful pods. Trust me, it’s incredibly rewarding, and you’ll never look at store-bought chili the same way again.
Choosing Your Chili Pepper Variety
Before we dive into the nitty-gritty, let’s talk about variety. Chili peppers come in a dazzling array of shapes, sizes, and heat levels. From the mild and fruity Poblano to the scorching Carolina Reaper, there’s a chili pepper out there for everyone.
Here’s a quick guide to help you choose:
* Mild (0-5,000 Scoville Heat Units): Bell peppers, Poblano, Anaheim, Jalapeño (can vary)
* Medium (5,000-50,000 SHU): Serrano, Cayenne, Tabasco
* Hot (50,000-250,000 SHU): Thai Chili, Scotch Bonnet
* Very Hot (250,000+ SHU): Habanero, Ghost Pepper, Carolina Reaper
Tip: If you’re a beginner, I recommend starting with a milder variety like Jalapeño or Poblano. You can always work your way up to the hotter stuff later!
Starting Your Chili Pepper Seeds
Chili peppers have a relatively long growing season, so starting them indoors is crucial, especially if you live in a cooler climate. I usually start my seeds about 8-10 weeks before the last expected frost.
Here’s what you’ll need:
* Chili pepper seeds (obviously!)
* Seed starting trays or small pots
* Seed starting mix (a light, well-draining mix is essential)
* A heat mat (optional, but highly recommended)
* A grow light (also optional, but helps prevent leggy seedlings)
* A spray bottle filled with water
Now, let’s get those seeds germinating!
1. Prepare your seed starting trays: Fill each cell or pot with seed starting mix, leaving about half an inch of space at the top. Gently tap the tray to settle the mix.
2. Sow the seeds: Place 2-3 seeds in the center of each cell or pot. Cover them with a thin layer (about 1/4 inch) of seed starting mix.
3. Water gently: Use a spray bottle to thoroughly moisten the soil. Avoid overwatering, as this can lead to rot.
4. Provide warmth: Place the seed starting trays on a heat mat. Chili pepper seeds germinate best at temperatures between 80-85°F (27-29°C).
5. Provide light: If you’re using a grow light, position it a few inches above the seed starting trays. If not, place the trays in a warm, sunny location.
6. Maintain moisture: Keep the soil consistently moist, but not soggy. Check the trays daily and mist with water as needed.
7. Be patient: Chili pepper seeds can take anywhere from 7 to 21 days to germinate, depending on the variety and conditions.
Transplanting Your Seedlings
Once your seedlings have developed their first set of true leaves (the leaves that look like miniature versions of the adult leaves), it’s time to transplant them into larger pots.
Here’s what you’ll need:
* Small pots (3-4 inch diameter)
* Potting mix (a good quality potting mix is fine for this stage)
* A small trowel or spoon
Here’s how to transplant:
1. Prepare the pots: Fill each pot with potting mix, leaving about an inch of space at the top.
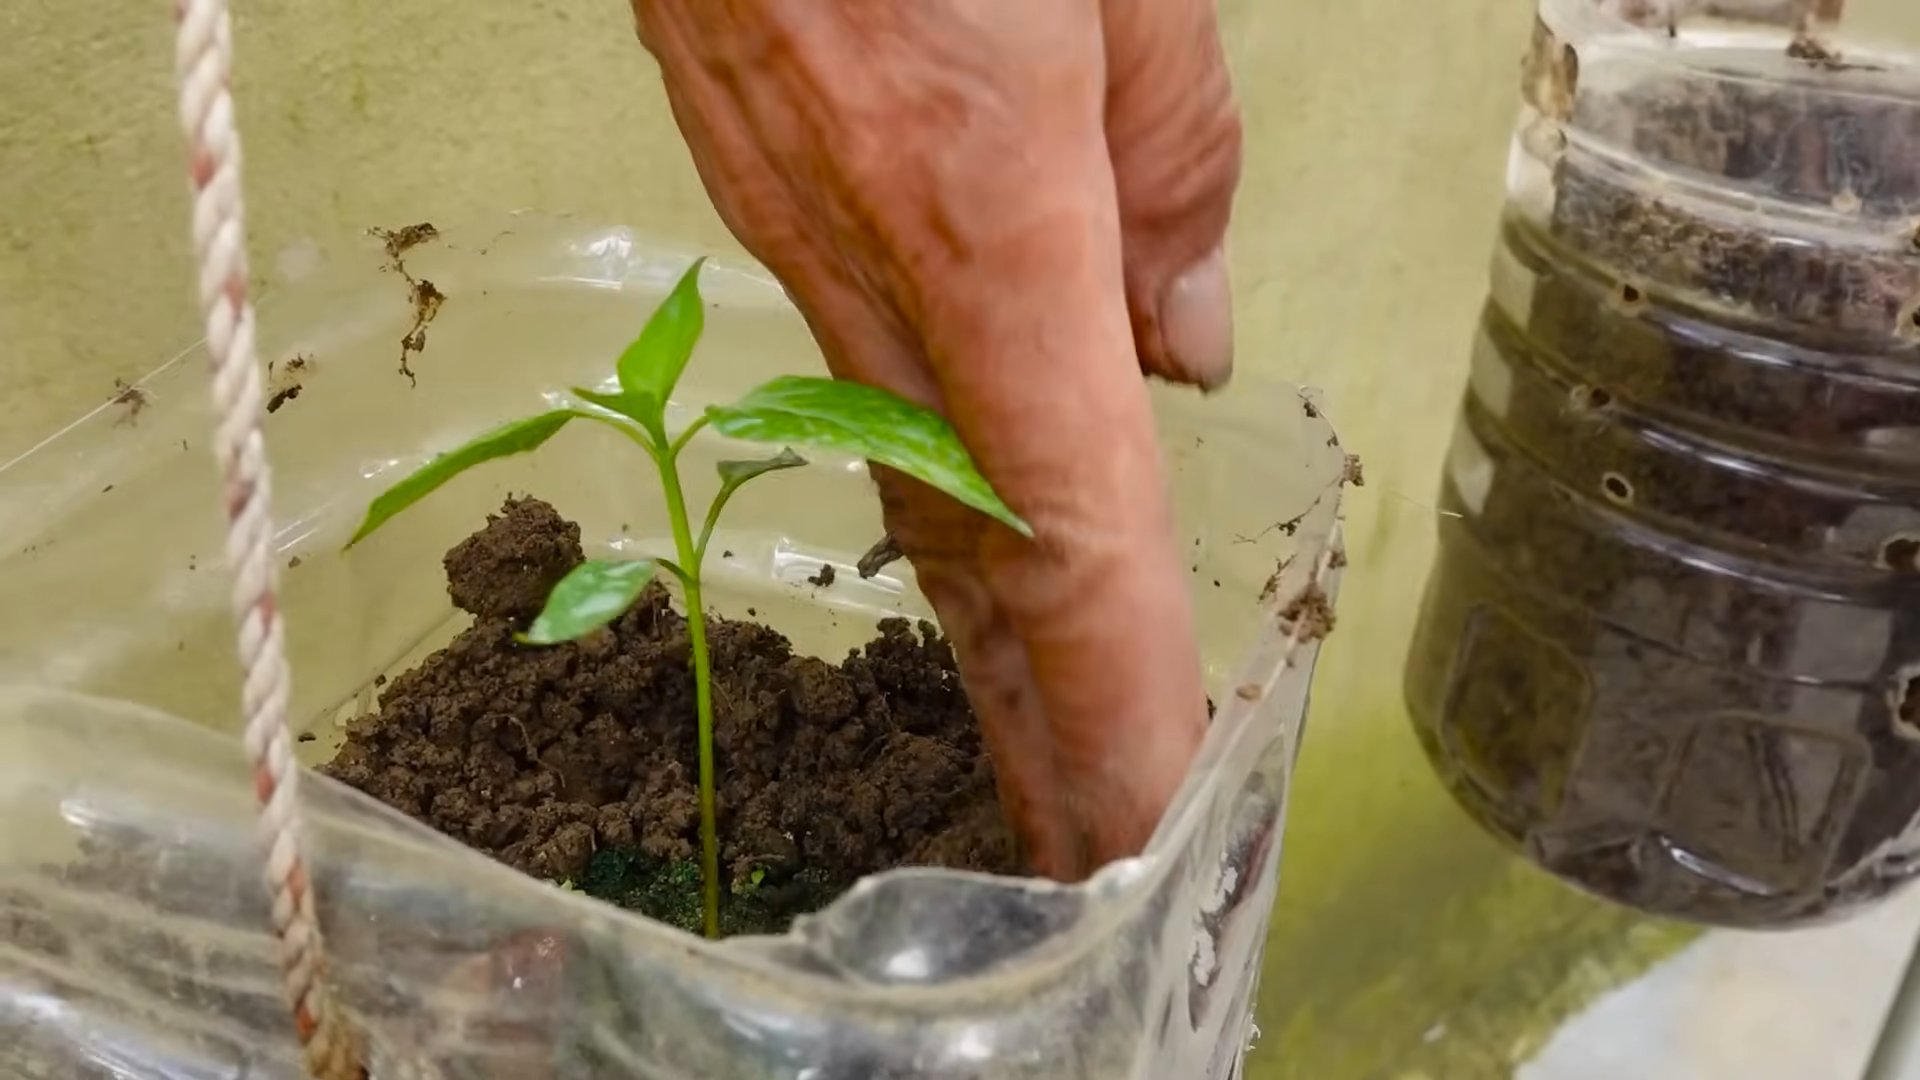
2. Gently remove the seedlings: Carefully loosen the soil around the seedlings with a small trowel or spoon. Gently lift the seedlings out of the seed starting tray, being careful not to damage the roots.
3. Transplant the seedlings: Make a small hole in the center of each pot and place the seedling in the hole. Gently backfill with potting mix, making sure the seedling is planted at the same depth it was in the seed starting tray.
4. Water thoroughly: Water the transplanted seedlings thoroughly to help settle the soil.
5. Provide light and warmth: Place the transplanted seedlings under a grow light or in a warm, sunny location.
Hardening Off Your Seedlings
Before you can plant your chili pepper seedlings outdoors, you need to “harden them off.” This process gradually acclimates the seedlings to the outdoor environment, preventing them from getting shocked by the sun, wind, and temperature changes.
Here’s how to harden off your seedlings:
1. Start slowly: On the first day, place the seedlings outdoors in a sheltered location for just an hour or two.
2. Gradually increase exposure: Each day, gradually increase the amount of time the seedlings spend outdoors.
3. Protect from harsh conditions: If the weather is particularly windy, sunny, or cold, bring the seedlings back indoors.
4. After a week or two: After a week or two of hardening off, your seedlings should be ready to be planted outdoors.
Planting Your Chili Peppers Outdoors
Now for the exciting part – planting your chili peppers in their final home!
Here’s what you’ll need:
* Your hardened-off chili pepper seedlings
* A sunny location with well-draining soil
* Compost or other organic matter
* A shovel or trowel
* Watering can or hose
* Mulch (optional)
* Stakes or cages (optional, but recommended for taller varieties)
Here’s how to plant:
1. Prepare the soil: Dig a hole that is slightly larger than the root ball of the seedling. Amend the soil with compost or other organic matter to improve drainage and fertility.
2. Plant the seedlings: Gently remove the seedling from its pot and place it in the hole. Make sure the top of the root ball is level with the surrounding soil.
3. Backfill with soil: Fill the hole with soil and gently firm it around the base of the seedling.
4. Water thoroughly: Water the newly planted seedlings thoroughly to help settle the soil.
5. Mulch (optional): Apply a layer of mulch around the base of the plants to help retain moisture and suppress weeds.
6. Stake or cage (optional): If you’re growing a taller variety of chili pepper, provide support with stakes or cages to prevent the plants from toppling over.
Spacing: Space your chili pepper plants about 18-24 inches apart, depending on the variety.
Caring for Your Chili Pepper Plants
Once your chili peppers are planted, it’s important to provide them with the care they need to thrive.
* Watering: Water your chili pepper plants regularly, especially during hot, dry weather. Aim to keep the soil consistently moist, but not soggy.
* Fertilizing: Fertilize your chili pepper plants every 2-3 weeks with a balanced fertilizer. You can also use a fertilizer specifically formulated for peppers and tomatoes.
* Pruning: Pruning isn’t strictly necessary, but it can help improve air circulation and encourage bushier growth. You can remove any suckers (small shoots that grow from the base of the plant) or any yellowing or damaged leaves.
* Pest and disease control: Keep an eye out for common chili pepper pests like aphids, spider mites, and whiteflies. You can control these pests with insecticidal soap or neem oil. Chili peppers can also be susceptible to diseases like blossom end rot and fungal infections. Ensure good air circulation and avoid overwatering to prevent these problems.
Harvesting Your Chili Peppers
The moment you’ve been waiting for! Harvesting your chili peppers is the most rewarding part of the process.
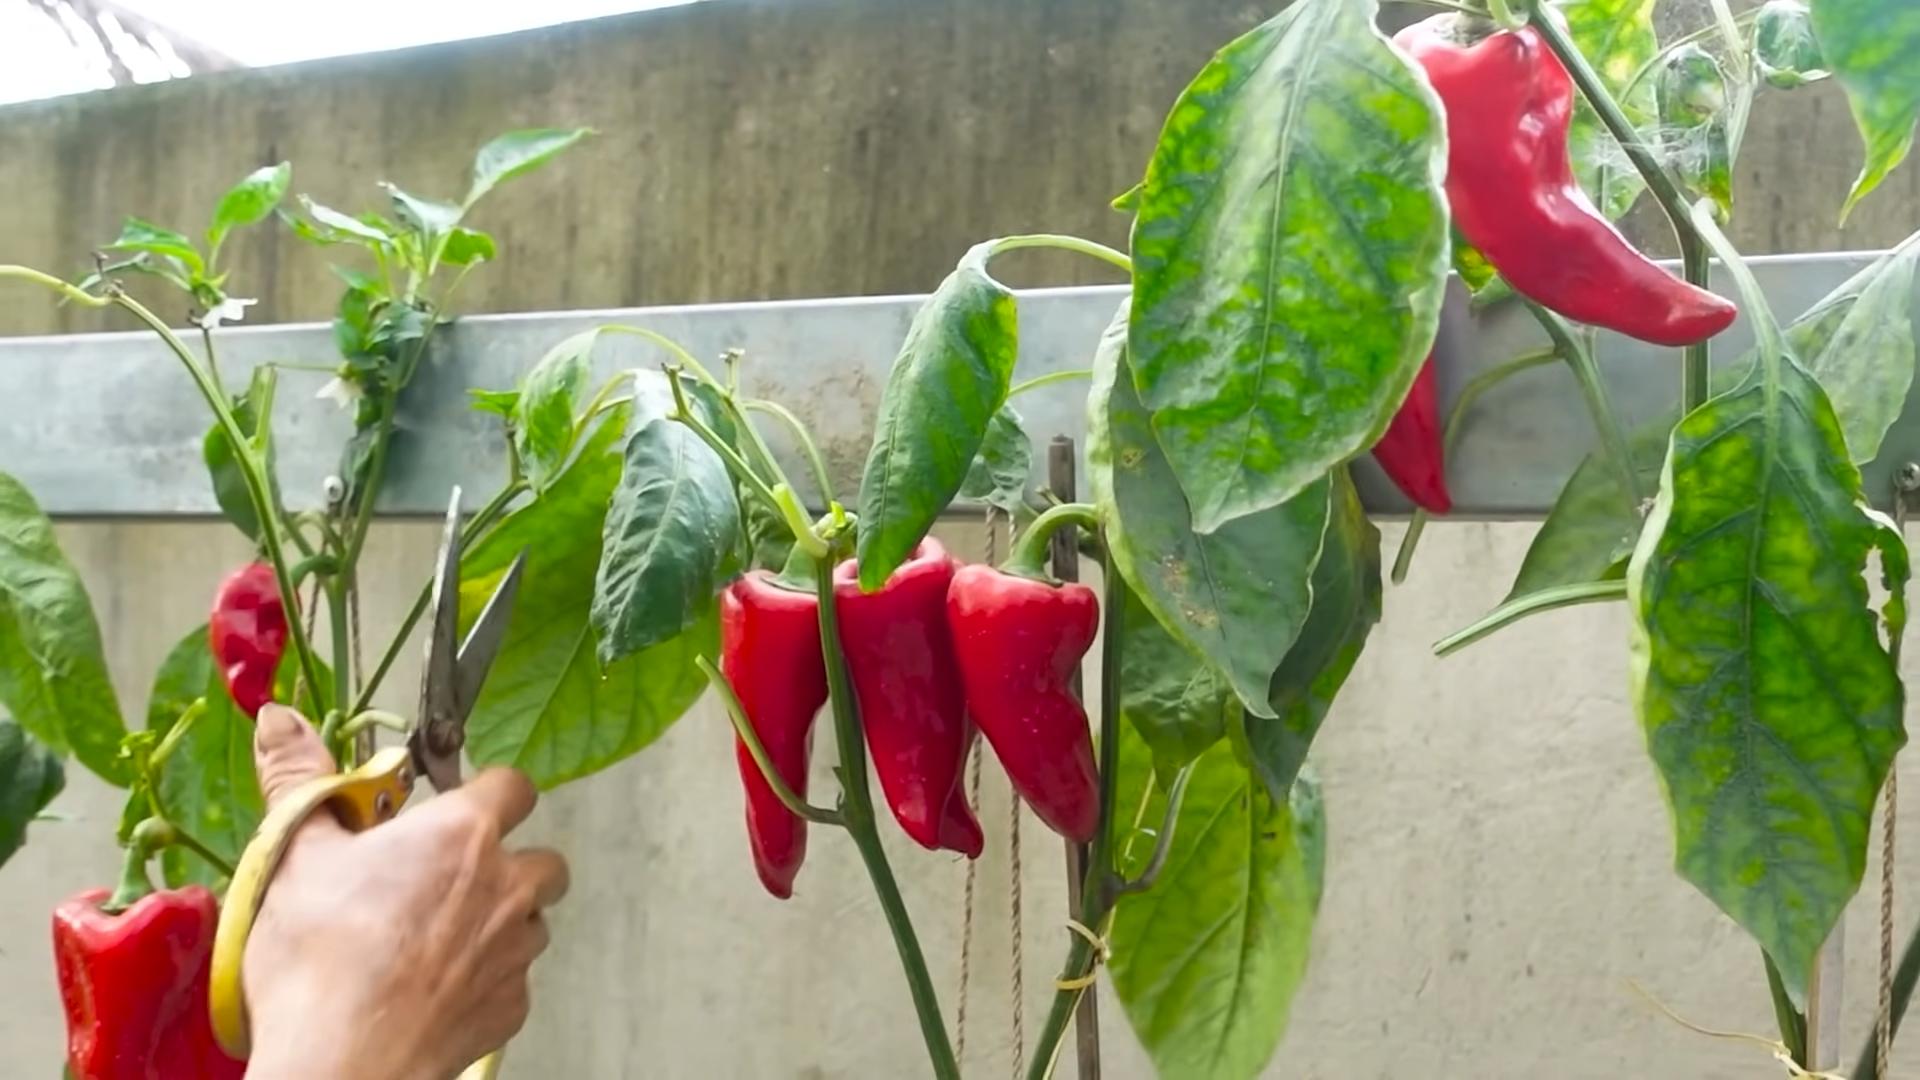
* When to harvest: Chili peppers are typically ready to harvest when they have reached their mature color and size. The color will depend on the variety, but most chili peppers will turn from green to red, yellow, or orange when ripe.
* How to harvest: Use a pair of scissors or pruning shears to cut the chili peppers from the plant. Be careful not to damage the plant.
* Handling hot peppers: If you’re harvesting hot peppers, wear gloves to protect your skin from the capsaicin (the compound that makes chili peppers hot). Avoid touching your eyes or face while handling hot peppers.
Drying Your Chili Peppers
If you have a bumper crop of chili peppers, you can dry them for long-term storage.
Here are a few ways to dry chili peppers:
* Air drying: String
Conclusion
So, there you have it! Growing your own chili peppers isn’t just a fun gardening project; it’s a gateway to a world of flavor, freshness, and fiery satisfaction. We’ve walked you through the essential steps, from selecting the right seeds to nurturing your plants and harvesting your bounty. But why is this DIY trick a must-try?
Firstly, the taste. Store-bought chili peppers, while convenient, often lack the vibrant, complex flavors that homegrown peppers possess. When you cultivate your own, you control every aspect of their growth, ensuring optimal conditions for flavor development. Imagine the difference between a bland, mass-produced chili powder and a spice blend made from peppers you nurtured from seed – the difference is astronomical!
Secondly, the variety. The world of chili peppers is vast and diverse, with countless varieties offering a spectrum of heat levels, flavors, and colors. By growing your own, you can explore this diversity and cultivate peppers that you simply won’t find in your local supermarket. From the smoky sweetness of Poblano peppers to the scorching heat of Scotch Bonnets, the possibilities are endless.
Thirdly, the satisfaction. There’s something incredibly rewarding about nurturing a plant from seed to harvest. Watching your chili pepper plants grow and thrive, knowing that you’re responsible for their success, is a deeply fulfilling experience. And when you finally harvest your peppers and use them to create delicious meals, the sense of accomplishment is unparalleled.
But the benefits don’t stop there. Growing your own chili peppers is also a sustainable and eco-friendly choice. You’re reducing your reliance on commercially grown peppers, which often travel long distances and contribute to carbon emissions. Plus, you can avoid the use of harmful pesticides and herbicides by opting for organic gardening practices.
Ready to take your chili pepper game to the next level? Consider these variations and suggestions:
* Hydroponic Chili Peppers: For those with limited space or a desire for faster growth, hydroponic chili pepper cultivation is an excellent option. This method involves growing plants in nutrient-rich water solutions without soil.
* Container Gardening: If you don’t have a garden, don’t worry! Chili peppers thrive in containers, making them perfect for balconies, patios, and even indoor spaces.
* Experiment with Different Varieties: Don’t be afraid to try different chili pepper varieties. Research their heat levels and flavor profiles to find the perfect peppers for your taste.
* Preserve Your Harvest: Once you’ve harvested your chili peppers, consider preserving them through drying, pickling, or making hot sauce. This will allow you to enjoy your homegrown peppers year-round.
* Companion Planting: Enhance your chili pepper garden by incorporating companion plants like basil, tomatoes, and carrots. These plants can help deter pests, improve soil health, and boost overall growth.
Growing your own chili peppers is more than just a gardening project; it’s an adventure in flavor, sustainability, and self-sufficiency. It’s a chance to connect with nature, learn new skills, and create something truly special. So, grab some seeds, get your hands dirty, and embark on this exciting journey. We’re confident that you’ll be amazed by the results.
We encourage you to try this DIY trick and share your experience with us! Let us know what varieties you’re growing, what challenges you’ve faced, and what delicious creations you’ve made with your homegrown chili peppers. Share your photos and stories on social media using #HomegrownChiliPeppers and inspire others to join the fun. Let’s cultivate a community of chili pepper enthusiasts and celebrate the joys of growing our own food! This is the best way to ensure you are getting the most out of your **grow chili peppers** experience.
FAQ
Q: What is the best time of year to start growing chili peppers?
A: The best time to start growing chili peppers depends on your climate. In general, chili peppers need a long growing season with warm temperatures. If you live in a region with mild winters, you can start your seeds indoors 6-8 weeks before the last expected frost. If you live in a colder climate, you may need to start your seeds even earlier. The key is to ensure that the seedlings have enough time to mature before being transplanted outdoors. You can also purchase starter plants from a local nursery if you prefer to skip the seed-starting process.
Q: What kind of soil is best for growing chili peppers?
A: Chili peppers thrive in well-draining, fertile soil with a slightly acidic to neutral pH (around 6.0-7.0). Amend your garden soil with compost or other organic matter to improve drainage and fertility. If you’re growing chili peppers in containers, use a high-quality potting mix specifically formulated for vegetables. Avoid using garden soil in containers, as it can become compacted and impede drainage.
Q: How much sunlight do chili peppers need?
A: Chili peppers need at least 6-8 hours of direct sunlight per day to thrive. Choose a sunny location in your garden or on your patio for your chili pepper plants. If you’re growing chili peppers indoors, place them near a south-facing window or use grow lights to supplement natural sunlight. Insufficient sunlight can result in leggy plants with poor fruit production.
Q: How often should I water my chili pepper plants?
A: Water your chili pepper plants regularly, especially during hot, dry weather. The soil should be kept consistently moist but not waterlogged. Overwatering can lead to root rot, while underwatering can stress the plants and reduce fruit production. Check the soil moisture level regularly by sticking your finger into the soil. If the top inch of soil feels dry, it’s time to water.
Q: What are some common pests and diseases that affect chili peppers?
A: Chili peppers can be susceptible to various pests and diseases, including aphids, spider mites, whiteflies, blossom-end rot, and fungal diseases. Regularly inspect your plants for signs of infestation or disease. Use organic pest control methods, such as insecticidal soap or neem oil, to control pests. Ensure good air circulation around your plants to prevent fungal diseases. Blossom-end rot is caused by calcium deficiency and can be prevented by adding calcium to the soil or using a calcium-rich fertilizer.
Q: How do I know when my chili peppers are ripe?
A: The color of ripe chili peppers varies depending on the variety. Most chili peppers will change color from green to red, yellow, orange, or brown when they are ripe. The peppers should also feel firm and slightly glossy. You can also test the ripeness by tasting a small piece of the pepper. If it has the desired heat level and flavor, it’s ready to harvest.
Q: How do I harvest chili peppers?
A: Use pruning shears or scissors to cut the chili peppers from the plant. Be careful not to damage the plant when harvesting. Wear gloves when handling hot chili peppers to avoid skin irritation. You can harvest chili peppers at any stage of ripeness, but they will have the most flavor and heat when they are fully ripe.
Q: How can I preserve my chili peppers?
A: There are several ways to preserve chili peppers, including drying, pickling, freezing, and making hot sauce. Drying is a simple method that involves hanging the peppers in a warm, dry place until they are completely dry. Pickling involves preserving the peppers in a vinegar-based brine. Freezing is a convenient way to store chili peppers for later use. Making hot sauce is a fun and creative way to use your homegrown chili peppers.
Q: Can I grow chili peppers indoors?
A: Yes, you can grow chili peppers indoors, but you’ll need to provide them with adequate sunlight or grow lights. Choose a sunny location near a south-facing window or use grow lights to supplement natural sunlight. Use a well-draining potting mix and water regularly. You may also need to hand-pollinate the flowers to ensure fruit production.
Q: What are some tips for growing hotter chili peppers?
A: Several factors can influence the heat level of chili peppers, including genetics, growing conditions, and stress. Choose varieties known for their high heat levels, such as Scotch Bonnets or Habaneros. Provide your plants with plenty of sunlight, water, and nutrients. Stressing the plants slightly by withholding water or fertilizer can also increase the heat level of the peppers. However, avoid stressing the plants too much, as this can reduce fruit production.

Leave a Comment