
Growing Onions From Scraps: Did you know you could essentially have an endless supply of onions without constantly buying new ones? It sounds like magic, right? Well, it’s not magic, it’s just a clever little gardening trick that I’m excited to share with you! For centuries, resourceful gardeners have been finding ways to maximize their yields and minimize waste. This particular technique taps into that tradition, allowing you to nurture new life from what would otherwise be tossed in the compost bin.
Think about it: onions are a staple in so many dishes. From savory soups and stews to flavorful stir-fries and vibrant salads, they add a depth of flavor that’s hard to beat. But buying onions week after week can add up. That’s where this DIY hack comes in! I’m going to show you how to easily regrow onions from the scraps you already have. Not only will you save money, but you’ll also experience the satisfaction of nurturing something from practically nothing. Plus, it’s a fantastic way to reduce food waste and embrace a more sustainable lifestyle. So, let’s dive into the simple steps of growing onions from scraps and unlock the potential of your kitchen cast-offs!
DIY Kitchen Cabinet Makeover: From Drab to Fab!
Hey there, fellow DIY enthusiasts! Are your kitchen cabinets looking a little…tired? Maybe they’re sporting a dated color, showing wear and tear, or just plain boring? Don’t despair! You don’t need to spend a fortune on a brand-new kitchen. With a little elbow grease and some clever DIY magic, you can completely transform your kitchen cabinets and give your entire kitchen a fresh, updated look. I’m going to walk you through a complete cabinet makeover, covering everything from prep work to painting to adding stylish hardware. Let’s get started!
What You’ll Need: The Essential Toolkit
Before we dive in, let’s gather our supplies. Having everything on hand will make the process much smoother and less frustrating. Trust me, you don’t want to be running to the hardware store mid-project!
* Cleaning Supplies: Degreaser (like TSP), all-purpose cleaner, sponges, cloths, and paper towels. Grease and grime are the enemy of a good paint job!
* Sanding Supplies: Sandpaper (various grits – 120, 220), sanding block or orbital sander, tack cloth. Sanding is crucial for adhesion.
* Primer: A good quality bonding primer is essential, especially if you’re painting over a glossy surface.
* Paint: Choose a durable paint specifically designed for cabinets. I recommend a paint with a satin or semi-gloss finish for easy cleaning. Consider using cabinet-specific enamel paint for the best results.
* Painting Tools: Paintbrushes (angled brush for trim and details), paint rollers (foam rollers for a smooth finish), paint tray, paint can opener, painter’s tape.
* Hardware: New knobs, pulls, hinges (optional). This is where you can really personalize your cabinets!
* Screwdriver or Drill: For removing and installing hardware.
* Drop Cloths or Plastic Sheeting: To protect your floors and countertops.
* Wood Filler: For filling any holes or imperfections.
* Caulk (optional): For sealing gaps around the cabinets.
* Safety Gear: Safety glasses, dust mask, gloves. Protect yourself!
* Pencil and Measuring Tape: For marking hardware placement.
* Level: To ensure hardware is installed straight.
Phase 1: Preparation is Key!
This is arguably the most important part of the entire project. A well-prepped surface is the foundation for a beautiful and long-lasting finish. Don’t skip these steps!
1. Remove Doors and Drawers: Carefully remove all cabinet doors and drawers. Label each one with painter’s tape so you know exactly where it goes when you reassemble everything. Trust me, this will save you a lot of headaches later. I like to use a system like “Upper Left 1,” “Lower Right 2,” etc.
2. Remove Hardware: Take off all knobs, pulls, and hinges. Store them in a safe place if you plan to reuse them. If you’re replacing the hinges, make sure to get the same type (overlay, inset, or partial overlay) to ensure a proper fit.
3. Clean Thoroughly: This is where the degreaser comes in. Use a strong degreaser like TSP (trisodium phosphate) to remove all grease, grime, and food splatters from the cabinet doors, drawers, and frames. Rinse well with clean water and let everything dry completely. Then, use an all-purpose cleaner for a final wipe-down.
4. Sand the Surfaces: Sanding creates a slightly rough surface that the primer can grip onto. Use 120-grit sandpaper to lightly sand all surfaces that will be painted. If your cabinets have a very glossy finish, you may need to sand a bit more aggressively. After the initial sanding, switch to 220-grit sandpaper for a smoother finish. Remember to sand with the grain of the wood.
5. Fill Holes and Imperfections: Use wood filler to fill any holes, dents, or scratches. Let the wood filler dry completely according to the manufacturer’s instructions. Once dry, sand the filled areas smooth with 220-grit sandpaper.
6. Caulk (Optional): If there are any gaps between the cabinets and the wall, you can use caulk to seal them. This will give your cabinets a more finished look. Apply the caulk smoothly and wipe away any excess with a damp cloth.
7. Tack Cloth Time: Use a tack cloth to remove all sanding dust from the surfaces. This is crucial for a smooth paint finish. A tack cloth is a slightly sticky cloth that picks up even the finest dust particles.
8. Tape Off Areas: Use painter’s tape to protect any areas you don’t want to paint, such as countertops, walls, or the inside of the cabinets. Make sure the tape is firmly pressed down to prevent paint from bleeding underneath.
Phase 2: Priming for Perfection
Primer is your best friend! It helps the paint adhere better, blocks stains, and provides a uniform surface for the paint to cover.
1. Apply Primer: Apply a thin, even coat of bonding primer to all surfaces that will be painted. Use a paintbrush for edges and details, and a foam roller for larger areas. Make sure to get into all the nooks and crannies.
2. Let it Dry: Allow the primer to dry completely according to the manufacturer’s instructions. This is important! Don’t rush this step.
3. Lightly Sand Again: Once the primer is dry, lightly sand it with 220-grit sandpaper to smooth out any imperfections. This will help create an even smoother surface for the paint.
4. Tack Cloth Again: Use a tack cloth to remove any sanding dust from the primed surfaces.
Phase 3: Painting Like a Pro
Now for the fun part! Painting is where you’ll really see your cabinets transform.
1. Apply the First Coat of Paint: Apply a thin, even coat of your chosen cabinet paint to all surfaces. Use a paintbrush for edges and details, and a foam roller for larger areas. Work in long, smooth strokes, and avoid applying too much paint at once, which can lead to drips and runs.
2. Let it Dry: Allow the first coat of paint to dry completely according to the manufacturer’s instructions. Again, patience is key!
3. Lightly Sand (You Guessed It!): Lightly sand the first coat of paint with 220-grit sandpaper to smooth out any imperfections. This will help the second coat of paint adhere better and create a smoother finish.
4. Tack Cloth (One Last Time!): Use a tack cloth to remove any sanding dust from the painted surfaces.
5. Apply the Second Coat of Paint: Apply a second thin, even coat of paint to all surfaces. This coat will provide full coverage and a beautiful, durable finish.
6. Let it Dry Completely: Allow the second coat of paint to dry completely according to the manufacturer’s instructions. I usually wait at least 24 hours before handling the cabinets.
Phase 4: Hardware Installation and Reassembly
Almost there! Now it’s time to add the finishing touches and put everything back together.
1. Install Hardware: If you’re using new hardware, now’s the time to install it. Use a template or measuring tape to ensure that the hardware is placed evenly and consistently on all the doors and drawers. A level is your friend here! I like to mark the placement with a pencil before drilling any holes.
2. Reattach Doors and Drawers: Carefully reattach the cabinet doors and drawers to the cabinet frames. Make sure the hinges are properly aligned and that the doors and drawers open and close smoothly.
3. Adjust Hinges (If Necessary): If the doors or drawers are not aligned properly, you may need to adjust the hinges. Most hinges have adjustment screws that allow you to fine-tune the position of the door.
4. Remove Painter’s Tape: Carefully remove the painter’s tape from around the cabinets.
5. Clean Up: Clean up any paint splatters or drips.
Tips for Success: Avoiding Common Pitfalls
* Don’t Skip the Prep Work: I can’t stress this enough! Proper preparation is the key to a successful cabinet makeover.
* Use Quality Products: Invest in good quality primer, paint, and hardware. It will make a difference in the final result.
* Apply Thin Coats of Paint: Multiple thin coats are better than one thick coat. This will prevent drips and runs and create a smoother finish.
* Let the Paint Dry Completely: Don’t rush the drying process. Allow the paint to dry completely between coats and before reassembling the cabinets.
* Take Your Time: This is not a project to rush through. Take your time and pay attention to detail.

Conclusion
So, there you have it! Transforming those humble onion scraps into a thriving supply of fresh, flavorful onions is not just a fun gardening project; it’s a sustainable and incredibly rewarding way to reduce food waste and enhance your culinary creations. This simple DIY trick, growing onions from scraps, is a game-changer for home cooks and gardening enthusiasts alike.
Why is this a must-try? Think about it: you’re essentially getting free onions! Instead of tossing those root ends into the compost bin, you’re giving them a second life, a chance to flourish and provide you with a continuous supply of fresh produce. It’s an economical, eco-friendly, and surprisingly easy way to add a touch of green to your life.
Beyond the sheer practicality, there’s a certain magic in watching something you would normally discard spring back to life. It’s a tangible connection to the natural world, a reminder of the resilience of nature, and a satisfying accomplishment to witness your efforts bear fruit (or rather, onions!).
But the fun doesn’t stop there. Feel free to experiment with different varieties of onions. Try regrowing red onions for a vibrant addition to your salads, or shallots for a more delicate flavor. You can even try growing green onions from their base, providing you with a constant supply of fresh chives for garnishing your dishes.
Consider planting your regrown onions in different locations in your garden. Some varieties might thrive better in full sun, while others might prefer partial shade. Observe how they grow and adjust your approach accordingly. You can also experiment with different soil types and fertilizers to see what yields the best results.
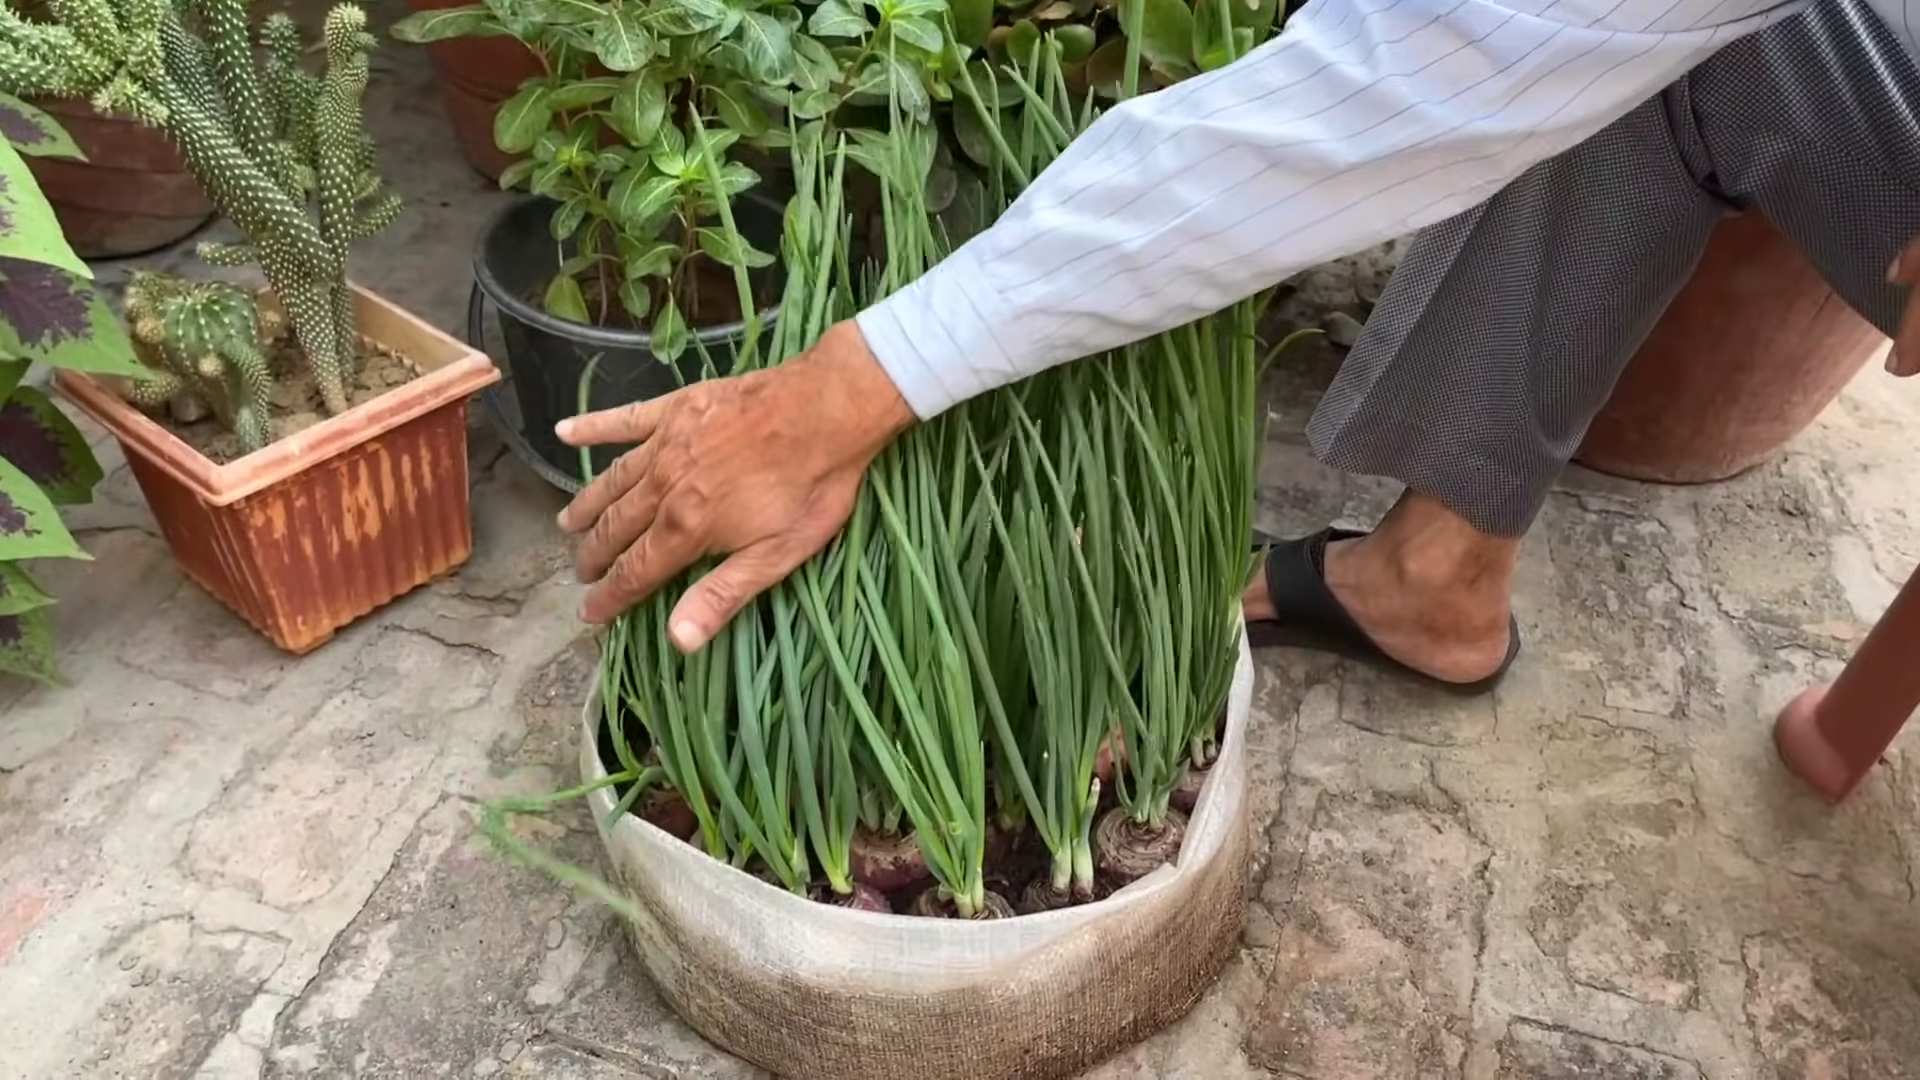
Another variation to consider is growing your onions in containers. This is a great option if you have limited garden space or if you want to keep your onions closer to your kitchen for easy access. Just make sure to choose a pot that is large enough to accommodate the onion’s root system and provide adequate drainage.
Don’t be afraid to get creative and adapt this method to your own unique circumstances and preferences. The beauty of gardening lies in the experimentation and the joy of discovering what works best for you.
We wholeheartedly encourage you to give this DIY trick a try. It’s a simple, sustainable, and incredibly rewarding way to grow your own food and reduce food waste. Once you experience the satisfaction of harvesting your own home-grown onions, you’ll be hooked!
And most importantly, we want to hear about your experiences! Share your photos, tips, and stories with us in the comments below. Let’s create a community of passionate gardeners who are committed to growing their own food and living more sustainably. What challenges did you face? What successes did you celebrate? What unique variations did you try? Your insights can help others learn and grow, and together, we can make a positive impact on our planet. So, grab those onion scraps, get your hands dirty, and let the growing begin!
Frequently Asked Questions (FAQ)
1. What kind of onions can I regrow from scraps?
You can regrow most types of onions from scraps, including yellow onions, white onions, red onions, shallots, and even green onions. The key is to have the root end intact. For green onions, you only need the white part with the roots attached. Experiment with different varieties to see which ones thrive best in your climate and soil conditions. Remember that the flavor of the regrown onion might be slightly different from the original, depending on the variety and growing conditions.
2. How long does it take to grow onions from scraps?
The time it takes to grow onions from scraps can vary depending on several factors, including the type of onion, the growing conditions, and the climate. Generally, you can expect to see new green shoots emerging within a week or two of planting the root end. However, it can take several months for the onion bulb to fully mature. Green onions, on the other hand, can be harvested much sooner, usually within a few weeks. Be patient and provide your onions with the proper care, and you’ll be rewarded with a bountiful harvest.
3. What is the best way to prepare the onion scraps for planting?
The best way to prepare the onion scraps for planting is to let them dry out for a day or two after cutting them from the onion. This will help to prevent rot and encourage root growth. Once the cut end has dried slightly, you can plant the root end directly into the soil or start it in a glass of water. If you choose to start it in water, make sure to change the water every day or two to prevent bacterial growth. Once the roots have developed, you can transplant the onion into the soil.
4. What kind of soil is best for growing onions from scraps?
Onions prefer well-drained soil that is rich in organic matter. Amend your soil with compost or well-rotted manure before planting to improve its fertility and drainage. A slightly acidic to neutral soil pH (around 6.0 to 7.0) is ideal. Avoid heavy clay soils, as they can retain too much moisture and lead to root rot. If you have clay soil, consider growing your onions in raised beds or containers with a well-draining potting mix.
5. How much sunlight do onions need to grow from scraps?
Onions need at least 6-8 hours of sunlight per day to thrive. Choose a sunny location in your garden or on your patio for planting. If you are growing your onions indoors, place them near a sunny window or use a grow light to supplement the natural light. Insufficient sunlight can result in weak, leggy growth and smaller bulbs.
6. How often should I water my onions grown from scraps?
Water your onions regularly, especially during dry periods. Keep the soil consistently moist, but avoid overwatering, as this can lead to root rot. Water deeply whenever the top inch of soil feels dry to the touch. Mulching around your onions can help to retain moisture and suppress weeds.
7. Do I need to fertilize my onions grown from scraps?
Yes, onions benefit from regular fertilization, especially during their active growing period. Use a balanced fertilizer that is rich in nitrogen, phosphorus, and potassium. You can also use organic fertilizers, such as compost tea or fish emulsion. Apply fertilizer every few weeks, following the instructions on the product label.
8. How do I know when my onions are ready to harvest when growing onions from scraps?
Onions are typically ready to harvest when the tops start to turn yellow and fall over. This indicates that the bulb has reached its full size and is starting to mature. You can also gently dig around the base of the onion to check the size of the bulb. If the bulb is large and firm, it is likely ready to harvest.
9. Can I grow onions from scraps indoors?
Yes, you can grow onions from scraps indoors, especially green onions. Place the root end in a glass of water or plant it in a pot with well-draining potting mix. Provide plenty of sunlight or use a grow light. Change the water regularly or water the soil when it feels dry to the touch. You can harvest the green shoots as needed for cooking.
10. What are some common problems when growing onions from scraps, and how can I prevent them?
Some common problems when growing onions from scraps include root rot, pests, and diseases. To prevent root rot, make sure to plant your onions in well-drained soil and avoid overwatering. To prevent pests and diseases, practice good garden hygiene, such as removing weeds and debris. You can also use organic pest control methods, such as neem oil or insecticidal soap. If you notice any signs of disease, such as yellowing leaves or spots, remove the affected plants immediately to prevent the spread of the disease.
11. Can I regrow onions in water permanently?
While you can regrow green onions in water indefinitely, bulb onions will eventually need to be planted in soil to fully develop. Growing onions in water is a great way to get a quick supply of green shoots, but for larger bulbs, soil is essential for providing the necessary nutrients and support.
12. Will the regrown onion be as big as the original?
The size of the regrown onion will depend on several factors, including the variety of onion, the growing conditions, and the amount of care you provide. In general, regrown onions may not be as large as the original, but they will still be flavorful and useful in your cooking. The focus of growing onions from scraps is often on sustainability and reducing waste, rather than producing massive bulbs.

Leave a Comment